Articles
How To Trim A Carpet
Modified: February 25, 2024
Learn the step-by-step process of trimming a carpet in this comprehensive guide. Find helpful articles, tips, and techniques to achieve a professional finish.
(Many of the links in this article redirect to a specific reviewed product. Your purchase of these products through affiliate links helps to generate commission for Storables.com, at no extra cost. Learn more)
Introduction
Trimming a carpet is an essential task that can greatly enhance the appearance and functionality of a room. Whether you’re replacing an old carpet or installing a new one, knowing how to trim it to the correct size is crucial for achieving a professional and polished look.
In this article, we will guide you through the step-by-step process of trimming a carpet. From measuring and marking to securing the trimmed carpet, we will cover all the necessary actions to ensure a successful carpet trimming project.
Before we delve into the details, it’s important to have the right tools and materials on hand. Let’s take a look at what you’ll need for this task:
- Measuring tape
- Marker or chalk
- Utility knife
- Straightedge or carpet cutter
- Carpet trimmer or stair tool
- Double-sided carpet tape or adhesive
- Knee kicker or power stretcher (if necessary)
Once you have gathered all the necessary tools and materials, you’re ready to begin the carpet trimming process. Let’s get started with step one: measuring and marking.
Key Takeaways:
- Achieving a professional and polished look when trimming a carpet requires the right tools, precise measurements, and careful cutting. Prioritize safety, take your time, and enjoy the rewarding transformation of your space.
- From measuring and marking to securing the trimmed carpet, each step in the process is essential for achieving a successful carpet trimming project. Attention to detail, proper preparation, and patience are key to a polished and professional result.
Tools and Materials Needed
Before you start trimming your carpet, it’s essential to have the right tools and materials ready. Having these items on hand will ensure that you can perform the task effectively and efficiently. Here’s a list of the tools and materials you’ll need:
- Measuring tape: A measuring tape is crucial for accurately measuring the dimensions of your carpet and the area it needs to cover. Make sure you have a reliable and easy-to-read measuring tape to get precise measurements.
- Marker or chalk: You’ll need a marker or chalk to mark the cutting lines on the carpet. Choose a color that contrasts with the carpet, making the marks clearly visible.
- Utility knife: An excellent quality utility knife is essential for cutting the carpet to the required size. Make sure the knife has a sharp blade, as this will make clean and precise cuts.
- Straightedge or carpet cutter: A straightedge or carpet cutter is used to guide the knife along a straight line while trimming the carpet. This tool ensures that your cuts are straight and accurate.
- Carpet trimmer or stair tool: A carpet trimmer or stair tool is used to tuck in the edges of the carpet and secure them in place. This tool provides a clean and finished look to your trimmed carpet.
- Double-sided carpet tape or adhesive: To secure the trimmed carpet to the floor, you’ll need double-sided carpet tape or adhesive. Ensure that the adhesive is suitable for carpet installation and provides a strong bond.
- Knee kicker or power stretcher (if necessary): If your carpet requires stretching during installation, a knee kicker or power stretcher can come in handy. These tools help to ensure a tight and secure fit.
By having these tools and materials ready, you’ll be well-prepared to undertake the carpet trimming process efficiently and effectively. Now that you have everything you need, let’s move on to the step-by-step instructions for trimming your carpet.
Step 1: Measuring and Marking
The first step in trimming a carpet is to accurately measure the area where the carpet will be placed. This ensures that you cut the carpet to the correct size, providing a precise fit and a professional finish.
To measure the area, start by measuring the length and width of the space. Use a measuring tape and take accurate measurements from wall to wall, ensuring that you include any alcoves or protrusions in your measurements.
Once you have the measurements, transfer them onto the carpet, using a marker or chalk. Start by marking the length on one side of the carpet, measuring from the edge. Then, move to the opposite side and mark the length again. Connect the two marks using a straightedge, creating a straight and even line.
Next, mark the width of the carpet by measuring from one end and making a mark on both sides. Use a straightedge to connect these marks, creating the width line.
Make sure to double-check your measurements and lines before moving on to the next step. It’s crucial to have accurate measurements and straight lines to ensure a properly trimmed carpet.
In addition to the dimensions, you may also need to mark any additional areas where the carpet needs to be cut, such as around doorways or corners. Use a tape measure to measure these areas and mark them on the carpet accordingly.
By taking accurate measurements and marking the carpet correctly, you’ll be ready to move on to the next step, which involves removing the existing carpet if necessary. Let’s explore this step in detail in the next section.
Step 2: Removing the Existing Carpet
If you are replacing an old carpet, or if there is an existing carpet in the area where you plan to install the trimmed carpet, you will need to remove it before proceeding further. Removing the existing carpet is essential to ensure a clean and smooth surface for the new carpet.
Before you start removing the carpet, it’s important to take safety precautions. Wear protective gloves and a dust mask to protect yourself from dust and debris. Additionally, be cautious of any sharp objects, staples, or tacks that may be hidden in the carpet.
Here is a step-by-step guide for removing the existing carpet:
- Clear the area: Begin by removing all furniture, rugs, and any other items from the room. This will allow you to have a clear space to work in.
- Locate the edges: Use a utility knife to carefully cut a small portion of the carpet along one wall. This will allow you to locate the edges of the carpet and determine how it is secured to the floor.
- Remove the carpet: Starting from one corner, grip the edge of the carpet and pull it up and away from the floor. Slowly and steadily work your way across the room, pulling up the carpet. You may need to use a carpet puller or pliers to loosen any stubborn sections.
- Remove the carpet padding: Once the carpet is removed, you may also need to remove the carpet padding. This is usually held in place with staples or adhesive. Use pliers or a scraper to remove any staples or adhesive residue.
- Inspect the subfloor: After removing the carpet and padding, inspect the subfloor for any damage or unevenness. If necessary, repair or prepare the subfloor before installing the trimmed carpet.
Once you have successfully removed the existing carpet and prepared the subfloor, you are ready to move on to the next step: preparing the carpet for trimming. We will explore this step in detail in the following section.
When trimming a carpet, always use a sharp utility knife and a straight edge to ensure clean and precise cuts. Take your time and measure twice before cutting to avoid mistakes.
Step 3: Preparing the Carpet for Trimming
With the existing carpet removed, it’s time to prepare the carpet for trimming. This step involves ensuring that the carpet is in the right condition and ready to be cut to the desired size. Here’s a step-by-step guide to help you prepare the carpet:
- Clean the carpet: Before trimming, make sure the carpet is clean. Vacuum the carpet to remove any dirt, dust, or debris. This will allow for a smoother cutting process and ensure a neat finish.
- Inspect for damages: Thoroughly inspect the carpet for any damages, such as tears, fraying, or stains. If you come across any significant damages, it may be necessary to repair or replace that portion of the carpet before proceeding.
- Square the carpet: Lay the carpet flat on the floor and use a straightedge or square to ensure that the edges are straight and squared. This will help you make accurate cuts and achieve a seamless finish when trimming.
- Secure loose edges: If any edges of the carpet are loose, use a carpet trimmer or stair tool to tuck them under and secure them in place. This will prevent the carpet from unraveling or becoming frayed during the trimming process.
- Consider pattern and placement: If your carpet has a pattern, take a moment to consider how it will look when cut and installed. Ensure that the pattern lines up correctly and that the placement will enhance the aesthetics of the room.
By taking the time to clean, inspect, square, and secure the carpet, you will ensure that it is in the best possible condition for trimming. This will make the cutting process smoother and result in a neatly trimmed carpet.
Once you have prepared the carpet, you are now ready to move on to the next step: trimming the carpet to size. We will explore this crucial step in detail in the following section.
Read more: How To Trim Garage Door
Step 4: Trimming the Carpet to Size
Now that the carpet is prepared and ready, it’s time to trim it to the desired size. This step requires precision and careful cutting to achieve a clean and exact fit. Here’s a step-by-step guide to help you trim the carpet:
- Place the carpet: Position the carpet in the area where it will be installed, making sure it aligns with the markings you made during the measuring and marking step.
- Start trimming: Using a sharp utility knife or a carpet cutter, carefully cut along the marked lines. Be sure to follow the straight lines you created during the measuring and marking step to ensure an even and precise cut.
- Use a straightedge: If needed, use a straightedge or ruler to guide your cuts and ensure straight lines. This will help you avoid any crooked or uneven cuts.
- Make multiple passes: For thicker carpets, you may need to make multiple passes with the utility knife to cut through the entire thickness. Be patient and take your time to achieve clean and smooth cuts.
- Trim around obstacles: If you encounter any obstacles such as doorways, corners, or irregular shapes, carefully measure and mark these areas on the carpet. Use the utility knife to make precise cuts around these obstacles, ensuring a proper fit.
Throughout the trimming process, remember to prioritize safety. Always cut away from your body and keep your fingers clear of the knife’s path. Take breaks if needed to avoid fatigue, as this can impact the quality of your cuts.
After trimming the carpet, take a moment to inspect the edges and ensure they are clean and even. If necessary, make any minor adjustments or touch-ups to achieve a seamless and professional result.
With the carpet successfully trimmed to size, it’s time to move on to the final step: securing the trimmed carpet. We will discuss this step in detail in the following section.
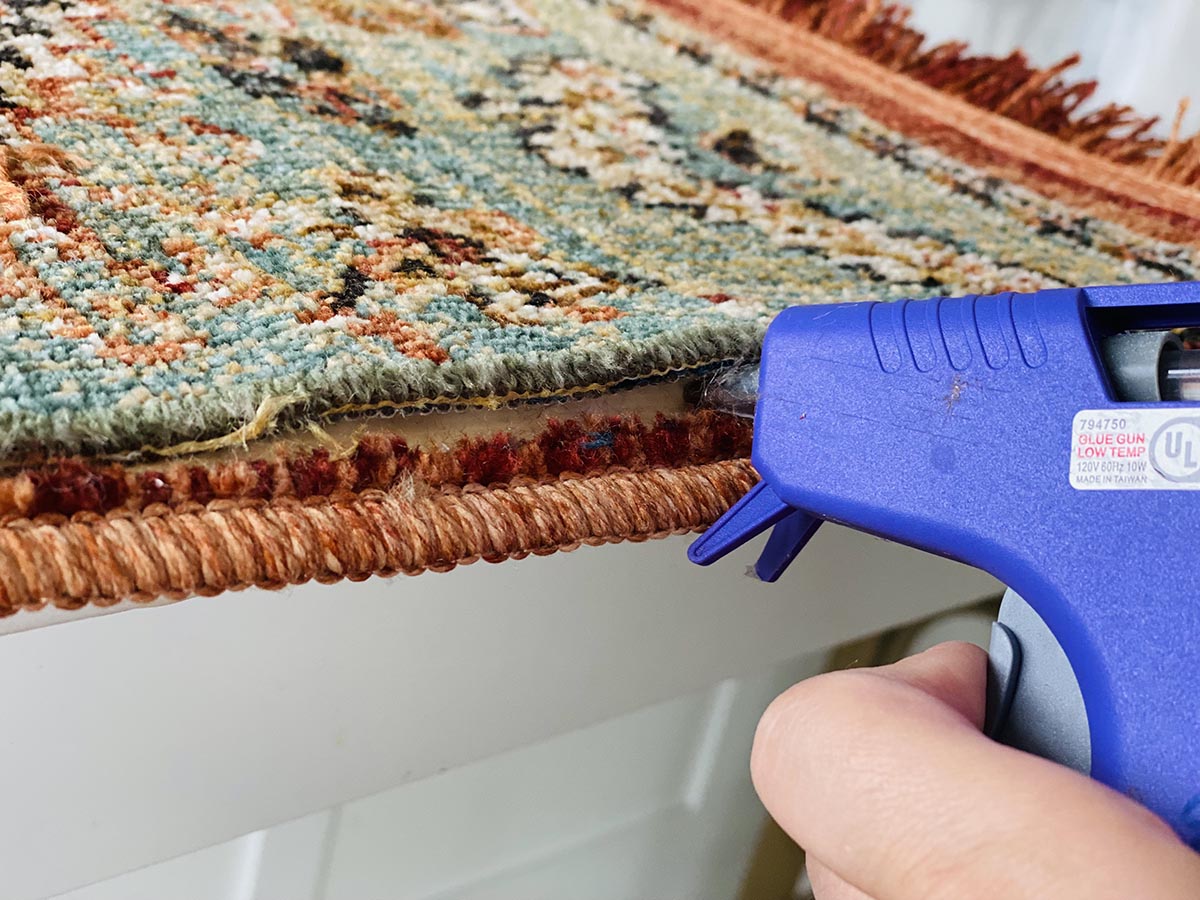
Step 5: Securing the Trimmed Carpet
Once the carpet is trimmed to the desired size, the final step is to secure it in place. Properly securing the carpet is crucial to ensure it stays in position and provides a seamless and professional finish. Follow these steps to securely install the trimmed carpet:
- Clean the floor: Before installing the carpet, make sure the floor is clean and free of debris. Sweep or vacuum the area to ensure a smooth surface for the carpet to adhere to.
- Apply double-sided carpet tape: Using double-sided carpet tape, apply strips along the perimeter of the room. Place the tape close to the edge of the floor, leaving a small gap between the tape and the wall.
- Lay the trimmed carpet: Carefully lay the trimmed carpet over the taped perimeter, ensuring that it aligns properly with the walls and any other objects in the room.
- Press the carpet into the tape: Once the carpet is in position, firmly press the edges into the double-sided tape. This will create a strong bond and prevent the carpet from shifting or moving.
- Use a carpet trimmer or stair tool: To ensure a clean and finished look, use a carpet trimmer or stair tool to tuck in the edges of the carpet along the walls. This will give the carpet a seamless appearance and prevent it from unraveling.
- Inspect and adjust: Take a moment to inspect the entire carpet installation. Make any necessary adjustments to ensure the carpet is properly aligned, free of wrinkles, and securely in place.
Depending on the specific requirements of your carpet and the room, you may need to use additional techniques or tools to secure the carpet, such as adhesive or a knee kicker. Follow the manufacturer’s instructions or consult with a professional if needed.
By taking the time to secure the trimmed carpet properly, you will ensure a long-lasting and visually appealing result.
Congratulations! You have successfully completed the steps to trim and install your carpet. Take a moment to appreciate the transformation and enjoy the fresh, new look of your room.
Conclusion
Trimming a carpet is a rewarding task that can completely transform the look and feel of a room. By following the step-by-step process outlined in this article, you can achieve a professional and polished result. Let’s recap the key points:
First, make sure you have all the necessary tools and materials on hand, including a measuring tape, marker or chalk, utility knife, straightedge, carpet trimmer, double-sided carpet tape, and potentially a knee kicker or power stretcher if needed.
Next, measure and mark the area where the carpet will be placed. Double-check your measurements and ensure your lines are straight and accurate for precise trimming.
If there is an existing carpet, safely remove it, clear the area, and inspect the subfloor for any damage or unevenness.
Prepare the carpet by cleaning it, making any necessary repairs, and ensuring the edges are secure and squared.
Trim the carpet to size, using a sharp utility knife or carpet cutter. Take your time, follow the marked lines, and make multiple passes if needed for thicker carpets.
Finally, secure the trimmed carpet in place using double-sided carpet tape or adhesive. Ensure the edges are pressed firmly into the tape and use a carpet trimmer or stair tool to create a finished look.
By following these steps and paying attention to detail, you can achieve a professionally trimmed carpet that enhances the aesthetics and functionality of your room.
Remember to prioritize safety throughout the process, take breaks when needed, and always double-check your work for accuracy and quality.
With your trimmed carpet securely installed, sit back, and admire the transformation. Enjoy the comfort, beauty, and warmth that a well-trimmed carpet brings to your space.
Frequently Asked Questions about How To Trim A Carpet
Was this page helpful?
At Storables.com, we guarantee accurate and reliable information. Our content, validated by Expert Board Contributors, is crafted following stringent Editorial Policies. We're committed to providing you with well-researched, expert-backed insights for all your informational needs.