Articles
How To Layout Stairs With Framing Square
Modified: May 6, 2024
Learn how to layout stairs using a framing square with our informative articles. Step-by-step instructions and helpful tips for a successful staircase project.
(Many of the links in this article redirect to a specific reviewed product. Your purchase of these products through affiliate links helps to generate commission for Storables.com, at no extra cost. Learn more)
Introduction
Welcome to our comprehensive guide on how to layout stairs with a framing square. If you’re planning to build a staircase for your home or any other construction project, understanding the process of properly laying out the stairs is crucial for achieving a safe and aesthetically pleasing result.
Layout stairs might seem like a daunting task, especially if you’re not familiar with the tools and techniques involved. However, with the help of a framing square, you can simplify the process and ensure accurate measurements.
In this article, we will walk you through the step-by-step process of using a framing square to layout stairs. We will cover everything from understanding the anatomy of a framing square to calculating the rise and run of the stairs, marking and cutting the stringers, building the stair frame, and installing the treads and risers.
By the end of this guide, you’ll have all the knowledge and confidence needed to tackle your stair layout project successfully. So let’s dive in!
Key Takeaways:
- Master the art of laying out stairs with a framing square by understanding the anatomy of the tool, calculating rise and run measurements, and accurately transferring measurements to the stringers for a safe and visually appealing staircase.
- Ensure a smooth and successful stair layout project by meticulously preparing the work area, following local building codes, and wearing appropriate safety gear throughout the construction process.
Read more: How To Layout Stairs
Materials and Tools Needed
Before you begin laying out the stairs with a framing square, it’s important to gather all the necessary materials and tools. Here’s a list of what you’ll need:
- Framing square
- Tape measure
- Pencil
- Saw (circular saw or hand saw)
- Level
- Chalk line
- Stair gauges or a speed square (optional, but helpful)
- Stringers (pressure-treated lumber)
- Treads and risers
- Screws or nails
The framing square is the primary tool you’ll be using to lay out the stairs. It consists of a triangular-shaped ruler with various measurements and angles marked on its surface. Make sure your framing square is in good condition and free from any defects that could affect its accuracy.
A tape measure is essential for taking precise measurements of the area where the stairs will be located. This will help you determine the length and width of the stringers and the overall dimensions of the stair frame.
A pencil is needed for marking the measurements and cut lines on the stringers. Choose a pencil with a sharp point to ensure clear and accurate markings.
To cut the stringers, you’ll need a saw. A circular saw is often the most efficient choice, but a hand saw can do the job if you don’t have access to power tools. Make sure the saw blade is sharp and suitable for cutting pressure-treated lumber.
A level is crucial for ensuring that the stairs are straight and level once they’re constructed. Use a long level to check both the horizontal and vertical alignments during the installation process.
A chalk line can be handy for marking straight and precise lines on the stringers and other components. This will help guide your cuts and ensure accuracy.
Stair gauges or a speed square are optional, but they can make the process easier and more efficient. Stair gauges can be attached to the framing square to quickly transfer measurements, while a speed square can serve as a multifunctional tool for checking angles and making straight cuts.
Lastly, you’ll need the actual materials for constructing the stairs. Pressure-treated lumber is recommended for stringers as it provides durability and resistance to moisture and rot. Choose treads and risers that match your desired aesthetic and meet safety standards.
Gather all these materials and tools before starting your stair layout project to ensure smooth progress and professional results.
Understanding the Anatomy of a Framing Square
Before we delve into the process of laying out stairs with a framing square, it’s important to familiarize ourselves with the different parts and measurements of this versatile tool.
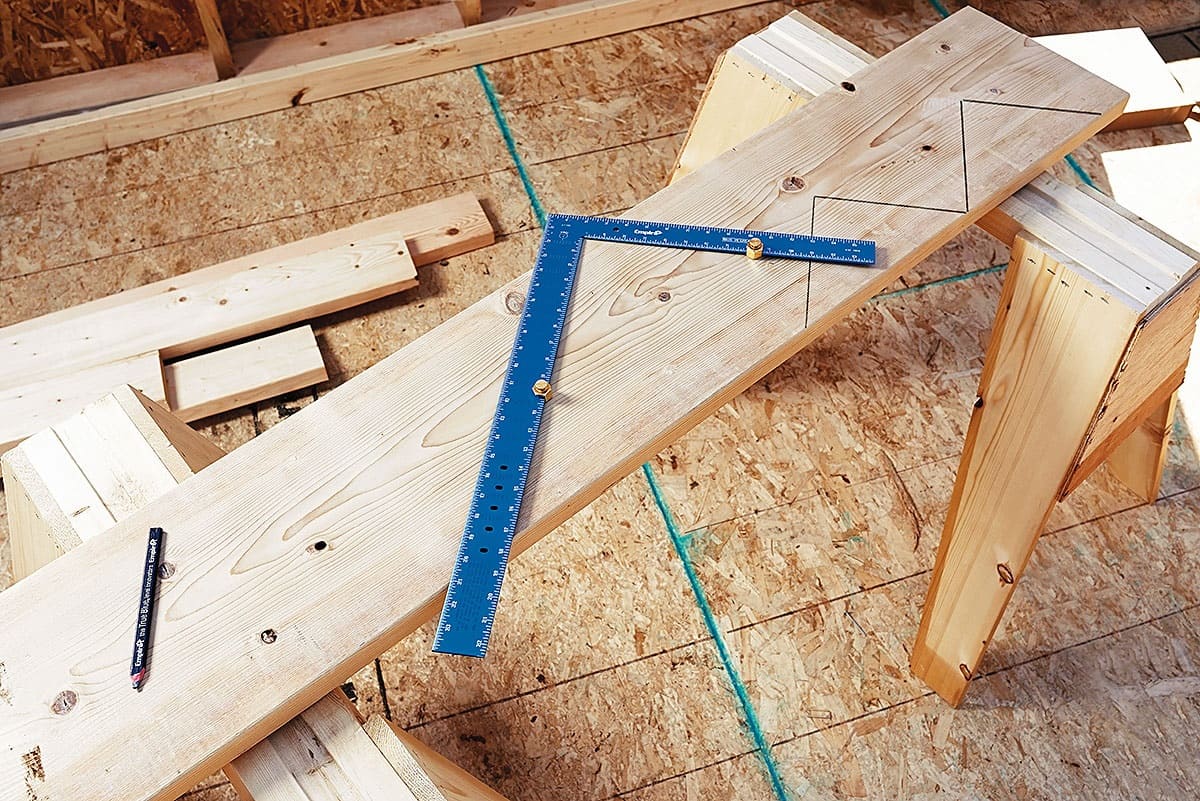
A framing square consists of two arms that meet at a 90-degree angle, forming the shape of an “L.” The longer arm is known as the blade, while the shorter arm is called the tongue.
On the blade, you will find a variety of measurements and markings, including inches, feet, and angles. The most commonly used markings for stair layout purposes are the rise and run measurements.
The rise measurement represents the vertical height between each step, while the run measurement indicates the horizontal depth of each step. These two measurements, along with the desired number of steps, will determine the overall dimensions of the stairs.
In addition to the rise and run measurements, a framing square also has other useful markings. These include rafter tables for determining the length and angle of rafters, square measurements for checking corners and angles, and degree markings for more complex layout tasks.
The tongue of the framing square is primarily used as a reference point and helps in aligning the square for accurate measurements. It’s important to note that the tongue must always be kept flush against the edge of the material to ensure precise and consistent results.
Some framing squares also come with additional features such as stair gauges. These are adjustable metal tabs that can be attached to the square to help quickly transfer measurements and maintain consistency while marking the stringers.
Understanding the anatomy and measurements of a framing square is essential for correctly laying out stairs. It allows you to leverage the tool’s functionality and make accurate calculations, resulting in a well-designed staircase that adheres to safety standards.
Now that we have a grasp of the framing square’s anatomy, we can move on to the practical steps of preparing the work area for stair layout.
Preparing the Work Area
Before you can begin laying out your stairs with a framing square, it’s important to properly prepare the work area. This will ensure that you have a clean, safe, and organized space to work in. Here are some steps to follow:
- Clean the area: Start by clearing the area of any debris, tools, or objects that could obstruct your work. Sweep away dust and dirt to create a clean and level surface.
- Measure and mark the starting point: Use a tape measure to determine the starting point of your staircase. Measure from the top of the landing or floor to where the bottom of the stringer will be. Mark this point with a pencil.
- Establish the stringer position: Measure the width of the stringer and mark it on the floor or landing. This will give you a visual reference for where the stringer will be positioned.
- Clear obstructions: Ensure that there are no obstacles or obstructions in the path of the stairs. This includes removing any furniture, plants, or other objects that may interfere with the construction process.
- Check for level: Use a level to check the levelness of the landing or floor where the stairs will be installed. If it’s not level, you may need to make adjustments or use shims to ensure a level foundation for the stairs.
- Ensure proper ventilation: If you’re working indoors, make sure the work area is well-ventilated. Open windows or use fans to improve air circulation and prevent the accumulation of fumes or dust.
- Wear protective gear: Prioritize safety by wearing appropriate protective gear, such as safety goggles, gloves, and ear protection. This will safeguard you from potential hazards during the construction process.
By taking the time to prepare the work area properly, you’ll create a conducive environment for laying out the stairs with a framing square. This will help you work efficiently and ensure accurate measurements and cuts.
With the work area prepared, we can now move on to determining the number of steps needed for the staircase.
Determining the Number of Steps
The next step in laying out stairs with a framing square is determining the number of steps needed. This will depend on the total vertical height or rise measurement of your staircase. To calculate the number of steps, follow these steps:
- Measure the total rise: Use a tape measure to measure the vertical distance between the top of the landing or floor to the bottom of the landing or floor where the staircase will end. This measurement is known as the total rise.
- Determine the ideal riser height: Consider the building codes and safety standards in your area, as they often dictate the maximum allowable riser height. Divide the total rise by the maximum allowable riser height to get an initial estimate of the number of steps.
- Adjust for practicality and comfort: Evaluate the estimated number of steps and make adjustments as necessary. Keep in mind that an excessive number of small steps or a small number of large steps can be inconvenient and uncomfortable to use. Aim for a balance that allows for a natural and comfortable stride.
- Round to a whole number: Once you have determined the ideal number of steps, round it to the nearest whole number. You may need to slightly adjust the riser heights to accommodate this rounding.
By following these steps, you will be able to determine the appropriate number of steps for your staircase. This will ensure that the stairs are comfortable and safe to use, while also complying with building codes and regulations.
Once you have determined the number of steps, you can move on to calculating the rise and run measurements for each step. This will allow you to accurately lay out the stringers and proceed with the construction of the stairs.
In the next section, we will guide you through the process of calculating the rise and run of the stairs using a framing square.
Read more: How To Measure The Square Footage Of Stairs
Calculating the Rise and Run of the Stairs
Now that you’ve determined the number of steps needed, the next step is to calculate the rise and run measurements for each step. The rise measurement refers to the vertical height from one step to another, while the run measurement indicates the horizontal depth of each step. Follow these steps to calculate the rise and run:
- Measure the total rise: Use a tape measure to determine the vertical distance between the top of the landing or floor to the bottom of the landing or floor where the staircase will end. This is the total rise of the stairs.
- Divide the total rise by the number of steps: Take the total rise measurement and divide it by the number of steps determined in the previous step. This will give you the riser height, which is the vertical height from one step to another.
- Measure the depth of each step: To calculate the run measurement, measure the horizontal depth of the staircase. Ideally, the run measurement should be large enough to provide a comfortable and safe walking surface. A common guideline is to aim for a run measurement between 9 and 11 inches.
- Calculate the tread length: Subtract the riser height from the desired tread depth (run measurement) to calculate the tread length. This is the horizontal distance between the front edge of one step and the front edge of the step below.
It’s essential to note that the rise and run measurements must be consistent for all steps to ensure a safe and comfortable staircase. Inconsistencies in these measurements can lead to tripping hazards or uncomfortable climbing experiences.
Once you have calculated the rise and run measurements, you can proceed to transfer these measurements to the stringers and mark the cutting lines. This will be covered in the next section.
By accurately calculating the rise and run of the stairs, you’ll be able to create a staircase that is both functional and visually pleasing.
In the following section, we will guide you through the process of transferring these measurements to the stringers and marking the cutting lines.
When laying out stairs with a framing square, always double-check your measurements and angles to ensure accuracy. Use a carpenter’s pencil to mark your cuts and lines clearly for easy reference during construction.
Transferring Measurements to the Stringers
With the rise and run measurements calculated, the next step in laying out stairs with a framing square is to transfer these measurements to the stringers. The stringers are the diagonal supports that will hold the steps in place. To transfer the measurements, follow these steps:
- Position the framing square: Place the framing square on the edge of the stringer board, with the tongue at the bottom and the blade along the top. Ensure that the tongue is flush against the edge of the board.
- Align the rise measurement: Locate the riser measurement on the blade of the framing square. Make sure that the bottom of the riser measurement lines up with the bottom of the stringer board.
- Mark the rise measurement: Use a pencil to mark the top edge of the stringer board at the corresponding riser measurement on the blade of the framing square. This will indicate where each step will begin.
- Align the run measurement: Move the framing square down the stringer board, aligning the run measurement with the previous mark made for the rise measurement. Ensure that the bottom of the run measurement lines up with the bottom of the stringer board.
- Mark the run measurement: Use a pencil to mark the top edge of the stringer board at the corresponding run measurement on the blade of the framing square. This will indicate where each tread will end.
- Continue marking the measurements: Repeat steps 3 to 5 for each step, ensuring that the rise and run measurements are consistent throughout the stringer board.
- Double-check the measurements: Before cutting the stringer, double-check that all the rise and run measurements are accurate and consistent. This will help ensure a level and properly designed staircase.
Once you have transferred the measurements and marked the cutting lines on the stringer, you are ready to proceed with cutting the stringer and building the stair frame, which will be covered in the following sections.
Transferring the measurements to the stringers accurately is crucial in creating a structurally sound and visually appealing set of stairs. Take your time and pay attention to detail during this step to ensure the best outcome.
In the next section, we will guide you through the process of markiing and cutting the stringers.
Marking and Cutting the Stringers
After transferring the measurements to the stringers, the next step in laying out stairs with a framing square is to mark and cut the stringers. The stringers are the diagonal supports that will hold the steps in place. Follow these steps to mark and cut the stringers:
- Secure the stringer: Place the stringer on a stable work surface, ensuring it is secure and won’t move during the cutting process.
- Mark the top and bottom cutting lines: Measure and mark the top and bottom cutting lines on the stringer board based on the transferred measurements. Use a pencil and a straight edge to ensure accuracy.
- Draw the rise and run lines: To establish the shape of each step, connect the marks made for the rise and run measurements on the stringer board. Use a straight edge or a framing square to draw these lines.
- Mark the tread and riser cuts: Determine the desired width of the tread and riser, and mark these measurements on the lines drawn in the previous step. Ensure that these marks are consistent for all steps.
- Double-check the measurements: Before proceeding with the cutting process, double-check that all the measurements and marks are accurate and consistent. Take the time to review and make any necessary adjustments to avoid costly mistakes.
- Cut the stringers: Use a saw (circular saw or hand saw) to carefully cut along the marked lines. Take your time and follow the lines precisely to ensure clean and accurate cuts.
- Test fit the stringers: Once the stringers are cut, position them in place to ensure a proper fit. Check that the risers and treads align correctly and make any adjustments if required.
It’s important to note that cutting the stringers accurately is essential for the structural integrity and safety of the staircase. Take your time during this step and double-check all measurements and cuts before proceeding.
In the next section, we will guide you through the process of building the stair frame using the cut stringers.
Note: Ensure that you wear appropriate safety gear, such as goggles and gloves, during the cutting process to protect yourself from debris and potential injuries.
Building the Stair Frame
With the stringers cut, the next step in laying out stairs with a framing square is to build the stair frame. The stair frame provides the structure and support for the steps. Follow these steps to build the stair frame:
- Position the stringers: Place the stringers in their designated positions, ensuring that the bottom is securely resting on the floor or landing, and the top is flush with the top of the landing or floor.
- Attach the stringers: Use screws or nails to secure the stringers in place. Make sure they are tightly fastened to provide stability and support.
- Check for level: Use a level to ensure that the stringers are level both horizontally and vertically. Make any necessary adjustments to achieve a level staircase.
- Install the risers: Starting from the bottom, attach the risers (vertical boards that form the front of each step) to the stringers. Use screws or nails to secure them in place. Ensure they are level and evenly spaced.
- Install the treads: Place the treads (horizontal boards that form the top surface of each step) on top of the risers. Make sure they are level and evenly spaced. Secure them to the stringers using screws or nails.
- Reinforce the connections: To strengthen the stair frame, add additional screws or nails to reinforce the connections between the stringers, risers, and treads. This will provide extra stability and durability.
Throughout the building process, periodically use the level to check that the stairs remain level and plumb. This will help ensure that the final staircase is safe and well-built.
Remember to follow local building codes and regulations regarding stair construction. These codes may dictate specific requirements for riser height, tread depth, handrails, and other safety considerations.
With the stair frame complete, you have successfully built the foundation of your stairs. The final step is to install the treads and risers, which we will cover in the next section.
Take your time during the construction process to ensure accuracy and quality. A well-built stair frame will provide a safe and durable staircase for years to come.
Read more: What Are The Red Stairs In Times Square
Installing the Treads and Risers
After building the stair frame, the next step in laying out stairs with a framing square is to install the treads and risers. These components provide the walking surface and the front face of each step. Follow these steps to install the treads and risers:
- Measure and cut the treads and risers: Measure the width and depth of each step. Cut the treads (horizontal boards) and risers (vertical boards) to the appropriate dimensions.
- Start at the bottom: Begin by installing the bottom riser. Apply construction adhesive on the back of the riser and press it firmly against the stringer.
- Install the remaining risers: Repeat the process for each riser. Apply adhesive on the back and press it against the stringer. Ensure they are level and evenly spaced.
- Install the treads: Starting from the bottom, place the treads on top of the risers. Ensure they are level and evenly spaced. Secure them to the stringers using screws or nails.
- Check for level and stability: Use a level to ensure that the treads are level both horizontally and vertically. Check that the stairs feel stable and secure. Make any necessary adjustments.
- Install additional support (optional): Depending on the length and width of your staircase, you may need to install additional supports underneath the treads for added stability.
- Fill nail or screw holes: If desired, fill the nail or screw holes with wood filler and sand them down for a smooth finish. This will give your stairs a polished appearance.
Throughout the installation process, periodically use the level to check that the stairs remain level and balanced.
Once the treads and risers are installed, take a moment to inspect the staircase for any loose connections or potential hazards. Tighten any screws or nails that may have loosened and confirm that all components are secure.
Congratulations! You have now successfully installed the treads and risers, completing the construction of your stairs.
In the next section, we will provide a recap and conclude our guide on how to layout stairs with a framing square.
Please note that local building codes and regulations may have specific requirements for the installation of treads and risers, such as minimum tread depth, maximum riser height, and other safety considerations. Ensure you comply with these regulations to ensure a safe and compliant staircase.
Conclusion
Congratulations on completing the process of laying out stairs with a framing square! By following the steps outlined in this guide, you have gained the knowledge and skills necessary to create a safe and well-designed staircase. Let’s recap the key points covered:
We began by understanding the anatomy of a framing square and its importance in accurately measuring and marking the components of the staircase. We then moved onto preparing the work area, ensuring a clean and organized space to carry out the layout process.
Next, we determined the number of steps needed by calculating the total rise and dividing it by the desired riser height. We then calculated the rise and run measurements for each step, ensuring consistency and comfort.
Transferring the measurements to the stringers was the next step, marking the cutting lines and ensuring accuracy and precision. Following that, we successfully cut the stringers and built the stair frame, securing and leveling the components to create a stable structure.
Finally, we installed the treads and risers, completing the stair construction process. By carefully adhering to the measurements and leveling the components, we ensured a safe and functional staircase.
Throughout the process, it’s crucial to adhere to local building codes and regulations to ensure compliance with safety standards. Always wear appropriate safety gear and take the time to double-check your measurements and cuts for accuracy.
We hope that this guide has provided you with the necessary knowledge and confidence to successfully layout stairs using a framing square. Remember to apply these principles to your specific staircase project, considering the unique dimensions and requirements of your space.
Now that you have completed the construction of your stairs, enjoy the satisfaction of having a well-crafted and visually appealing addition to your home or construction project. May your stairs provide safe and effortless access for many years to come!
Ready to upgrade your home or start a new hobby? Dive into our DIY home improvement article for easy-to-follow steps and handy tricks that will empower you to enhance your living space like a pro. If you're passionate about crafting and constructing, don't miss our exciting review of the top woodworking tools and trends set to dominate in 2024. This comprehensive guide is your go-to resource for selecting the right tools to create stunning woodwork projects effortlessly.
Frequently Asked Questions about How To Layout Stairs With Framing Square
Was this page helpful?
At Storables.com, we guarantee accurate and reliable information. Our content, validated by Expert Board Contributors, is crafted following stringent Editorial Policies. We're committed to providing you with well-researched, expert-backed insights for all your informational needs.


0 thoughts on “How To Layout Stairs With Framing Square”