Articles
How To Make A Quilted Bedding
Modified: August 22, 2024
Discover helpful articles and tips on how to make beautiful quilted bedding that will transform your bedroom into a cozy retreat.
(Many of the links in this article redirect to a specific reviewed product. Your purchase of these products through affiliate links helps to generate commission for Storables.com, at no extra cost. Learn more)
Introduction
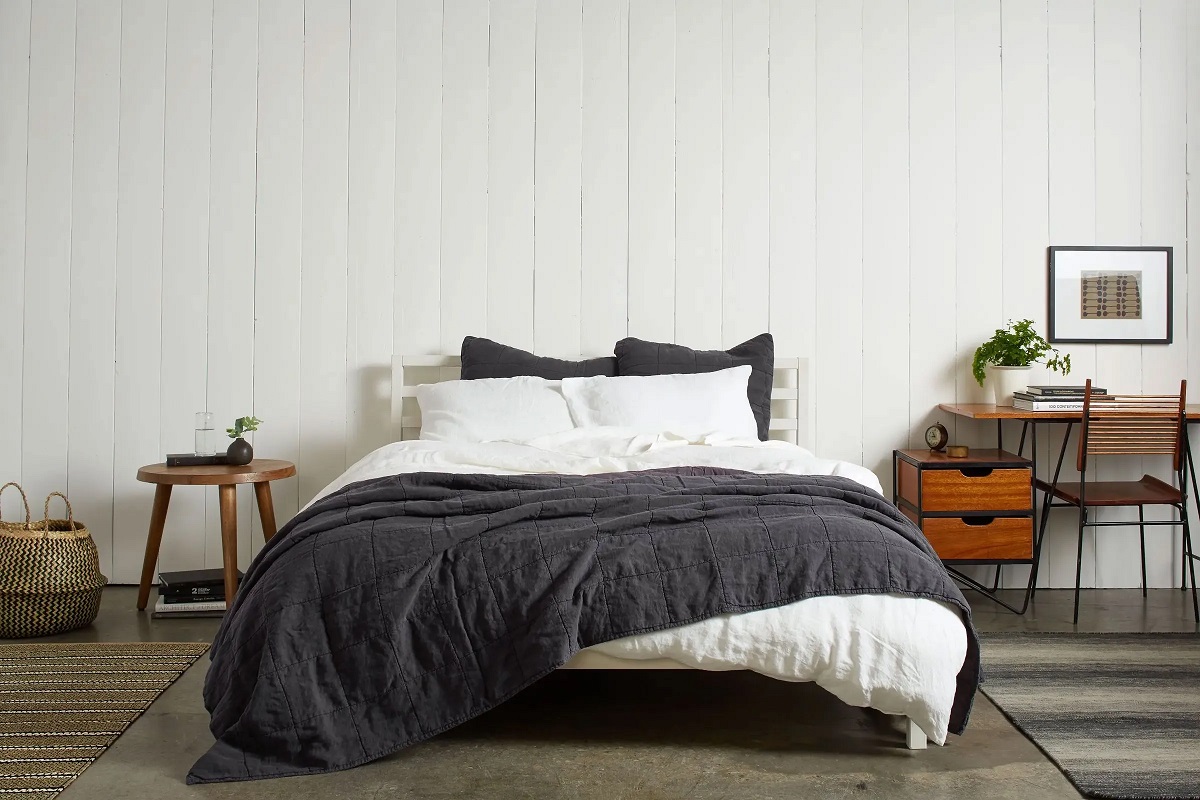
Quilting is a centuries-old art form that allows you to create beautiful, cozy, and personalized bedding. Making a quilted bedding not only adds a touch of warmth and comfort to your bedroom but also gives you the opportunity to showcase your creativity and craftsmanship. Whether you are a seasoned quilter or a beginner, this article will guide you through the steps of making a quilted bedding.
Quilts have been used for centuries to keep people warm during cold nights. They were initially made from scraps of fabric sewn together, while the more modern quilting techniques involve intricate patterns and designs. Quilted bedding is not only functional but also serves as a beautiful piece of art that can enhance the aesthetics of your bedroom.
Before you embark on your quilting journey, it’s essential to gather all the necessary materials. These include:
- Fabric: Choose a variety of fabrics in different colors and patterns to create interest and contrast.
- Batting: This is the middle layer of the quilt sandwich and provides warmth and thickness.
- Thread: Select thread that matches or complements the colors of your fabric.
- Quilting ruler: A ruler with measurement markings will help you accurately cut the fabric.
- Rotary cutter and mat: These tools make cutting the fabric easier and more precise.
- Pins or clips: Use these to hold the fabric layers together during quilting.
- Sewing machine: A sewing machine will speed up the quilting process and ensure neat, straight stitches.
- Iron and ironing board: It’s crucial to press the fabric before cutting and sewing to ensure accuracy.
Once you have gathered your materials, it’s time to prepare the fabric for quilting. Wash and iron the fabric to remove any dirt or wrinkles. This step will also ensure that the fabric shrinks before you start sewing. If you plan to use different fabrics, be sure to prewash them separately, as some fabrics may bleed color.
In the next section, we will discuss how to cut the fabric and prepare the quilt top. Stay tuned!
Key Takeaways:
- Quilting is a timeless art form that allows you to express creativity and create functional works of art. Each step of the process requires precision, attention to detail, and a touch of artistry.
- Your quilted bedding reflects your time, dedication, and creativity. Embrace imperfections, enjoy the process, and take pride in your accomplishments as a quilter.
Read more: What Is A Bed Quilt
Materials Needed
Before you embark on your quilting project, it’s important to gather all the necessary materials. Having everything prepared and ready to go will help streamline the process and ensure that you have everything you need on hand.
Here are the essential materials you’ll need to create a quilted bedding:
- Fabric: Choose a variety of fabrics in different colors and patterns to add visual interest to your quilt. Consider the size of your quilt and the design you have in mind when purchasing fabric.
- Batting: This is the middle layer of the quilt sandwich that provides warmth and thickness. There are different types of batting available, such as cotton, polyester, and wool. Choose a batting that suits your preferences and desired level of warmth.
- Thread: Select high-quality thread that matches or complements the colors of your fabric. Cotton thread is commonly used for quilting due to its strength and durability.
- Quilting ruler: A quilting ruler with measurement markings is essential for accurately cutting the fabric. It helps ensure precise and consistent shapes and sizes throughout your quilt.
- Rotary cutter and mat: These tools make cutting fabric quick and precise. The rotary cutter is a sharp, circular blade that glides smoothly along the ruler, while the cutting mat protects surfaces and provides a stable cutting surface.
- Pins or clips: Use quilting pins or clips to hold the fabric layers together during quilting. These pins ensure that the layers stay aligned and prevent shifting as you sew.
- Sewing machine: A sewing machine is invaluable for quilting, as it allows for efficient stitching and precise control. Make sure your sewing machine is in good working condition and that you have the necessary accessories, such as different presser feet and a walking foot for quilting.
- Iron and ironing board: An iron and ironing board are essential tools for pressing your fabric before cutting and sewing. Pressing helps remove wrinkles and ensures accurate measurements.
In addition to these basic materials, you may also consider investing in additional quilting supplies, such as a quilting hoop or frame, hand quilting needles, and embroidery floss for decorative stitching. These extras can add unique touches to your quilted bedding and allow for more creative expression.
It’s important to note that the quantity of materials needed will depend on the size and design of your quilted bedding. Measure the desired dimensions of your quilt and calculate the necessary amount of fabric, batting, and thread accordingly.
Now that you have all the necessary materials, you’re ready to move on to the next step: preparing the fabric for quilting. Get ready to dive into the world of fabric selection and cutting techniques!
Preparing the Fabric
Before you start cutting and sewing your fabric for quilting, it’s important to properly prepare it. Preparing the fabric ensures that it is clean, wrinkle-free, and ready for the quilting process.
Here are the steps to prepare your fabric for quilting:
- Washing: It’s recommended to wash your fabric before quilting to remove any dirt, chemicals, or sizing. This step also helps to pre-shrink the fabric so that it doesn’t warp or distort after quilting. Follow the manufacturer’s instructions for washing and drying the fabric.
- Drying: After washing, tumble dry your fabric in a dryer or hang it up to air dry. Once dried, iron the fabric to remove any wrinkles and ensure a smooth surface for cutting and sewing.
- Pressing: Using an iron set to the appropriate heat setting for your fabric, press the fabric to remove any remaining wrinkles. Start from one end and work your way across, being careful not to stretch or distort the fabric.
- Fabric Selection: If you are using multiple fabrics in your quilt, take the time to lay them out and arrange them in a pleasing pattern. Consider color combinations, contrast, and overall design. This step allows you to visualize how the fabrics will come together in your finished quilted bedding.
Once your fabric is prepared, you can move on to the next step: cutting the fabric. This step involves accurately measuring and cutting the fabric pieces according to your desired quilt design and pattern.
Remember to handle your fabric with care throughout the preparation process to avoid unnecessary stretching, tearing, or distortion. Take your time to ensure that your fabric is in the best possible condition before you begin the creative and rewarding journey of quilting.
Now that your fabric is prepped and ready, it’s time to dive into the exciting world of cutting and piecing your quilt top. Get your quilting ruler, rotary cutter, and mat ready as we delve into the details of creating a stunning quilted bedding!
Cutting the Fabric
One of the crucial steps in making a quilted bedding is cutting the fabric. Accurate and precise cutting ensures that your quilt pieces fit together seamlessly and result in a beautifully finished quilt top. Here’s a step-by-step guide to cutting the fabric for your quilt:
- Choose the Quilt Pattern: Select a quilt pattern or design that you would like to create. This will determine the size and shape of your fabric pieces.
- Measure and Mark: Use a quilting ruler and a fabric marking tool to measure and mark the dimensions of your fabric pieces. Double-check your measurements to ensure accuracy.
- Fabric Layout: Lay out your fabric on a flat surface, making sure it is smooth and wrinkle-free. Place your quilting ruler on top of the fabric, aligning it with the marked lines.
- Cut with a Rotary Cutter: Hold the quilting ruler firmly in place and use a sharp rotary cutter to cut along the edge of the ruler. Apply even pressure to ensure a clean and straight cut. Be cautious while using the cutter to avoid any injuries.
- Repeat the Process: Continue measuring, marking, and cutting the fabric pieces according to your quilt pattern. Take your time to ensure accuracy and consistency throughout the cutting process.
- Organize and Label: As you finish cutting each piece, organize them and label them if needed. This helps keep track of the fabric pieces and makes it easier when it comes time to sew them together.
When cutting the fabric, it’s crucial to pay attention to grain lines and fabric direction. Grain lines refer to the direction of the fabric threads and can affect how the fabric behaves when sewn and quilted. Make sure to align the grain lines with the quilt pattern to ensure proper fabric orientation.
Additionally, be mindful of fabric waste and efficiency. Try to arrange your fabric pieces in a way that minimizes leftover scraps and maximizes the usage of fabric.
Once you have finished cutting all the fabric pieces for your quilt, you are ready to move on to the next step: sewing the quilt top. Stay tuned as we delve into the exciting process of piecing together your quilted bedding!
Sewing the Quilt Top
Now that you have all the fabric pieces cut and organized, it’s time to sew them together to create the quilt top. Sewing the quilt top is an exciting step that brings your design to life. Follow these steps to sew your quilt top:
- Layout Design: Lay out your fabric pieces on a flat surface according to your quilt design. Take your time to arrange and re-arrange the pieces until you are satisfied with the overall layout.
- Stitching Rows: Start sewing your fabric pieces together row by row. Align the edges of the fabric pieces, right sides facing each other, and pin or clip them in place to secure them while sewing.
- Seam Allowance: Use a 1/4-inch seam allowance or the seam allowance specified in your quilt pattern. Sew the fabric pieces together using a straight stitch, removing the pins or clips as you go.
- Pressing Seams: After sewing each row, press the seams open or to one side. Pressing ensures that the seams lay flat and gives your quilt top a neat and professional appearance.
- Stitching Rows Together: Once all the rows are sewn, stitch them together to complete the quilt top. Again, align the edges, pin or clip them, and sew using the appropriate seam allowance.
- Pressing Final Seams: Press the final seams either open or to one side, depending on your preference and quilt pattern. This final pressing will give your quilt top a polished look.
As you sew the quilt top, pay attention to the accuracy of your seam allowances and the alignment of the fabric pieces. Use a guide on your sewing machine to ensure consistent seam widths. You can also use a quarter-inch foot or quilting foot that provides a precise seam allowance.
Remember to backstitch at the beginning and end of each seam to secure the stitches and prevent unraveling. Take your time and sew with patience and precision to achieve the desired result.
Once you have sewn the quilt top, give it a final press to remove any wrinkles or creases. Congratulations! You have successfully completed the process of sewing the quilt top.
In the next section, we will discuss how to create the quilt sandwich and prepare it for quilting. Get ready to take your quilted bedding to the next level as we dive into the exciting world of quilting the layers!
When making quilted bedding, be sure to pre-wash your fabric to prevent shrinkage after the quilt is finished. This will ensure that your quilted bedding maintains its shape and size after washing.
Read more: How To Put Quilt On Bed
Creating the Quilt Sandwich
Creating the quilt sandwich is a crucial step in the quilting process. It involves layering the quilt top, batting, and backing fabric to prepare for the quilting stitches. Follow these steps to create the quilt sandwich:
- Lay the Backing Fabric: Start by laying the backing fabric right side down on a large, flat surface. Smooth out any wrinkles or creases, ensuring the fabric is taut and flat.
- Secure the Backing: Tape or pin the edges of the backing fabric to the surface to keep it in place. This will prevent shifting or wrinkling during the layering process.
- Add Batting Layer: Place the batting on top of the backing fabric, ensuring it is centered and covers the entire quilt top. Smooth out any wrinkles or folds in the batting.
- Add the Quilt Top: Carefully place the quilt top on the batting, ensuring it is centered and aligned with the backing fabric. Smooth out any wrinkles or folds in the quilt top.
- Secure the Layers: Pin or baste the layers together to hold them in place during the quilting process. Use safety pins placed several inches apart or use a basting stitch to secure the layers temporarily.
When layering the quilt sandwich, it’s important to keep the layers flat and smooth to ensure even quilting. Take your time to adjust any wrinkles or folds and make sure all layers are aligned correctly.
You can also consider using quilting spray adhesive to temporarily hold the layers together before quilting. This adhesive keeps the layers in place during the movement of the quilt sandwich. However, always follow the manufacturer’s instructions and be mindful of any allergies or sensitivities to the adhesive.
Creating the quilt sandwich is a crucial step as it provides stability and dimension to your quilted bedding. The layers work together to add warmth, provide structure, and showcase the beautiful quilt top design.
Now that you have successfully created the quilt sandwich, the next step is to quilt the layers together. Stay tuned as we dive into the exciting process of stitching and adding texture to your quilted bedding.
Quilting the Layers
Quilting the layers is the process of stitching the quilt top, batting, and backing fabric together. This step not only secures the layers but also adds decorative stitching and texture to your quilted bedding. Follow these steps to quilt the layers:
- Select a Quilting Design: Decide on the quilting design you would like to use. This can be simple straight lines, free-motion designs, or intricate patterns. Consider the overall look and feel you want to achieve for your quilted bedding.
- Mark the Quilting Lines: If you are using a specific quilting design, use a fabric marking tool to mark the lines or patterns on the quilt top. Ensure your markings are visible and will not damage or leave permanent traces on the fabric.
- Thread the Sewing Machine: Select a thread color that complements your fabric and quilt design. Wind the thread onto the bobbin and thread the sewing machine with the chosen thread.
- Start Quilting: Begin quilting by sewing along the marked lines or following your chosen quilting design. Take your time to ensure even stitches and secure the layers together. Backstitch at the beginning and end of each line of quilting to secure the stitches.
- Experiment with Quilting Techniques: Explore different quilting techniques like free-motion quilting, stippling, or meandering to add texture and interest to your quilted bedding. These techniques allow you to create unique patterns and designs with your stitching.
- Continue Quilting: Work your way across the quilt, quilting as desired. Take breaks as needed to rest your hands and eyes. It’s important to maintain consistency in the stitching as you progress.
- Inspect and Adjust: After quilting, inspect your work to ensure all layers are quilted evenly and securely. If you spot any loose threads or areas that need reinforcement, take the time to make any necessary adjustments.
When quilting, it’s important to maintain a consistent stitch length and a steady sewing pace. Practice on scrap fabric or quilted samples to familiarize yourself with the desired tension and speed for your specific sewing machine.
Remember, quilting is an art form, and mistakes happen. Embrace imperfections as part of the uniqueness and charm of your quilted bedding.
Once you have finished quilting the layers, it’s time to move on to the final step: binding the edges. Stay tuned as we explore how to add a finishing touch to your quilted bedding!
Binding the Edges
Binding the edges of your quilted bedding not only gives it a polished and professional finish but also provides durability and secures the quilt layers together. Follow these steps to bind the edges of your quilt:
- Prepare the Binding Strips: Cut fabric strips for binding, ensuring they are long enough to cover the perimeter of your quilt. The width of the strips should be around 2.5 inches. If necessary, sew multiple strips together to create a continuous binding strip.
- Join the Ends: Join the ends of the binding strips together to create a continuous loop. This can be done using a diagonal seam or a straight seam, depending on your preference.
- Prepare the Quilt: Trim the excess batting and backing fabric from the edges of your quilt, ensuring all layers are even. Press the quilt edges to create a crisp and clean edge for the binding.
- Attach the Binding: Starting in the middle of one side of the quilt, align the raw edge of the binding strip with the raw edge of the quilt. Leave a small tail of binding loose, and begin sewing the binding to the quilt using a 1/4-inch seam allowance.
- Miter the Corners: When you reach a corner, stop sewing a quarter-inch away from the edge. Fold the binding strip up at a 45-degree angle, creating a mitered corner. Fold the strip back down, aligning it with the next side, and continue sewing.
- Continue Binding: Sew the binding along all four sides of the quilt, miterring the corners as you go. When you are close to where you started, trim the excess binding, leaving a small overlap.
- Join the Binding: Open up both ends of the binding and fold back the edges. Trim one end at a 45-degree angle. Fold the other end over and slip it into the trimmed end, creating a neat and invisible seam. Pin or clip the ends together.
- Finish Sewing: Finish sewing the binding to the quilt, securing the ends and completing the binding loop. Use a slip stitch or a blind stitch to hand sew the binding down, ensuring the stitches are hidden and the binding is secure.
When attaching the binding, make sure to sew close to the folded edge of the binding strip to ensure a tight and secure binding. Take your time to ensure even stitches and consistent tension throughout the binding process.
Once the binding is sewn down, press the quilted bedding to give it a final finish. Take a step back and admire your beautifully bound quilted bedding!
Adding the binding is the final step, bringing your quilted bedding to completion. Your hard work and attention to detail will result in a stunning and functional piece that can be cherished for years to come.
In the last section, we will discuss how to add the finishing touches to your quilted bedding. Stay tuned for the final step in this rewarding quilting project!
Adding Finishing Touches
Now that you have completed the major steps of creating your quilted bedding, it’s time to add those final finishing touches. These small details can elevate your quilt and make it truly special. Here are some ideas to consider:
- Labeling: Consider adding a label to your quilted bedding, documenting the date, your name, and any special notes or dedications. This label serves as a personalized touch and creates a lasting memory.
- Embroidery or Appliqué: Add embroidery or appliqué designs to your quilted bedding for added embellishment. This could be a monogram, a special motif, or even small images that hold significance to you or the recipient of the quilt.
- Emblishments: Consider adding decorative embellishments such as beads, buttons, or ribbons to specific areas of the quilt top. These elements can add texture, visual interest, and a touch of whimsy.
- Quilting Labels: If you have used unique quilting techniques or patterns, consider including labels that describe or showcase these elements. This adds an educational aspect to your quilted bedding and can be appreciated by fellow quilters.
- Wash and Finishing: Before using or gifting your quilted bedding, give it a final wash to remove any remaining markings, loose threads, or surface dust. This washing will also help to soften the quilt and give it that cozy, comfortable feel.
Additionally, take the time to inspect your quilted bedding for any loose threads or areas that may need reinforcement. Make any necessary repairs to ensure the longevity of your quilt.
Remember, the finishing touches are an opportunity to truly make your quilted bedding unique and reflective of your personal style. Have fun and let your creativity shine through.
Congratulations! You have successfully completed all the steps from preparing the fabric to adding the finishing touches. Your quilted bedding is now ready to be admired, used, or gifted to bring warmth and beauty to any bedroom.
Quilting is a labor of love, and your dedication and craftsmanship shine through in the final product. Enjoy your quilted creation and take pride in the skills you have developed throughout this journey.
Now, wrap yourself up in the warmth of your quilted masterpiece and revel in the joy of creating something beautiful and meaningful.
Happy quilting!
Read more: How To Make A Quilt
Conclusion
Congratulations on completing the journey of creating your own quilted bedding! Throughout this process, you have learned how to select materials, prepare fabric, cut and sew the quilt top, create the quilt sandwich, quilt the layers, bind the edges, and add those special finishing touches. What once started as a bundle of fabric has now transformed into a beautiful, handcrafted piece that brings warmth and personality to your bedroom.
Quilting is a timeless art form that allows you to express your creativity and create functional works of art. Each step of the process requires precision, attention to detail, and a touch of artistry. As you gain experience, you may explore more complex patterns, designs, and techniques to expand your quilting repertoire.
Quilted bedding not only provides warmth and comfort but also adds a touch of charm and personality to your living space. It can be a centerpiece that sparks conversation or a cherished heirloom passed down through generations.
Remember, quilting is a journey, not just a destination. Embrace the imperfections and enjoy the process of creating something unique. Your quilts carry the stories of the fabrics you selected, the hours you spent cutting and sewing, and the love and care with which you crafted each stitch.
Whether you keep your quilted bedding for yourself or gift it to someone special, it is a labor of love that reflects your time, dedication, and creativity. Take pride in your accomplishments and share the joy of quilting with others.
Now that you have completed this project, allow yourself to reflect and celebrate your achievements. Take a step back and admire the beauty and craftsmanship of your quilted bedding. Know that you have embarked on a journey that has not only resulted in a stunning piece but also fostered personal growth and honed your skills as a quilter.
We hope that this guide has provided you with valuable insights and guidance throughout your quilting journey. May it inspire and motivate you to continue exploring new patterns, techniques, and designs.
So, snuggle up under your quilted bedding, appreciate the warmth and comfort it brings, and remember the joy that comes from creating something with your own hands. Happy quilting!
Frequently Asked Questions about How To Make A Quilted Bedding
Was this page helpful?
At Storables.com, we guarantee accurate and reliable information. Our content, validated by Expert Board Contributors, is crafted following stringent Editorial Policies. We're committed to providing you with well-researched, expert-backed insights for all your informational needs.


0 thoughts on “How To Make A Quilted Bedding”