Articles
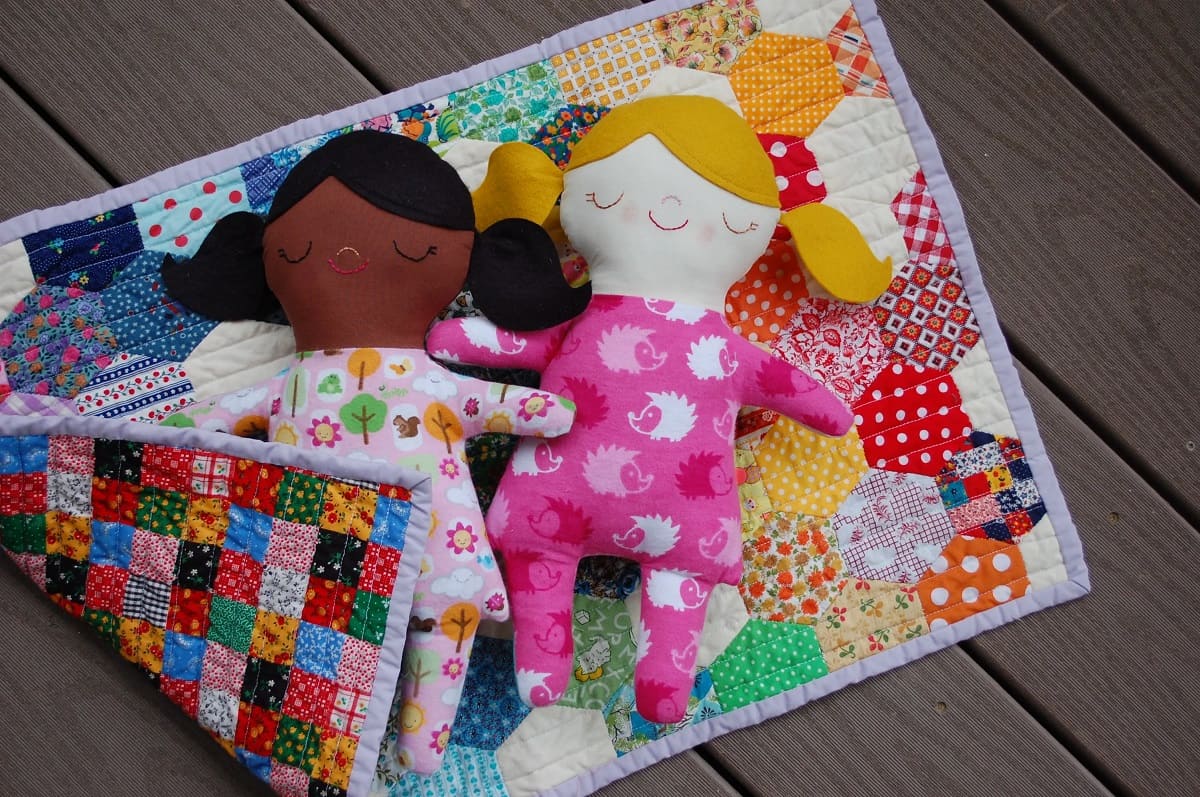
How To Make A Doll Quilt
Modified: August 28, 2024
Learn how to make a charming doll quilt with our step-by-step articles. Create a miniature masterpiece for your favorite doll!
(Many of the links in this article redirect to a specific reviewed product. Your purchase of these products through affiliate links helps to generate commission for Storables.com, at no extra cost. Learn more)
Introduction
Quilting is a timeless craft that brings joy and warmth to both the maker and the receiver. And what better way to start your quilting journey than by making a lovely doll quilt? Doll quilts are smaller in size, making them a perfect project for beginners or for those looking for a quick and satisfying sewing project.
In this article, we will guide you through the steps of making a doll quilt from start to finish. Whether you’ve never picked up a needle and thread or you’re an experienced quilter looking for a fun and relaxing project, this guide is for you. So gather your supplies, unleash your creativity, and let’s get started!
Key Takeaways:
- Dive into the world of quilting by creating a charming doll quilt, perfect for beginners or experienced quilters seeking a quick and satisfying sewing project. Unleash your creativity and enjoy the journey!
- From fabric selection to final touches, making a doll quilt is a rewarding and creative endeavor. Embrace your unique style, share your quilts with others, and continue to explore the endless possibilities of quilting.
Read more: How To Make A Doll Dresser
Supplies Needed
Before we dive into the quilting process, let’s gather all the supplies that you will need to create your beautiful doll quilt:
- Fabric: Choose a variety of cotton fabrics in different colors and patterns. You will need fabric for the quilt top, backing fabric, and batting.
- Cutting tools: A rotary cutter, cutting mat, and ruler will make it easier to accurately cut your fabric.
- Pins or clips: These will be used to secure your fabric layers together while quilting.
- Thread: Select a thread color that complements your chosen fabrics.
- Sewing machine: While it is possible to hand sew a doll quilt, a sewing machine will make the process faster and more efficient.
- Iron and ironing board: Pressing your fabric and seams is essential for achieving neat and professional-looking quilt blocks.
- Quilting ruler: This tool will help you measure and cut your fabric accurately.
- Quilt binding: Choose a fabric or pre-made binding to finish the edges of your doll quilt.
- Quilting gloves: Optional but helpful for getting a good grip on the quilt layers while quilting.
Now that you have all your supplies ready, let’s move on to the next step: choosing the fabric for your doll quilt.
Choosing the Fabric
When it comes to choosing fabric for your doll quilt, the possibilities are endless. You can go for a coordinated and cohesive look with fabrics from the same collection or mix and match patterns to create a more eclectic and playful quilt.
Consider the following tips when selecting fabric for your doll quilt:
- Color Palette: Decide on the color scheme you want for your quilt. You can opt for bright and vibrant colors, soft pastels, or even a monochromatic look. Choose colors that make you happy and reflect your personal style.
- Scale of Prints: Mix fabrics with different scales of prints to add interest to your quilt. Pair larger prints with smaller ones to create contrast and balance.
- Solid Fabrics: Don’t forget to include a few solid-colored fabrics in your selection. Solids can help break up busy patterns and provide visual rest for the eyes.
- Texture: Consider incorporating fabrics with different textures, such as linen, chambray, or even flannel, to add dimension to your quilt.
- Theme or Style: If you’re making a doll quilt for a specific theme or occasion, choose fabrics that reflect that theme. For example, for a holiday-themed quilt, opt for fabrics with festive motifs.
Remember, quilting is a creative and personal endeavor, so trust your instincts and select fabrics that speak to you. Once you have chosen your fabrics, it’s time to move on to the next step: cutting the fabric.
Cutting the Fabric
Now that you have chosen your fabric, it’s time to start cutting it into the required pieces for your doll quilt. Follow these steps to ensure accurate and precise cuts:
- Preparation: Before you start cutting, wash and press your fabric to remove any wrinkles or sizing. This will make it easier to work with and ensure that your quilt remains in good condition even after washing.
- Measurements: Refer to your chosen doll quilt pattern or decide on the size you want your quilt to be. Measure and mark the dimensions on your fabric using a washable fabric marker or pencil.
- Cutting Tools: Use a rotary cutter, cutting mat, and ruler to make precise cuts. Line up the ruler with your marked measurements and carefully cut along the edge of the ruler with the rotary cutter.
- Quilt Blocks: If you are creating a quilt with different blocks, cut the fabric pieces according to the measurements specified in your pattern. Double-check your measurements and make any necessary adjustments before cutting.
- Consistency: Ensure that your cuts are consistent across all the fabric pieces to maintain uniformity in your quilt blocks. Taking the time to double-check your measurements and cutting carefully will result in more accurate and professional-looking quilt blocks.
Once you have cut all your fabric pieces, organize them and keep them in the appropriate order for piecing the quilt. Now that your fabric is ready, let’s move on to the next step: piecing the quilt.
Piecing the Quilt
Piecing the quilt is the process of sewing together the fabric pieces to create the quilt top. Follow these steps to ensure a seamless and well-aligned quilt top:
- Layout: Arrange your fabric pieces according to the design you want for your doll quilt. Experiment with different layouts until you are satisfied with the placement of the fabrics.
- Chain Piecing: To save time and thread, use the chain piecing method. Start sewing the fabric pieces together one by one, ensuring that the right sides are facing each other. After sewing one pair, continue on to the next without cutting the thread. This creates a “chain” of fabric pieces that are connected by a thread.
- Seam Allowance: Use a ¼ inch seam allowance for piecing the quilt. This is the standard seam allowance used in quilting and will ensure that your quilt top is properly constructed.
- Pinning or Clipping: To keep your fabric pieces aligned, pin or use sewing clips at the beginning and end of each seam. This will prevent your fabric layers from shifting as you sew.
- Piecing Blocks: If you are creating a quilt with different blocks, piece each block separately. Press the seams open or to one side, depending on your preference and the pattern instructions.
- Pressing: After each seam, press the fabric with an iron to ensure that the seam lays flat and the fabric is smooth. This will result in neat and professional-looking quilt blocks.
- Repeat: Continue piecing your fabric pieces together until you have completed the quilt top according to your design. Take your time and enjoy the process of creating your unique doll quilt top!
Once you have completed piecing the quilt top, it’s time to move on to the next step: pressing the seams.
Read more: How To Make A Swimming Pool For Dolls
Pressing Seams
Pressing the seams is a crucial step in quilting that helps create crisp and flat quilt blocks. By pressing the seams, you will achieve a more professional and polished look for your doll quilt. Follow these steps to properly press your quilt seams:
- Set up your ironing board and plug in your iron. Make sure your iron is at the appropriate temperature for the fabric you are working with.
- Start by pressing the seams as they were sewn, also known as “setting the seam.” This helps to meld the thread into the fabric and creates a more even and tight seam.
- Open the seam with your fingers or with the help of a seam ripper, being careful not to tear or stretch the fabric.
- Press the seam open using your iron on a medium heat setting. Gently glide the iron along the seam, applying even pressure from one end to the other.
- For seams that are pressed to one side, place your quilt block on the ironing board with the seam facing upwards. Use your iron to press the seam towards the darker or heavier fabric. This will help reduce bulk and ensure a flatter block.
- Continue pressing the seams as you piece your quilt top. Take your time and ensure that all the seams are pressed in the appropriate direction, following your chosen quilt pattern or design.
Pressing your seams not only enhances the overall appearance of your quilt, but it also helps with the accuracy of your piecing. By having flat seams, your quilt blocks will fit together more seamlessly and result in a more professional-looking finished project.
Now that you have pressed your seams, it’s time to move on to the next step: adding borders to your doll quilt.
When making a doll quilt, consider using smaller-scale prints and simpler patterns to ensure the design is proportional to the size of the quilt.
Adding Borders
Adding borders to your doll quilt is not only a decorative element but also serves to frame and enhance the overall design. Follow these steps to add borders to your quilt:
- Measurements: Measure the width and length of your quilt top. This will determine the size of the borders you will need to cut.
- Fabric: Choose a fabric for your borders that complements the colors and patterns of your quilt top. You can go for a solid color or a coordinating print.
- Border Width: Decide on the width you want for your borders. The width can vary depending on your design, but a common border width is 2.5 to 3 inches.
- Cutting: Using a rotary cutter, mat, and ruler, cut strips of fabric for the borders. The length of the strips should be equal to the measurement of the quilt’s sides, plus the width of the borders and an additional 2 inches for seam allowances.
- Sewing: Attach the border strips to the sides of the quilt top by sewing a quarter-inch seam allowance. Begin and end the borders with backstitching to secure the seams. Press the seams towards the border fabric.
- Repeat: Measure and cut strips for the top and bottom borders, following the same process as before. Pin and sew the border strips, aligning the corners to ensure a neat and even finish.
Adding borders not only completes the quilt top but also stabilizes the edges and provides a finished look. Take your time when choosing fabrics and aligning the corners to ensure a professional and well-finished doll quilt.
Now that the borders are added, it’s time to move on to the next step: quilting the layers.
Quilting the Layers
Quilting is the process of stitching the three layers of a quilt together: the quilt top, batting, and backing fabric. Follow these steps to quilt your doll quilt:
- Prepare the Layers: Lay your quilt backing fabric right side down on a flat surface. Smooth out any wrinkles or creases. Place the batting on top of the backing fabric, aligning them properly.
- Quilt Top Placement: Lay your quilt top right side up on top of the batting, aligning it with the backing fabric and smoothing out any wrinkles. Pin or use sewing clips to secure all three layers together.
- Choosing a Quilting Method: Decide on the quilting method you want to use. There are several options, including straight-line quilting, free-motion quilting, or using a quilting machine.
- Quilting Design and Marking: Plan your quilting design. You can follow the seams, create geometric patterns, or experiment with free-motion quilting. Use fabric markers or tape to mark any straight lines or specific quilting patterns.
- Quilting Stitches: Depending on your chosen quilting method, set up your sewing machine or quilting frame. Start quilting from the center of your quilt and work your way outwards. Use a walking foot or darning foot when necessary, and adjust the stitch length and tension accordingly.
- Take Breaks and Breathe: Quilting can be time-consuming, so take breaks when needed. It’s also important to stay relaxed and maintain a steady rhythm as you quilt.
Remember, there is no right or wrong way to quilt. Embrace the process and experiment with different designs and techniques to enhance the overall look of your doll quilt. Once you have finished quilting, remove any pins or clips and admire your beautiful quilted layers.
Now that your quilt layers are intricately stitched together, it’s time to move on to the next step: binding the quilt.
Binding the Quilt
Binding is the final step in completing your doll quilt. It not only provides a finished and polished look but also seals the edges of the quilt. Follow these steps to bind your quilt:
- Fabric Selection: Choose a fabric for your quilt binding that complements the colors and patterns of your quilt top. You can use a coordinating solid fabric or a print.
- Cutting the Binding Strips: Measure the perimeter of your quilt to determine the length of your binding strips. Cut fabric strips that are 2.5 to 3 inches wide, and join them together using diagonal seams to create one continuous strip.
- Preparing the Binding: Fold the binding strip in half lengthwise, wrong sides together, and press it with an iron. This will create a long, thin strip.
- Attaching the Binding: Starting in the middle of one side of the quilt, align the raw edges of the binding strip with the raw edge of the quilt. Pin or clip the binding in place, and begin sewing with a ¼ inch seam allowance, leaving a tail of binding unstitched.
- Mitered Corners: When you approach a corner, stop stitching ¼ inch before you reach the edge. Fold the binding strip up, away from the quilt, creating a 45-degree angle. Then fold the binding strip back down, aligning it with the next edge of the quilt. Continue stitching along the next edge. Repeat for all corners.
- Joining the Ends: As you approach the starting point, stop stitching a few inches before the tail of the binding. Fold the tail back on itself, creating a clean finish. Then overlap the beginning binding edge and the folded tail, trim the excess, and stitch them together. Finish sewing the binding to the quilt.
- Finishing: Fold the binding over the raw edge of the quilt, covering the stitched line. Hand-stitch the folded edge of the binding to the back of the quilt using a blind stitch or slip stitch.
Binding can be a meticulous process, but it adds that final touch to your doll quilt. Take your time, ensure the binding is evenly sewn and neatly finished, and soon your quilt will be complete.
Now that your quilt is beautifully bound, all that’s left to do is add some final touches to make it truly special.
Read more: How To Make A Quilt
Adding Final Touches
Now that your doll quilt is complete, it’s time to add those final touches to make it truly special. Here are a few ideas to consider:
- Label your Quilt: Create a personalized label for your doll quilt to mark it as your own. You can include your name, the date of completion, and any other details you wish to add. Sew it onto the back of your quilt for a personal touch.
- Embellish with Embroidery: Add some hand embroidery to your quilt to enhance its beauty. You can stitch small designs, initials, or even a heartfelt message onto the fabric. Embroidery adds a unique and personalized element to your quilt.
- Quilt Care Instructions: Include a small care card with your doll quilt. This card can provide instructions on how to wash and care for the quilt, ensuring it stays in great condition for years to come.
- Trim the Threads: Take a few moments to trim any loose threads that may be sticking out from your quilt. This detail will give your quilt a clean and polished look.
- Hang or Display: Consider hanging your doll quilt on a wall or displaying it on a quilt rack or stand. This way, you can enjoy your beautiful creation and showcase it as a work of art.
- Share Your Quilt: Gift your doll quilt to a loved one or donate it to a charity or local organization. Sharing your quilt brings joy to others and allows them to appreciate your craftsmanship.
Remember, these final touches are all optional and can be customized to suit your personal preferences and the intended use of your doll quilt. Enjoy the process of adding these final touches, and get ready to proudly display or gift your completed quilt.
As you can see, making a doll quilt is a creative and rewarding project. Whether you’re a beginner or an experienced quilter, creating a doll quilt allows you to practice your skills, experiment with fabric combinations, and achieve a delightful finished piece. So gather your materials, embrace your creativity, and make a charming doll quilt that will bring joy for years to come!
Congratulations on completing your doll quilt! Enjoy the process and take pride in your beautiful creation. Happy quilting!
Conclusion
Congratulations! You have successfully completed your journey of making a doll quilt. Through careful fabric selection, precise cutting, meticulous piecing, and thoughtful finishing touches, you have created a beautiful and cherished piece of art. The time and effort you put into your quilt have resulted in a unique and personalized creation that will be treasured for years to come.
Quilting is not just about stitching fabrics together; it’s a journey of self-expression, creativity, and patience. As you immersed yourself in this project, you gained valuable skills, learned new techniques, and discovered the joy of creating something with your own hands.
But this journey doesn’t have to end here. Now that you have mastered the art of making a doll quilt, you can explore new quilt patterns, experiment with different fabric combinations, and dive into more complex and intricate designs. Quilting offers endless possibilities, and each new project allows you to grow and refine your skills even further.
Remember to embrace your unique style and inject your personality into every quilt you make. Whether you choose bold colors, traditional designs, or contemporary patterns, let your quilts reflect your personal flair and artistic vision.
Lastly, quilting is not just a solitary pursuit; it fosters community and connection. Share your quilts with others, gift them to loved ones, or donate them to those in need. Your quilts have the power to bring warmth, comfort, and joy to others, creating lasting memories and treasured heirlooms.
So, gather your materials, ignite your creativity, and embark on your next quilting adventure. With each stitch, you’ll continue to create beautiful quilts and leave a lasting legacy of your passion and talent. Happy quilting!
Frequently Asked Questions about How To Make A Doll Quilt
Was this page helpful?
At Storables.com, we guarantee accurate and reliable information. Our content, validated by Expert Board Contributors, is crafted following stringent Editorial Policies. We're committed to providing you with well-researched, expert-backed insights for all your informational needs.


0 thoughts on “How To Make A Doll Quilt”