Articles
How To Make A Crazy Quilt
Modified: January 5, 2024
Learn the art of creating stunning crazy quilts with our collection of informative articles. Discover various techniques and tips to perfect your quilting skills and create unique masterpieces.
(Many of the links in this article redirect to a specific reviewed product. Your purchase of these products through affiliate links helps to generate commission for Storables.com, at no extra cost. Learn more)
Introduction
Crazy quilting is a unique and visually stunning form of quilting that allows for creative expression and experimentation. Unlike traditional quilting, which follows a structured pattern, crazy quilts are made up of irregularly shaped fabric pieces joined together in a collage-like fashion. This style of quilting became popular in the late 19th century and has continued to captivate quilters and crafters for generations.
In this article, we will explore the art of creating a crazy quilt and guide you through each step of the process. From selecting fabrics and piecing them together to adding decorative stitches and embellishments, you will learn how to bring your own unique vision to life. So, grab your sewing supplies and let’s dive into the world of crazy quilting!
Key Takeaways:
- Unleash Your Creativity: Crazy quilting offers a unique and visually stunning way to express yourself through fabric, stitches, and embellishments. Embrace the freedom to experiment and create a one-of-a-kind masterpiece.
- Personalized Masterpiece: With a mix of fabrics, decorative stitches, and embellishments, each crazy quilt becomes a reflection of its creator. Enjoy the journey of creating a visually captivating and deeply meaningful work of art.
Read more: How To Make A Quilt
Materials Needed
Before you can begin creating your own crazy quilt, it’s important to gather all the necessary materials. Here’s a list of items you’ll need:
- Fabric: Choose a variety of fabrics in different colors, patterns, and textures. Look for fabrics that inspire you and complement each other. Consider using scraps from previous projects or repurposing old garments for a personal touch.
- Foundation Fabric: This fabric will serve as the base for your crazy quilt blocks. Use a sturdy fabric such as muslin or cotton canvas.
- Backing Fabric: Select a fabric for the back of your quilt. This will provide stability and protect your stitches.
- Batting: Choose a batting that suits the desired level of warmth and loft for your quilt. Cotton, polyester, or wool batting are common options.
- Needles: Have a variety of needles on hand, including hand sewing needles and embroidery needles. Different needle sizes are useful for different stitches and fabrics.
- Thread: Use high-quality sewing threads in various colors to match your fabrics and add visual interest to your quilt.
- Embroidery Floss: This is optional but can be used for decorative stitching and embellishments. Choose floss in colors that coordinate with your fabrics.
- Scissors: Invest in sharp fabric scissors for cutting fabric and thread. Additionally, have an embroidery scissors with pointed ends for trimming and precision cutting.
- Pins: Use sharp pins to hold fabric pieces in place while sewing.
- Marking Tools: Have fabric marking tools, such as fabric pencils or chalk, to mark guidelines on your quilt blocks.
- Embellishments: Consider adding beads, buttons, ribbons, lace, or other trims to further enhance your crazy quilt designs.
- Sewing Machine: While not necessary, a sewing machine can speed up the piecing process if you prefer machine stitching over hand stitching.
Having these materials readily available will ensure a smooth and enjoyable quilting experience. Now that you’ve gathered your supplies, let’s move on to selecting fabrics for your crazy quilt!
Choosing Fabrics
When it comes to choosing fabrics for your crazy quilt, the possibilities are endless. It’s an opportunity to unleash your creativity and experiment with different colors, patterns, and textures. Here are some tips to help you navigate through the fabric selection process:
- Color Palette: Decide on a color scheme or palette that will set the tone for your quilt. You can go for a harmonious palette using colors from the same family, or create contrast by combining complementary colors.
- Patterns and Textures: Mix and match fabrics with different patterns and textures to add visual interest to your crazy quilt. Consider using florals, stripes, plaids, geometric designs, or even fabrics with novelty prints.
- Scale and Proportion: Pay attention to the scale of the patterns on your fabrics. Combine fabrics with varying pattern sizes to create depth and balance in your quilt blocks.
- Fabric Weight: Select fabrics with different weights and textures to add dimension to your quilt. Lightweight fabrics can create a delicate and airy feel, while heavier fabrics can add structure and weight.
- Contrasting Elements: Incorporate fabrics with contrasting elements, such as shiny satin against rough textured fabric or smooth silk against a coarser material. This contrast can create a visually striking effect.
- Personal Meaning: Consider using fabrics that hold personal meaning to you, like fabrics from clothing that have sentimental value or fabrics that reflect your hobbies or interests. These personal touches make your crazy quilt even more special.
Remember, there are no strict rules when it comes to choosing fabrics for crazy quilting. It’s all about expressing your individuality and creating a visually captivating design. Mix and match fabrics that spark joy and inspire your creativity.
Once you have gathered your selected fabrics, it’s time to move on to the next step: cutting and piecing them together to create the blocks for your crazy quilt.
Cutting and Piecing
Now that you have your fabric selection ready, it’s time to cut and piece the fabrics together to create the blocks for your crazy quilt. Here’s a step-by-step guide:
- Prepare Your Foundation Fabric: Start by cutting your foundation fabric into blocks of desired sizes. You can choose uniform-sized blocks or experiment with different shapes and sizes for a more eclectic look.
- Cut Fabric Pieces: Using your chosen fabrics, cut irregularly shaped pieces that will fit within the boundaries of your foundation fabric blocks. Don’t worry about making perfect shapes or sizes – the charm of crazy quilting lies in the randomness and uniqueness of each piece.
- Arrange and Layer: Lay the fabric pieces on top of your foundation fabric blocks, experimenting with different arrangements until you achieve a pleasing composition. Overlap the fabric pieces, leaving space between them for decorative stitches and embellishments.
- Pin and Sew: Pin the fabric pieces in place, then begin stitching them onto the foundation fabric using a basic running stitch or any other stitch of your choice. While hand stitching is traditionally used in crazy quilting, you can also use a sewing machine for faster and more precise stitching.
- Continue Piecing: Repeat the process of cutting, arranging, pinning, and sewing fabric pieces until your entire foundation fabric block is covered. Remember to leave some spaces for decorative stitches and embellishments.
- Trim Excess Fabric: Once your fabric pieces are securely attached, trim any excess fabric that extends beyond the edges of your foundation fabric block. This will give your quilt a neat and polished appearance.
Don’t be afraid to experiment with different layouts and combinations of fabrics. Let your creativity guide you as you piece together your crazy quilt blocks. The beauty of this quilting style is that there are no rules or restrictions, so embrace the freedom to create something truly unique.
With your crazy quilt blocks complete, it’s time to move on to the next step: assembling the blocks to form your quilt top.
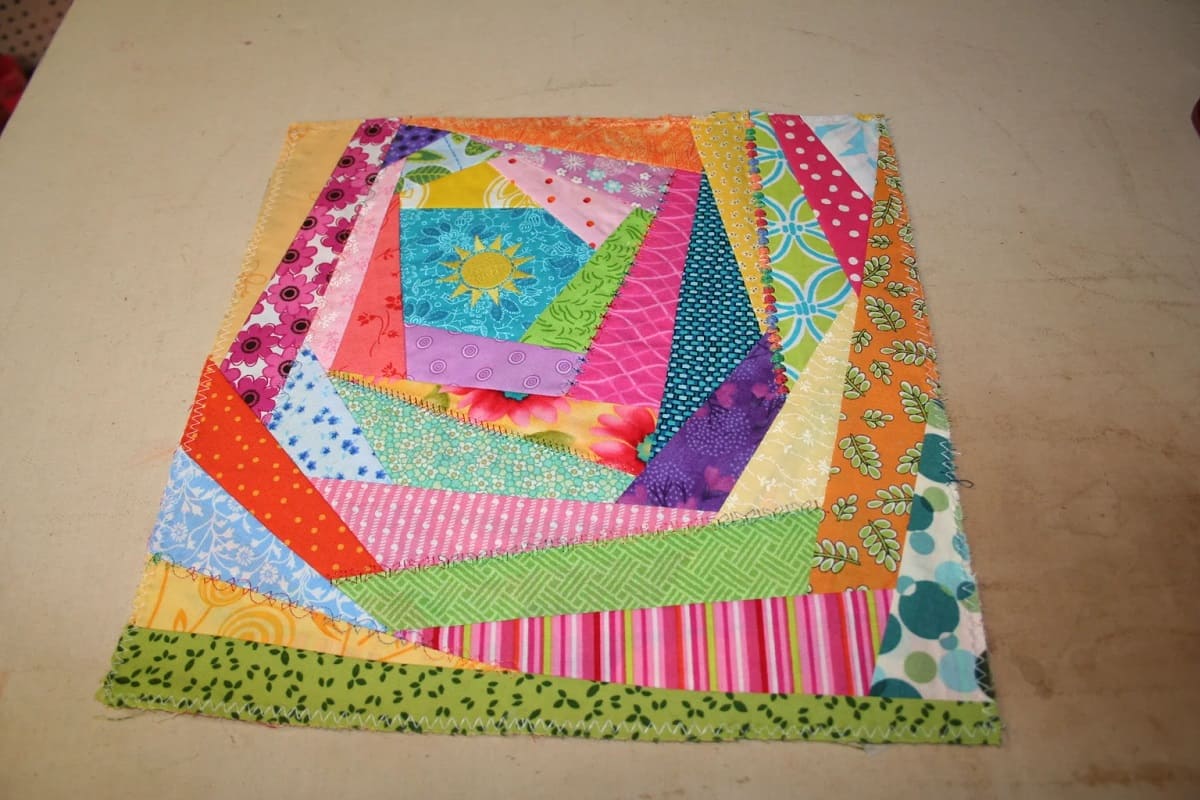
When making a crazy quilt, use a variety of fabric textures and colors to create a visually interesting and unique design. Be sure to also incorporate decorative stitching and embellishments for added flair.
Assembling the Blocks
Now that you have finished piecing your crazy quilt blocks, it’s time to assemble them and create your quilt top. This step requires some planning and organization to ensure a cohesive and visually pleasing design. Follow these steps to assemble your quilt:
- Lay Out the Blocks: Start by laying out your quilt blocks on a flat surface. Experiment with different arrangements and orientations until you find a layout that appeals to you. Take into consideration the colors, patterns, and textures of each block to create a balanced and harmonious composition.
- Organize the Blocks: Once you’re satisfied with the layout, number or label each block to keep track of the order in which they will be sewn together. This will make the assembly process easier and prevent any confusion later on.
- Join the Blocks: Starting with the first two blocks, place them right sides together and pin along one edge. Sew a straight seam using a ¼ inch seam allowance. Repeat this process for all the remaining blocks, joining them together in the designated order.
- Press the Seams: After each seam is stitched, press the seam allowances in the desired direction. Pressing the seams open or towards one side will depend on your personal preference and the weight of the fabrics used.
- Continue Joining Blocks: Repeat the process of joining blocks and pressing the seams until all the blocks are sewn together, forming the quilt top. Take your time to ensure accuracy and neatness in your seams.
It’s important to note that crazy quilts don’t have to be perfectly square or rectangular. Embrace the irregular shapes and sizes of your blocks, as they add to the charm and uniqueness of the finished quilt.
Once your crazy quilt top is assembled, it’s time to add decorative stitches and embellishments to enhance its beauty. Let’s explore the next step: embellishments and decorative stitches.
Read more: How To Make A Quilt Larger
Embellishments and Decorative Stitches
One of the most exciting aspects of creating a crazy quilt is the opportunity to embellish it with decorative stitches and add unique embellishments. These elements will elevate your quilt to a whole new level of creativity and beauty. Here’s how you can add embellishments and decorative stitches:
Decorative Stitches:
- Embroidery Stitches: Explore different embroidery stitches, such as the satin stitch, seed stitch, or French knot, to add texture and dimension to your quilt. Use embroidery floss that complements your fabric colors for a striking effect.
- Blanket Stitch: The blanket stitch is perfect for securing the edges of fabric pieces and adding a decorative border. You can use it to outline each block or create a beautiful border around the entire quilt.
- Crazy Quilt Stitches: Crazy quilting has its own set of stitches that are commonly used for embellishment. These include the herringbone stitch, feather stitch, and spider web stitch. Experiment with these stitches to create intricate patterns and designs.
- Machine Quilting: If you prefer machine stitching, consider using decorative machine stitches to quilt your crazy quilt. Play around with different stitch patterns and thread colors to add visual interest to your quilt top.
Embellishments:
- Beads and Sequins: Adding beads and sequins can create a luxurious and sparkling effect on your quilt. Select beads and sequins in various colors, sizes, and shapes to reflect your personal style.
- Ribbons and Lace: Incorporating ribbons and lace can add a touch of elegance to your quilt. Attach them along the seams or as decorative borders to enhance the overall design.
- Buttons: Buttons are versatile embellishments that can add both visual interest and functionality. Incorporate them as decorative accents or use them as fasteners for pockets or flaps on your quilt.
- Trims and Appliques: Explore the use of trims, such as ric rac, braids, or pom-poms, to add a whimsical touch to your quilt. Additionally, consider using fabric appliques to depict images or create focal points.
Remember, the choice of embellishments and decorative stitches is a personal one. Let your creativity shine through by adding elements that speak to your unique style and preferences.
With the embellishments and decorative stitches in place, your crazy quilt is almost complete. Let’s move on to the final step: adding the finishing touches to bring your quilt together.
Finishing Touches
As you near the completion of your crazy quilt, it’s time to add the finishing touches that will give your quilt a polished and professional look. Here are some important steps to consider:
- Trim Excess Threads: Carefully trim any loose threads or stray fibers on both the front and back of your quilt. This simple step will ensure a clean and neat appearance.
- Add Batting and Backing: Layer your quilt top with batting for warmth and loft, and a backing fabric for stability. Baste the layers together with safety pins or use temporary adhesive spray to hold them in place.
- Quilting: Quilt your crazy quilt by stitching through all layers – the quilt top, batting, and backing fabric – to secure them together. You can choose to hand quilt using traditional stitches or opt for machine quilting for a quicker finish.
- Bind the Edges: To complete your quilt, bind the edges. Cut binding fabric into strips, fold and press them in half lengthwise, and then sew them onto the quilt’s outer edges. Hand stitch the folded edge of the binding to the back of the quilt for a clean finish.
Once you’ve completed these final steps, your crazy quilt will be ready to be admired and cherished. Take a moment to appreciate the beauty and uniqueness of your creation.
Remember, the process of creating a crazy quilt is as much about the journey as it is about the final product. Enjoy the freedom to experiment, express yourself creatively, and let your imagination run wild. Each crazy quilt is a reflection of its creator, making it a truly special and personalized work of art.
Now that you’ve learned how to make a crazy quilt, it’s time to gather your materials, unleash your creativity, and embark on this exciting quilting adventure. Enjoy the process and have fun creating your very own masterpiece!
Happy quilting!
Conclusion
Crazy quilting is a captivating and versatile form of quilting that allows for endless creativity and personal expression. Through the process of selecting fabrics, cutting and piecing, adding decorative stitches and embellishments, and applying finishing touches, you can create a unique and visually stunning crazy quilt that is a true reflection of your individuality.
Throughout this article, we have explored the materials needed for crazy quilting, discussed how to choose fabrics that inspire and complement each other, guided you through the process of cutting and piecing the fabric pieces together, and provided insights on adding decorative stitches and embellishments to your quilt. We have also highlighted the importance of the finishing touches that will give your quilt a polished and professional appearance.
While following the techniques mentioned in this article can guide you in creating a beautiful crazy quilt, it’s important to remember that the true beauty lies in embracing your own creativity and making the quilt uniquely yours. Dare to experiment with different fabrics, stitches, and embellishments, and let your inspiration guide you.
Crazy quilting is not just a craft, but an artistic expression that tells a story. It allows you to incorporate special fabrics with sentimental value, add personal touches, and create a quilt that holds deep meaning for you and your loved ones.
So, gather your sewing supplies, explore your fabric stash, let your imagination soar, and immerse yourself in the joy of creating a one-of-a-kind crazy quilt. Enjoy the process, celebrate your creativity, and proudly display your finished masterpiece for all to admire.
Happy quilting!
Frequently Asked Questions about How To Make A Crazy Quilt
Was this page helpful?
At Storables.com, we guarantee accurate and reliable information. Our content, validated by Expert Board Contributors, is crafted following stringent Editorial Policies. We're committed to providing you with well-researched, expert-backed insights for all your informational needs.


0 thoughts on “How To Make A Crazy Quilt”