Articles
How To Make A Strip Rag Quilt
Modified: February 24, 2024
Learn how to create a beautiful strip rag quilt with our informative articles. Discover tips, tricks, and step-by-step guides to make your quilting project a success.
(Many of the links in this article redirect to a specific reviewed product. Your purchase of these products through affiliate links helps to generate commission for Storables.com, at no extra cost. Learn more)
Introduction
Welcome to the wonderful world of quilting! If you have been searching for a fun and creative project to showcase your sewing skills, look no further than a strip rag quilt. This type of quilt is not only beautiful and functional but also beginner-friendly, making it the perfect project for those new to quilting.
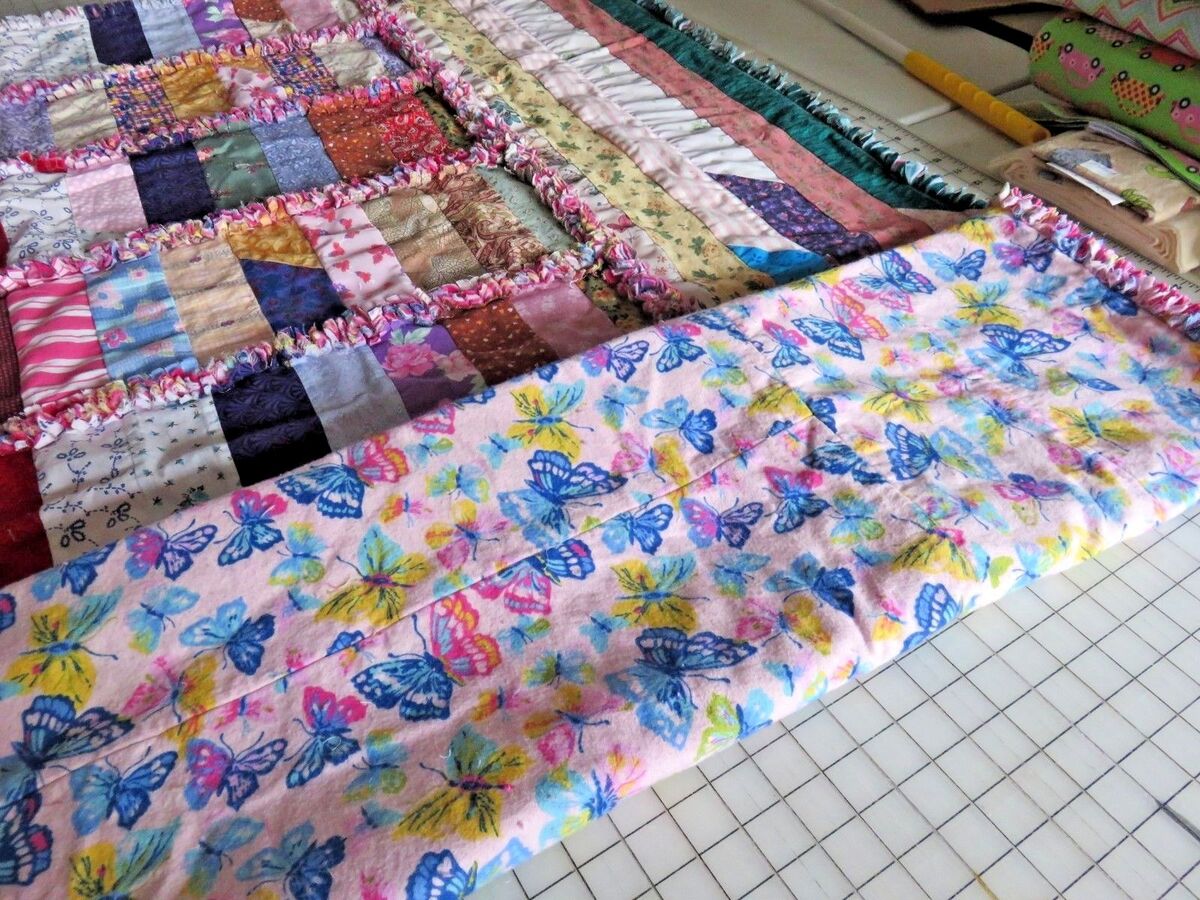
A strip rag quilt is a quilt made by sewing together fabric strips and then adding a layer of batting and a backing fabric. The magic happens when the raw edges of the fabric strips are left exposed and then frayed for a charming, rustic look once the quilt is washed and dried. This technique creates a cozy and textured quilt that is both visually appealing and soft to touch.
In this article, we will guide you through the step-by-step process of making a strip rag quilt. We will start by discussing the materials needed for the project and then delve into each stage of creating your quilt, from preparing the fabric strips to adding the finishing touches.
Whether you are a seasoned quilter looking for a new project or a beginner eager to dive into the world of quilting, this article will provide you with all the information you need to create your very own strip rag quilt. So, gather your supplies, dust off your sewing machine, and let’s get started on this exciting quilting adventure!
Key Takeaways:
- Dive into the world of quilting with a beginner-friendly strip rag quilt, combining creativity and sewing skills to create a cozy, textured, and visually appealing masterpiece.
- Personalize your strip rag quilt with fabric choices, patterns, and quilting techniques, and enjoy the satisfaction of creating a functional piece of art that can be cherished for years.
Read more: How To Make A Rag Quilt
Materials Needed
Before diving into the creation of your strip rag quilt, there are a few essential materials you will need. Here is a list of items you should gather before starting the project:
1. Fabric: Choose a variety of fabrics in different colors and patterns to create a visually interesting quilt. You will need enough fabric to cut into strips for the top layer of the quilt. As a general guideline, aim for at least 2 yards of fabric in total.
2. Batting: Select a soft and lightweight batting to provide warmth and structure to your quilt. The size of the batting should match the desired final dimensions of your quilt.
3. Backing Fabric: Choose a fabric for the backing of your quilt that complements the colors and design of the top layer. The size of the backing fabric should match the dimensions of the batting.
4. Sewing Machine: A sewing machine will be your primary tool for stitching the fabric strips together. Make sure your sewing machine is in good working condition and that you have the necessary accessories, such as needles and thread.
5. Rotary Cutter and Mat: A rotary cutter and self-healing cutting mat will make the process of cutting fabric strips much easier and more precise. These tools allow you to cut multiple layers of fabric at once.
6. Ruler: A clear quilting ruler with marked measurements is essential for accurately cutting fabric strips and ensuring straight lines in your quilt.
7. Scissors: In addition to the rotary cutter, you will need a pair of fabric scissors for cutting individual strips and trimming frayed edges.
8. Iron and Ironing board: Pressing the fabric strips and seams is crucial for achieving neat and professional-looking results. An iron and ironing board will be necessary for this task.
9. Pins or Clips: Pins or clips can be used to hold the fabric strips together during the sewing process, ensuring they stay aligned.
10. Seam Ripper: Mistakes happen, and a seam ripper will come in handy for removing stitches when needed.
11. Safety Pins: Safety pins are useful for basting the layers of the quilt together before quilting.
12. Washing Machine and Dryer: Lastly, a washing machine and dryer are essential for fraying the fabric edges and achieving the signature ragged look of the quilt.
By gathering these materials beforehand, you will have everything you need to begin creating your own beautiful strip rag quilt. Now that you have everything ready, let’s move on to the first step: Preparing the Fabric Strips.
Step 1: Preparing the Fabric Strips
In order to create a strip rag quilt, you will need to cut your fabric into long strips. The width and length of the strips can vary depending on your desired design. Here is a step-by-step guide on how to prepare the fabric strips:
- Choose the width of your fabric strips: Typically, the width of the fabric strips used in a strip rag quilt ranges from 2 to 4 inches. You can use a ruler and rotary cutter to achieve precise measurements.
- Prepare the fabric: Start by washing and ironing your fabric to remove any wrinkles and ensure that it shrinks before you begin cutting. This step is important to prevent the quilt from distorting after washing it later on.
- Cut the fabric strips: Lay your fabric flat on a cutting mat, aligning the edge of the fabric with the ruler. Use the rotary cutter to cut along the ruler, creating long, parallel strips. Repeat this process until you have enough fabric strips to cover the desired width of your quilt. Remember to cut enough strips to cover the entire length of the quilt as well.
- Vary the fabric designs: To add visual interest to your quilt, consider using a variety of fabric designs, colors, and patterns. Mixing prints and solids can create a dynamic and textured look.
- Trim the fabric strips: Once you have cut all the fabric strips, trim any uneven edges or excess fabric. This will ensure that all the strips are the same length and straight, making it easier to sew them together later on.
- Organize the fabric strips: Arrange your fabric strips in the desired order, taking into consideration the pattern and color placement. This step will help you visualize how your quilt will look once it is assembled.
By following these steps, you will have a collection of fabric strips ready to be sewn together for your strip rag quilt. Now that you have prepared the fabric strips, let’s move on to the next step: Sewing the Strips Together.
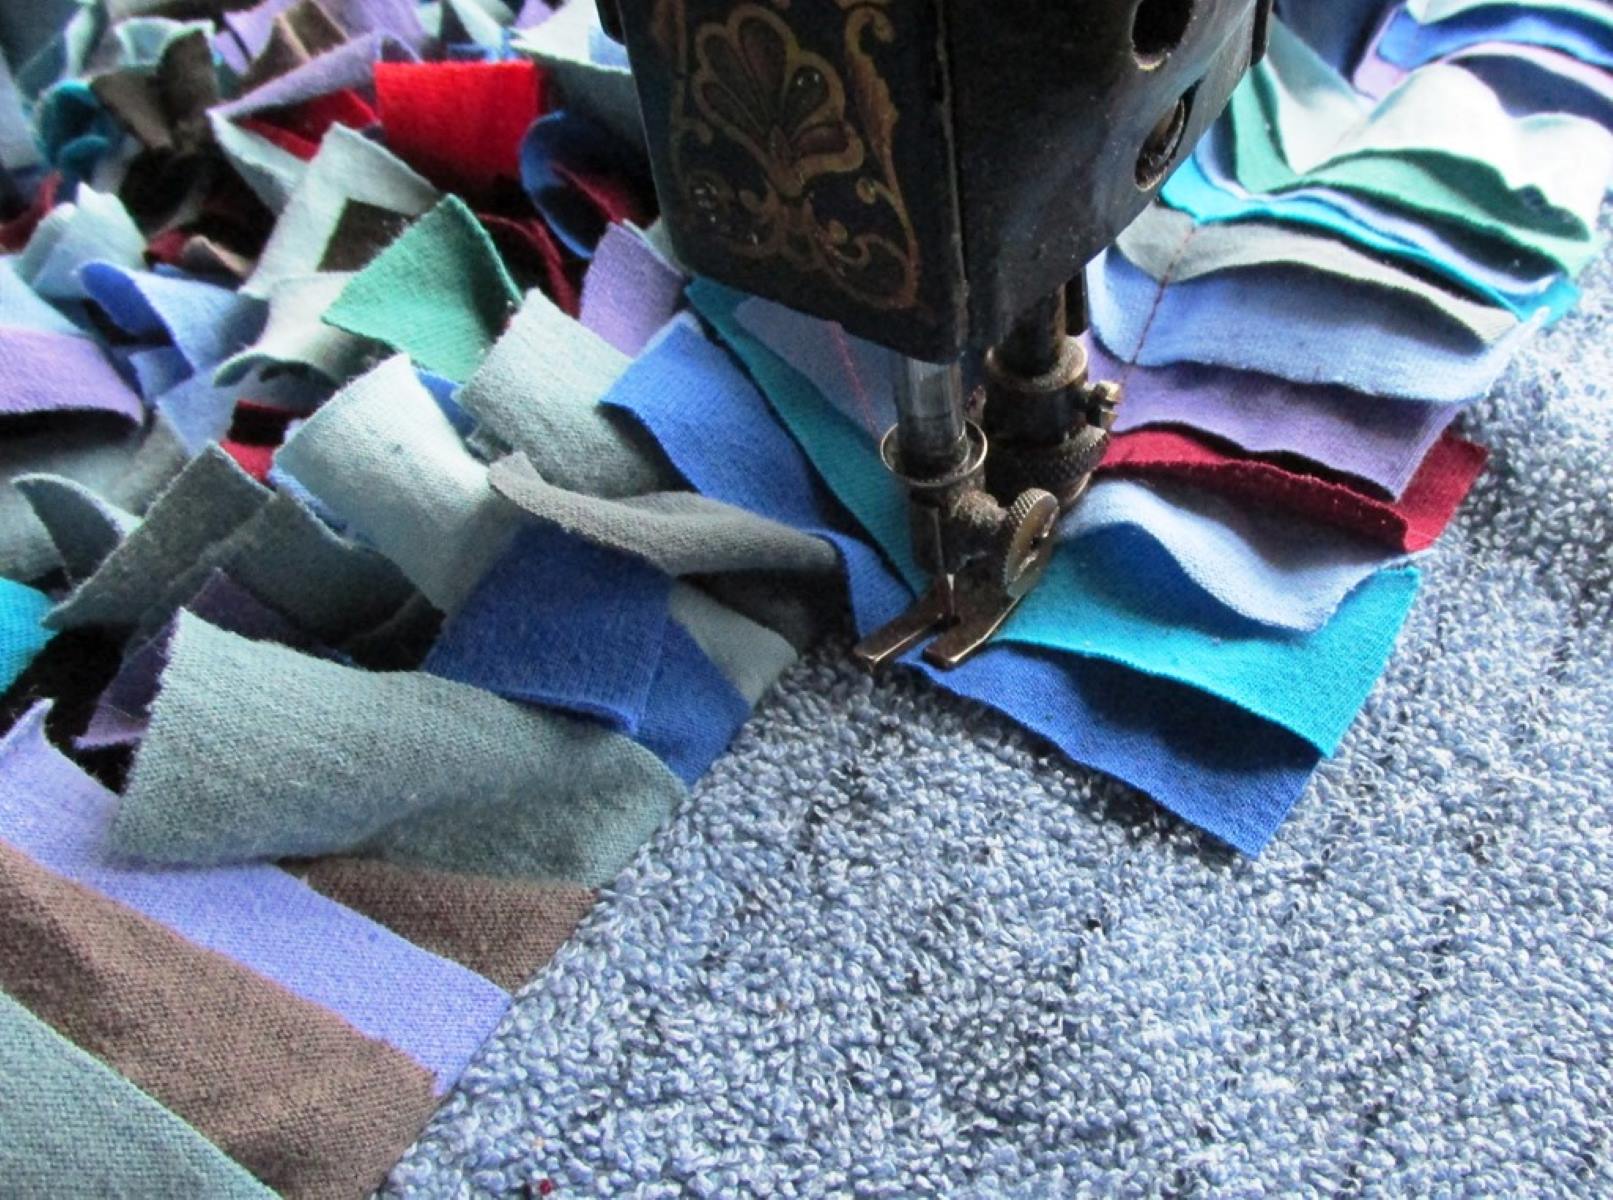
Step 2: Sewing the Strips Together
Once you have prepared your fabric strips, it’s time to sew them together to create the top layer of your strip rag quilt. This step involves joining the strips side by side to create long panels of fabric. Here’s a detailed guide on how to sew the fabric strips together:
- Lay out your fabric strips: Arrange your fabric strips in the desired order, ensuring that their edges are aligned. This is where your organized strip placement from the previous step will come in handy.
- Place the first two strips right sides together: Take the first two fabric strips and place them right sides together, with their raw edges aligned. Pin them in place to secure them for sewing.
- Sew a straight stitch: Using a 1/4-inch seam allowance, sew a straight stitch along the pinned edge to join the two fabric strips together. Backstitch at the beginning and end of the seam to secure the stitches.
- Press the seam open: After sewing the first two fabric strips together, press the seam open using an iron. This will help to create a flat and neat seam.
- Add more fabric strips: Continue adding fabric strips in the same manner, sewing them together and pressing the seams open as you go. Remember to align the strip edges and use pins to hold them in place before stitching.
- Check for straightness: Periodically check that your fabric strips are laying straight and not becoming twisted. If necessary, adjust the alignment and re-sew any seams that may have gone off track.
- Trim excess fabric: Once you have sewn all the fabric strips together, trim any excess fabric from the sides to create a smooth and even panel of fabric. This will also help to ensure that the quilt top is the desired size.
By following these steps, you will have successfully sewn your fabric strips together to create the top layer of your strip rag quilt. Take a moment to admire your beautiful fabric panel before moving on to the next step: Creating the Quilt Sandwich.
Step 3: Creating the Quilt Sandwich
Now that your fabric strips are sewn together, it’s time to create the quilt sandwich by layering the quilt top, batting, and backing fabric together. This step is essential for adding structure and warmth to your strip rag quilt. Follow these steps to create the quilt sandwich:
- Prepare the backing fabric: Lay your backing fabric flat, wrong side up, on a clean and spacious surface. Smooth out any wrinkles or folds using your hands or an iron.
- Place the batting on top of the backing fabric: Carefully place the batting on top of the backing fabric, ensuring that all the edges are aligned. Smooth out any wrinkles or bumps in the batting.
- Center the quilt top on the batting: Place your fabric strip panel (quilt top) on top of the batting, right side up. Center it so that there is an even amount of batting and backing fabric visible on all sides of the quilt top.
- Secure the layers: Pin or baste the layers together to hold them in place. You can use safety pins to secure the layers at regular intervals or choose to baste the layers using long stitches. This step will prevent them from shifting during the quilting process.
- Smooth out any wrinkles: Carefully smooth out any wrinkles or folds that may have formed during the layering process. This will ensure that your quilt is flat and even when it is finished.
Once you have completed these steps, you will have successfully created the quilt sandwich, consisting of the quilt top, batting, and backing fabric. The next step is to start quilting the layers together and giving your strip rag quilt its unique texture and charm. Let’s move on to Step 4: Quilting the Layers.
When making a strip rag quilt, be sure to prewash and dry your fabric to prevent uneven shrinkage. This will help ensure that your finished quilt maintains its shape and appearance.
Read more: How To Make A Denim Rag Quilt
Step 4: Quilting the Layers
Quilting is the process of stitching the layers of the quilt together, adding decorative patterns and ensuring that the quilt remains durable and long-lasting. In Step 4, you will learn how to quilt the layers of your strip rag quilt. Follow these steps to achieve beautiful and secure quilting:
- Choose a quilting method: There are several quilting methods you can choose from, including free-motion quilting, straight-line quilting, or simple outline quilting. Select a method that complements the design of your strip rag quilt and your personal preference.
- Select the quilting thread: Choose a thread that matches or complements the colors of your quilt top. Ensure that the thread is suitable for machine quilting and is strong enough to withstand the wear and tear of use.
- Set up your sewing machine: Prepare your sewing machine for quilting by attaching the appropriate quilting foot, adjusting the stitch length, and filling the bobbin with the chosen quilting thread.
- Start quilting: Begin quilting by securing the layers together at a starting point. You can do this by sewing a few reverse stitches or by using a locking stitch function if your machine has it.
- Follow your chosen quilting pattern: Quilt along the lines or patterns you have chosen, keeping your stitches even and consistent. Take your time and ensure that you are maintaining a steady speed as you move the quilt under the machine needle.
- Backstitch at the end: When you reach the end of a quilting line or pattern, backstitch a few stitches to secure the quilting. This helps to prevent unraveling over time.
- Continue quilting: Repeat the quilting process, moving across the quilt in a systematic manner. You can quilt in straight lines, create geometric patterns, or experiment with free-motion quilting to add your personal touch to the quilt.
- Trim the threads: After completing the quilting, trim any thread tails that may be sticking out from the quilt top or backing fabric for a clean and finished look.
With these steps, you have successfully quilted the layers of your strip rag quilt. The next step is to add the binding and give your quilt a polished and professional finish. Let’s move on to Step 5: Binding the Quilt.
Step 5: Binding the Quilt
Binding is the final step in creating a quilt, serving to enclose the raw edges and provide a finished look. In this step, you will learn how to add binding to your strip rag quilt. Follow these steps to complete the binding:
- Prepare the binding fabric: Cut strips of fabric for your binding, making sure they are wide enough to cover the raw edges of your quilt sandwich. A common width for binding strips is 2.5 inches.
- Calculate the length of binding needed: Measure the perimeter of your quilt sandwich, including all sides. Add a few extra inches to account for corners and overlap when joining the binding strips.
- Create the binding: Sew the binding strips together at a 45-degree angle to create one continuous strip. Trim the excess fabric and press the seams open or to one side.
- Attach the binding: Starting in the middle of one side of the quilt, align the raw edge of the binding strip with the raw edge of the quilt sandwich. Leave a small tail of binding at the beginning.
- Sew the binding: Using a 1/4-inch seam allowance, sew the binding to the quilt sandwich, securing the raw edges together. Stop sewing 1/4 inch away from the corner, backstitch, and then lift the presser foot.
- Miter the corners: Fold the binding strip up at a 45-degree angle to create a neat corner. Fold it back down, aligning the edge with the next side of the quilt, and continue sewing. Repeat this process for all four corners.
- Join the ends of the binding: When you reach the starting point, trim the excess binding, leaving enough to overlap with the tail. Open up the binding ends, and sew them together with a diagonal seam. Trim any excess fabric.
- Finish sewing the binding: Sew the remaining binding to the quilt, overlapping the stitching slightly. Backstitch to secure the ends.
- Wrap the binding: Fold the binding over the raw edges of the quilt sandwich to the backside. Pin or clip it in place.
- Hand-sew the binding: Using a blind stitch or slip stitch, hand-sew the binding to the back of the quilt, ensuring that the stitches are discreet and secure. Take care to catch only the backing fabric and not the quilt top.
Congratulations! You have successfully completed the binding process for your strip rag quilt. Now, there’s just one more step before you can enjoy your finished quilt. Let’s move on to Step 6: Finishing Touches.
Step 6: Finishing Touches
Congratulations on reaching the final step of creating your strip rag quilt! Step 6, the Finishing Touches, involves a few final steps to enhance the overall look and durability of your quilt. Follow these steps to complete your quilt:
- Trim the excess threads: Inspect your quilt for any loose threads and trim them using fabric scissors. Pay attention to both the front and back of the quilt, ensuring a clean and neat appearance.
- Clip the seams: Along the raw fabric edges, make small clips every 1/4 inch or so. Be careful not to cut through the stitching. These clips will help the fabric fray when the quilt is washed and dried.
- Wash and dry the quilt: Place your strip rag quilt in the washing machine on a gentle cycle with cold water. After washing, transfer it to the dryer and tumble dry on low heat. This will encourage the fraying of the fabric edges, giving your quilt that cozy, ragged appearance.
- Inspect for loose threads: Once your quilt is dry, carefully check for any loose threads or areas that need reinforcement. If necessary, use a needle and thread to secure any weak spots or loose edges.
- Enjoy your strip rag quilt: Your strip rag quilt is now complete! Find the perfect spot to showcase your creation and enjoy the cozy comfort it brings. Whether it’s snuggling up with a good book or adding warmth to your living room décor, your strip rag quilt is sure to be a cherished piece.
By following these final steps, you have put the finishing touches on your strip rag quilt. Take pride in your accomplishment and admire the unique texture and beauty of your handmade creation. Your quilt is now ready to be enjoyed for years to come!
Thank you for joining us on this quilting adventure. We hope you found this article helpful and that it inspired you to explore more projects in the world of quilting. Happy quilting!
Conclusion
Congratulations on completing your strip rag quilt! Through each step of this project, you’ve learned valuable techniques and skills that will carry over into future quilting endeavors. Your dedication and creativity have resulted in a beautiful and cozy quilt that is truly one-of-a-kind.
Creating a strip rag quilt is a wonderful way to express your creativity and showcase your sewing skills. The process of selecting fabrics, sewing them together, and adding the finishing touches is a labor of love that yields a quilt with a unique charm. The exposed and frayed edges give the quilt a rustic and textured look, while the layers of fabric provide warmth and durability.
Remember to personalize your strip rag quilt by playing with fabric choices, patterns, and quilting techniques. You can experiment with different colors, incorporate appliqué designs, or add intricate quilting motifs to make your quilt even more special.
Whether you’re a beginner or an experienced quilter, the strip rag quilt project is an enjoyable and satisfying endeavor. It allows you to tap into your creativity and create a functional piece of art that can be cherished for years. Plus, it makes for a thoughtful and heartfelt gift for loved ones.
As you continue on your quilting journey, don’t hesitate to explore different quilting techniques, patterns, and designs. Quilting is a versatile art form with endless possibilities, and each new project will offer you the chance to learn and grow as a quilter.
We hope that this article has provided you with a comprehensive guide to making a strip rag quilt. From preparing the fabric strips to quilting the layers and adding the finishing touches, you now have the knowledge and confidence to create your own strip rag quilt.
So, gather your materials, fire up your sewing machine, and embark on the exciting adventure of making a strip rag quilt. Let your imagination run wild and enjoy the process of creating something beautiful and meaningful.
Thank you for joining us on this quilting journey. Happy quilting!
Frequently Asked Questions about How To Make A Strip Rag Quilt
Was this page helpful?
At Storables.com, we guarantee accurate and reliable information. Our content, validated by Expert Board Contributors, is crafted following stringent Editorial Policies. We're committed to providing you with well-researched, expert-backed insights for all your informational needs.


0 thoughts on “How To Make A Strip Rag Quilt”