Articles
How To Cut Strips For A Quilt
Modified: August 22, 2024
Learn the step-by-step process of cutting strips for your quilt with our informative and detailed articles. Get expert tips and techniques for precise and beautiful quilting results.
(Many of the links in this article redirect to a specific reviewed product. Your purchase of these products through affiliate links helps to generate commission for Storables.com, at no extra cost. Learn more)
Introduction
Quilting is a beloved craft that combines creativity, precision, and comfort. Whether you’re a seasoned quilter or just starting out, one of the fundamental steps in quilt-making is cutting fabric into strips. These strips serve as the building blocks for various quilt patterns, adding vibrant colors and texture to the final design.
In this article, we will explore the art of cutting strips for a quilt. We will discuss the essential tools and materials you’ll need, and guide you through a step-by-step process to achieve precise and consistent strips. By the end, you’ll have the knowledge and confidence to cut strips with ease and accuracy, setting the foundation for your beautiful quilt creation.
Key Takeaways:
- Master the art of cutting fabric strips for quilts with precision and confidence. Select quality fabric, measure accurately, and use the right tools for a successful quilt-making journey.
- Embrace the creativity and attention to detail required for cutting fabric strips. From selecting the right fabric to trimming and storing, each step contributes to the beauty of your quilt.
Read more: How To Cut Triangles For A Quilt
Tools and Materials
Before diving into the process of cutting strips for a quilt, it’s important to gather the necessary tools and materials. Here’s a list of what you’ll need:
Rotary Cutter:
A rotary cutter is a must-have tool for quilt-making. It’s a handheld cutting device with a circular blade that provides precise and effortless cutting of fabric. Make sure to choose a rotary cutter with a comfortable grip and a sharp, replaceable blade.
Quilting Ruler:
A quilting ruler is a long, transparent ruler with measurement markings. It’s used to ensure accurate and consistent cutting of fabric strips. Look for a ruler that has clear lines and easy-to-read measurements, preferably with a non-slip backing to prevent shifting.
Self-Healing Cutting Mat:
A self-healing cutting mat is a thick, resilient mat designed to protect your work surface and extend the life of your rotary cutter blade. It’s important to choose a mat that is large enough for your fabric and has gridlines for precise measurement and alignment.
Read more: How To Cut Quilt Squares
Fabric:
Choose fabric that suits your quilt design. You can opt for pre-cut fabric strips or purchase fabric by the yard and cut your own strips. Keep in mind the desired width and length of the strips for your specific quilt pattern.
Fabric Scissors:
While a rotary cutter is the primary tool for cutting fabric strips, having a pair of sharp fabric scissors can be handy for small, intricate cuts or trimming loose threads.
Additionally, you may find the following tools helpful:
- Steam iron
- Ironing board or pressing surface
- Seam ripper
- Water-soluble fabric marker or chalk
- Pins or clips to secure fabric
With these tools and materials at hand, you’re ready to embark on the strip-cutting journey for your quilt project!
Step 1: Understanding Strip Cutting
Before you begin cutting fabric into strips for your quilt, it’s important to have a clear understanding of the concept of strip cutting. Strip cutting involves cutting long, narrow pieces of fabric that serve as the foundation for quilt blocks, borders, sashing, binding, and other design elements.
Here are a few key things to understand about strip cutting:
Strip Width:
The width of the strips you cut will depend on your quilt pattern and design. Common strip widths range from 1.5 inches to 3.5 inches. It’s essential to follow the pattern instructions or determine the desired width based on your design preferences.
Read more: How To Cut Backing For A Quilt
Seam Allowance:
When cutting fabric strips, it’s crucial to account for seam allowances. Typically, a quarter-inch seam allowance is used in quilting projects, meaning you’ll need to add an additional quarter-inch to the desired finished width of each strip. For example, if you want 2-inch finished strips, you’ll cut 2.5-inch-wide fabric strips.
Grainline:
The grainline of the fabric refers to the direction of the fabric threads. When cutting fabric strips, it’s important to cut along the lengthwise grain (parallel to the selvage edge) or the crosswise grain (perpendicular to the selvage edge) for optimal stability and minimal stretching.
Selvage Edge:
The selvage edge is the tightly woven edge of the fabric that runs parallel to the grainline. It often contains manufacturer information and is less flexible than the rest of the fabric. When cutting fabric strips, it’s recommended to trim off the selvage edge before cutting to ensure even and accurate strips.
By understanding these key concepts, you’ll be well-prepared to move on to the next step of cutting fabric strips for your quilt. Keep these principles in mind as you select fabric and measure for cutting, ensuring a successful and cohesive quilting project.
Step 2: Choosing and Preparing Fabric
Choosing the right fabric for your quilt is a crucial step in the quilt-making process. The fabric you select will determine the overall look, feel, and durability of your finished quilt. Here are some guidelines to help you choose and prepare your fabric for cutting strips:
Read more: How To Connect Cut LED Strips
Fabric Selection:
Consider the color scheme, pattern, and theme of your quilt when selecting fabric. Choose fabrics that complement each other and create a cohesive design. You can opt for solids, prints, or a combination of both, depending on your personal preferences and the desired outcome of your quilt.
Additionally, pay attention to the fabric’s quality. Ensure that the fabric is tightly woven and does not have any flaws or defects. This will ensure that your quilt stands the test of time.
Pre-Washing:
It’s recommended to pre-wash your fabric before cutting it into strips. This helps to remove any sizing, shrinkage, or excess dye that may affect the fabric’s color or shape. Follow the manufacturer’s instructions for pre-washing, which typically involves washing the fabric in cold water with a gentle detergent. After washing, dry the fabric on a low heat setting or air-dry it.
Pressing:
After pre-washing, iron your fabric to remove any wrinkles or creases. A well-pressed fabric allows for more accurate cutting and sewing. Use a steam iron on a low to medium setting, and be cautious not to stretch or distort the fabric while pressing.
Fabric Grain Alignment:
Before cutting your fabric into strips, ensure that the fabric grain is properly aligned. The lengthwise grain (parallel to the selvage) should be straight and perpendicular to the crosswise grain (perpendicular to the selvage). This ensures that your fabric strips have consistent tension and minimal stretching.
By carefully selecting and preparing your fabric, you’ll set the stage for successful strip cutting and a beautifully crafted quilt. Take the time to choose fabrics that you love and treat them with care, and your quilt will be a reflection of your creativity and attention to detail.
Read more: How Wide To Cut Binding For A Quilt
Step 3: Measuring and Marking
Measuring and marking accurately is crucial when cutting fabric strips for your quilt. Consistent measurements ensure that your strips are the correct size and align correctly, resulting in a well-crafted quilt. Follow these steps to measure and mark your fabric:
Step 1: Determine Strip Width
Refer to your quilt pattern or design to determine the desired width of your fabric strips. Consider the seam allowance and add the necessary additional width, as discussed in the previous step. For example, if your pattern calls for 2-inch finished strips with a quarter-inch seam allowance, your fabric strips’ initial width should be 2.5 inches.
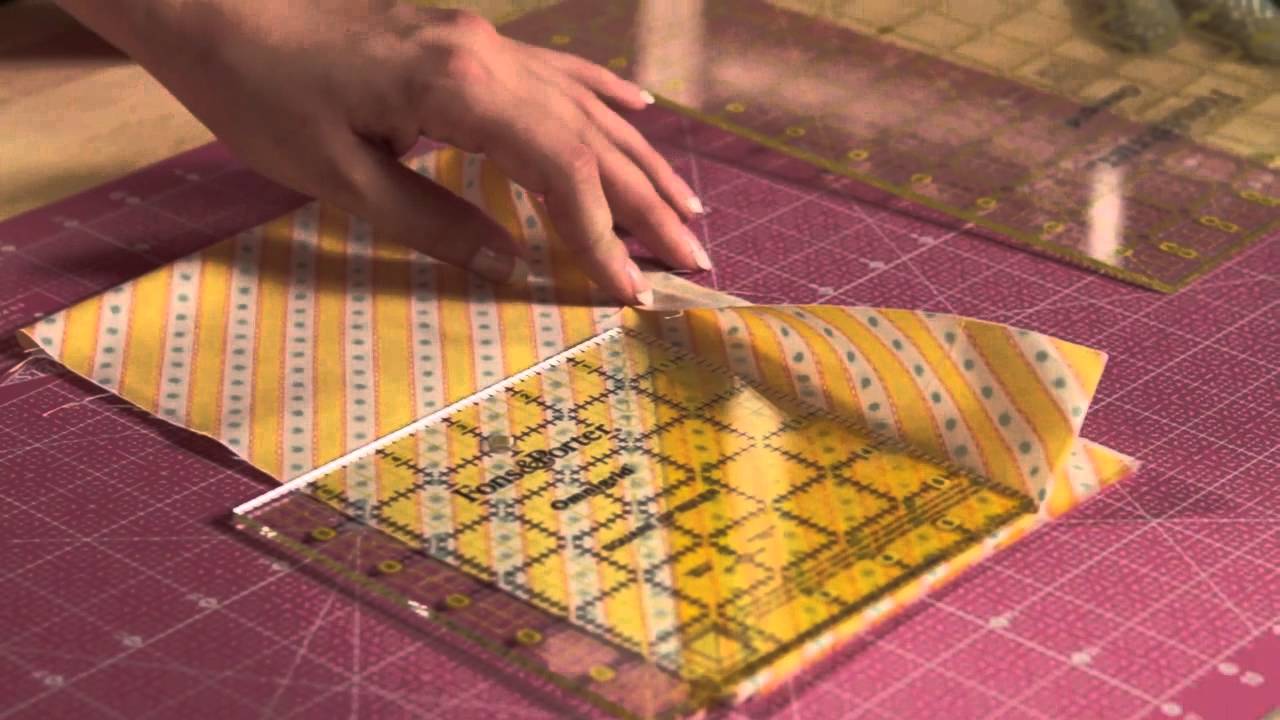
Step 2: Use a Quilting Ruler
Place your fabric on a self-healing cutting mat, ensuring that it is flat and smooth. Using a quilting ruler, align the ruler’s edge with the selvage edge or the straight, properly aligned grainline of the fabric. The ruler should have clear measurements and lines to facilitate accurate marking and cutting.
Step 3: Measure and Mark the Strips
With the ruler in place, measure and mark the fabric at the desired width of your strips. Use a fabric marker or chalk that is easily visible but can be easily removed later. Make sure to mark along the entire length of the fabric strip to maintain consistency.
Read more: How To Machine Quilt A Large Quilt
Step 4: Repeat for Additional Strips
If your quilt requires multiple strips of the same width, repeat the measuring and marking process for each strip. Take care to align the ruler and measure accurately each time to ensure uniformity in strip widths.
Step 5: Mark Cutting Lines
In addition to marking the strip width, consider marking cutting lines if you plan to cut your fabric into shorter lengths later. This will help maintain accuracy and ease during the cutting process.
Remember, precise measuring and marking are essential to the success of your quilt project. Take your time, double-check your measurements, and mark your fabric with care. Doing so will ensure that your fabric strips are cut accurately and ready for the next step in the quilting process.
Step 4: Cutting the Strips
With your fabric measured and marked, it’s time to move on to cutting the fabric into strips. This step requires precision and attention to detail to ensure that your strips are straight and consistent in width. Follow these steps to cut your fabric strips:
Step 1: Position Fabric on Cutting Mat
Place your fabric on a self-healing cutting mat, ensuring that it is flat and aligned with the markings. Smooth out any wrinkles or folds to keep the fabric stable during the cutting process.
Read more: How To Quilt A Jelly Roll Race Quilt
Step 2: Align Ruler and Fabric
Take your quilting ruler and align the edge with the marked line indicating the width of your strips. Ensure that the ruler is securely in place and does not shift during cutting.
Step 3: Use Rotary Cutter
Hold the rotary cutter firmly and align it with the edge of the ruler. Apply gentle pressure and smoothly cut along the ruler’s edge to create your fabric strip. Take care to make a clean, straight cut, and avoid any slanting or jagged edges.
Read more: How To Machine Quilt A Large Quilt
Step 4: Repeat for Additional Strips
If you need to cut multiple strips of the same width, slide your ruler along the fabric, aligning it with the next marked line. Repeat the cutting process for each strip, ensuring that they are all the same width.
Step 5: Trim Selvage and Excess Fabric
Once you have cut your desired number of fabric strips, you may need to trim off any selvage edges or excess fabric. Carefully use scissors or a rotary cutter to trim any uneven edges and ensure that all your fabric strips are neat and uniform.
Remember, accuracy is key when cutting fabric strips for your quilt. Take your time, double-check your measurements and alignments, and make clean cuts. By doing so, you’ll create precise and consistent fabric strips that will contribute to a high-quality quilt.
Read more: How To Quilt Placemats
Step 5: Trimming and Storing
After cutting your fabric strips, it’s important to trim and store them properly to maintain their quality and organization. This final step ensures that your fabric strips are ready for use in your quilt and remain in good condition throughout the quilting process. Follow these steps to trim and store your fabric strips:
Step 1: Trim Excess Threads
Inspect each fabric strip for any loose threads or frayed edges. Use a pair of fabric scissors or a thread cutter to trim any excess threads and create clean edges. This will give your fabric strips a professional and tidy appearance.
Step 2: Check for Straightness
Ensure that each fabric strip is straight and free from any curving or waviness. If you notice any unevenness, gently tug on the fabric strip to straighten it. Additionally, check the edges of the fabric strip to make sure they are parallel and not jagged.
Step 3: Fold and Store
Once your fabric strips are trimmed and straightened, it’s time to store them properly. Fold each strip neatly, aligning the edges to create an even stack. You can fold them in half or roll them, depending on your personal preference and the available storage space.
Read more: How To Piece A Quilt
Step 4: Label and Organize
To make it easier to find specific fabric strips later on, consider labeling them. You can use small adhesive labels or sticky notes to mark the width and color of each fabric strip. This will help you stay organized and save time in the future when selecting strips for your quilt.
Step 5: Store in a Fabric Bin or Bag
To protect your fabric strips from dust, moisture, and sunlight, store them in a fabric bin or bag. These storage solutions will keep your strips organized, easily accessible, and in good condition for future use. Remember to store them in a cool and dry place to prevent any damage or fading.
By following these steps, you’ll ensure that your fabric strips are well-trimmed, neatly organized, and ready to be incorporated into your quilt. Taking the time to properly trim and store your fabric strips will make the quilting process more efficient and enjoyable.
Conclusion
Mastering the art of cutting fabric strips for a quilt is an essential skill for any quilting enthusiast. By following the steps outlined in this article, you can ensure that your fabric strips are accurately measured, marked, cut, trimmed, and stored. This attention to detail will contribute to the success of your quilt project and the overall quality of the finished piece.
Remember to use the proper tools, such as a rotary cutter, quilting ruler, and self-healing cutting mat, to achieve precise and consistent cuts. Take the time to select and prepare your fabric, considering factors like color, pattern, and quality. Accurate measuring and marking are key to achieving the desired strip width, while proper alignment of the fabric grain will prevent stretching or distortion.
When it’s time to cut the fabric, ensure that your ruler is securely in place and make clean, straight cuts with your rotary cutter. Trim any excess threads and check for straightness before folding and storing your fabric strips in a labeled and organized manner.
Mastering the skill of cutting fabric strips for quilts may take time and practice, but with each project, you’ll gain confidence and improve your accuracy. So put your newly acquired knowledge into practice, get creative with your fabric selection, and embark on your next quilting adventure.
Now you’re ready to take your quilting skills to the next level and create stunning quilts with beautifully cut fabric strips. Enjoy the process, embrace your creativity, and let your imagination run wild as you design and stitch your delightful quilt!
Frequently Asked Questions about How To Cut Strips For A Quilt
Was this page helpful?
At Storables.com, we guarantee accurate and reliable information. Our content, validated by Expert Board Contributors, is crafted following stringent Editorial Policies. We're committed to providing you with well-researched, expert-backed insights for all your informational needs.


0 thoughts on “How To Cut Strips For A Quilt”