Articles
How To Make Cat Stairs
Modified: December 7, 2023
Find helpful articles and guides on how to make your own cat stairs. Create a safe and playful environment for your furry friend.
(Many of the links in this article redirect to a specific reviewed product. Your purchase of these products through affiliate links helps to generate commission for Storables.com, at no extra cost. Learn more)
Introduction
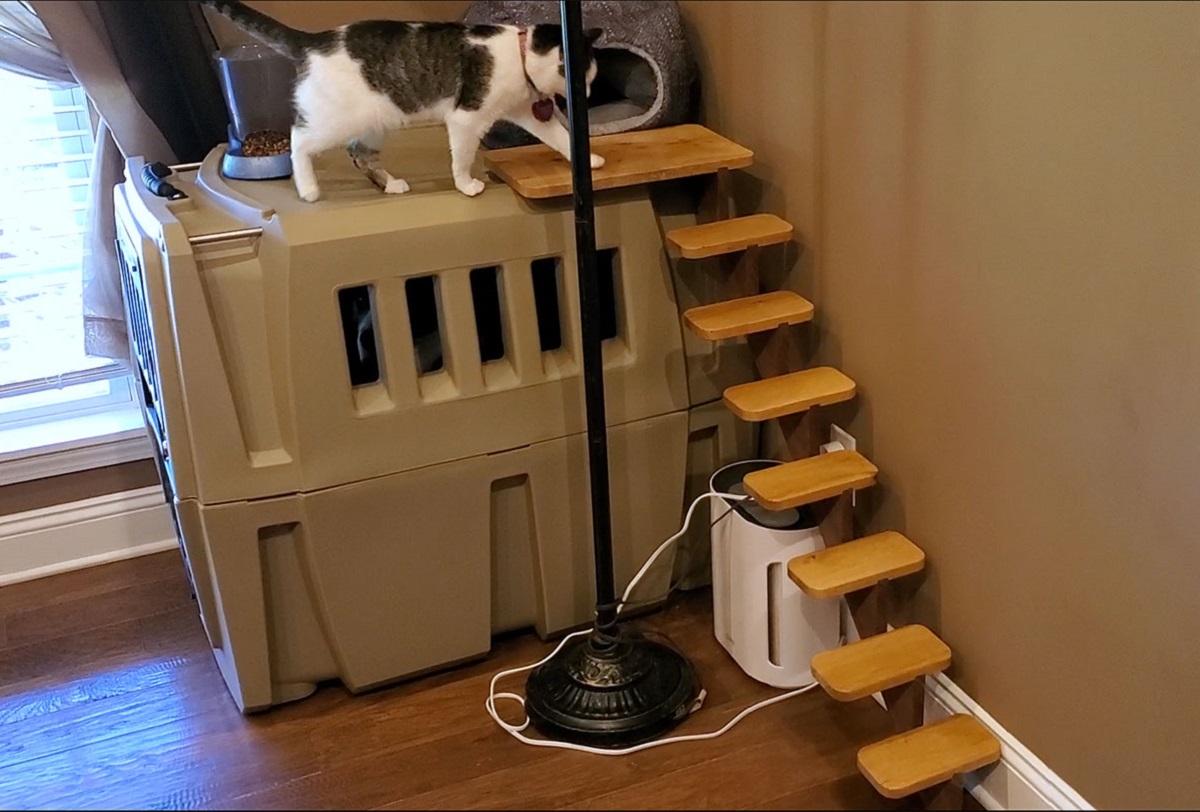
Creating a safe and comfortable environment for our feline friends is essential for their well-being and happiness. If you have multiple levels in your home or a high piece of furniture that your cat loves to climb onto, providing a set of cat stairs can make their life easier and prevent potential injuries. In this article, we will guide you through the process of making cat stairs from scratch, ensuring that they meet your cat’s needs and blend seamlessly with your home decor.
Cat stairs are more than just functional; they can also be a stylish addition to your home. Whether you have a playful kitten or an older cat who needs a little extra help getting around, these stairs will provide them with a safe and convenient way to reach their favorite spots without jumping or straining.
Not only will cat stairs improve the overall quality of your cat’s life, but they also offer numerous benefits for you as a pet owner. By giving your cat a designated route to access higher surfaces, you can prevent them from climbing on furniture that may be off-limits or prone to damage. Additionally, cat stairs can help minimize the risk of injury, particularly for senior cats with arthritis or joint issues.
By following the steps outlined in this guide, you can create custom cat stairs that match your home’s aesthetics and accommodate your cat’s specific needs. These stairs can be made from various materials such as wood or carpet, providing a sturdy and comfortable pathway for your feline companion. So let’s gather the necessary materials and get started on building your very own set of cat stairs!
Key Takeaways:
- Create custom cat stairs to provide safe and stylish access for your feline friend, enhancing their mobility and preventing potential injuries. Balance functionality and aesthetics for a rewarding DIY project.
- Prioritize your cat’s safety and comfort by following step-by-step instructions to construct sturdy, personalized cat stairs that blend seamlessly with your home decor. Enjoy the satisfaction of creating a functional and visually appealing structure.
Read more: How To Block Cats From Stairs
Materials Needed
Before you begin building your cat stairs, it’s essential to gather all the necessary materials. Most of these items can easily be found at your local hardware store or online. Here’s a list of the materials you will need:
- Wood: Choose a sturdy and durable wood material such as plywood or pine boards. The amount of wood required will depend on the size and design of your cat stairs.
- Saw: A saw will be necessary to cut the wood to the desired dimensions. A hand saw or a power saw, such as a circular saw or a jigsaw, will do the job.
- Measuring Tape: Accurate measurements are crucial for creating well-fitted and safe cat stairs. Make sure to have a measuring tape on hand.
- Screws or Nails: You’ll need screws or nails to secure the different parts of the cat stairs. Choose the appropriate size depending on the thickness of the wood.
- Drill or Hammer: A drill or hammer will be required to insert the screws or nails into the wood.
- Carpet or Upholstery: To provide traction and comfort for your cat, consider using carpet or upholstery fabric to cover the steps of the cat stairs.
- Staple Gun or Adhesive: Depending on the chosen method, you may need a staple gun or adhesive to attach the carpet or fabric to the steps.
- Sandpaper: Sandpaper will help smooth any rough edges or surfaces on the wood, ensuring that the cat stairs are safe for your feline companion.
- Paint or Stain (optional): If you prefer to add a touch of color or protect the wood, consider using paint or stain according to your personal preference.
- Safety Equipment: Don’t forget to wear safety goggles and gloves to protect yourself during the construction process.
Once you have gathered these materials, you will be well-prepared to start building your cat stairs. It’s always a good idea to have everything organized and ready before beginning to ensure a smooth and efficient construction process.
Step 1: Measuring and Planning
Before you start cutting wood or assembling any parts, it’s crucial to take accurate measurements for your cat stairs. By doing so, you can ensure that they fit properly in your designated space and cater to your cat’s needs. Follow these steps to measure and plan your cat stairs effectively:
- Measure the height: Determine the total height from the floor to the desired landing spot. This measurement will help you determine the number of steps and the height of each step. The height of each step should be comfortable for your cat to easily climb without putting excessive strain on their joints.
- Measure the width: Measure the width of the space where you plan to install the cat stairs. This will help you determine the appropriate width for the steps and ensure they fit seamlessly into the area without causing any obstructions.
- Determine the number of steps: Divide the total height measured in step one by an ideal step height. The recommended step height is around 7-8 inches (18-20 cm). Round the number up to ensure each step is of sufficient height for your cat.
- Calculate the step depth: The step depth should be wide enough for your cat’s paws to comfortably rest on. Typically, a step depth of 10-12 inches (25-30 cm) is suitable. Multiply the step depth by the number of steps determined in the previous step to get the overall length of your cat stairs.
- Sketch the design: With all the measurements in hand, sketch out a design for your cat stairs. Visualize where each step will be, along with the overall structure and dimensions. This will serve as a guide during the construction process.
Taking accurate measurements and planning your cat stairs in advance will ensure that the final product is safe and appropriate for your cat’s needs. You can now move on to the next step of choosing the design that suits your style and preference.
Step 2: Choosing the Design
When it comes to cat stairs, there are various designs to choose from, depending on your preferences, available space, and your cat’s abilities. Consider the following factors when selecting the design for your cat stairs:
- Size and space: Take into account the available space where you plan to install the cat stairs. Consider the height, width, and depth of the area to ensure that the design you choose fits seamlessly within the designated space.
- Number of steps: The number of steps will depend on the height you measured in Step 1 – Measuring and Planning. Ensure that the selected design provides enough steps to comfortably reach the desired landing spot without putting excessive strain on your cat.
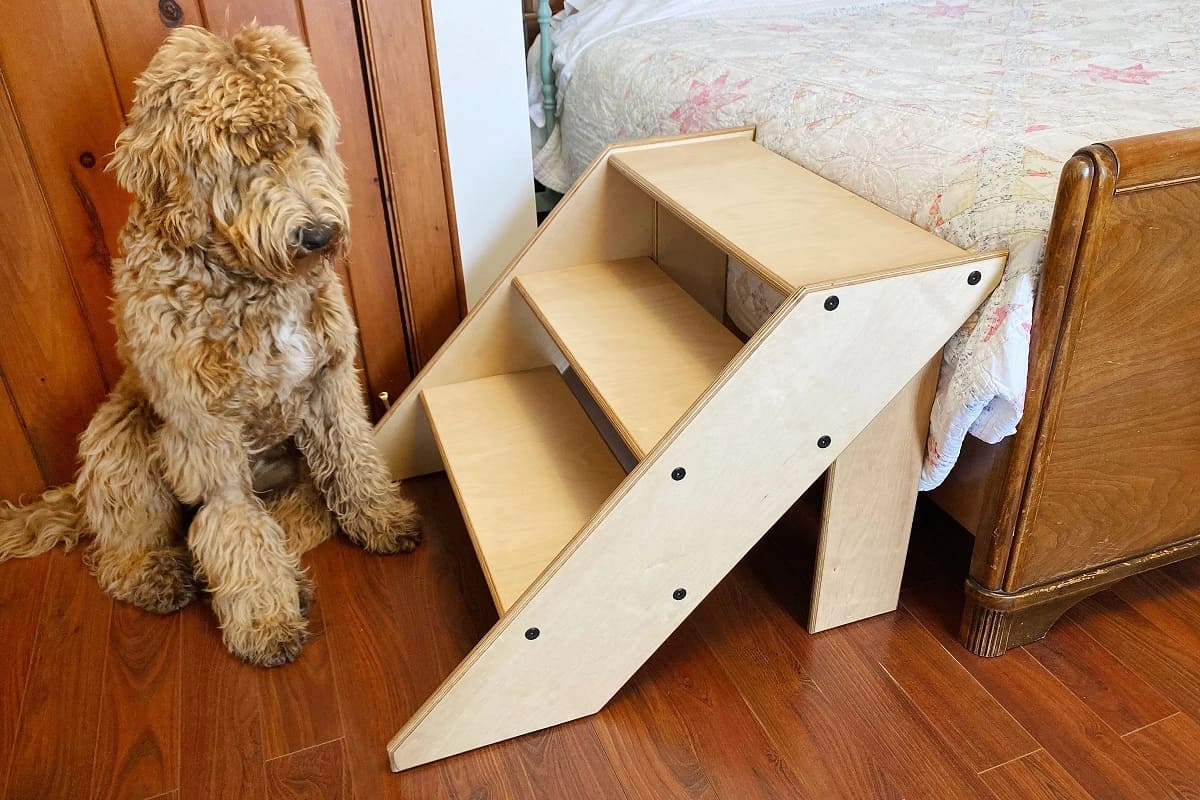
- Stair style: Cat stairs can be designed in various styles, including straight stairs, L-shaped stairs, or even spiral stairs. Consider your cat’s agility and preference when selecting the style. Older cats or cats with mobility issues may benefit from shallower steps or ramps.
- Material and aesthetics: Select a design that matches your home’s aesthetics and complements the existing furniture and decor. Cat stairs can be made from various materials such as wood, carpet, or upholstery fabric. Choose materials that are safe for your cat and easy to clean and maintain.
- Safety features: Ensure that the design you choose incorporates safety features such as non-slip surfaces on the steps. Adding carpet or traction pads to each step will provide your cat with the necessary grip to navigate the stairs confidently.
By considering these factors, you can choose a cat stair design that not only suits your preferences but also meets your cat’s needs. Once you have selected the design, you can move on to gathering and preparing the materials needed for the construction process.
Step 3: Gathering and Preparing Materials
Now that you have chosen the design for your cat stairs, it’s time to gather all the necessary materials and prepare them for construction. Here’s what you need to do in this step:
- Purchase the materials: Based on the design you have chosen, make a list of all the materials needed, including wood, screws or nails, carpet or upholstery fabric, and any other items specific to your design. Visit your local hardware store or order the materials online to ensure you have everything on hand.
- Double-check the measurements: Before proceeding, double-check all the measurements you took in Step 1 – Measuring and Planning. Ensure that the dimensions align with the chosen design and the available space. If necessary, make adjustments to the measurements to ensure everything fits perfectly.
- Cut the wood: Using a saw, carefully cut the wood pieces according to the measurements you have determined. Take your time and ensure that the cuts are precise and clean, as this will affect the overall stability and appearance of your cat stairs.
- Sand the wood: Use sandpaper to smooth any rough edges or surfaces on the wood pieces. This will help prevent your cat from getting splinters and ensure a safe and comfortable experience for them.
- Prepare the carpet or fabric: If you have chosen to cover the steps with carpet or upholstery fabric, now is the time to prepare it. Cut the carpet or fabric into appropriate sizes to fit each step. You can also consider using adhesive or a staple gun to secure the carpet or fabric in place.
Taking the time to gather and prepare all the materials properly will ensure a smoother construction process. By having everything ready and organized, you can proceed to the next step of building the base of your cat stairs.
Read also: 8 Best Cat Stairs For 2024
Step 4: Building the Base
Now that you have gathered and prepared all the necessary materials, it’s time to start building the base of your cat stairs. The base will provide stability and support for the steps, ensuring that your cat can climb up and down safely. Follow these steps to construct the base:
- Begin with the bottom step: Lay one of the cut wood pieces on the floor, ensuring it is positioned securely and evenly. This will serve as the bottom step of your cat stairs.
- Align the other steps: Place the remaining cut wood pieces on top of the bottom step, ensuring they are evenly spaced and aligned. Use a measuring tape to verify that the steps are level and positioned correctly.
- Attach the steps: Use screws or nails to secure each step to the one below. Make sure to countersink the screws or drive the nails flush with the wood surface to avoid any potential hazards.
- Reinforce the base: To add extra stability, consider adding support beams or brackets between each step. This will help distribute the weight evenly and prevent any wobbling of the cat stairs.
- Double-check the stability: Once all the steps and reinforcement are in place, double-check the stability of the base. Test it by gently applying pressure to ensure there is no excessive movement or instability.
By following these steps, you can construct a sturdy and reliable base for your cat stairs. This will serve as the foundation for the steps that your cat will climb on. With the base complete, it’s time to move on to the next step of constructing the steps themselves.
When making cat stairs, ensure that the steps are wide enough for your cat to comfortably climb and descend. Also, consider adding carpet or grip tape to the steps for better traction.
Step 5: Constructing the Steps
With the base of your cat stairs completed, it’s time to move on to constructing the steps. The steps are essential for your cat to climb up and down comfortably and safely. Follow these steps to construct the steps of your cat stairs:
- Measure and cut the step pieces: Use the measurements you determined earlier to cut the wood pieces for each step. Ensure that each step is the desired width and depth to accommodate your cat’s size and agility.
- Sand the step pieces: Take the time to sand each step piece to smoothen any rough edges or surfaces. This will provide a comfortable and safe surface for your cat to step on without any potential hazards.
- Align the steps: Place each step piece on top of the corresponding step on the base. Make sure they are evenly spaced and aligned with each other to create a consistent and visually pleasing staircase.
- Secure the steps: Use screws or nails to attach each step piece to the base. Ensure that they are securely fastened and countersink the screws or drive the nails flush with the wood surface for a neat and hazard-free finish.
- Add traction and comfort: If desired, attach carpet or upholstery fabric to each step to provide traction and comfort for your cat. Use adhesive or a staple gun to securely attach the material, making sure there are no loose edges that may pose a tripping hazard.
- Double-check the stability: Once all the steps are constructed and attached, double-check the stability and sturdiness of the cat stairs. Apply gentle pressure to each step to ensure that there is no wobbling or instability.
By following these steps, you can construct the steps of your cat stairs with ease. Keep in mind your cat’s size, agility, and comfort when determining the dimensions, and ensure that each step is secure and stable. With the steps complete, it’s time to move on to attaching them to the base in the next step.
Step 6: Attaching the Steps to the Base
Now that you have constructed the steps of your cat stairs, it’s time to attach them securely to the base. Attaching the steps properly is crucial for the stability and safety of the cat stairs. Follow these steps to securely attach the steps to the base:
- Position the steps: Carefully position each step on the corresponding spot on the base. Ensure that they are aligned and evenly spaced to create a visually appealing and functional staircase.
- Secure the steps: Use screws or nails to attach the steps to the base. Drive the screws or nails through the step and into the base, making sure they go in securely and countersinking or driving them flush with the surface.
- Reinforce the attachment: To enhance the stability, consider adding additional screws or nails from the sides of the steps into the base. This will strengthen the connection between the steps and the base, minimizing any wobbling or movement.
- Double-check the stability: Once all the steps are securely attached to the base, double-check the stability of the cat stairs. Apply gentle pressure to each step to ensure that they are secure and there is no excessive movement.
It’s important to ensure that each step is attached securely to the base to prevent any accidents or instability when your cat uses the stairs. Taking the time to properly attach the steps will provide a safe and reliable set of cat stairs for your furry friend to enjoy.
With the steps securely attached to the base, you’re one step closer to completing your cat stairs. The next step involves securing the stairs in place to ensure they remain steady when your cat is using them.
Step 7: Securing the Stairs in Place
To ensure the safety and stability of your cat stairs, it’s important to secure them in place. This step will prevent any accidental movement or shifting when your cat is using the stairs. Follow these steps to secure the stairs in place:
- Determine the placement: Decide where you want to position the cat stairs, whether it’s against a wall or near a piece of furniture. Ensure that the stairs are easily accessible for your cat and that there is enough space for them to climb up and down comfortably.
- Mark the position: Use a pencil or tape to mark the desired position of the cat stairs on the floor or against the wall. This will serve as a guide when securing the stairs in place.
- Attach the stairs to the wall or floor: Depending on the placement, you can use screws, brackets, or furniture straps to secure the cat stairs. Attach the stairs to the wall or floor using the appropriate hardware, making sure they are securely fastened and there is no wobbling or movement.
- Test the stability: After securing the stairs, give them a gentle shake or apply some pressure to ensure they are stable and firmly attached. If there is any movement, adjust the hardware or attachments to ensure a secure fit.
Securing the cat stairs in place is crucial to prevent any accidents or injuries. By taking the time to properly secure the stairs, you can provide a safe and reliable climbing structure for your cat to use without any concerns.
With the cat stairs securely in place, it’s time to move on to the final step: adding the finishing touches to make the stairs visually appealing and comfortable for your cat.
Read more: How To Make A Cat Hammock
Step 8: Adding Finishing Touches
In the final step of creating your cat stairs, you can add the finishing touches to enhance their appearance and make them more comfortable for your furry friend. Follow these steps to complete your cat stairs:
- Paint or stain (optional): If desired, you can paint or stain the cat stairs to match your home decor or give them a unique look. Ensure that the paint or stain you choose is pet-safe and will not cause any harm to your cat.
- Apply a protective coating (optional): To further protect the wood and ensure longevity, consider applying a clear protective coating such as varnish or polyurethane. This will help prevent scratches and wear over time.
- Add non-slip surfaces: To make the cat stairs safer for your cat, add non-slip surfaces to each step. You can use adhesive-backed traction pads or secure pieces of carpet or upholstery fabric that provide grip and prevent slipping.
- Decorate and personalize: Make the cat stairs more inviting and appealing by decorating them with cat-friendly toys, plants, or blankets. You can also personalize them with your cat’s name or add decorative elements that align with your home decor.
Adding the finishing touches to your cat stairs not only enhances their aesthetic appeal but also ensures the comfort and safety of your cat. By providing non-slip surfaces and personalizing the stairs, you create an inviting environment that your cat will be eager to explore and use.
With the final touches applied, take a step back and admire your completed cat stairs. You have created a functional, safe, and visually appealing structure that will make it easier for your cat to navigate your home and reach their favorite spots. Enjoy watching your cat enjoy their new stairs and savor the satisfaction of a job well done!
Remember to regularly check the cat stairs for any signs of wear or damage and make any necessary repairs or replacements to ensure they continue to provide a safe and comfortable climbing experience for your cat. Happy cats make happy homes!
Conclusion
In conclusion, creating cat stairs can greatly improve your feline companion’s quality of life by providing safe and easy access to elevated areas. By following the steps outlined in this guide, you can construct cat stairs that are tailored to your cat’s needs and blend seamlessly with your home decor. Let’s recap the key points covered in this article:
- Measuring and planning: Take accurate measurements of the space and determine the number of steps needed for your cat stairs.
- Choosing the design: Consider factors such as size, style, material, and safety features when selecting a design for your cat stairs.
- Gathering and preparing materials: Gather all the necessary materials and ensure they are properly prepared, including cutting and sanding the wood and preparing any desired covering material.
- Building the base: Construct a stable and sturdy base for the cat stairs to provide a solid foundation for the steps.
- Constructing the steps: Assemble the steps, ensuring they are evenly spaced and securely attached to the base.
- Attaching the steps to the base: Secure the steps to the base, reinforcing the attachment if necessary.
- Securing the stairs in place: Attach the cat stairs to the wall or floor to prevent any movement or instability.
- Adding finishing touches: Optional steps include painting or staining the stairs, applying a protective coating, adding non-slip surfaces, and personalizing the stairs.
By following these steps, you can create a custom set of cat stairs that provide convenience, safety, and comfort for your beloved feline friend. Remember, the key is to strike a balance between functionality and aesthetics, ensuring that the cat stairs meet both your cat’s needs and your personal style preferences.
Building your own cat stairs not only saves you money compared to store-bought options but also allows you to customize the design and materials to suit your specific requirements. Plus, the satisfaction and joy of creating something with your own hands are truly rewarding.
So, why wait? Start gathering your materials, measure and plan the design, and embark on this exciting DIY project to provide your cat with a safe and inviting way to explore their surroundings. Your feline companion will appreciate the enhanced mobility, and you’ll enjoy watching them confidently navigate their new cat stairs with ease.
Remember, always prioritize your cat’s safety and comfort throughout the construction process, and regularly inspect and maintain the cat stairs to ensure they remain in good condition. With a little bit of creativity and effort, you can create a functional and visually appealing set of cat stairs that will enrich your cat’s life and bring harmony to your home. Happy building!
Frequently Asked Questions about How To Make Cat Stairs
Was this page helpful?
At Storables.com, we guarantee accurate and reliable information. Our content, validated by Expert Board Contributors, is crafted following stringent Editorial Policies. We're committed to providing you with well-researched, expert-backed insights for all your informational needs.
0 thoughts on “How To Make Cat Stairs”