Articles
What Are Floating Stairs
Modified: October 20, 2024
Discover the beauty and functionality of floating stairs with our insightful articles. Explore different designs, installation techniques, and maintenance tips for this innovative architectural feature.
(Many of the links in this article redirect to a specific reviewed product. Your purchase of these products through affiliate links helps to generate commission for Storables.com, at no extra cost. Learn more)
Introduction
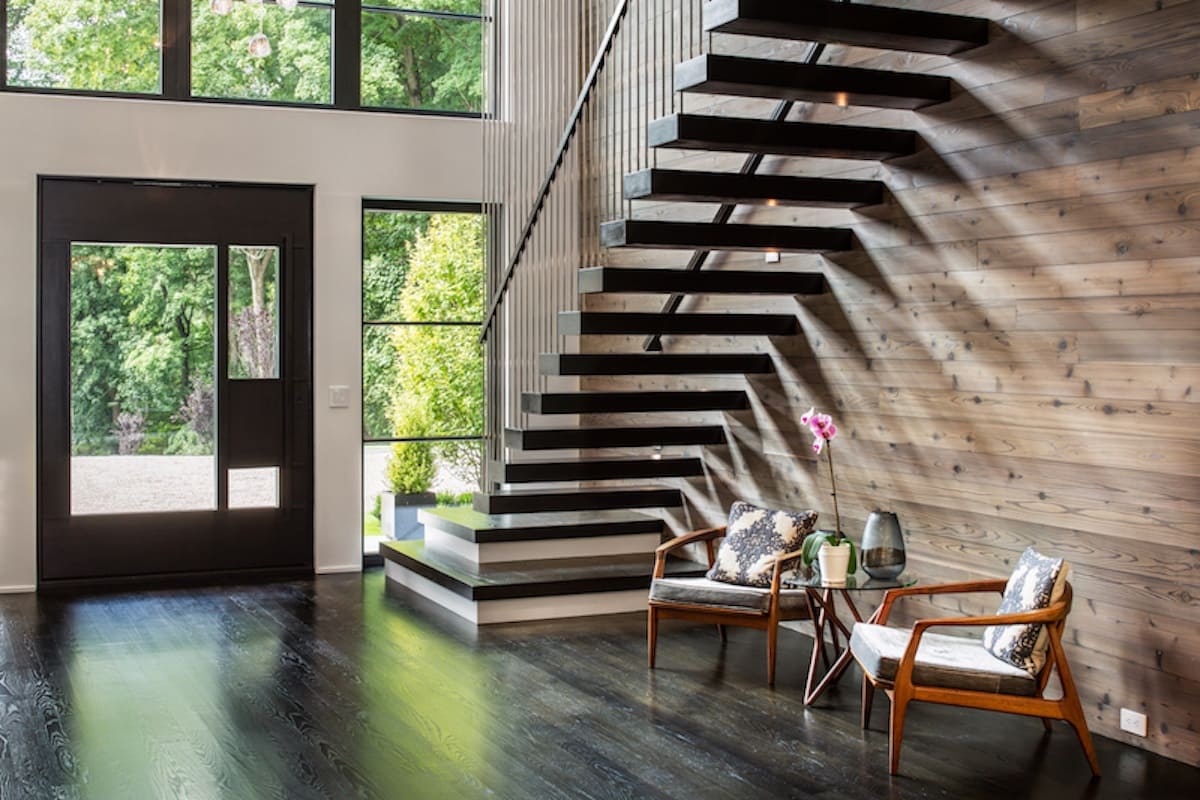
Floating stairs, also known as cantilevered stairs or open riser stairs, have gained popularity in modern architectural designs for their sleek and minimalist appearance. These unique staircases seem to defy gravity, as they appear to be floating on thin air without the need for visible supports or traditional stringers.
In this article, we will explore the concept of floating stairs, their history, benefits, construction methods, material options, design possibilities, safety considerations, and maintenance requirements. Whether you are an architect, designer, or homeowner interested in incorporating floating stairs into your space, or simply curious about this fascinating architectural feature, this article will provide you with a comprehensive understanding of floating stairs.
As the name implies, floating stairs create an illusion of floating in mid-air, giving them an ethereal and contemporary appeal. Their minimalist design allows them to blend seamlessly into any interior or exterior environment, making them a popular choice for both residential and commercial projects.
While traditional stairs rely on stringers or support beams visible underneath the treads and risers, floating stairs use a hidden structural framework to provide support. This hidden framework is anchored to the wall and supports the treads, giving the impression that the steps are floating unsupported. The absence of visible supports not only enhances the aesthetic appeal but also creates an open and airy atmosphere.
Since their introduction, floating stairs have become a symbol of modern design and are often associated with contemporary architecture. They are commonly featured in high-end homes, luxury hotels, office buildings, and public spaces, where they add a touch of sophistication and elegance.
Throughout the rest of this article, we will delve deeper into the various aspects of floating stairs, from their definition and history to their construction techniques, design possibilities, and maintenance requirements. So, let’s embark on this journey to explore the world of floating stairs in more detail.
Key Takeaways:
- Floating stairs, with their visually striking appearance and modern functionality, offer a captivating blend of sleek design and architectural elegance, making them a powerful element in contemporary architecture and interior design.
- While the visual appeal of floating stairs is undeniable, safety should always be a primary concern. Adhering to building codes, ensuring structural integrity, and regular maintenance are essential for creating a safe and stunning staircase environment.
Read more: How Much Do Floating Stairs Cost
Definition of Floating Stairs
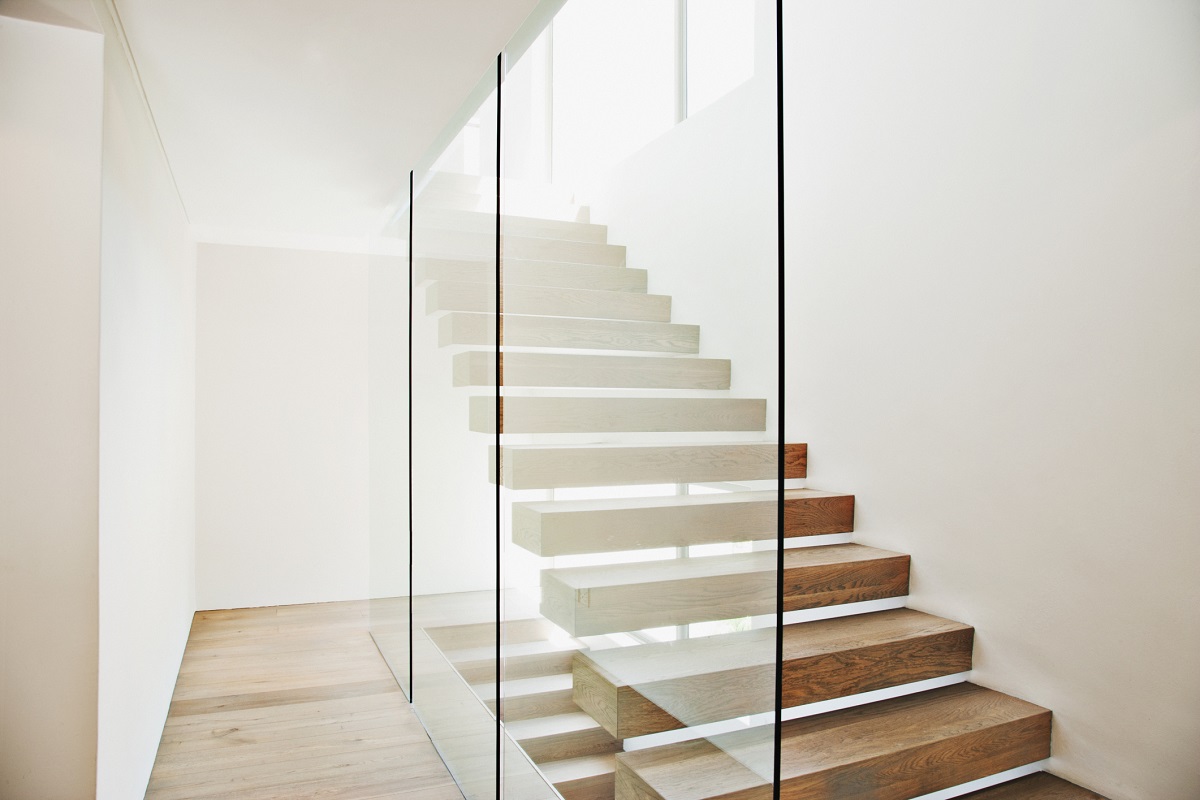
Floating stairs are a type of staircase design characterized by their lack of visible supports or stringers underneath the treads. Instead, these stairs appear to float in mid-air, giving them a visually striking and modern aesthetic. The illusion is created by using a hidden structural framework that provides support to the treads without the need for traditional stringers.
The term “floating stairs” is often used interchangeably with other terms like “cantilevered stairs” or “open riser stairs.” These terms all refer to a similar design concept where the steps appear to be suspended in the air, with no visible means of support.
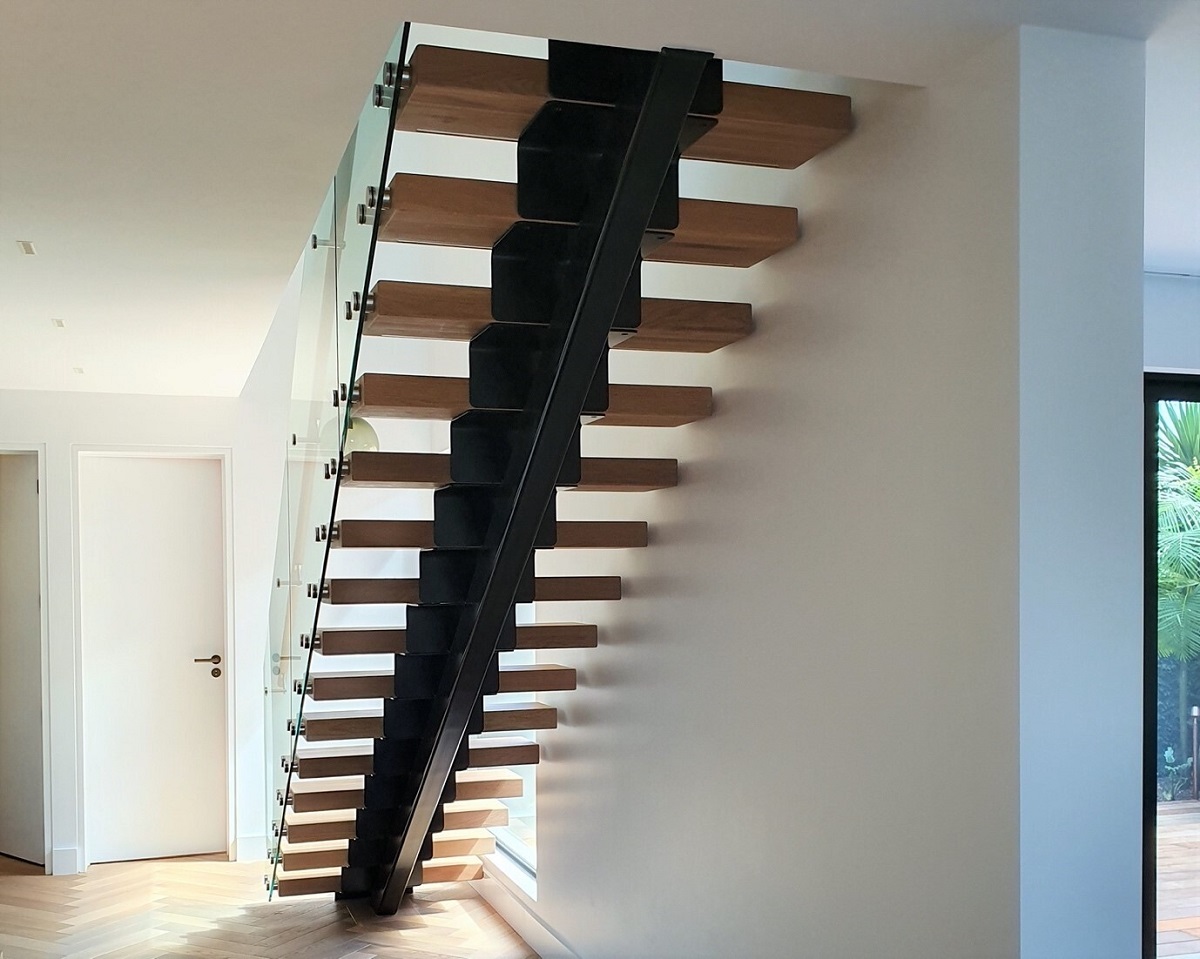
Unlike traditional stairs, where the steps are supported by stringers or beams placed at the sides or beneath the treads, floating stairs rely on a different structural system. The treads are usually anchored to a hidden steel framework that is securely attached to the wall or a load-bearing structure, providing stability and support. This hidden framework gives the illusion that the steps are floating, resulting in a clean and minimalist look.
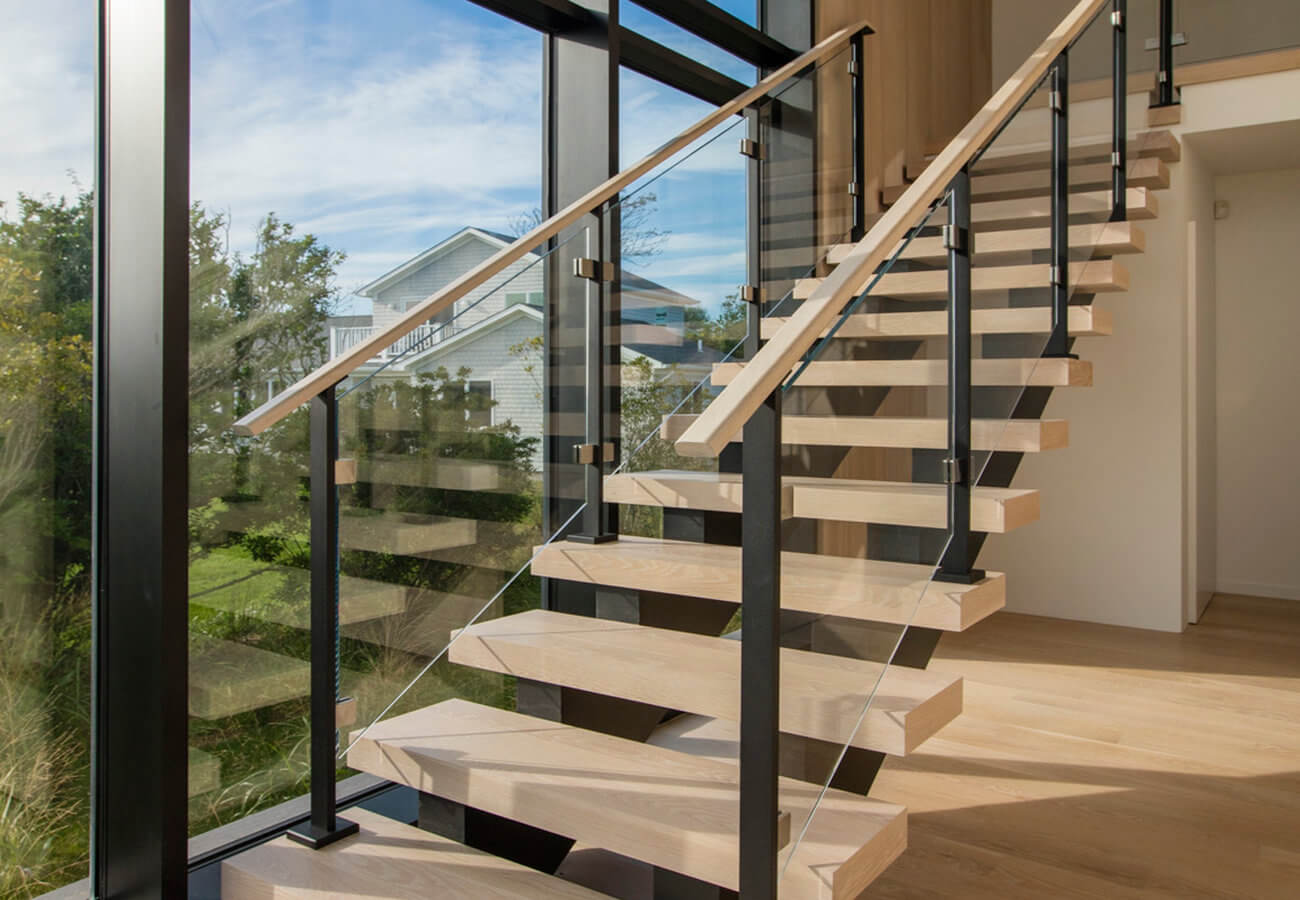
Another defining characteristic of floating stairs is the open riser design. Open risers refer to the absence of vertical elements between the treads, creating an open space between each step. This design element further enhances the floating effect and allows light to pass through, creating a sense of openness and airiness.
Floating stairs can be designed in various shapes and configurations, including straight, curved, or spiral designs, depending on the space and personal preference. They can be constructed with a variety of materials, such as wood, glass, or metal, allowing for endless design possibilities and customization.
In summary, floating stairs are a modern and visually stunning staircase design characterized by their lack of visible supports, open risers, and the illusion of floating in mid-air. They offer a unique architectural element that adds elegance and sophistication to any interior or exterior space.
History of Floating Stairs
The concept of floating stairs may seem like a modern innovation, but their roots can be traced back to ancient civilizations. In fact, variations of floating stairs have been used in architectural designs throughout history, proving that their appeal and functionality have stood the test of time.
One of the earliest examples of floating stairs can be found in ancient Egyptian architecture. The Mortuary Temple of Queen Hatshepsut, built around 1479-1458 BCE, features a ramp with steps that seemingly float in mid-air. These steps were made from limestone, creating a striking visual effect that showcased the architectural prowess of the time.
In ancient Chinese architecture, floating stairs were also utilized. The Hanging Monastery, built over 1,500 years ago, showcases remarkable cantilevered walkways and staircases. These floating staircases were constructed by embedding the wooden beams into the rock face, creating a unique and awe-inspiring architectural feat.
However, it was during the modernist movement of the 20th century that the popularity of floating stairs surged. Architects and designers sought to break away from traditional design conventions and embrace new materials and construction techniques.
One notable figure in the history of floating stairs is the renowned architect, Frank Lloyd Wright. Wright’s Fallingwater, completed in 1939, exemplifies his innovative approach to design, including the implementation of floating stairs. The cantilevered stone staircases in Fallingwater create a harmonious connection between the interior and exterior spaces, perfectly blending nature with architecture.
The popularity of floating stairs continued to grow throughout the mid-20th century and into the present day. The advancements in engineering and materials provided architects and designers with more flexibility in creating elaborate floating staircase designs.
Today, floating stairs are commonly featured in contemporary and modern architectural projects. They have become a symbol of architectural innovation and a statement of style. From residential homes to commercial spaces, floating stairs are coveted for their ability to provide both functionality and aesthetic appeal.
Overall, the history of floating stairs shows that the concept has been explored and embraced by various civilizations and architects throughout time. Its enduring popularity and timeless design make floating stairs a captivating architectural feature that continues to inspire and delight people around the world.
Benefits of Floating Stairs
Floating stairs offer a range of benefits that make them a popular choice in modern architecture and interior design. Beyond their visually stunning appearance, these unique staircases provide practical advantages and enhance the overall living or working experience. Let’s explore some of the key benefits of floating stairs:
- Modern and Minimalist Aesthetic: The sleek and minimalist design of floating stairs adds a touch of elegance and sophistication to any space. Their clean lines and open riser design create a contemporary look that complements various interior styles, from minimalistic to industrial.
- Space-Saving Design: By eliminating the need for visible supports or stringers, floating stairs take up less visual and physical space. This allows for a more open and spacious feel, especially in smaller areas where traditional stairs may feel bulky or obstructive.
- Enhanced Natural Light: The open riser design of floating stairs allows light to flow through the staircase, creating a sense of openness and brightness. This can make the surrounding space appear larger and more inviting, as well as contribute to a well-lit and pleasant environment.
- Architectural Focal Point: Floating stairs have a unique ability to become a striking focal point in any space. Their visually captivating design draws attention and adds interest, making them an architectural feature that captures the eye and sparks conversation.
- Adaptable to Various Design Styles: Floating stairs are highly versatile, making them suitable for a wide range of design styles. Whether your space is contemporary, industrial, or even rustic, floating stairs can be customized to complement your chosen aesthetic through material selection, finish options, and handrail designs.
- Customization Options: When it comes to floating stairs, the possibilities are virtually endless. From choosing the type of material, such as wood, glass, or metal, to selecting the shape and configuration of the staircase, there is ample room for customization. This allows you to create a staircase that perfectly aligns with your design vision and personal preferences.
- Easy Maintenance: Floating stairs typically have fewer parts and components compared to traditional stairs, making them easier to clean and maintain. With minimal crevices and nooks, dust and debris accumulation can be reduced, simplifying the cleaning process. Additionally, the use of durable and low-maintenance materials ensures the longevity and longevity of your staircase.
- Improved Safety: When properly designed and constructed, floating stairs can provide a safe means of vertical circulation. Balustrades, handrails, and other safety features can be incorporated into the staircase design to ensure stability and prevent accidents. Consulting with professionals during the design and installation process is crucial to ensure compliance with safety codes and regulations.
Overall, floating stairs offer a perfect balance of style, functionality, and adaptability. Their modern aesthetic, space-saving design, and customization options make them an excellent choice for those seeking to elevate their space with a touch of architectural elegance.
Construction of Floating Stairs
The construction of floating stairs requires careful planning, precision, and adherence to building codes and safety regulations. While the specific construction methods may vary depending on factors such as design, material choice, and space limitations, here is a general overview of the construction process for floating stairs:
- Design and Planning: The construction process begins with the design and planning stage. This involves determining the location, size, and configuration of the staircase, considering factors such as the available space, structural support, and aesthetic goals. It is important to consult with architects, designers, and structural engineers to ensure that the design meets the necessary requirements and can be safely implemented.
- Structural Framework: The hidden structural framework is a critical component of floating stairs. It provides support and stability to the treads without the need for visible stringers. Depending on the design and materials used, the framework is typically made of steel or another load-bearing material. The framework is securely anchored to the load-bearing wall or structure, ensuring the staircase’s strength and stability.
- Treads and Risers: The treads and risers are the steps that people walk on when using the staircase. These elements can be made from a variety of materials, such as wood, glass, or metal, depending on personal preference and design goals. The treads are securely attached to the hidden structural framework, giving the illusion of floating.
- Installation of Balustrades and Handrails: Balustrades and handrails are essential for safety and compliance. These components can be incorporated into the floating staircase design to prevent falls and provide support while using the stairs. The choice of materials and design for balustrades and handrails should complement the overall aesthetic and meet safety regulations.
- Finishing Touches: Once the main structure of the floating stairs is in place, attention can be turned to the finishing touches. This includes sanding, staining, or painting the treads and risers to achieve the desired look. Additionally, lighting can be strategically installed to enhance the floating effect, either through recessed lighting on the treads or accent lighting along the staircase’s sides.
- Inspection and Certification: Before the floating stairs can be used, a thorough inspection should be conducted to ensure compliance with local building codes and safety standards. Structural integrity, balustrade height, tread width, and handrail specifications are some of the factors that will be assessed during the inspection process. Obtaining the necessary certifications and permits is crucial to ensure the safety of users and the legality of the installation.
It is important to note that the construction of floating stairs can be complex and should be carried out by experienced professionals, including architects, designers, and structural engineers. Their expertise will ensure that the construction process is done correctly, safely, and in accordance with applicable regulations.
By carefully planning, selecting quality materials, and adhering to proper construction techniques, a well-constructed floating staircase can provide both functional access between levels and a stunning architectural feature that enhances any space.
When designing floating stairs, ensure that the structural support is sufficient to bear the weight of the stairs and the people using them. Consult with a professional to ensure safety and compliance with building codes.
Read more: What Is A Floating Floor
Materials Used in Floating Stairs
Floating stairs can be constructed using a variety of materials, each offering its own unique aesthetic, durability, and maintenance requirements. The choice of materials for floating stairs depends on factors such as the design concept, budget, and personal preferences. Here are some commonly used materials in the construction of floating stairs:
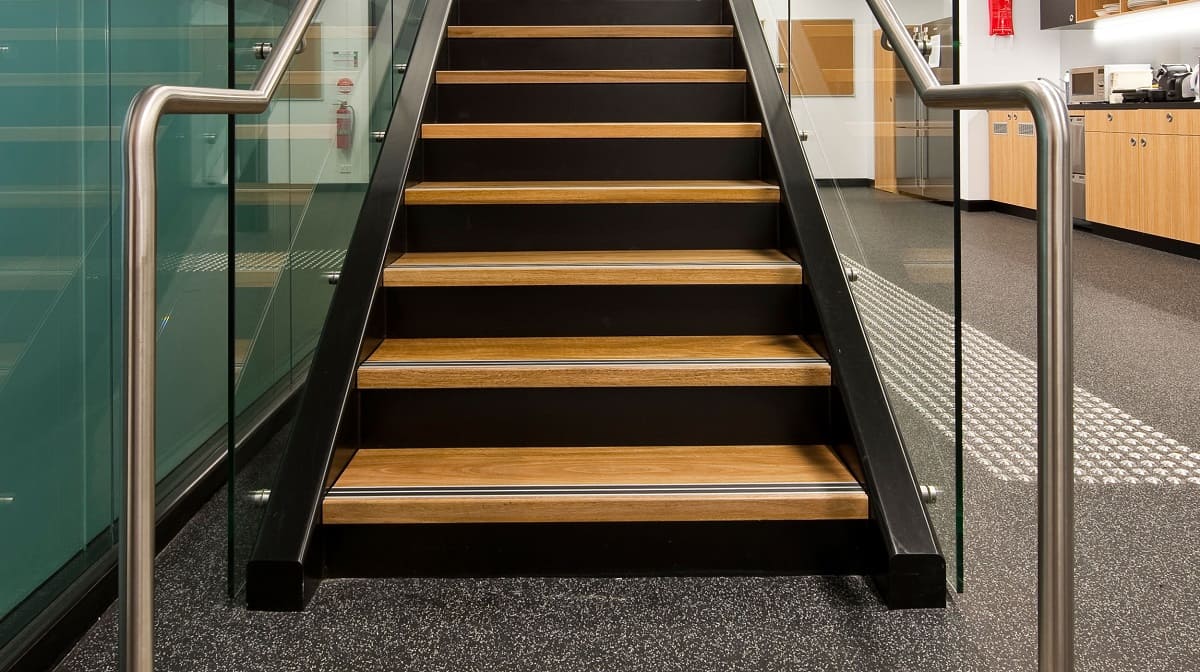
- Wood: Wood is a popular choice for floating stairs due to its natural warmth, versatility, and timeless appeal. Various types of wood can be used, including oak, maple, walnut, and mahogany, each offering its own distinct character and grain pattern. Wood can be finished with stains or clear finishes to highlight its natural beauty and protect it from wear and tear.
- Glass: Glass is a modern and sleek material often used in contemporary floating stair designs. It provides an open and transparent look that complements various interior styles. Tempered or laminated glass is typically used for safety reasons, as it is strong and resistant to shattering. Glass treads can be combined with stainless steel or glass balustrades to create a visually stunning effect.
- Metal: Metal, such as steel or aluminum, is a durable and versatile option for floating stairs. It offers a sleek and industrial aesthetic, especially when combined with glass or wood elements. Metal stairs can be powder-coated or finished in different colors or textures to match the desired style. Metal meshes or grating can also be incorporated into the treads to create a unique visual effect.
- Concrete: Concrete is a robust and resilient material suitable for both interior and exterior floating stairs. It can be poured in various shapes and finishes, including smooth or textured surfaces. Concrete stairs can be left unfinished for a raw and industrial look or polished and sealed for a more refined appearance. The addition of decorative elements, such as embedded stones or tiles, can also enhance the aesthetic appeal of concrete stairs.
- Stone: Natural stone, such as marble, granite, or limestone, offers a luxurious and sophisticated look to floating stairs. Stone treads can be cut and polished to create a seamless and elegant staircase design. Each type of stone has its own unique color variations and textures, adding a touch of nature to the space. However, it is important to consider the weight of stone when incorporating it into the floating stairs design.
- Acrylic or Resin: Acrylic or resin materials can be used to create a contemporary and transparent look for floating stairs. These materials offer the advantage of being lightweight and durable, making them suitable for various design applications. They can be molded into different shapes and colors, providing a high degree of customization possibilities.
- Combination of Materials: Many floating stairs designs incorporate a combination of different materials to create a unique and visually appealing look. For example, combining wood treads with metal or glass balustrades can add depth and contrast to the overall design. Mixing materials allows for creativity and customization, resulting in a truly personalized floating staircase.
When selecting materials for floating stairs, it is essential to consider factors such as durability, safety, maintenance requirements, and budget. Consulting with professionals can help in choosing the most appropriate materials that align with your design vision, functional needs, and budget constraints.
Ultimately, the choice of materials for floating stairs plays a significant role in defining the overall aesthetic and character of the staircase, making it a key aspect of the design process.
Design Options for Floating Stairs
Floating stairs offer a wide range of design options, allowing for customization and creative expression. Whether you prefer a minimalist and sleek look or a bold and dramatic statement, the design possibilities for floating stairs are virtually limitless. Here are some design options to consider when incorporating floating stairs into your space:
- Straight Stairs: Straight floating stairs are the most common and straightforward design option. They provide a clean and simple look, seamlessly blending into any architectural style. Straight stairs work well in narrow spaces or when a minimalist aesthetic is desired.
- Curved or Spiral Stairs: Curved or spiral floating stairs add a touch of elegance and architectural interest to any space. With their sweeping lines and graceful curves, these staircases make a striking design statement. Curved or spiral stairs are ideal for spaces with more room to accommodate the flowing shape of the staircase.
- Cantilevered Treads: Cantilevered treads are a popular design choice for floating stairs. In this design, the treads extend from the wall without any visible supports, creating a truly floating effect. Cantilevered treads add a sense of lightness and boldness to the staircase design.
- Open Riser Design: The open riser design is a signature feature of floating stairs. By eliminating the vertical elements between the treads, open risers create an open and airy feel, allowing light to pass through and enhancing the floating effect. Additionally, open risers can create a sense of spaciousness within the area, making them popular in smaller or compact spaces.
- Material Combinations: Floating stairs can be customized by combining different materials for treads, risers, and balustrades. For example, pairing wooden treads with glass balustrades creates a harmonious blend of warmth and transparency. Mixing metal and wood can result in a contemporary and industrial look. Experimenting with material combinations allows for the creation of unique and personalized designs.
- Color and Finish: The color and finish of the treads and risers play a significant role in defining the overall look of floating stairs. Wood can be stained or painted to match the desired color scheme, from rich mahogany tones to light and airy white. Metal can be finished in different coatings, such as polished, brushed, or powder-coated, to achieve the desired texture and appearance.
- Lighting Integration: Lighting can be integrated into floating stairs to enhance their aesthetic appeal and functionality. LED strip lights can be placed along the sides or underneath the treads to create a glow that adds drama and safety. Lighting fixtures can also be positioned at each step to highlight the elegant contour of the staircase.
- Handrail Options: The handrail design of floating stairs can be customized to fit the overall style and function of the staircase. Sleek and minimalistic handrails, such as metal cables or stainless steel railings, provide a contemporary look. Wooden handrails offer a warm and traditional touch. The choice of handrail material and design should complement the staircase and ensure safety during use.
When designing floating stairs, it is important to consider the overall aesthetic of the space, the architecture of the building, and your personal preferences. Working with experienced architects or designers can help you explore design options and create a floating staircase that becomes a stunning centerpiece in your home or commercial space.
Remember, the design choices are vast, allowing you to tailor floating stairs to suit your unique style and vision.
Safety Considerations for Floating Stairs
While floating stairs offer a visually stunning and modern design, ensuring safety is of utmost importance. Proper planning, construction, and adherence to safety guidelines are crucial to create a secure and functional staircase. Here are some key safety considerations to keep in mind when incorporating floating stairs into your space:
- Building Codes and Regulations: Familiarize yourself with local building codes and regulations regarding floating stairs. These codes specify requirements for dimensions, tread depth, riser height, handrail specifications, and balustrade heights. Consulting with professionals, such as architects and engineers, can help ensure compliance with these safety standards.
- Structural Integrity: The construction of floating stairs should prioritize structural integrity to guarantee stability and prevent accidents. Ensure that the hidden structural framework is robust and securely anchored to the wall or supporting structure. The framework should be designed by a professional to withstand the anticipated load and usage of the staircase.
- Tread and Riser Design: Proper dimensions for the treads and risers are essential for safe and comfortable use of the stairs. The tread depth and riser height should meet local building codes to prevent tripping or stumbling. Consistency in dimensions for each step is crucial to maintain a smooth and uniform experience when navigating the staircase.
- Balustrades and Handrails: Balustrades and handrails play a critical role in providing support and preventing falls. The height and spacing of balustrades should comply with local safety requirements to prevent people from falling over the sides. Handrails should be sturdy and graspable, providing stability and guidance while using the stairs. Regular inspections should be conducted to ensure their integrity and stability.
- Slip Resistance: The surface of the treads should have adequate slip resistance to prevent accidents, especially in wet or high traffic areas. Depending on the material chosen for the treads, consider incorporating nonslip treatments or using materials with inherent slip-resistant properties. It is essential to maintain traction on each step to ensure safety, especially in environments where slips and falls are more likely to occur.
- Lighting and Visibility: Proper lighting is essential to ensure visibility and reduce the risk of accidents. Adequate lighting should be provided along the flight of floating stairs, including bright illumination on each step. This can be achieved through recessed lighting or strategically placed fixtures. Lighting should be evenly distributed to eliminate shadows and ensure safe navigation of the staircase, even in low-light conditions.
- Handicap Accessibility: When designing floating stairs, it is important to consider accessibility for individuals with disabilities. If the staircase is the primary means of vertical circulation, provisions such as wider treads, handrail extensions, and appropriate slope should be considered to accommodate wheelchair users or individuals with mobility challenges.
- Professional Installation and Inspection: Floating stairs should be installed by experienced professionals familiar with the unique construction and safety requirements of such staircases. It is recommended to have a qualified inspector evaluate the staircase during and after installation to ensure it meets safety standards and complies with all regulations.
By prioritizing safety considerations and implementing appropriate measures throughout the design and construction process, you can enjoy the unique and aesthetic benefits of floating stairs without compromising on safety.
Consulting with professionals and working with experienced contractors will help ensure that your floating staircase provides not only a stunning architectural feature but also a reliable and secure means of vertical circulation.
Maintenance of Floating Stairs
Maintaining floating stairs is essential to ensure their longevity, safety, and visual appeal. Regular upkeep and care will help preserve the condition of the materials used and maintain the overall integrity of the staircase. Here are some maintenance tips to keep your floating stairs in optimal condition:
- Cleaning: Regular cleaning is important to prevent dirt, dust, and debris from accumulating on the treads, risers, and handrails. Depending on the materials used, you can use a soft cloth, non-abrasive cleaner, or mild detergent to clean the surfaces. Be sure to follow the manufacturer’s recommendations and avoid using harsh chemicals or abrasive scrubbers that can damage the materials.
- Inspect for Damage: Regularly inspect your floating stairs for any signs of damage, including cracks, loose treads, squeaking, or wobbling. Pay attention to the connections between the treads and the hidden structural framework or the balustrades. If you notice any issues, contact a professional immediately to address and repair the problem. Prompt repairs can prevent more significant damage and ensure the safety of the staircase.
- Stain or Seal Maintenance: If your floating stairs have wooden treads or handrails, it is important to periodically inspect and maintain the stain or sealant. Over time, the finish may wear off, making the wood vulnerable to moisture and damage. Reapply the appropriate stain or sealant as needed to protect the wood and maintain its appearance. Follow the manufacturer’s instructions for proper application and drying time.
- Check Balustrades and Handrails: Inspect the balustrades and handrails regularly to ensure their stability and integrity. Ensure that the connections are secure, and there are no loose or damaged components. Tighten any loose screws or bolts and repair or replace any damaged balusters or handrail segments. Balustrades and handrails should be able to withstand force and provide reliable support while using the stairs.
- Address Moisture Issues: Moisture can pose a risk to certain materials, such as wood or metal. Address any moisture-related issues promptly, such as leaks or condensation, as they can lead to deterioration or corrosion. Keep the surrounding area well-ventilated, especially in humid environments, to reduce the risk of moisture buildup. Consider using waterproofing or moisture-resistant coatings on susceptible materials if necessary.
- Keep Stairs Clear: Avoid placing objects or clutter on the stairs that may pose a tripping hazard or obstruct the path. Keep the area around the staircase clear to ensure safe passage and prevent accidents. Regularly remove any debris or obstacles to maintain a safe and unobstructed staircase.
- Professional Inspections: Periodically have your floating stairs inspected by professionals to ensure their structural integrity and adherence to safety codes. Professionals can identify potential issues or areas in need of maintenance that may not be immediately apparent. Regular inspections will help catch any problems early on and allow for timely repairs.
Remember that proper maintenance will not only keep your floating stairs looking their best but also ensure their safety and functionality. Regular cleaning, inspections, and addressing any necessary repairs promptly will help extend the lifespan of your floating staircase and preserve its beauty for years to come.
Read more: What Is Float Glass
Conclusion
Floating stairs offer a captivating blend of sleek design, architectural elegance, and modern functionality. With their visually striking appearance and seemingly gravity-defying structure, these staircases have become increasingly popular in contemporary architecture and interior design. Throughout history, floating stairs have been used by various civilizations, and their appeal continues to endure.
The construction of floating stairs requires meticulous planning, adherence to safety regulations, and the expertise of professionals. From selecting the appropriate materials to considering design options and safety measures, every aspect plays a significant role in creating a stunning and secure staircase.
When properly designed and constructed, floating stairs provide numerous benefits. They enhance the aesthetic appeal of any space, create a sense of openness, and allow for optimal natural light. Floating stairs can be customized to suit various design styles, whether that be a minimalist aesthetic, an industrial look, or a luxurious setting.
While the visual appeal of floating stairs is undeniable, safety should always be a primary concern. Adhering to building codes, ensuring structural integrity, and maintaining slip-resistant surfaces are essential for a safe staircase environment. Regular maintenance, including cleaning, inspections, and addressing any necessary repairs, is key to preserving the lifespan and functionality of floating stairs.
Whether you are an architect, designer, or homeowner interested in incorporating floating stairs into your space, or simply curious about this architectural marvel, understanding their definition, history, benefits, construction methods, materials, design options, safety considerations, and maintenance requirements is crucial. Floating stairs are a significant investment, and with the right knowledge and guidance, you can create a staircase that not only adds visual appeal but also enhances the overall experience within your space.
In conclusion, floating stairs are an exceptional architectural feature that adds excitement, style, and sophistication to any environment. Their ability to create an illusion of floating in mid-air, combined with their customizable options and practical benefits, makes them a powerful element in modern design. By incorporating floating stairs into your space, you can elevate both the aesthetic and functionality of your home or commercial project, making a bold statement that will be admired for years to come.
Frequently Asked Questions about What Are Floating Stairs
Was this page helpful?
At Storables.com, we guarantee accurate and reliable information. Our content, validated by Expert Board Contributors, is crafted following stringent Editorial Policies. We're committed to providing you with well-researched, expert-backed insights for all your informational needs.


0 thoughts on “What Are Floating Stairs”