Articles
How To Make Check Boxes In Google Docs
Modified: January 6, 2024
Learn how to create check boxes in Google Docs for efficient data storage and organization.
(Many of the links in this article redirect to a specific reviewed product. Your purchase of these products through affiliate links helps to generate commission for Storables.com, at no extra cost. Learn more)
Introduction
Google Docs is a widely used platform for creating and editing documents online. It offers a variety of tools and features that make document formatting and collaboration easy and efficient.
One useful feature that you may want to utilize in your Google Docs is check boxes. Check boxes can be used to create interactive to-do lists, forms, surveys, and more. They provide a visual representation of completion or selection.
In this article, we will explore different methods to create check boxes in Google Docs. Whether you are a student, professional, or anyone who wants to keep track of tasks or selections, these methods will help you enhance your documents and stay organized.
So, let’s dive in and discover how to make check boxes in Google Docs!
Key Takeaways:
- Easily create interactive check boxes in Google Docs using bulleted lists, symbols, “Insert” menu, tables, or copy-pasting. Choose the method that suits your formatting and customization needs for efficient document organization.
- Explore various methods to add visually appealing check boxes to your Google Docs, from simple bulleted lists to customizable symbols and tables. Enhance your documents with interactive elements for better organization and collaboration.
Read more: How To Insert Check Boxes In Google Sheets
Method 1: Using the Bulleted List Feature
One of the simplest ways to create check boxes in Google Docs is by using the built-in bulleted list feature. Here’s how:
- Open your Google Docs document and place your cursor where you want to insert the check box.
- Click on the “Bulleted list” icon in the formatting toolbar at the top of the page. It looks like a bulleted list symbol (•).
- A bullet point will be added at the cursor position. To convert it into a check box, click on the “Increase indent” icon in the formatting toolbar. It looks like a right-facing arrow with a horizontal line beneath it.
- The bullet point will transform into a check box, and you can now click on it to mark or unmark it.
You can continue adding more items to your bulleted list with check boxes by pressing the “Enter” key after each item and repeating steps 2-4.
Using the bulleted list feature is a quick and convenient way to create check boxes. However, keep in mind that the formatting options for the check boxes are limited with this method. If you prefer more customization, continue reading to explore other methods!
Method 2: Inserting Check Boxes Using the Symbol Tool
If you are looking for more control over the design and appearance of your check boxes, you can use the symbol tool in Google Docs. Follow these steps:
- Open your Google Docs document and position the cursor where you want to insert the check box.
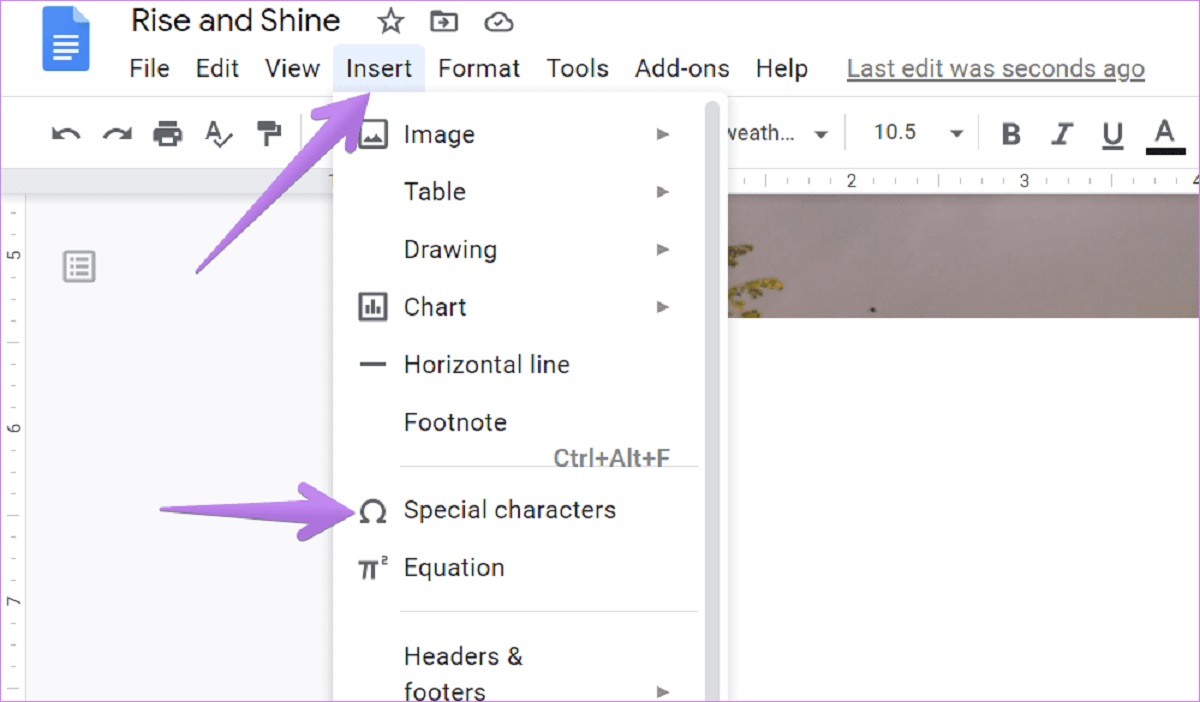
- Go to the “Insert” tab in the top menu and select “Special characters.”
- A character map window will appear. In the search bar, type “check mark” or “box” to find relevant symbols.
- Browse through the available symbols and click on the check box or box symbol that you prefer.
- Once you click on the symbol, it will be inserted at the cursor position. You can resize or adjust it as needed.
This method provides more options for check box styles, allowing you to choose from a variety of symbols available in the special characters tool. You can also change the size, color, and other formatting properties to customize the appearance of the check box.
The symbol tool opens up endless possibilities for creating unique and visually appealing check boxes in your Google Docs. However, keep in mind that not all fonts may support the symbols, so make sure to select a widely compatible font to ensure consistent display across different devices.
Now that you know how to insert check boxes using the symbol tool, let’s explore another method that offers even more flexibility!
Method 3: Using the “Insert” Menu Option
If you prefer a more straightforward way to create check boxes in Google Docs, you can use the “Insert” menu option. Follow these steps:
- Open your Google Docs document and position the cursor where you want to insert the check box.
- Go to the “Insert” tab in the top menu and select “Checkbox” from the drop-down menu.
- A check box will be inserted at the cursor position, and you can click on it to mark or unmark it.
This method offers a quick and convenient way to insert check boxes without needing to modify bullet points or search for symbols. The check boxes created using this method are simple and standardized.
Additionally, if you want to remove or delete the check box, simply click on it and press the “Delete” or “Backspace” key, just like you would with regular text.
With the “Insert” menu option, you can swiftly create check boxes in your Google Docs with just a few clicks. However, if you’re looking for more advanced customization options, let’s explore method 4!
To create check boxes in Google Docs, go to the “Insert” menu, select “Special characters,” and search for “square.” Choose the square box and copy-paste it to create a check box.
Method 4: Creating Check Boxes with the “Table” Tool
If you want to create check boxes with more flexibility and customization options, you can utilize the “Table” tool in Google Docs. Follow these steps:
- Open your Google Docs document and place your cursor where you want to insert the check box.
- Go to the “Table” tab in the top menu and select the desired table size (e.g., 1×1 for a single check box).
- A table will be inserted at the cursor position. Resize the table by clicking and dragging the borders as needed.
- Click within the table cell and go to the “Table” tab again.
- Select the cell and apply the cell border style to make it resemble a check box. You can choose thicker borders or customize the border color to make it stand out.
Once you have customized the table cell to resemble a check box, you can mark or unmark it by clicking within the cell. You can also copy and paste the table cell to create multiple check boxes with the same styling.
Using tables to create check boxes gives you more control over the design and layout. You can adjust the size, shape, and positioning of the check boxes within the table to suit your needs.
However, keep in mind that using tables for check boxes can be time-consuming if you need to create a large number of them. In such cases, it may be more efficient to explore other methods discussed earlier.
So far, we’ve covered various methods to create check boxes in Google Docs. But what if you need to copy and paste check boxes from another document? Let’s explore method 5 next!
Read more: How To Check Breakers In Breaker Box
Method 5: Copy and Pasting Check Boxes
If you have existing check boxes in another document or source, you can easily copy and paste them into your Google Docs. Follow these steps:
- Open the document or source where the check boxes are located.
- Select the check box (or a group of check boxes) that you want to copy.
- Copy the selected check boxes. You can use the keyboard shortcut “Ctrl+C” (Windows) or “Cmd+C” (Mac), or right-click and choose “Copy” from the context menu.
- Switch to your Google Docs document and place the cursor where you want to paste the check boxes.
- Paste the copied check boxes. You can use the keyboard shortcut “Ctrl+V” (Windows) or “Cmd+V” (Mac), or right-click and choose “Paste” from the context menu.
The check boxes will be pasted into your Google Docs document, and you can resize or rearrange them as needed. You can also copy and paste multiple check boxes at once to save time and effort.
This method is especially useful if you have a predefined set of check boxes that you want to reuse across multiple documents or if you want to collaborate with others who have already created check boxes.
However, keep in mind that the formatting and styling of the check boxes may differ depending on the source from which you copy them. It’s always a good idea to review and adjust the formatting if necessary to maintain consistency within your Google Docs document.
With method 5, you now have another convenient way to add check boxes to your Google Docs. But before we conclude, let’s summarize what we’ve covered so far.
Conclusion
In this article, we explored five different methods to create check boxes in Google Docs. Each method offers its own advantages and allows for various levels of customization.
Method 1 involves using the bulleted list feature, which is a quick and simple way to create basic check boxes with limited formatting options. It’s perfect for straightforward checklists and to-do lists.
If you prefer more design choices, Method 2 allows you to insert check boxes using the symbol tool. This method offers a wide range of symbols to choose from and allows for customization in terms of size and color.
For those who prefer a straightforward approach without modifying bullet points or searching for symbols, Method 3, using the “Insert” menu option, is a convenient solution. This method provides standardized check boxes that can be easily inserted and removed.
To have more flexibility and customization options, Method 4 involves creating check boxes with the “Table” tool. This method allows for complete control over the design and layout of the check boxes, making it suitable for when you need more elaborate check boxes.
Lastly, Method 5 allows you to copy and paste check boxes from other documents or sources. This is an efficient method if you already have a predefined set of check boxes or if you need to collaborate with others who have already created check boxes.
Depending on your specific requirements and preferences, you can choose the method that best suits your needs for creating check boxes in Google Docs.
So, whether you want to create interactive to-do lists, forms, surveys, or simply keep track of tasks, these methods will help you enhance your documents and stay organized.
Now that you have learned how to make check boxes in Google Docs, it’s time to put your knowledge into practice and start adding interactive elements to your documents!
Frequently Asked Questions about How To Make Check Boxes In Google Docs
Was this page helpful?
At Storables.com, we guarantee accurate and reliable information. Our content, validated by Expert Board Contributors, is crafted following stringent Editorial Policies. We're committed to providing you with well-researched, expert-backed insights for all your informational needs.


0 thoughts on “How To Make Check Boxes In Google Docs”