Articles
How To Put A Ceiling In A Basement
Modified: October 28, 2024
Learn how to put a ceiling in a basement with our informative articles. Transform your space with these helpful tips and expert advice.
(Many of the links in this article redirect to a specific reviewed product. Your purchase of these products through affiliate links helps to generate commission for Storables.com, at no extra cost. Learn more)
Introduction
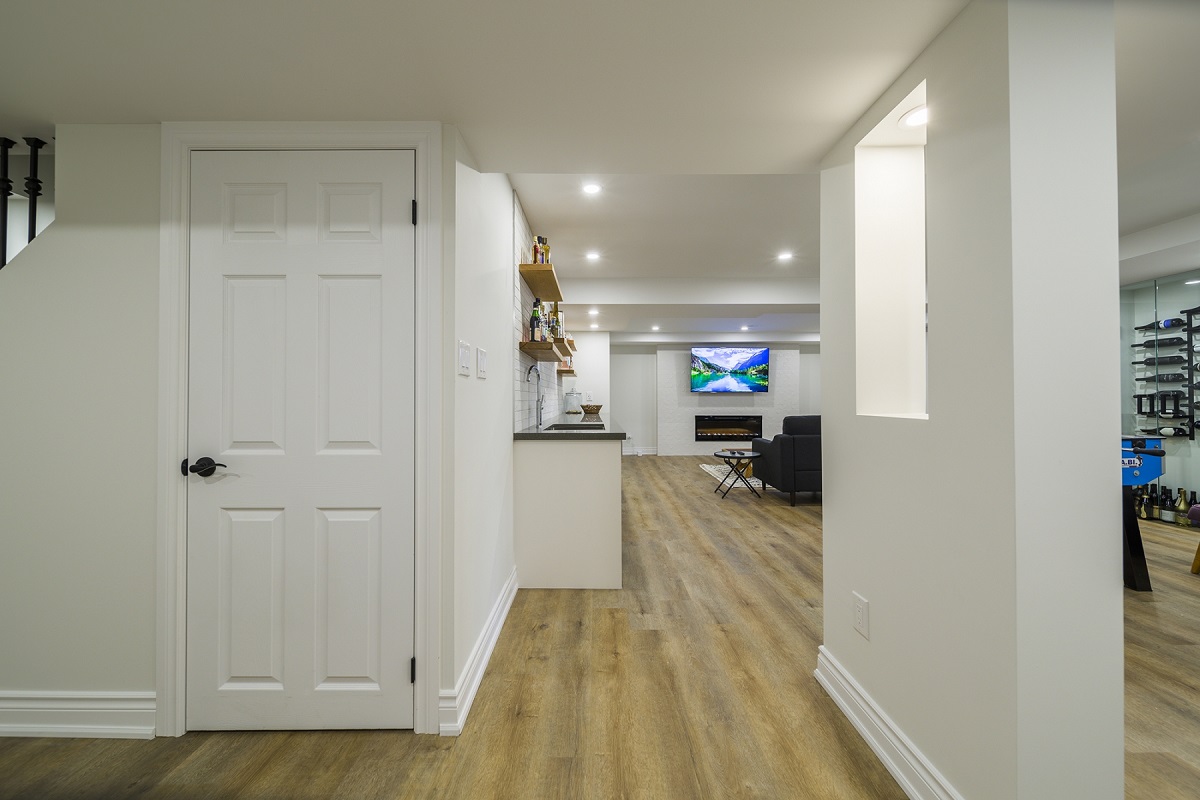
Welcome to our guide on how to put a ceiling in a basement! Whether you’re converting your basement into a livable space or simply looking to improve its appearance, adding a ceiling can significantly enhance the overall look and feel of the area. A well-designed ceiling not only provides a finished and polished look but also helps with insulation and noise reduction.
Before diving into the details of how to install a ceiling in your basement, it’s important to evaluate the space and plan the design accordingly. Basements can present unique challenges, such as moisture issues and limited ceiling height. By taking proper measurements, selecting suitable materials, and following the right installation techniques, you can transform your basement into a comfortable and inviting space.
In this comprehensive guide, we will walk you through the essential steps involved in putting a ceiling in your basement. From evaluating the space to selecting the appropriate materials, and from framing the ceiling to installing the finishing touches, we’ve got you covered.
So let’s get started and unlock the potential of your basement!
Key Takeaways:
- Transform your basement into a functional and attractive living space by evaluating the space, planning the design, and installing insulation for energy efficiency and noise reduction.
- Elevate the look of your basement ceiling by adding finishing touches, such as moldings, trim, and customized paint or stain, to create a stylish and visually appealing space.
Read more: How To Soundproof A Basement Ceiling
Step 1: Evaluate the Basement Space
Before you begin installing a ceiling in your basement, it’s crucial to evaluate the space to ensure it’s suitable for the project. Here are two key considerations:
- Checking for moisture and humidity levels: Basements are prone to moisture problems, which can lead to mold growth, musty odors, and even structural damage. Start by inspecting the walls and floor for signs of water intrusion, such as stains, dampness, or peeling paint. Use a moisture meter to test the humidity levels. Ideally, the moisture content should be below 60%. If you notice excessive moisture, address the underlying issues before proceeding with the ceiling installation. This may involve waterproofing the basement or fixing any external drainage problems.
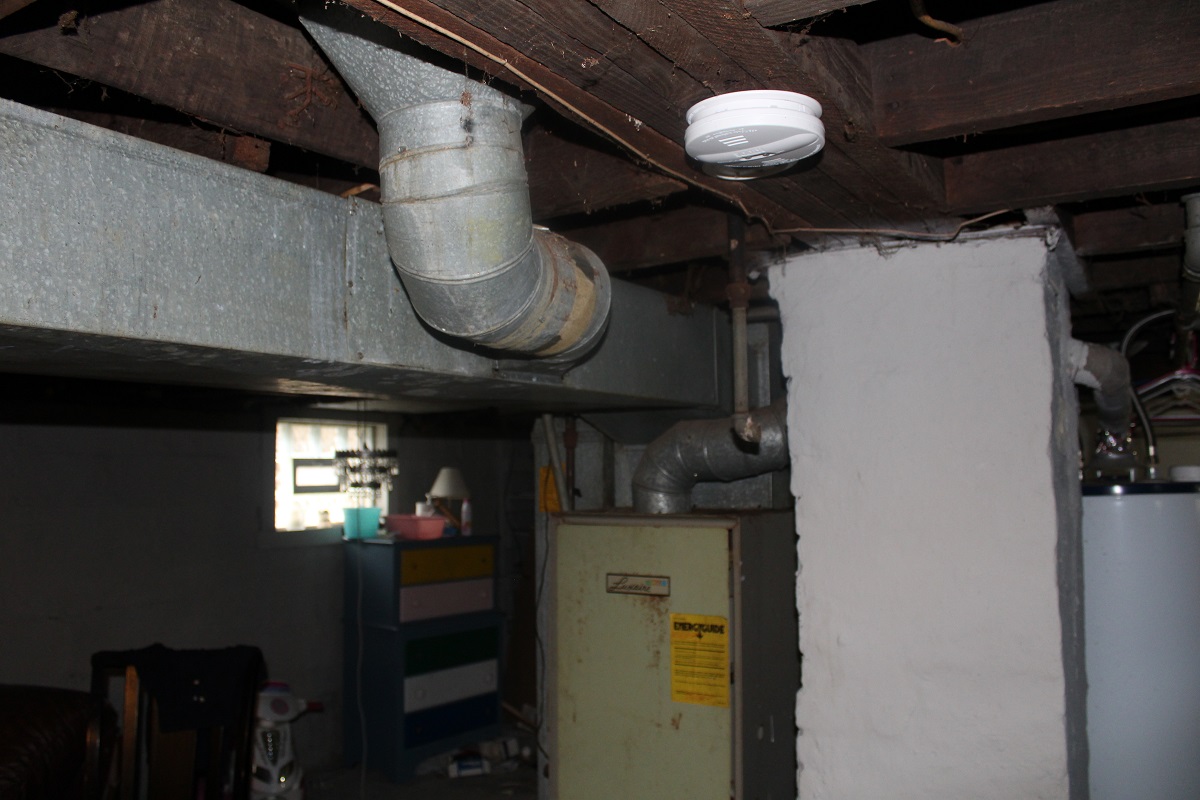
- Identifying structural issues: Basement ceilings often have obstructions, such as pipes, ductwork, or support beams. Take note of these structural elements and plan the ceiling design accordingly. Determine if any modifications or relocations are necessary to accommodate the desired ceiling height and layout. It’s also essential to inspect the condition of the basement walls and floor for any signs of cracks, unevenness, or structural instability. Addressing these issues before installing the ceiling will ensure a sturdy and safe framework.
By thoroughly evaluating the basement space, you can identify and address any potential problems early on. This will prevent future issues and ensure a successful ceiling installation.
Step 2: Planning the Ceiling Design
Once you have evaluated the basement space, the next step is to plan the design for your ceiling. Here are two crucial factors to consider:
- Determining the desired ceiling height: Basements often have lower ceiling heights compared to the rest of the house. Decide on the desired ceiling height based on the functionality and aesthetics you want to achieve. Keep in mind any regulations or building codes that may dictate minimum ceiling heights for habitable spaces. If your ceiling height is limited, there are creative design options such as recessed lighting, suspended ceilings, or using mirrors to create an illusion of more space.
- Choosing the appropriate ceiling materials: There are various options for basement ceilings, each with its own advantages and considerations. Some popular choices include drywall, drop ceilings, tongue and groove wood panels, or acoustic ceiling tiles. Consider factors such as moisture resistance, sound insulation, ease of installation, and overall aesthetic appeal when selecting the materials. Ensure the chosen materials are suitable for basement environments, as they may need to withstand higher humidity levels.
By carefully planning the design of your ceiling, you can create a visually appealing and functional space that meets your specific requirements. Take into account your basement’s limitations, style preferences, and practical needs to achieve the desired results.
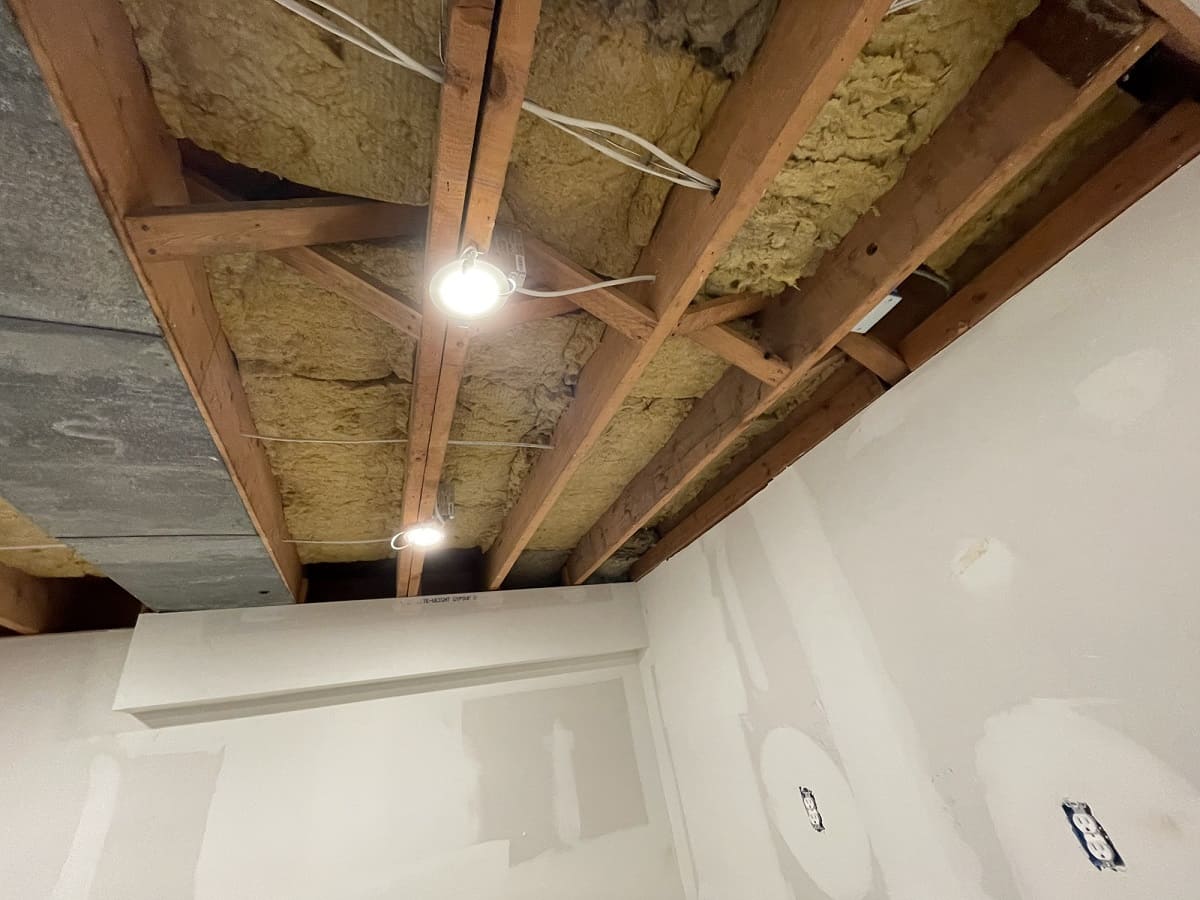
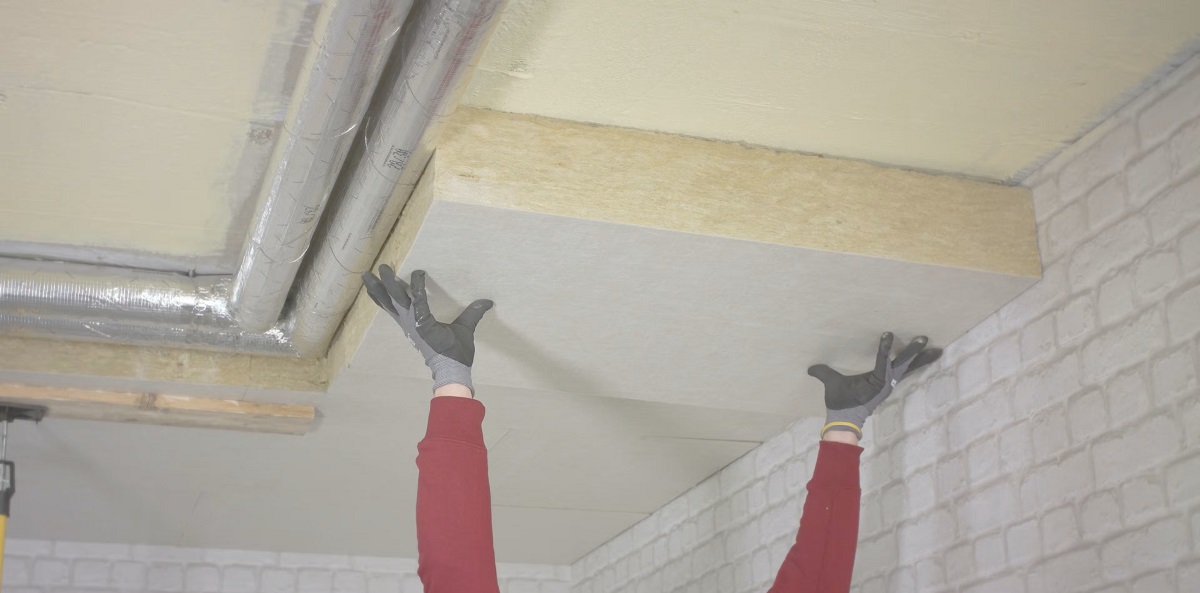
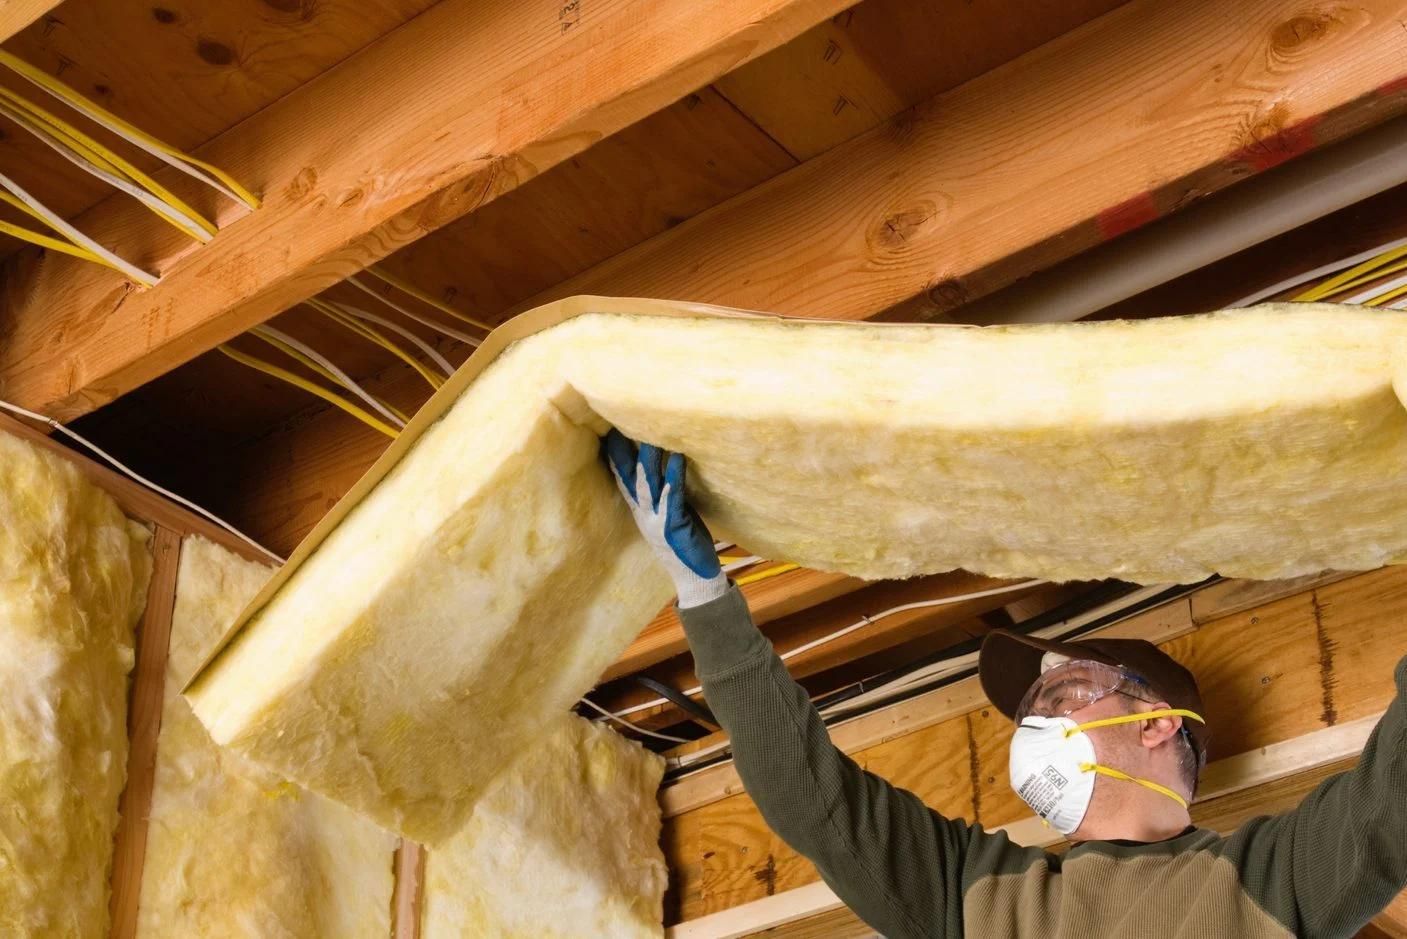
Step 3: Installing Ceiling Insulation
Insulating your basement ceiling is a crucial step to enhance energy efficiency, control temperature, and reduce noise transmission. Here’s what you need to know:
- Understanding the importance of insulation in basements: Basements are often more susceptible to temperature fluctuations and moisture compared to other areas of the house. Insulating the ceiling helps create a thermal barrier, preventing heat loss during the winter and heat gain during the summer. It also helps control condensation and reduces the risk of mold growth.
- Selecting the right type of insulation for your basement ceiling: There are various insulation options available, depending on your budget and specific requirements. Common choices include fiberglass batts, spray foam insulation, or rigid foam boards. Fiberglass batts are cost-effective and easy to install, but they may not provide the best moisture resistance. Spray foam insulation creates an airtight barrier and is ideal for irregularly shaped areas, but it can be more expensive. Rigid foam boards offer excellent insulation properties and moisture resistance, but they require careful installation and may be more costly.
Before installing insulation, ensure there are no moisture issues in the basement. If you detect any water leaks or excessive dampness, address those problems before proceeding. Additionally, consult local building codes and regulations to determine the required R-value (insulation effectiveness) for your area.
Properly insulating the basement ceiling will help create a more comfortable and energy-efficient space. It will also contribute to reducing energy costs and enhancing the overall usability of your basement.
Step 4: Framing the Ceiling
Once you have evaluated the space, planned the design, and installed the insulation, the next step is to frame the ceiling. Framing provides the structure for your ceiling and allows for the installation of lighting fixtures and other electrical components. Here’s how to go about it:
- Measuring and marking the layout for the ceiling frame: Start by measuring the dimensions of your basement to determine the layout for the ceiling frame. Using a tape measure and a chalk line, mark the locations where the ceiling joists will be installed. Ensure the measurements are accurate and level to ensure a properly aligned frame.
- Installing the framing components: Once you have determined the layout, it’s time to install the framing components. Typically, wooden or metal studs are used for framing. Secure the studs to the floor and the walls, making sure they are plumb and properly aligned. Use a level to ensure everything is straight and square. Install blocking between the joists where necessary for added stability.
During the framing process, it’s important to plan for any electrical or plumbing needs. Consider the placement of lighting fixtures, outlets, and any ventilation requirements. Consult a licensed electrician or plumber if necessary to ensure safe and proper installation.
Remember to leave access points for future maintenance or repairs, such as removable panels or adjustable frames. This will make it easier to access wires, pipes, or other components behind the ceiling if needed.
Framing the ceiling is a critical step that provides the foundation for the rest of the ceiling installation process. Take the time to measure and install the framing components accurately to ensure a sturdy and well-supported ceiling.
When putting a ceiling in a basement, consider using a drop ceiling for easy access to utilities or a drywall ceiling for a more finished look. Make sure to leave space for ventilation and lighting fixtures.
Read more: How To Finish A Basement Ceiling
Step 5: Installing Electrical Wiring and Plumbing
Once the framing of the ceiling is complete, it’s time to address the electrical and plumbing needs of your basement. This step is essential for ensuring functionality and convenience in your space. Here’s what you need to do:
- Running electrical wires for lighting and outlets: Determine the location of lighting fixtures, outlets, and any other electrical components in your basement. Plan the wiring layout to ensure proper placement and functionality. Consult a licensed electrician to run the electrical wires safely and meet the necessary codes and regulations. This includes connecting the wires to the main electrical panel, installing switches, and ensuring proper grounding.
- Addressing plumbing needs if applicable: If your basement includes plumbing fixtures such as a bathroom or laundry room, this is the time to address any plumbing needs. Consult a licensed plumber to install necessary pipes, drains, and fixtures. Ensure they are properly connected to the main plumbing system and meet local plumbing codes.
During the installation of electrical wiring and plumbing, it’s crucial to prioritize safety. Work with licensed professionals who are experienced in their respective fields. This will help ensure that all installations are up to code and meet the necessary safety standards.
Remember to consider the placement of lighting fixtures and outlets strategically to enhance functionality and create a well-lit space. If possible, incorporate energy-efficient lighting options such as LED fixtures to minimize energy usage and costs.
By properly addressing the electrical and plumbing needs, you can create a basement space that is fully functional and meets your specific requirements.
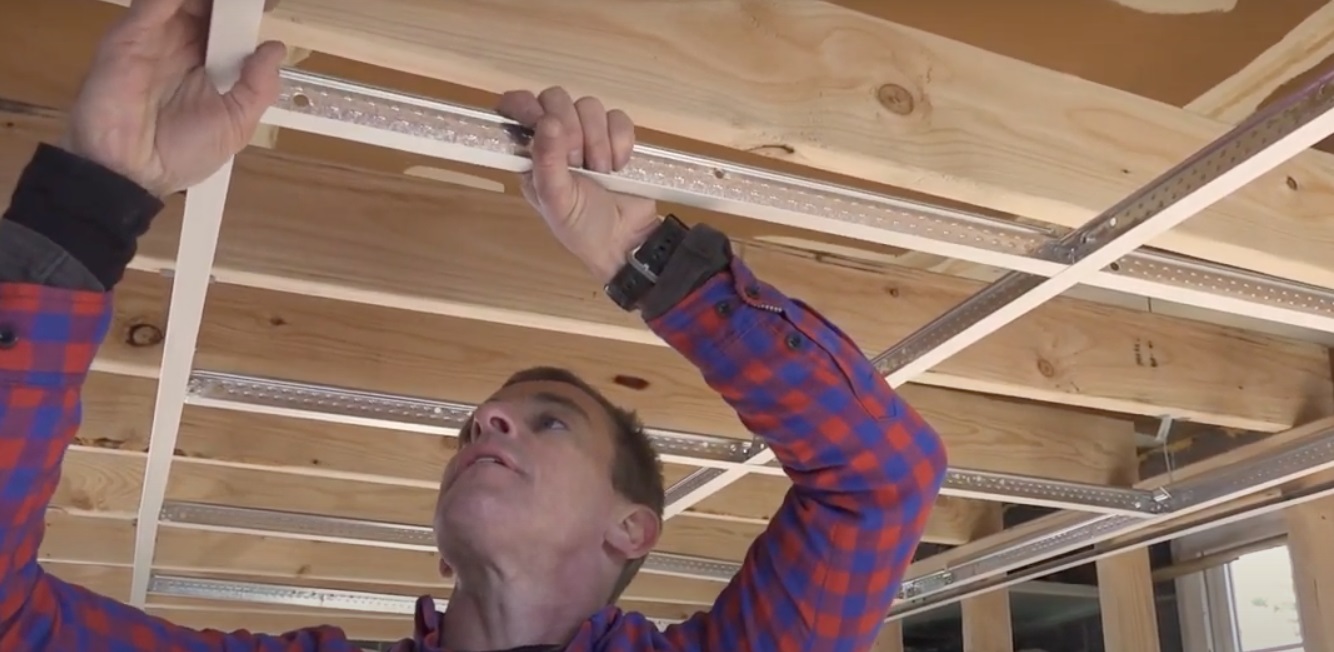
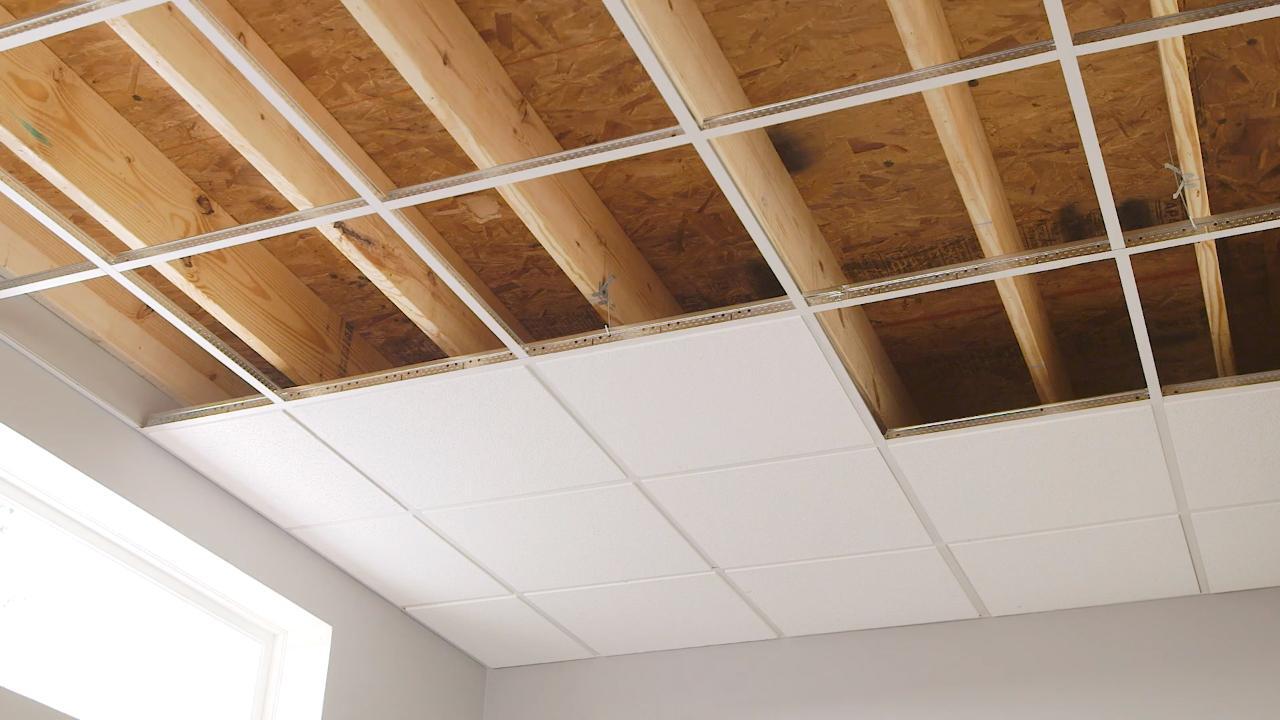
Step 6: Installing the Ceiling Tiles or Panels
With the framing and electrical/plumbing work complete, it’s time to move on to the exciting step of installing the ceiling tiles or panels. This step will give your basement ceiling its finished look. Follow these guidelines to ensure a successful installation:
- Preparing the tiles/panels for installation: Before you begin, make sure your ceiling tiles or panels are properly prepared. If you’re using acoustic ceiling tiles, check for any damaged or warped pieces and replace them. If you’re installing wood or metal panels, ensure they are clean and free from any debris or contaminants that may affect their appearance or performance.
- Securing the tiles/panels onto the ceiling frame: Start by positioning the first tile or panel in one corner of the basement ceiling. Use appropriate fasteners, such as staples, screws, or adhesives, to secure it in place. Make sure it is level and aligned with the surrounding tiles or panels. Repeat this process, working your way across the ceiling, ensuring each tile or panel is securely attached. Take care to maintain consistent spacing between tiles or panels for a uniform look.
Consider the design and pattern you want to achieve with your ceiling tiles or panels. You can opt for a simple grid pattern, staggered arrangement, or even mix different styles for a more creative look. Always refer to the manufacturer’s instructions for guidance on installation methods and recommended materials.
If you’re installing drop or suspended ceiling tiles, you’ll need to install a grid system first to support the tiles. Measure and install the main runners and cross tees according to the manufacturer’s instructions, ensuring they are level and properly aligned. With the grid system in place, you can easily insert and secure the ceiling tiles.
Take your time during the installation process to ensure each tile or panel is installed correctly. This will result in a visually appealing and professionally finished basement ceiling.
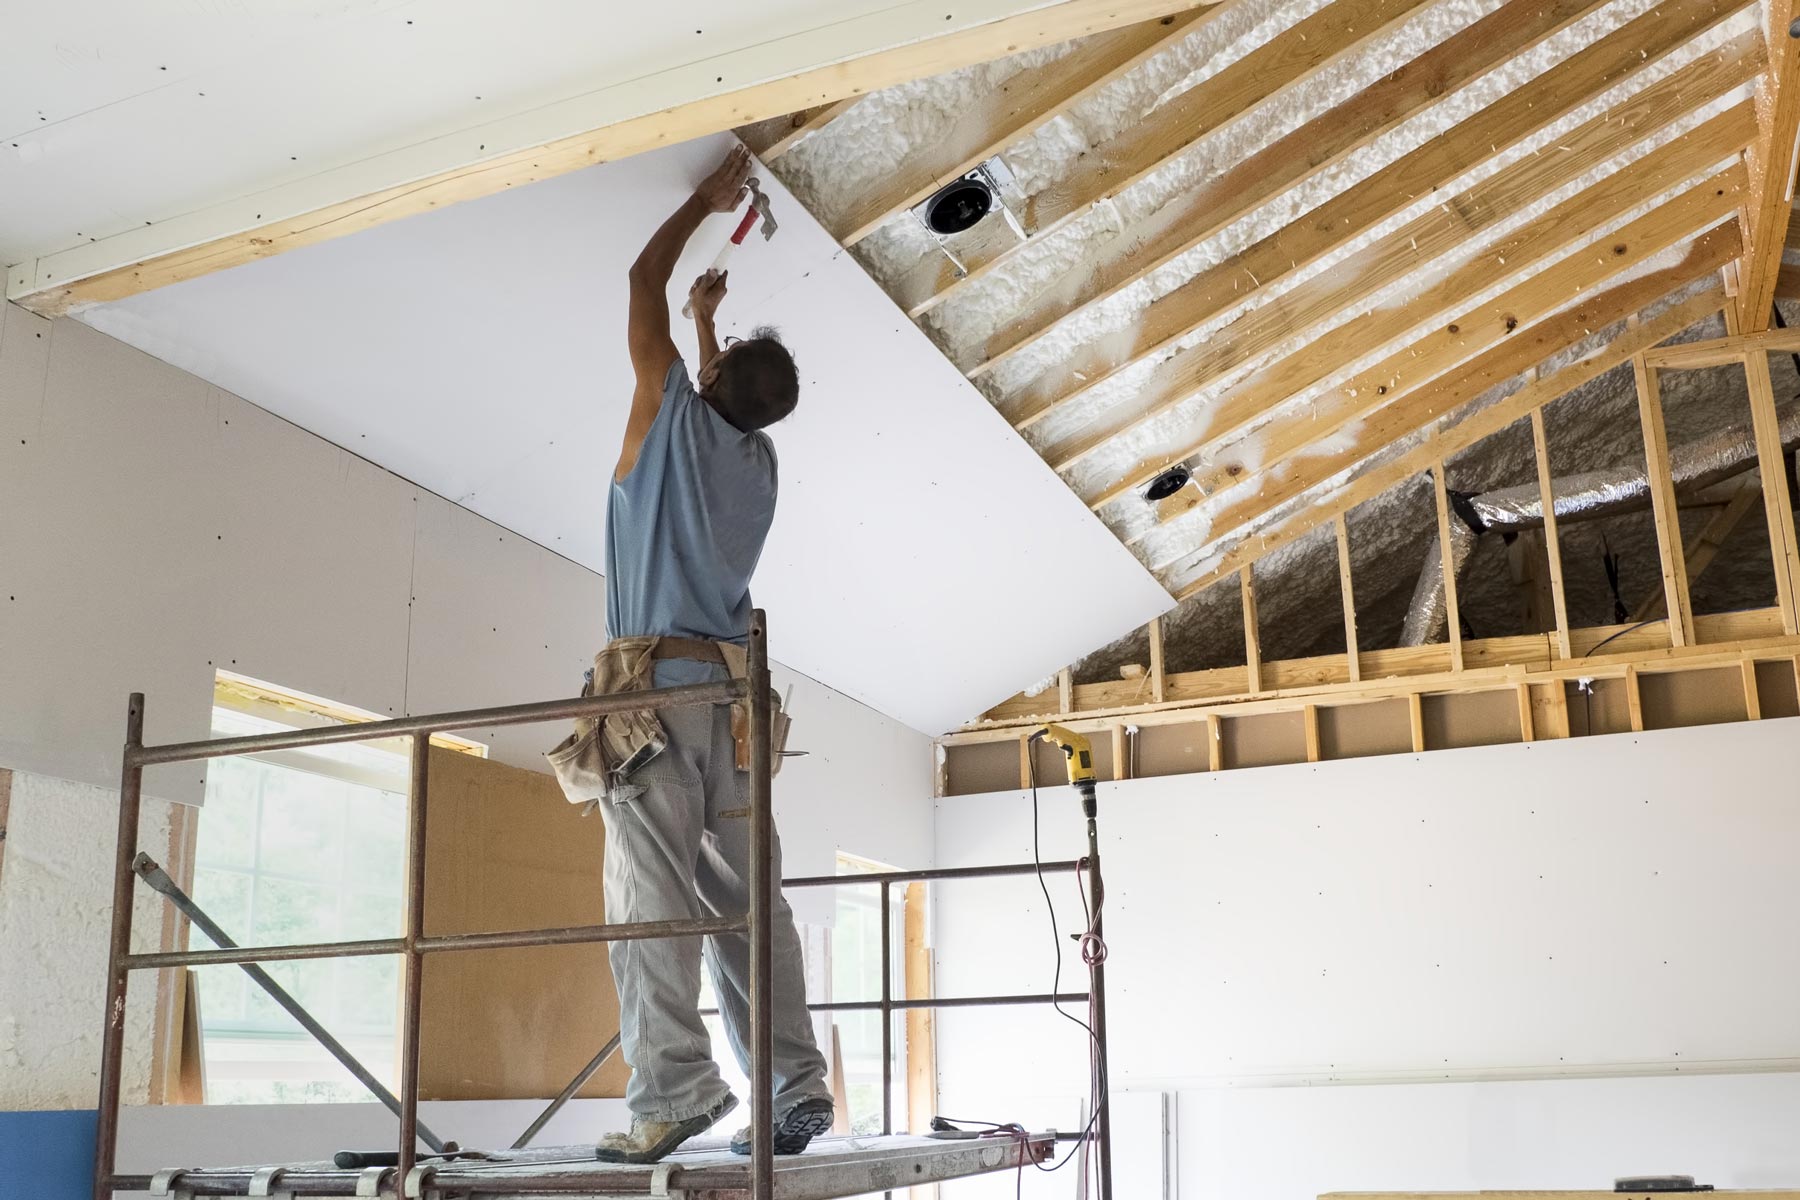
Step 7: Finishing Touches
Almost there! The final step in installing a ceiling in your basement involves adding the finishing touches to create a polished and aesthetically pleasing look. Here’s what you need to do:
- Adding moldings and trim for a polished look: To give your ceiling a finished appearance, consider adding moldings and trim. These decorative elements help to conceal any gaps or rough edges, providing a clean and polished look. Choose moldings and trim that complement the overall style of your basement and secure them to the edges of the ceiling tiles or panels using appropriate adhesives or fasteners.
- Painting or staining the ceiling: If you’ve installed ceiling tiles or panels that can be painted or stained, this is the perfect opportunity to add a splash of color or enhance the natural beauty of the material. Select a high-quality paint or stain suitable for the ceiling material and apply it evenly using a roller or paint sprayer. Allow the paint or stain to dry completely before moving any furniture or accessories back into the basement.
When choosing paint or stain colors, consider the overall aesthetics and purpose of your basement. Lighter colors can make the space feel more open and airy, while darker hues create a cozy and intimate atmosphere. If you’re unsure, test a small area before committing to a color.
Additionally, take the time to clean up any construction debris or dust that may have accumulated during the installation process. A thorough clean-up will ensure a pristine and inviting space.
By adding moldings and trim and applying paint or stain, you’ll elevate the overall look of your basement ceiling, transforming it into a stylish and visually appealing part of your home.
Conclusion
Congratulations on completing the installation of a ceiling in your basement! By following the steps outlined in this guide, you have transformed your basement into a functional and attractive living space. Let’s recap the key points:
1. Evaluate the basement space: Before starting the installation, assess the moisture levels and identify any structural issues that need to be addressed.
2. Plan the ceiling design: Determine the desired ceiling height and select the appropriate materials that suit your basement’s needs and aesthetic preferences.
3. Install ceiling insulation: Improve energy efficiency, temperature control, and noise reduction by properly insulating the basement ceiling.
4. Frame the ceiling: Measure, mark, and install framing components to provide the structure for the ceiling and accommodate electrical and plumbing needs.
5. Install electrical wiring and plumbing: Work with licensed professionals to run electrical wires and address any necessary plumbing installations, ensuring functionality and safety.
6. Install ceiling tiles or panels: Secure the chosen ceiling tiles or panels to the framing, following manufacturer instructions, to create a finished and visually appealing ceiling.
7. Add finishing touches: Enhance the look of your ceiling by adding moldings and trim, and consider painting or staining the ceiling for a customized and polished appearance.
With these steps completed, you have successfully transformed your basement into a livable area that adds value and comfort to your home. Enjoy the benefits of a well-insulated, aesthetically pleasing ceiling that enhances the overall ambiance of your basement.
Remember, it’s essential to consult professionals when needed and adhere to local building codes throughout the installation process. By doing so, you will ensure a safe and compliant outcome for your basement ceiling project.
We hope this guide has been helpful, inspiring, and informative. Now, it’s time to enjoy your newly installed basement ceiling and make the most of your renovated space!
Frequently Asked Questions about How To Put A Ceiling In A Basement
Was this page helpful?
At Storables.com, we guarantee accurate and reliable information. Our content, validated by Expert Board Contributors, is crafted following stringent Editorial Policies. We're committed to providing you with well-researched, expert-backed insights for all your informational needs.


0 thoughts on “How To Put A Ceiling In A Basement”