Articles
How To Put An Extension Ladder Back Together
Modified: October 18, 2024
Learn how to put an extension ladder back together with step-by-step instructions in this informative article. Ideal for DIY enthusiasts and contractors.
(Many of the links in this article redirect to a specific reviewed product. Your purchase of these products through affiliate links helps to generate commission for Storables.com, at no extra cost. Learn more)
Introduction
Putting an extension ladder back together may seem like a daunting task, but with the right tools and a step-by-step approach, it can be done easily and safely. Whether your ladder needs to be reassembled after storage or you’ve had to disassemble it for transportation, this guide will walk you through the process to help you put your ladder back together like a pro.
Before you begin, it’s important to note that safety should always be your top priority. Make sure you have a stable surface to work on and take precautions to avoid any potential hazards. Additionally, if you’re unsure about any aspect of ladder reassembly, consult the manufacturer’s instructions or seek professional assistance.
In this article, we’ll outline the steps to put an extension ladder back together, from gathering the necessary tools to testing the reassembled ladder. By following these steps carefully, you’ll have your ladder ready for use in no time.
Key Takeaways:
- Reassembling an extension ladder is a manageable task with the right tools and step-by-step approach, ensuring safety and stability for elevated tasks.
- Prioritize safety, inspect and secure ladder components, and test for stability to confidently reassemble and use an extension ladder for elevated tasks.
Read more: How To Put Glass Back Together
Step 1: Gather the Necessary Tools
Before you start reassembling your extension ladder, it’s essential to gather all the necessary tools to ensure a smooth and efficient process. Here are the tools you’ll need:
- A socket wrench or adjustable wrench
- A rubber mallet or hammer with a soft face
- Ladder rung lock pins (if needed)
- Grease or lubricant (optional)
Having these tools on hand will make it easier to reassemble your ladder properly. Make sure you have them readily available before proceeding to the next step.
It’s worth mentioning that ladder designs can vary, so the tools required may differ depending on the type of ladder you’re working with. Always refer to the manufacturer’s instructions for specific tool requirements.
Once you have gathered all the necessary tools, you’re ready to move on to the next step of putting your extension ladder back together.
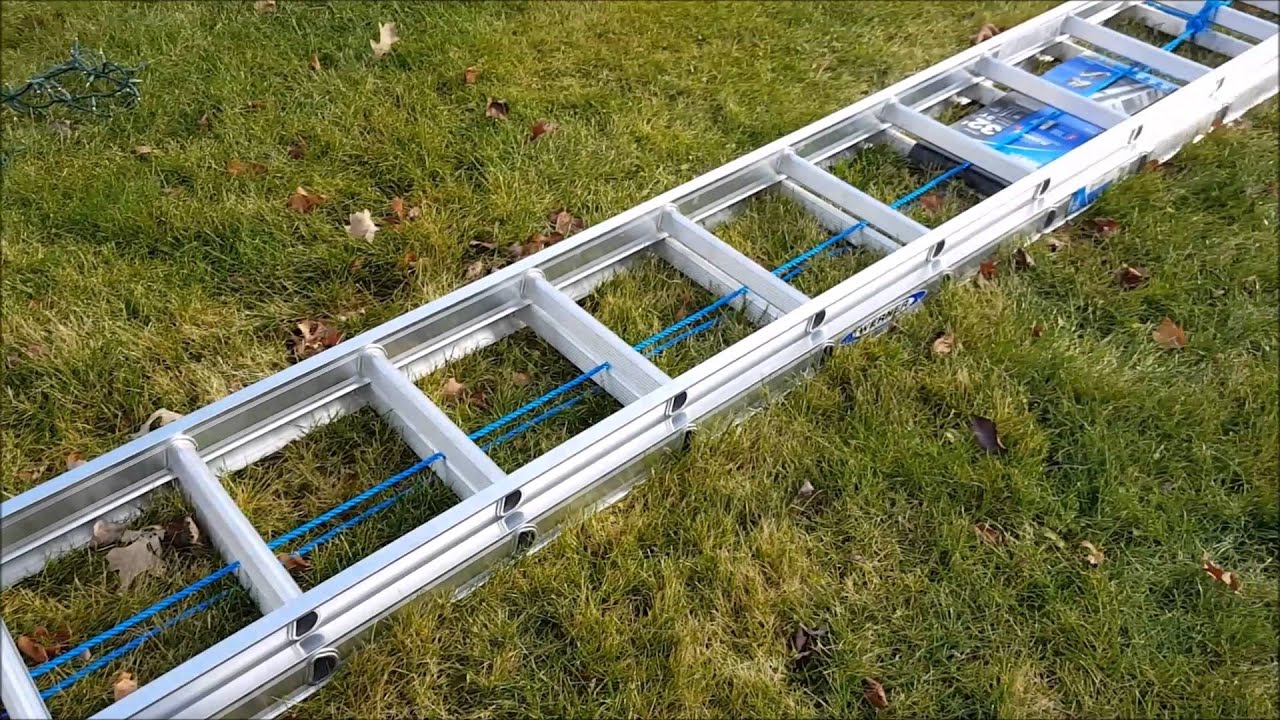
Step 2: Lay Out the Parts
With your tools ready, it’s time to lay out all the parts of your extension ladder. By organizing and visually inspecting the components, you’ll get a better understanding of how everything fits together.
Start by finding a clean and spacious area where you can spread out the ladder parts. Lay them out in a logical sequence, making sure to keep similar components together. This will help you easily identify and access each part during the reassembly process.
Some key parts to look out for include:
- The side rails: These are the main vertical parts of the ladder.
- The rungs: These are the horizontal steps of the ladder that connect the side rails.
- The rung locks: These are mechanisms that secure the rungs in place.
- The base rung and feet: These are the parts that provide stability and support at the bottom of the ladder.
As you lay out the parts, take the opportunity to inspect them for any signs of damage or wear. If you notice any cracked or bent components, it’s important to replace them before proceeding with the reassembly.
By laying out and inspecting the ladder parts, you’ll be able to familiarize yourself with the components and ensure that everything is in good condition before moving on to the next step.
Step 3: Reassemble the Side Rails
Now that you have laid out the ladder parts and inspected them, it’s time to begin reassembling the side rails. The side rails are the main vertical components of the ladder that provide support and stability.
To start, take one of the side rails and align it with the corresponding holes or slots on the other side rail. Make sure the rung holes are facing inward so that the rungs can be inserted later. The rails should fit snugly together, forming a straight line.
Once the side rails are aligned, it’s time to secure them together. Depending on the ladder design, this may involve using bolts, screws, or other fastening mechanisms. Refer to the manufacturer’s instructions to determine the specific method for reassembling the side rails.
Using a socket wrench or adjustable wrench, tighten the bolts or screws to securely fasten the side rails together. Be sure not to overtighten, as this could cause damage to the ladder. Check for any wobbling or misalignment – if you notice any, adjust the side rails accordingly and re-tighten the fasteners.
Once the side rails are properly reassembled and secure, move on to the next step of attaching the rung locks.
Note: Some extension ladders may have pre-assembled side rails, in which case you can skip this step and move directly to attaching the rung locks.
Step 4: Attach the Rung Locks
The next step in putting your extension ladder back together is attaching the rung locks. Rung locks are mechanisms that secure the ladder rungs in place, preventing them from sliding or slipping out during use.
Start by locating the rung locks among your ladder parts. These are typically small metal brackets or tabs that fit into holes or slots on the side rails.
Once you have identified the rung locks, slide them into the corresponding holes or slots on the side rails. Ensure that they are evenly spaced and aligned along the ladder’s length.
Once the rung locks are in place, you’ll need to secure them to the side rails. This can usually be done by inserting bolts, screws, or other fasteners and tightening them using a socket wrench or adjustable wrench.
Make sure to follow the manufacturer’s instructions for the specific type of rung locks on your ladder. They may have specific recommendations on how to secure them in place and adjust them for optimal functionality.
Once the rung locks are securely attached, give them a gentle tug to ensure they are locked in place and will hold the ladder rungs firmly.
By attaching the rung locks, you are one step closer to having a fully functional extension ladder. The next step is to secure the ladder rungs in place.
When putting an extension ladder back together, start by aligning the rungs and rails, then secure the locking mechanisms. Finally, test the ladder to ensure it is safe and secure before use.
Step 5: Secure the Rungs
Now that the rung locks are in place, it’s time to secure the ladder rungs. The rungs are the horizontal steps of the ladder that connect the side rails and provide a solid foothold while using the ladder.
To secure the rungs, start by inserting each rung into the rung locks, one by one. Make sure each rung is fully seated and aligned with the ladder’s sides.
Depending on your ladder design, the rungs may have locking mechanisms or tabs that need to be engaged to ensure they stay in place. These may include spring-loaded mechanisms or locking pins that need to be inserted.
Follow the manufacturer’s instructions to properly engage the locking mechanisms for your ladder’s rungs. This may involve sliding the mechanism into place, pushing down on a tab, or inserting a locking pin.
Take the time to ensure that each rung is secure and locked in place. Give them a gentle tug to confirm that they are firmly held and won’t move or dislodge during use.
If any of the rungs feel loose or show signs of damage, consider replacing them with new ones. It’s important to have stable and secure rungs for safe ladder use.
With the rungs securely in place, you’re now ready to move on to the next step of connecting the base rung and feet of the ladder.
Step 6: Connect the Base Rung and Feet
In this step, you will connect the base rung and feet of the ladder. The base rung provides stability and support, while the feet ensure a secure grip on the ground.
Begin by identifying the base rung and the corresponding feet among your ladder parts. The base rung is typically a wider rung located at the bottom of the ladder, and the feet are the rubber or non-slip components that come into contact with the ground.
Attach the feet to the base rung by aligning the holes or slots on the feet with the corresponding tabs or brackets on the base rung. Once aligned, insert the feet into the base rung until they are firmly in place.
Depending on your ladder design, you may need to secure the feet to the base rung using bolts, screws, or other fasteners. Refer to the manufacturer’s instructions for the specific method for attaching the feet.
Before tightening the fasteners, check the alignment of the feet to ensure they are level and properly positioned. Adjust them if necessary, and then use a socket wrench or adjustable wrench to securely fasten the feet to the base rung.
Once the base rung and feet are connected, test their stability by giving the ladder a gentle shake. The ladder should feel secure, with no wobbling or instability. If you notice any looseness or instability, double-check the connections and make any necessary adjustments.
With the base rung and feet securely connected, you’re now ready for the next step: extending the ladder and locking it in place.
Step 7: Extend the Ladder and Lock in Place
Now that the ladder’s main components are assembled, it’s time to extend the ladder to its full length and lock it in place. This step is crucial for ensuring the ladder’s stability and safety while in use.
Begin by holding onto the ladder’s side rails and carefully extend the ladder by pulling it away from the base. Use smooth, steady motions to gradually extend the ladder to its desired length.
As you extend the ladder, make sure the rungs fully lock into position and engage with the rung locks. You should hear a snapping or clicking sound as each rung locks into place.
Continue extending the ladder until it reaches the desired height. Use caution and maintain a firm grip on the ladder to prevent any sudden movements or collapses.
Once the ladder is fully extended, check that it is straight and aligned. Look for any signs of bending or misalignment in the side rails. If necessary, make adjustments to ensure the ladder is in a stable and vertical position.
To lock the extended ladder in place, locate the locking mechanism on your ladder. This may be a latch, lever, or similar device located near the top of the ladder.
Engage the locking mechanism by following the instructions provided by the ladder’s manufacturer. This will typically involve sliding or pushing the latch or lever into a locked position. You may also need to manipulate other locking mechanisms, such as locking pins or spring-loaded mechanisms, depending on your ladder’s design.
Once the ladder is locked in place, test its stability by giving it a gentle shake. The ladder should not wobble or shift, indicating that it is securely locked and stable for use.
With the ladder successfully extended and locked in place, you’re almost ready to climb and use your ladder. However, before doing so, it’s important to perform a final step to ensure everything is in proper working order.
Step 8: Test and Adjust as Needed
The final step in putting your extension ladder back together is to test it and make any necessary adjustments to ensure its safety and functionality.
Climb a few rungs up the ladder while maintaining a firm grip on the side rails. This will allow you to test the ladder’s stability and check for any potential issues.
As you climb, pay attention to the ladder’s overall stability. Make sure it doesn’t sway or wobble excessively. If you notice any instability, check the connections and tighten any loose bolts or fasteners.
Additionally, test the locking mechanisms to ensure they are securely holding the ladder in place. Verify that the rungs remain locked and don’t slide or shift when weight is applied.
Take note of any other factors that may affect the ladder’s functionality or safety. Check for any gaps or imbalance between the rungs and side rails. Inspect the rungs for any signs of wear or damage and replace them if necessary.
If you encounter any issues during the testing process, refer to the ladder’s manufacturer instructions for troubleshooting guidance. If needed, consult a professional for further assistance.
After completing the ladder test and making any necessary adjustments, you can be confident that your extension ladder is assembled correctly and ready for use.
Remember to always follow proper ladder safety guidelines when using your ladder, including placing it on a stable surface, maintaining three points of contact, and not exceeding the ladder’s weight capacity.
By following these steps and conducting the necessary tests and adjustments, you can ensure that your extension ladder is in optimal condition and ready to serve its purpose safely and effectively.
Congratulations! You have successfully put your extension ladder back together and are now ready to accomplish your tasks at new heights.
Read more: How To Put A Blender Together
Conclusion
Putting an extension ladder back together may seem like a daunting task, but with the right approach and attention to detail, it can be accomplished easily and safely. By following the step-by-step process outlined in this guide, you can confidently reassemble your ladder and have it ready for use in no time.
From gathering the necessary tools to testing and adjusting the ladder, each step plays a crucial role in ensuring the ladder’s stability and functionality. Take the time to inspect the ladder parts, secure the rungs and rung locks, connect the base rung and feet, and extend and lock the ladder at the desired height.
Throughout the process, prioritize safety and double-check all connections and locking mechanisms. Test the ladder’s stability, making any necessary adjustments or replacements to ensure a secure and reliable ladder for your tasks.
Remember to always practice proper ladder safety when using your reassembled extension ladder. Look for a stable surface, maintain three points of contact, and adhere to the ladder’s weight capacity guidelines.
By following these recommendations and the manufacturer’s instructions, you can confidently put your extension ladder back together and be ready to tackle your projects at elevated heights.
So go ahead, take on those tasks that require reaching new heights, with the knowledge and confidence that comes from successfully reassembling your extension ladder.
Frequently Asked Questions about How To Put An Extension Ladder Back Together
Was this page helpful?
At Storables.com, we guarantee accurate and reliable information. Our content, validated by Expert Board Contributors, is crafted following stringent Editorial Policies. We're committed to providing you with well-researched, expert-backed insights for all your informational needs.


0 thoughts on “How To Put An Extension Ladder Back Together”