Articles
How To Remove Toilet Paper Holder From Wall
Modified: February 22, 2024
Want to remove a toilet paper holder from the wall? Read this helpful article for step-by-step instructions on how to get it done efficiently.
(Many of the links in this article redirect to a specific reviewed product. Your purchase of these products through affiliate links helps to generate commission for Storables.com, at no extra cost. Learn more)
Introduction
Having a toilet paper holder securely mounted on the wall is essential for any bathroom. However, there may come a time when you need to remove the holder, whether it’s for a renovation, replacement, or simply a change in design. Removing a toilet paper holder from the wall may seem like a daunting task, but with the right tools and techniques, it can be done smoothly and efficiently.
In this article, we will guide you through the step-by-step process of removing a toilet paper holder from the wall. We will also provide some tips and tricks to make the task even easier. So, let’s get started!
Key Takeaways:
- Easily remove a toilet paper holder by gathering the right tools, locating mounting brackets, and safely detaching it from the wall. Patch any holes for a seamless finish.
- Consider installing a new toilet paper holder for a refreshed bathroom look. Follow manufacturer’s instructions for a smooth installation process.
Step 1: Gather the necessary tools and materials
Before you begin removing the toilet paper holder from the wall, it’s important to gather all the necessary tools and materials. Having everything ready beforehand will save you time and make the process smoother. Here’s a list of what you’ll need:
- Screwdriver (Phillips or flat-head, depending on the screws)
- Utility knife or putty knife (for patching or repairing holes)
- Pliers or wrench (if there are stubborn fasteners)
- Optional: Patching compound or spackling paste
- Optional: Sandpaper (for smoothing out patched areas)
Once you’ve gathered all the necessary tools and materials, you’re ready to move on to the next step.
Step 2: Locate the mounting brackets
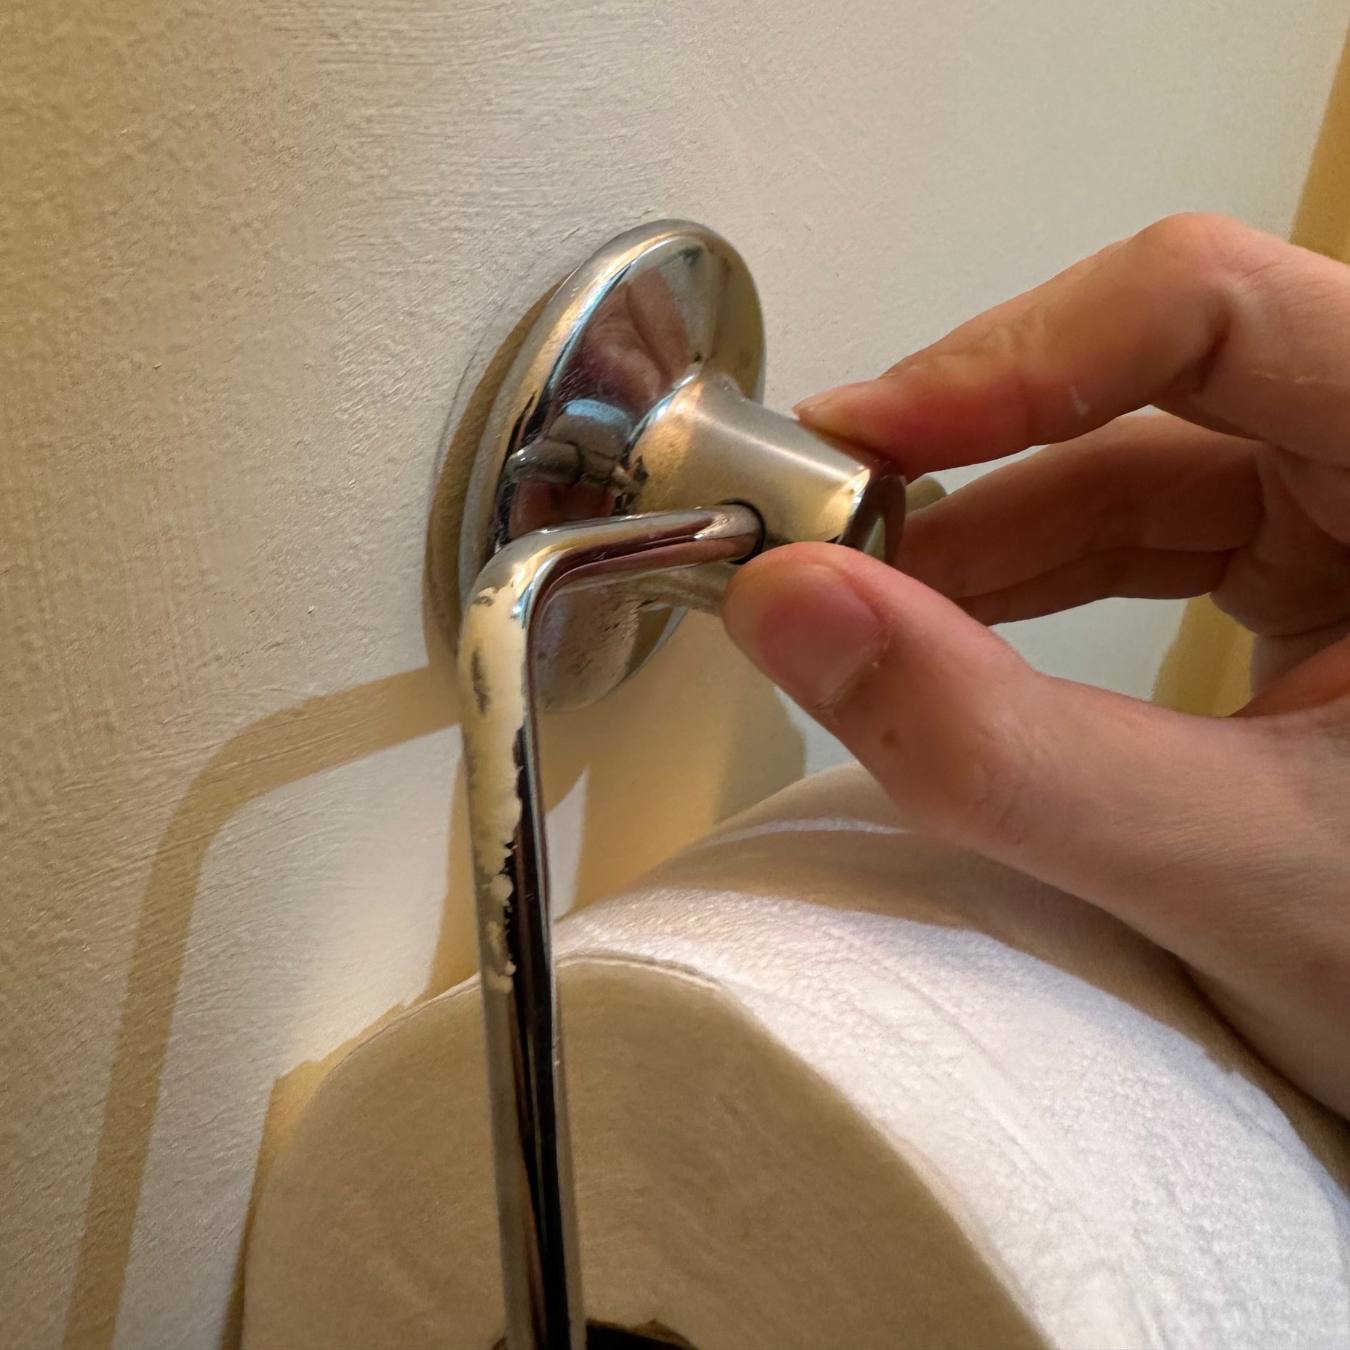
In order to remove the toilet paper holder from the wall, you first need to locate the mounting brackets. These brackets are typically hidden behind the holder or the decorative cover, so you may need to do a little bit of investigating.
Start by examining the holder closely for any visible screws or fasteners. They are usually located on the bottom or the sides of the holder. If you see any screws or fasteners, you may be able to remove the holder by simply unscrewing them.
If you don’t see any visible screws, gently try to remove the decorative cover or cap. This cover is usually attached with adhesive or a small clip. Carefully pry it open with a flat-head screwdriver or your fingers. Once the cover is removed, you should be able to see the mounting brackets.
Keep in mind that some toilet paper holders may have concealed mounting brackets. In this case, you won’t see any visible screws or brackets. Instead, you’ll have to feel around the holder and locate any access holes or slots.
Once you’ve located the mounting brackets, you’re ready to move on to the next step and remove the screws or fasteners.
Step 3: Remove the screws or fasteners
Now that you’ve located the mounting brackets, it’s time to remove the screws or fasteners that are securing the toilet paper holder to the wall. The process may vary depending on the type of holder you have and how it is attached.
If you have a holder with visible screws, use the appropriate screwdriver (Phillips or flat-head) to unscrew them in a counterclockwise direction. Make sure to keep a firm grip on the holder as you remove the screws to prevent it from falling off the wall.
If the screws are stubborn or difficult to turn, you can try using pliers or a wrench for added leverage. Be careful not to apply too much force, as it may damage the screws or the holder itself.
For holders with concealed mounting brackets or access holes, use a screwdriver to reach inside and unscrew the fasteners. You may need to rotate the screwdriver to find the right angle and alignment. Once you feel the fasteners loosening, continue rotating them counterclockwise until they are completely removed.
After removing all the screws or fasteners, gently pull the toilet paper holder away from the wall. It should come off easily, but if it feels stuck, check for any remaining screws or clips that may still be holding it in place.
With the screws or fasteners removed and the holder detached from the wall, you’re ready to move on to the next step and prepare the wall for any necessary repairs or patching.
Use a screwdriver to remove the screws holding the toilet paper holder to the wall. If there are plastic anchors, gently tap them with a hammer to push them into the wall before pulling the holder off.
Step 4: Detach the toilet paper holder from the wall
Now that the screws or fasteners have been removed, it’s time to detach the toilet paper holder from the wall. This step involves carefully separating the holder from any adhesive or caulking that may be securing it in place.
Start by gently pulling the holder away from the wall, applying steady and even pressure. Wiggle it slightly from side to side to loosen any adhesive or caulking that may be holding it in place.
If you encounter resistance and the holder doesn’t easily come off, it’s likely that there is adhesive or caulking behind it. In such cases, use a utility knife or putty knife to carefully cut through the adhesive or caulking, working your way around the edges of the holder.
Be cautious while using the knife to avoid damaging the wall or the holder. Take your time and work slowly to minimize the risk of accidents or mishaps.
Once the adhesive or caulking has been cut through, you should be able to fully detach the toilet paper holder from the wall. Set it aside in a safe place while you prepare the wall for any necessary repairs or patching.
By following these steps, you will be able to remove the toilet paper holder from the wall in a safe and effective manner, without causing any damage to the holder or the surrounding area.
Step 5: Patch or repair any holes
After removing the toilet paper holder from the wall, you may notice that there are holes or marks left behind. These can be unsightly and need to be patched or repaired to restore the wall’s appearance.
Start by inspecting the holes to determine their size and depth. For smaller holes, you can use a patching compound or spackling paste to fill them in. Larger holes may require a patching kit, which typically includes a piece of mesh or patching material.
If you’re using a patching compound or spackling paste, follow these steps:
- Clean the area around the hole with a damp cloth to remove any dust or debris.
- Apply a small amount of the patching compound or spackling paste to a putty knife or a flexible scraper.
- Smooth the compound or paste over the hole, ensuring that it is completely covered and leveled with the surrounding wall surface.
- Allow the patching compound or spackling paste to dry according to the manufacturer’s instructions.
- Sand the patched area lightly with sandpaper to achieve a smooth finish.
- Wipe away any dust or residue with a clean, damp cloth.
If you’re using a patching kit, here’s how to proceed:
- Clean the area around the hole with a damp cloth to remove any dust or debris.
- Follow the manufacturer’s instructions to cut a piece of patching material slightly larger than the hole.
- Apply a layer of patching compound or spackling paste around the edges of the hole.
- Place the patching material over the hole and press it firmly into the compound or paste.
- Apply another layer of compound or paste over the patching material, ensuring that it is completely covered and smoothed out.
- Allow the patching compound or spackling paste to dry according to the manufacturer’s instructions.
- Sand the patched area lightly with sandpaper to achieve a smooth finish.
- Wipe away any dust or residue with a clean, damp cloth.
Once the patched area has dried and been sanded, the wall should be ready for further treatment or a fresh coat of paint, if desired.
By patching or repairing any holes left behind by the toilet paper holder, you can ensure a seamless and professional-looking finish to your bathroom walls.
Step 6: Install a new toilet paper holder (optional)
If you’ve removed your old toilet paper holder for a renovation or simply want to replace it with a new one, this step will guide you through the process of installing a new toilet paper holder.
Before you begin, make sure you have the new toilet paper holder and any necessary mounting hardware, such as screws or brackets. Follow these steps to install the new holder:
- Start by determining the desired location for the new toilet paper holder. Consider factors such as height and accessibility.
- Using a tape measure or level, mark the exact position where you want to mount the holder on the wall.
- Using a drill or screwdriver, secure the mounting brackets or backplate to the wall by inserting screws into the pre-drilled holes.
- If the new holder has a decorative cover or cap, attach it to the mounting brackets.
- Insert the toilet paper holder onto the mounting brackets, ensuring that it is securely attached.
- Give the holder a gentle tug or wiggle to make sure it is properly installed and stable.
It’s important to note that the installation process may vary depending on the specific type and model of the toilet paper holder you have. Always refer to the manufacturer’s instructions for the most accurate and detailed guidance.
By following these steps, you can install a new toilet paper holder to complete the look and functionality of your bathroom.
Conclusion
Removing a toilet paper holder from the wall may seem like a daunting task, but with the right tools and techniques, it can be accomplished easily and efficiently. By following the step-by-step instructions outlined in this article, you can successfully remove a toilet paper holder and prepare the wall for any necessary repairs or patching.
Remember to gather all the necessary tools and materials before starting the process. Locate the mounting brackets, remove the screws or fasteners, and detach the toilet paper holder from the wall. Take care in cutting through any adhesive or caulking if necessary.
After removing the holder, assess the wall for any holes and patch them accordingly using patching compound, spackling paste, or a patching kit. Once the patched area has dried and been sanded, the wall will be ready for further treatment or a fresh coat of paint.
If you’re looking to replace your toilet paper holder, the optional step 6 provides guidance on installing a new one. Ensure you have the necessary hardware and follow the instructions provided with the new holder.
By following these steps and using the proper techniques, you can safely remove a toilet paper holder from the wall and complete any necessary repairs or replacements. Remember to take your time, be cautious, and consult the manufacturer’s instructions when needed.
With a little effort and patience, you can successfully remove a toilet paper holder from the wall, leaving you with a clean and refreshed bathroom that meets your design preferences and needs.
Frequently Asked Questions about How To Remove Toilet Paper Holder From Wall
Was this page helpful?
At Storables.com, we guarantee accurate and reliable information. Our content, validated by Expert Board Contributors, is crafted following stringent Editorial Policies. We're committed to providing you with well-researched, expert-backed insights for all your informational needs.


0 thoughts on “How To Remove Toilet Paper Holder From Wall”