Home>Articles>How To Run Pipes Through Walls And Floors For DIY Plumbing Work
Articles
How To Run Pipes Through Walls And Floors For DIY Plumbing Work
Modified: October 19, 2024
Learn how to run pipes through walls and floors with our helpful articles on DIY plumbing work.
(Many of the links in this article redirect to a specific reviewed product. Your purchase of these products through affiliate links helps to generate commission for Storables.com, at no extra cost. Learn more)
Introduction
Running pipes through walls and floors is a fundamental skill for any DIY plumber. Whether you’re installing new plumbing fixtures, rerouting pipes, or making repairs, knowing how to properly run pipes through these structures is crucial. It not only ensures the efficient flow of water and waste, but also helps maintain the integrity of your home’s infrastructure.
In this comprehensive guide, we will show you step-by-step instructions on how to run pipes through walls and floors. We will cover everything from planning and preparation to the actual installation process. By following these guidelines, you can confidently take on plumbing projects and save money by doing the work yourself.
Before we dive into the details, it’s important to note that plumbing projects require a certain level of skill and knowledge. If you’re unsure about any aspect of the job or run into unexpected issues, it’s always a good idea to consult with a professional plumber. Safety should be your top priority, so take the necessary precautions and don’t hesitate to seek professional help if needed.
Now, let’s get started with the planning and preparation phase of running pipes through walls and floors.
Key Takeaways:
- Proper planning, precise measurements, and understanding the layout of walls and floors are crucial for successfully running pipes through DIY plumbing projects. Choosing the right pipe material and securing pipes in place ensures a reliable and efficient plumbing system.
- Testing for leaks, patching access holes, and connecting pipes and fittings are essential steps to maintain the integrity and functionality of the plumbing system. Prioritizing safety and seeking professional assistance when needed are key aspects of successful DIY plumbing work.
Read more: How To Run Electrical Wire Through Walls
Planning and Preparation
Before you begin running pipes through walls and floors, it’s essential to plan the project meticulously. This helps you ensure that everything goes smoothly and minimizes the chances of mistakes or problems along the way. Here are the key steps to consider during the planning and preparation phase:
- Identify the purpose: Determine why you need to run pipes through walls and floors. Are you installing new plumbing fixtures, such as a bathroom or kitchen sink? Or are you rerouting existing pipes to accommodate a renovation or remodeling project? Understanding the purpose will guide your decisions throughout the process.
- Create a detailed plan: Sketch out the layout of your plumbing system, including the locations of fixtures, existing pipes, and the desired path for the new pipes. Label the hot and cold water lines, drainage pipes, and any other necessary connections.
- Consider building codes and permits: Check local building codes to ensure compliance with regulations. Some jurisdictions require permits for certain plumbing projects, so make sure to obtain the necessary permits if required.
- Calculate materials and quantities: Once you know the pipe routes and connections, measure the lengths of pipes needed. Take into account any fittings, connectors, and supports required. It’s always a good idea to have some extra materials on hand in case of measurement errors or unexpected changes.
- Set a budget: Determine your budget for the project, including the cost of materials, tools, and any professional help you might need. This will help you make informed decisions while staying within your financial limits.
- Collect the necessary tools and materials: Assemble all the tools and materials you’ll need for the project. This typically includes pipe cutters, wrenches, fittings, connectors, glue or soldering materials, and pipe supports. Having everything on hand before you start will save you time and frustration.
By carefully planning and preparing for your pipe installation project, you’ll set a solid foundation for success. With a clear understanding of the purpose, a detailed plan, and the right tools and materials, you can proceed confidently to the next steps of running pipes through walls and floors.
Tools and Materials Needed
Running pipes through walls and floors requires specific tools and materials to ensure a successful installation. Having the right equipment at hand will make the job easier and more efficient. Here’s a list of the essential tools and materials you’ll need:
Tools:
- Pipe cutter or hacksaw: Used to cut pipes to the desired length.
- Pipe wrench: Used to tighten and loosen pipe fittings.
- Tubing cutter: Specifically designed for cutting copper pipes.
- Drill: Required for creating holes in walls and floors.
- Hole saw: Necessary for cutting larger openings in walls and floors.
- Plumbers tape: Used to seal threaded pipe connections.
- Measuring tape: Essential for accurately measuring pipe lengths and distances.
- Pencil or marker: Used for marking pipe routes and measurement points.
- Level: Helps ensure pipes are installed straight and level.
- Safety equipment: Including gloves, safety glasses, and a mask to protect against any hazards during the installation process.
Materials:
- Pipes: Choose the appropriate material for your plumbing needs, such as copper, PEX, or PVC pipes.
- Pipe fittings: Connect and secure pipes together in a leak-proof manner.
- Pipe connectors: Used to join pipes of different materials or sizes.
- Pipe supports: Keep the pipes securely in place and prevent sagging or movement.
- Pipe insulation: Insulate hot water pipes to conserve energy and prevent heat loss.
- Primer and glue: Necessary for joining PVC pipes and fittings together.
- Solder and flux: Used for soldering copper pipes and fittings.
- Pipe hangers: Provide additional support to pipes and prevent excessive movement.
- Caulk or sealant: Used to seal any gaps or joints in walls or floors where pipes pass through.
Having these tools and materials readily available will make your pipe installation process much smoother. It’s important to choose high-quality products and materials to ensure the longevity and reliability of your plumbing system.
Read more: How To Find Plumbing Pipe In Walls
Safety Considerations
When working on any plumbing project, it’s crucial to prioritize safety to protect yourself and others. Plumbing work can involve sharp tools, heavy materials, and potential hazards, so taking the necessary precautions is essential. Here are some important safety considerations to keep in mind while running pipes through walls and floors:
1. Wear protective gear:
Always wear appropriate safety gear, including safety glasses, gloves, and a mask. These items will help protect your eyes, hands, and respiratory system from particles, dust, and potential chemical exposure.
2. Shut off the water supply:
Before starting any plumbing work, make sure to shut off the water supply to the area where you’ll be working. This prevents accidental water leaks or flooding and allows you to work on the pipes safely.
3. Turn off power and gas:
If your plumbing project involves working near electrical wiring or gas lines, ensure that the power and gas supply are turned off. This will prevent the risk of electric shock or gas leaks, which can be extremely dangerous.
4. Identify and avoid obstacles:
Before cutting into walls or floors, identify any potential obstacles such as electrical wires, ductwork, or structural components. Take steps to avoid damaging these elements or creating further safety hazards.
5. Use proper tools and techniques:
Make sure to use the right tools for the job and follow proper techniques. This not only ensures efficient work but also minimizes the risk of accidents or injuries. Properly maintain and inspect your tools to ensure they are in good working condition.
6. Work in a well-ventilated area:
If you’re using adhesives, solvents, or soldering materials, ensure you’re working in a well-ventilated area. This helps prevent the inhalation of harmful fumes and reduces the risk of chemical exposure.
7. Take breaks and stay hydrated:
Plumbing work can be physically demanding, so remember to take regular breaks and stay hydrated. Ensure you’re well-rested to maintain focus and reduce the risk of accidents due to fatigue.
These safety considerations are essential to keep in mind while running pipes through walls and floors. Always prioritize your safety and the safety of others, and don’t hesitate to seek professional assistance if needed.
Read more: How To Clean Plumbing Pipes
Understanding the Layout of Walls and Floors
Before running pipes through walls and floors, it’s important to have a clear understanding of their layout. This will help you determine the best path for your pipes and avoid any existing obstructions. Here are some key factors to consider when assessing the layout of walls and floors:
1. Studs and Joists:
Walls are typically built with vertical studs, while floors have horizontal joists. These structural elements provide support and stability to the building. It’s important to identify their location to determine where it is safe to cut and drill for pipe passages. Stud finders and blueprints can help locate them accurately.
2. Electrical Wiring and Ductwork:
Electrical wiring and HVAC ducts are commonly installed within walls and floors. These components need to be avoided or worked around when running pipes. Ensure you locate any existing electrical wires or ductwork before making any cuts or drilling holes to avoid damaging them. If needed, consult with a licensed electrician or HVAC specialist to assist in rerouting the wires or ducts.
3. Load-Bearing Walls:
Some walls provide structural support to the building, known as load-bearing walls. It is crucial to identify these walls to ensure that any cuts or openings made for pipe installation do not compromise the building’s stability. Consult with a structural engineer or a professional contractor if you’re uncertain about the load-bearing capability of a wall.
Read more: How To Insulate Plumbing Pipes
4. Plumbing Chases:
In some cases, walls or floors may have pre-built plumbing chases. These are designated spaces specifically designed for running pipes. Identifying these chases can significantly simplify the installation process, as they already provide a clear path for the pipes. Look for any access panels or markings that indicate the presence of plumbing chases.
5. Obstructions and Concealed Spaces:
It’s common to encounter obstructions, such as firebreaks or insulation, within walls and floors. These can hinder the direct passage of pipes. Carefully assess the space and plan how to navigate around these obstructions. Consider using flexible pipes or exploring alternative routes to avoid them.
Understanding the layout of walls and floors allows you to plan the pipe routes effectively and avoid unnecessary complications during installation. Take the time to thoroughly assess the space and consult with professionals if needed to ensure a successful pipe installation.
Locating Existing Pipes and Obstructions
Before running pipes through walls and floors, it’s essential to locate any existing pipes and obstructions. This step ensures that you can plan your pipe routes effectively and avoid damaging any pre-existing plumbing or structural elements. Here’s how you can locate existing pipes and obstructions:
1. Use Blueprints and Building Documentation:
If available, refer to the building blueprints or documentation that indicates the locations of existing pipes. These documents can provide valuable information about the plumbing layout and help you plan your new pipe routes accordingly.
Read more: How To Replace Plumbing Pipes
2. Visual Inspection:
Perform a visual inspection of the areas where you plan to run pipes. Look for any visible signs, such as exposed pipes or access panels, that indicate the presence of existing plumbing. This can help identify the general path of the pipes and guide your installation process.
3. Follow Fixtures and Appliances:
Trace existing pipes back to their sources by following fixtures and appliances, such as sinks, toilets, showers, or water heaters. These fixtures typically connect to the main plumbing lines, providing clues for locating existing pipes within the walls and floors.
4. Use a Pipe and Wire Locator:
Consider using a pipe and wire locator, also known as a stud finder or pipe detector, to locate existing pipes behind walls and buried within floors. These devices use electronic signals to detect metallic objects, including pipes, making it easier to pinpoint their locations.
5. Check Access Panels and Utility Rooms:
Access panels in walls or utility rooms can provide direct access to existing pipes. Open these panels and inspect the areas behind them to determine the specific path and location of the pipes. This information is useful for planning new pipe routes and avoiding any interference with the existing plumbing.
Read more: How To Hide Plumbing Pipes
6. Consult with a Professional:
If you’re unsure about the location of existing pipes or obstructions, or if you encounter any complexities, it’s always a good idea to consult with a professional plumber. They have the expertise and specialized tools to accurately locate pipes and can provide guidance based on your specific situation.
By thoroughly locating existing pipes and obstructions, you can plan your pipe installation with confidence. This not only ensures a smoother installation process but also helps avoid potential issues or damage to existing plumbing systems.
Choosing the Right Pipe Material
When running pipes through walls and floors for your DIY plumbing work, one crucial decision is choosing the right pipe material. Different materials offer varying levels of durability, flexibility, and resistance to corrosion, which can affect the longevity and performance of your plumbing system. Here are some common pipe materials to consider:
1. Copper:
Copper pipes are a popular choice for plumbing systems due to their excellent durability and resistance to corrosion. They have a long lifespan and are suitable for both hot and cold water applications. Copper pipes are known for their reliability and can be soldered or connected using compression or push-fit fittings.
2. PEX (Cross-linked Polyethylene):
PEX pipes are flexible and easy to work with, making them a practical option for running pipes through walls and floors. They are resistant to scale and chlorine, which enhances their durability. PEX pipes are available in different colors to distinguish between hot and cold water lines. They can be connected using crimp or clamp fittings.
Read more: How To Run Plumbing To A Shed
3. PVC (Polyvinyl Chloride):
PVC pipes are commonly used for drainage and waste systems, though they can also be suitable for water supply applications. They are lightweight, resistant to corrosion, and easy to install. PVC pipes are joined using solvent cement, making them a cost-effective choice for running pipes in walls and floors.
4. CPVC (Chlorinated Polyvinyl Chloride):
CPVC pipes are a variation of PVC pipes, specifically designed for hot water applications. They exhibit excellent heat resistance and are suitable for running pipes in walls and floors where hot water lines are required. CPVC pipes are typically connected using solvent cement or threaded fittings.
5. Galvanized Steel:
Galvanized steel pipes were commonly used in older plumbing systems. They are durable and resistant to corrosion but have been largely replaced by more modern materials. If you have existing galvanized steel pipes, consider replacing them with newer materials due to their potential for rusting and reduced water flow over time.
When choosing the right pipe material, consider factors such as the specific application, budget, local building codes, and the overall durability of the material. It’s also important to make sure the chosen pipe material is compatible with the fittings and connectors you plan to use.
Consulting with a professional plumber can provide valuable insights and help you make an informed decision based on your specific plumbing needs and requirements. Choosing the right pipe material ensures a reliable and efficient plumbing system that will serve you well for years to come.
Measuring and Marking the Pipe Route
Accurate measurement and marking of the pipe route is crucial for a successful plumbing project. Proper measurements ensure that the pipes fit precisely and follow the desired path through walls and floors. Here are the steps to effectively measure and mark the pipe route:
Read more: How To Run Plumbing In A House
1. Plan the Pipe Route:
Refer to your plumbing layout plan and determine the desired path for the pipes. Consider factors such as the most direct route, accessibility for future repairs or maintenance, and any potential obstacles or obstructions that need to be avoided.
2. Measure the Pipe Lengths:
Using a measuring tape, accurately measure the length of each pipe section needed for the planned route. Add a few extra inches to account for fittings, connectors, and any necessary adjustments during installation. Take note of the measurements to ensure you cut the pipes to the correct lengths.
3. Mark the Pipe Route:
Using a pencil or marker, mark the pipe route on the walls or floors according to your plan. Make sure the marks are clearly visible and can be easily followed during the installation process. Use a level to ensure your markings are straight and level if necessary.
4. Consider Pipe Supports:
Take into consideration the need for pipe supports at regular intervals. Pipe supports help prevent sagging or movement and keep the pipes securely in place. Mark the locations where supports will be installed along the pipe route. Ensure the supports are suitable for the chosen pipe material.
Read more: How To Run A Dryer Vent Through The Attic
5. Account for Access Points:
Mark the locations where you will need access points, such as for shut-off valves or cleanouts. These access points allow for easy maintenance or repairs in the future. Ensure there is sufficient space and clearance to install the necessary fittings and connectors at these points.
6. Double-Check Measurements:
Before cutting any pipes, double-check your measurements and marks to ensure accuracy. It’s better to take the time to verify everything before proceeding to avoid any unnecessary mistakes or rework.
7. Take Obstacles into Account:
If you encounter obstacles or obstructions during the pipe route, such as electrical wires or studs, adjust your markings accordingly to avoid interference. You may need to reroute the pipes or create notches or holes around these obstacles. Consult with a professional if you’re unsure about the best course of action.
By carefully measuring and marking the pipe route, you can ensure a precise and efficient installation process. Proper planning and accurate markings help minimize errors and save time during the actual pipe installation through walls and floors.
Cutting Access Holes in Walls and Floors
When running pipes through walls and floors, it’s often necessary to cut access holes to accommodate the pipes. These holes allow you to create openings for the pipes to pass through and connect to the plumbing system. Here are the steps to effectively cut access holes in walls and floors:
Read more: How To Run Doorbell Wire Through Brick
1. Plan the Location:
Refer to your plumbing layout plan and determine the specific locations where access holes are needed. Consider factors such as the path of the pipe, the proximity to fixtures or appliances, and the accessibility for future maintenance or repairs.
2. Mark the Hole Location:
Using a measuring tape, measure and mark the exact location for the access hole on the wall or floor. Double-check your measurements to ensure accuracy. Use a pencil or marker to make clear and visible markings.
3. Prepare the Area:
Cover the surrounding area with a drop cloth or plastic sheet to catch any dust or debris created during the cutting process. This will help keep the work area clean and minimize the cleanup afterward.
4. Select the Cutting Tool:
Choose the appropriate cutting tool based on the material of the wall or floor. For drywall or plaster, a drywall saw or keyhole saw works well. For wooden floors, a jigsaw or reciprocating saw may be needed. In some cases, you may need to use a drill with a hole saw attachment for larger access holes.
Read more: Which Plumbing Pipe Is The Best
5. Cut the Access Hole:
Using the selected cutting tool, carefully cut along the marked lines to create the access hole. Take your time and make slow, controlled cuts to ensure accuracy. Follow safety guidelines and wear personal protective equipment (PPE) such as goggles or a mask if necessary.
6. Check and Adjust:
After cutting the hole, inspect the area to ensure it is large enough to accommodate the pipe and any necessary fittings or connectors. Trim or enlarge the hole if needed, making sure to maintain a snug fit for the pipe while allowing for easy installation.
7. Smooth the Edges:
Use sandpaper or a file to smooth any rough edges around the access hole. This will help prevent damage to the pipe and make the installation process smoother. It’s important to create a clean and even surface for the pipe to pass through.
Remember to follow local building codes and regulations when cutting access holes in walls and floors. If you’re uncertain or uncomfortable with the cutting process, it’s always best to consult with a professional plumber or contractor for guidance.
Cutting access holes in walls and floors requires accuracy and caution. Following these steps will help you create the necessary openings for your pipes while ensuring a clean and professional-looking installation.
Drilling Holes for Pipe Passages
Drilling holes for pipe passages is a crucial step when running pipes through walls and floors. These holes provide a pathway for the pipes to pass through while maintaining the structural integrity of the surrounding materials. Here are the steps to effectively drill holes for pipe passages:
Read more: How To Run Extension Cord Through Window
1. Plan the Hole Locations:
Refer to your plumbing layout plan and determine the specific locations where the pipe passages are needed. Consider factors such as the path of the pipe, the size of the pipe, and any potential obstructions or obstacles that need to be avoided.
2. Select the Right Drill and Drill Bit:
Choose a drill that is suitable for the material you will be drilling into, whether it’s wood, drywall, or concrete. Make sure the drill bit size matches the diameter of the pipe that will be passing through the hole.
3. Mark the Hole Locations:
Using a measuring tape, measure and mark the exact locations for the holes on the wall or floor. Double-check your measurements to ensure accuracy. Use a pencil or marker to make clear and visible markings.
4. Prepare the Work Area:
Cover the surrounding area with a drop cloth or plastic sheet to catch any dust or debris created while drilling. This will help keep the work area clean and minimize the cleanup afterward. If necessary, use painter’s tape to create a guide or prevent the drill bit from wandering.
Read more: What Is A Drain Pipe In Plumbing
5. Drill the Holes:
Hold the drill steady and align the drill bit with the marked hole location. Apply gentle pressure and begin drilling at a low speed, gradually increasing speed as the hole deepens. Use a firm, but not excessive, grip on the drill to maintain control. Keep the drill perpendicular to the surface to ensure a straight and clean hole.
6. Check the Depth and Clean the Hole:
Periodically stop drilling and check the depth of the hole using a tape measure or depth gauge. Ensure the hole is deep enough for the pipe to pass through without obstruction. Once the desired depth is reached, withdraw the drill bit and use a brush or compressed air to clean out any debris from the hole.
7. Smooth the Edges (if necessary):
Depending on the material and the desired aesthetics, you may want to smooth the edges of the hole. Sandpaper or a file can be used to gently smoothen any rough or jagged edges for a clean and polished appearance.
Always follow safety guidelines when drilling holes, such as wearing safety goggles and using appropriate safety precautions for your specific drilling task. If you’re unsure about drilling into certain types of materials or if you’re uncomfortable with the drilling process, it’s best to consult with a professional plumber or contractor for assistance.
By following these steps, you can effectively and safely drill holes for pipe passages, ensuring a smooth and efficient installation of your pipes through walls and floors.
Running Vertical Pipes through Walls and Floors
Running vertical pipes through walls and floors is a common task when completing plumbing projects. Whether you’re installing new plumbing fixtures or rerouting existing pipes, understanding the process of running vertical pipes is essential. Here are the steps to effectively run vertical pipes through walls and floors:
Read more: How To Run Plumbing In A House
1. Plan the Pipe Route:
Refer to your plumbing layout plan and determine the specific path for the vertical pipe. Consider factors such as the most direct route, accessibility, and any potential obstructions or obstructions to avoid.
2. Identify Obstacles:
Before cutting into the wall or floor, identify any obstacles such as electrical wiring, ductwork, or structural supports. Use stud finders, blueprint plans, or consult with professionals to locate these elements and plan your pipe route accordingly.
3. Measure and Mark the Pipe Entry and Exit Points:
Measure and mark the entry and exit points for the vertical pipe on the wall or floor. Ensure the marks are level and aligned with the pipe route to maintain a clean and straight installation.
4. Cut Access Holes:
Use the appropriate cutting tools and techniques to cut access holes in the wall or floor at the marked entry and exit points. Follow the guidelines for cutting access holes we discussed earlier, ensuring the holes are large enough to accommodate the pipe and any necessary fittings or connectors.
Read more: How To Flush Out Plumbing Pipes
5. Drilling Holes for Pipe Passages:
Using the appropriate drill and drill bit, drill through the studs or joists vertically to create pathways for the pipe to pass through. Ensure the diameter of the holes matches the size of the pipe. Take care not to damage electrical wiring or other utilities while drilling.
6. Prepare the Pipe:
Cut the vertical pipe to the appropriate length, accounting for the distance between the entry and exit points. Thoroughly clean the ends of the pipe and deburr if necessary to ensure smooth and secure connections.
7. Thread or Connect the Pipe:
If working with threaded pipes, use a pipe threader or wrap plumber’s tape around the threads for a secure seal. If working with non-threaded pipes, use the appropriate connectors or fittings to join the sections together.
8. Insert the Pipe:
Insert the vertical pipe into the access holes, making sure it runs straight and plumb. Use pipe hangers or supports to secure the pipe at regular intervals and prevent sagging or movement.
Read more: How To Flush Out Plumbing Pipes
9. Connect to Existing Plumbing:
If connecting the vertical pipe to existing plumbing, use the appropriate fittings or connectors to make a secure and leak-proof connection. Follow the manufacturer’s instructions and use plumber’s tape or sealant when necessary.
10. Test for Leaks:
Once the vertical pipe is installed and connected, test for leaks by turning on the water supply and checking for any signs of water escaping or dripping. Address any leaks immediately to ensure a properly functioning plumbing system.
Running vertical pipes through walls and floors requires attention to detail and careful planning. By following these steps, you can successfully install vertical pipes that meet your plumbing needs while maintaining the structural integrity of your home.
Running Horizontal Pipes through Walls and Floors
Running horizontal pipes through walls and floors is a common task when installing or rerouting plumbing systems. Whether you’re connecting fixtures or extending existing pipes, understanding the process of running horizontal pipes is essential. Here are the steps to effectively run horizontal pipes through walls and floors:
Read more: How To Run Plumbing In A House
1. Plan the Pipe Route:
Refer to your plumbing layout plan and determine the desired path for the horizontal pipe. Consider factors such as the locations of fixtures, accessibility for maintenance or repairs, and any obstacles to avoid.
Read more: How To Flush Out Plumbing Pipes
2. Measure and Mark the Pipe Route:
Using a measuring tape, measure the distance for the horizontal pipe route. Mark the locations where the pipe will pass through the walls and floors. Ensure the marks are level and align with the pipe route.
3. Cut Access Holes:
At the marked locations, cut access holes in the walls or floors to create openings for the horizontal pipe. Refer to the guidelines we discussed earlier for cutting access holes, making sure they are large enough to accommodate the pipe and any necessary fittings.
4. Drill Holes for Pipe Passages:
Using the appropriate drill and drill bit, drill holes through the studs or joists horizontally to create pathways for the pipe to pass through. Ensure the diameter of the holes matches the size of the pipe. Take care not to damage any existing utilities or structural elements during the drilling process.
5. Prepare the Pipe:
Cut the horizontal pipe to the appropriate length, accounting for the distance between the access holes. Clean the ends of the pipe and deburr if necessary to ensure smooth connections.
Read more: How To Flush Out Plumbing Pipes
6. Thread or Connect the Pipe:
If working with threaded pipes, use a pipe threader or wrap plumber’s tape around the threads for a secure seal. If working with non-threaded pipes, use the appropriate connectors or fittings to join the sections together.
7. Insert the Pipe:
Insert the horizontal pipe into the access holes, ensuring that it runs parallel and level. Use pipe hangers or supports to secure the pipe at regular intervals to prevent sagging or movement.
8. Connect to Existing Plumbing:
If connecting the horizontal pipe to existing plumbing, use the appropriate fittings or connectors to make a secure and leak-proof connection. Follow the manufacturer’s instructions and use plumber’s tape or sealant as necessary.
9. Test for Leaks:
Once the horizontal pipe is installed and connected, test for leaks by turning on the water supply and checking for any signs of water escaping or dripping. Address any leaks immediately to ensure a properly functioning plumbing system.
Running horizontal pipes through walls and floors requires careful planning and precise execution. By following these steps, you can successfully run horizontal pipes that meet your plumbing needs while effectively navigating through walls and floors.
Read more: How To Flush Out Plumbing Pipes
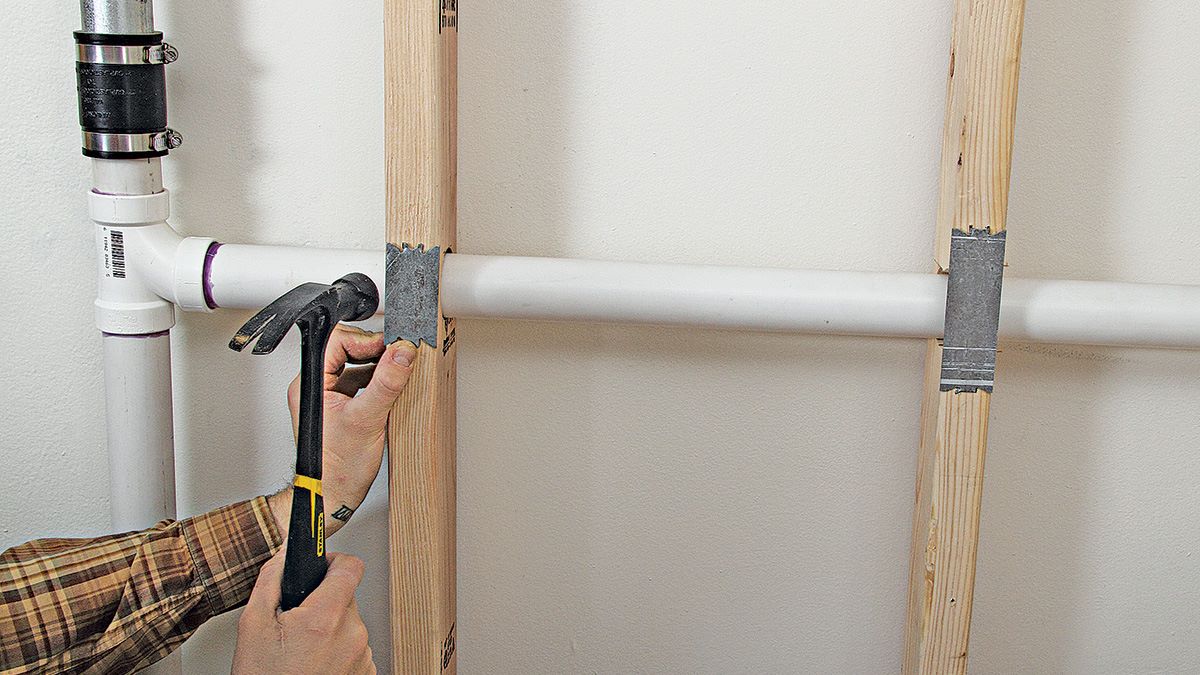
Securing Pipes in Place
Securing pipes in place is an essential step in any plumbing project. Properly securing the pipes ensures they remain stable, preventing unnecessary movement, sagging, or potential damage to the plumbing system. Here are the steps to effectively secure pipes in place:
1. Determine the Proper Supports:
Identify the appropriate supports for your specific pipe material and size. Options include pipe hangers, brackets, clips, straps, or clamps. Consider the weight and diameter of the pipe, as well as the spacing requirements for the supports.
2. Calculate the Support Spacing:
Refer to local plumbing codes and guidelines to determine the recommended distance between pipe supports. This ensures the pipes are adequately supported and prevents excessive movement. Factors that affect the spacing include the pipe diameter, material, and load-bearing capacity.
3. Mark the Support Locations:
Using a measuring tape, mark the locations where the pipe supports will be installed. Ensure the marks align with the pipe route and comply with the recommended spacing requirements. Make the marks clearly visible to guide the installation of the supports.
Read more: How To Flush Out Plumbing Pipes
4. Install the Pipe Supports:
Based on the marked locations, install the pipe supports using the appropriate method for your chosen supports. This may involve screwing or nailing pipe hangers or fastening clips or straps to structural elements such as studs or joists. Ensure the supports are securely attached to provide proper stability.
5. Adjust the Supports:
After installing the supports, ensure they are aligned properly and provide adequate support to the pipes. Make any necessary adjustments to ensure the pipe is level and properly seated within the supports. It’s important to avoid any excessive pressure or tension on the pipes, as this could cause damage or leaks.
6. Check for Proper Clearance:
Inspect the area surrounding the secured pipes to ensure there is sufficient clearance for the pipes and future maintenance or repairs. Verify that the pipes are not in direct contact with any sharp objects or abrasive surfaces that could cause damage over time.
7. Test for Stability:
Once the pipe supports are in place, gently shake or tap the pipes to ensure they are secure. They should not move excessively or make any rattling noises. If you notice any instability, readjust the supports or consider adding additional supports as needed.
Properly securing pipes in place helps ensure the long-term durability and functionality of your plumbing system. Following these steps will help prevent issues such as pipe sagging, leaks, or damage caused by movement. Take the time to adequately secure your pipes to maintain a reliable plumbing system for years to come.
Read more: How To Flush Out Plumbing Pipes
Connecting Pipes and Fittings
Connecting pipes and fittings is a fundamental step in any plumbing project. Properly joining pipes ensures a secure and leak-free plumbing system. Here are the steps to effectively connect pipes and fittings:
1. Choose the Right Fittings:
Select the appropriate fittings based on your specific plumbing needs and the type of pipes you are working with. Common types of fittings include couplings, elbows, tees, and valves. Ensure that the fittings are compatible with the material and size of the pipes.
2. Prepare the Pipe Ends:
Thoroughly clean and deburr the ends of the pipes to remove any dirt, debris, or rough edges. Use a pipe cleaner or emery cloth to create a smooth surface. This promotes a secure and leak-free connection.
3. Apply Joint Compound or Tape:
If working with threaded pipes and fittings, apply a suitable joint compound or wrap plumber’s tape around the male threads. This helps create a seal and prevent leaks at the connection point. Follow the manufacturer’s instructions for proper application.
Read more: How To Flush Out Plumbing Pipes
4. Insert the Pipe into the Fitting:
Insert the prepared end of the pipe into the fitting, ensuring a tight and secure fit. Twist the pipe clockwise while pushing it into the fitting until it is fully inserted. Apply gentle pressure to ensure a snug connection.
5. Tighten and Secure:
Use the appropriate tools, such as a pipe wrench or adjustable wrench, to tighten the fittings. Be careful not to overtighten, as this can damage the fitting or pipe. Follow the manufacturer’s recommendations for the specific type of fitting you are working with.
6. Test for Leaks:
After connecting the pipes and fittings, test for leaks by turning on the water supply and checking each connection point. Look for any signs of water escaping or dripping. If leaks are detected, retighten the fittings or apply additional joint compound or tape as necessary.
7. Consider Soldering or Gluing (if applicable):
If working with copper pipes or PVC pipes, soldering or gluing may be required for certain types of connections. Follow the proper techniques and safety precautions when soldering or gluing pipes and fittings. Consult with a professional or refer to manufacturer guidelines if you are unsure of the specific requirements for your particular materials.
It is crucial to follow local plumbing codes and regulations when connecting pipes and fittings. If you are uncertain or uncomfortable with any aspect of the process, it is always best to consult with a professional plumber for guidance.
By following these steps, you can effectively connect pipes and fittings, creating a reliable and leak-free plumbing system. Taking the time to properly join pipes ensures the longevity and efficiency of your plumbing installations.
Read more: How To Flush Out Plumbing Pipes
Testing for Leaks
Testing for leaks is an essential step in any plumbing project. It ensures the integrity and functionality of the plumbing system and helps identify any potential issues that may lead to leaks or water damage. Here are the steps to effectively test for leaks:
1. Turn Off Water Supply:
Before conducting the leak test, turn off the water supply to the area you are testing. This prevents water from flowing through the pipes during the testing process and allows you to focus on specific sections or connections.
2. Visually Inspect Connections and Joints:
Carefully inspect all the connections and joints for signs of moisture, water stains, or dripping water. Check the areas around pipe fittings, valves, and faucets. Look for any signs of water accumulation or wet spots, which indicate potential leaks.
3. Conduct a Static Leak Test:
For this test, keep the water supply turned off and observe the water meter or water pressure gauge. If the meter or gauge shows any movement, it could indicate a leak in the plumbing system. This test helps identify any leaks present when water is not actively flowing through the pipes.
Read more: How To Flush Out Plumbing Pipes
4. Perform a Visual Check with Running Water:
Gradually turn on the water supply to the area being tested. Observe the pipes and connections for any signs of leaks, such as dripping, spraying, or water stains. Pay close attention to areas that were visually inspected earlier and any connections that were recently installed or adjusted.
5. Conduct a Wipe Test:
Using a dry cloth or tissue, wipe along all the connections and joints, feeling for any moisture or water presence. Check both the top and bottom sides of horizontal pipes and connections. If the cloth becomes wet or damp, it is an indication of a leak.
6. Use a Leak Detection Solution or Soap Water Test:
If you suspect a small or hard-to-detect leak, you can use a leak detection solution or create a soap water mixture. Apply the solution to the area being tested and look for bubbles or foaming. The solution reacts with escaping gas or air from a leak, making it easy to spot even small leaks.
7. Address and Repair any Leaks:
If you detect any leaks during the testing process, take immediate action to address and repair them. Tighten loose connections, replace faulty or damaged fittings, or consult with a professional plumber if needed. Be proactive in fixing leaks to prevent water damage and maintain the efficiency of your plumbing system.
Testing for leaks is a critical step to ensure a reliable and functional plumbing system. By following these steps, you can identify and address leaks promptly, preventing potential water damage and maintaining the integrity of your plumbing installations.
Read more: How To Flush Out Plumbing Pipes
Patching and Repairing Access Holes
After running pipes through walls and floors, it’s important to patch and repair any access holes created during the installation process. Properly patching these holes ensures a finished and professional look while maintaining the structural integrity of the walls and floors. Here are the steps to effectively patch and repair access holes:
1. Gather the Necessary Materials:
Collect the materials needed for the patching process, including drywall patches or plugs, joint compound, a putty knife, sandpaper, and paint matching the surrounding surface, if applicable.
2. Prepare the Access Hole:
Clean any debris or dust from the edges of the access hole. Ensure the edges are smooth and free from loose material. If necessary, trim any uneven or damaged edges to create a clean and even surface for patching.
3. Apply the Drywall Patch or Plug:
If the access hole is in drywall, use a drywall patch or plug that fits the hole size. Apply a generous amount of joint compound to the back of the patch or plug and press it firmly into the hole, ensuring it is flush with the surrounding wall surface. Smooth out any excess compound using a putty knife and allow it to dry according to the manufacturer’s instructions.
Read more: How To Flush Out Plumbing Pipes
4. Sand and Feather the Patched Area:
Once the joint compound is dry, use sandpaper to smooth the patched area. Feather the edges of the compound outward to create a seamless transition between the patch and the surrounding wall or floor. Be careful not to sand too aggressively, as this can damage the surrounding surface.
5. Apply Additional Coats and Sanding (if needed):
If the patching compound shrinks or does not completely cover the access hole, apply a second coat of joint compound. Allow it to dry and sand it once again for a smooth finish. Repeat this process if necessary until the patched area is blend seamlessly with the surrounding surface.
6. Prime and Paint (if needed):
If the patched area requires painting, apply a coat of primer to the patched area to ensure proper adhesion of the paint. Once the primer is dry, paint the patch with the matching color to blend it with the surrounding wall or floor. Use a brush or roller to achieve a consistent finish.
7. Clean Up and Final Inspection:
Remove any dust or debris resulting from the patching and repair process. Inspect the patched area closely to ensure it is smooth, level, and visually consistent with the surrounding surface. Make any necessary touch-ups or adjustments to achieve a seamless and professional appearance.
Patching and repairing access holes is essential to maintain the visual integrity of your walls and floors. Following these steps will help you effectively patch and repair the holes, seamlessly blending them into the surrounding surfaces and creating a finished look for your plumbing installations.
Read more: How To Flush Out Plumbing Pipes
Conclusion
Running pipes through walls and floors for DIY plumbing work is a fundamental skill that every homeowner or aspiring DIY plumber should possess. By following the step-by-step guide outlined in this article, you can confidently take on plumbing projects and ensure the efficient flow of water and waste throughout your home.
From the initial planning and preparation phase to the final patching and repair work, each step plays a vital role in the success of your plumbing project. Careful measurement, marking, and understanding of the layout of walls and floors help determine the optimal pipe routes while avoiding obstacles and obstructions.
Choosing the right pipe material ensures the longevity and durability of your plumbing system, while securing the pipes in place prevents sagging or movement. Properly connecting pipes and fittings guarantees a reliable and leak-free plumbing system that will serve you well for years to come.
After the installation process, testing for leaks is essential to ensure the functionality and integrity of the plumbing system. Identifying and repairing any leaks promptly minimizes the risk of water damage and ensures the efficient operation of your plumbing installations.
Finally, patching and repairing access holes provides a finished and professional look to your walls and floors. Taking the time to properly patch and blend these holes ensures a seamless integration with the surrounding surfaces, maintaining the structural integrity and aesthetic appeal of your home.
Remember, while DIY plumbing work can be rewarding, it is essential to prioritize safety and seek professional assistance if needed. Always follow local building codes and regulations, use the appropriate tools and materials, and take the necessary precautions to protect yourself and your property.
By utilizing the knowledge and techniques outlined in this article, you can confidently tackle plumbing projects, save money on professional services, and maintain the functionality and integrity of your plumbing system. So roll up your sleeves, gather your tools, and get ready to run pipes through walls and floors like a pro!
Frequently Asked Questions about How To Run Pipes Through Walls And Floors For DIY Plumbing Work
Was this page helpful?
At Storables.com, we guarantee accurate and reliable information. Our content, validated by Expert Board Contributors, is crafted following stringent Editorial Policies. We're committed to providing you with well-researched, expert-backed insights for all your informational needs.
0 thoughts on “How To Run Pipes Through Walls And Floors For DIY Plumbing Work”