Articles
How To Scrub Stove Top
Modified: October 20, 2024
Learn how to effectively scrub your stove top with our informative articles. Discover the best techniques and products for a sparkling clean kitchen.
(Many of the links in this article redirect to a specific reviewed product. Your purchase of these products through affiliate links helps to generate commission for Storables.com, at no extra cost. Learn more)
Introduction
Keeping your stove top clean is not only essential for maintaining a tidy kitchen, but it also helps to ensure that your cooking surfaces function optimally. Over time, burner grates, drip pans, and the stovetop surface itself can accumulate grease, stains, and food residue, making them unsightly and potentially affecting the efficiency of your stove. However, with the right materials and a few simple steps, you can easily scrub your stove top and restore it to its sparkling best.
In this article, we will guide you through the process of scrubbing a stove top, providing you with the necessary knowledge and tips to get the job done efficiently and effectively. From removing burner grates and drip pans to cleaning control knobs and burner rings, we will cover all the essential steps to ensure a thorough clean. So let’s gather our materials and get started!
Key Takeaways:
- Easily achieve a sparkling clean stove top by using simple household materials like mild dish soap, baking soda, vinegar, and hot water. Follow a systematic approach to remove grease, stains, and grime for a pristine cooking surface.
- Don’t overlook the control knobs and burner rings when scrubbing your stove top. A thorough clean ensures every part of your stove is in top condition, creating a hygienic and inviting space in your kitchen.
Read also: 15 Amazing Cooktop Scrubbing Pads For 2025
Materials Needed
Before you dive into scrubbing your stove top, it’s important to gather all the necessary materials. Having everything ready beforehand will ensure that you can seamlessly go through each step without any interruptions. Here are the materials you’ll need:
- Mild dish soap
- Baking soda
- Vinegar
- Hot water
- Scrub brush or sponge
- Microfiber cloth or paper towels
- Plastic or silicone spatula
- Lemon or lemon juice (optional)
These materials are readily available and can be found in most households. If you don’t have any of these items on hand, they can be easily purchased from your local grocery store or online.
Once you have gathered all the necessary materials, you are ready to begin the process of scrubbing your stove top. The combination of mild dish soap, baking soda, vinegar, and hot water will work together to effectively remove grease, stains, and grime from your stove top surface, burner grates, and drip pans.
Step 1: Remove Burner Grates and Drip Pans
The first step in scrubbing your stove top is to remove the burner grates and drip pans. This will allow you to clean them more thoroughly without obstruction.
Start by turning off all the burners and allowing them to cool down completely. This is important to prevent any burns or injuries during the cleaning process.
Next, carefully lift off the burner grates. Depending on your stove model, these may be individual grates or a single griddle-style grate. Place them in a sink filled with warm water and a few drops of mild dish soap. Let them soak for about 15-20 minutes to loosen any stubborn grease or food particles.
While the burner grates are soaking, remove the drip pans from underneath the burner elements. Drip pans are designed to catch any spills or drips and are often removable for easy cleaning. Empty any liquid or debris from the drip pans into the trash and rinse them with warm, soapy water.
Once the burner grates and drip pans have soaked for a sufficient amount of time, use a scrub brush or sponge to gently scrub away any residue. Rinse them thoroughly with water and set them aside to dry completely before reassembling them on the stove top.
By removing the burner grates and drip pans at the beginning of the cleaning process, you can focus on cleaning the stovetop surface without any hindrance. This will ensure a more thorough and effective scrubbing of your stove top.
Step 2: Soak Burner Grates and Drip Pans
After removing the burner grates and drip pans in the previous step, it’s time to give them a thorough soak to loosen any stubborn grease and grime.
Fill a sink or basin with warm water and add a few drops of mild dish soap. Swirl the water gently to create a soapy solution.
Submerge the burner grates and drip pans into the soapy water, ensuring that they are completely covered. Allow them to soak for about 15-20 minutes. During this time, the soapy water will work its magic, breaking down the grease and food residue.
If you have particularly stubborn stains or built-up grime, you can enhance the cleaning power by adding baking soda or vinegar to the warm soapy water. Baking soda acts as a natural abrasive, while vinegar helps to dissolve tough stains.
After the designated soaking time, use a scrub brush or sponge to gently scrub the burner grates and drip pans. Pay extra attention to any areas with stubborn stains or residue. The combination of the soaking and scrubbing will remove the grease and grime, leaving them clean and shiny.
Rinse the burner grates and drip pans thoroughly with water to remove any soapy residue. Make sure to remove all the soap, as it can leave a slippery film if not properly rinsed.
Once rinsed, set the burner grates and drip pans aside to air dry completely. Placing them in a well-ventilated area or using a cloth or paper towel to pat them dry can also expedite the drying process.
By soaking the burner grates and drip pans, you are allowing the warm soapy water to break down the tough grease and grime, making them easier to clean. This step ensures that you can achieve a thorough clean that leaves them looking as good as new.
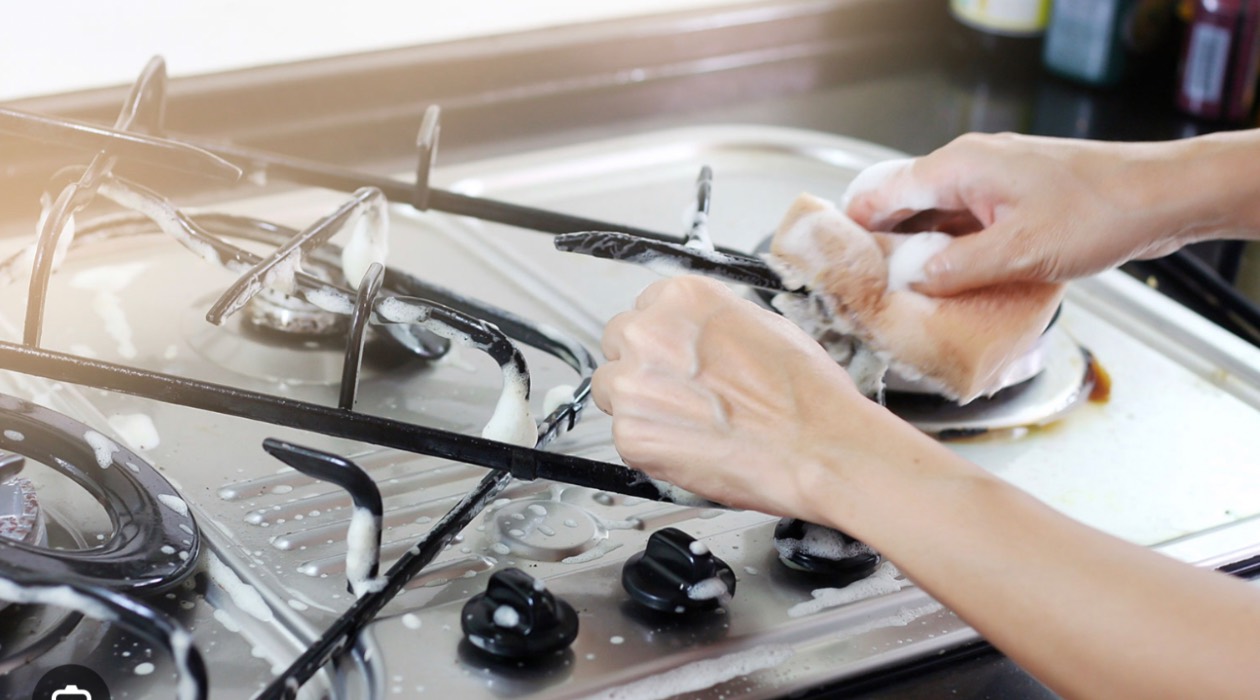
Step 3: Clean Stovetop Surface
With the burner grates and drip pans soaking, it’s time to shift your attention to cleaning the stovetop surface itself. This step will remove any grease, stains, and food residue that may have accumulated.
Start by removing any loose debris from the stovetop surface using a dry cloth or paper towel. Wipe away any crumbs or spills to create a clean working area.
Next, create a cleaning solution by mixing equal parts water and vinegar in a spray bottle. Vinegar is a natural cleaning agent that is effective in removing grease and grime.
Lightly spray the stovetop surface with the vinegar and water solution, ensuring that it is evenly coated. Allow the solution to sit for a few minutes to penetrate and loosen any stubborn residue.
Grab a scrub brush or sponge and gently scrub the stovetop surface in a circular motion. Pay close attention to any areas with visible stains or buildup. The gentle scrubbing action will effectively remove the grease and grime from the surface.
If you encounter tough stains or burnt-on food, sprinkle some baking soda onto the affected areas. The baking soda will act as a natural abrasive, helping to scrub away the stubborn residue.
After scrubbing, wipe down the stovetop surface with a damp microfiber cloth or paper towel to remove any remaining cleaning solution, along with the dissolved grease and grime.
To add a fresh scent and extra cleaning power, you can also squeeze some lemon juice onto the stovetop surface and gently rub it in. Lemon juice has natural antibacterial properties and helps to remove lingering odors.
Finally, use a clean, dry cloth or paper towel to buff the stovetop surface, leaving it clean and shiny. Ensure that no cleaning solution or water residue remains, as it can leave streaks or marks.
By thoroughly cleaning the stovetop surface, you are not only removing visible grime but also ensuring that your stove functions optimally. This step sets the foundation for a sparkling clean stove top.
Use a mixture of baking soda and water to create a paste. Apply it to the stove top and let it sit for 15 minutes. Then, scrub with a sponge or brush to remove tough stains and grease.
Read more: How To Make A Stove Top Distiller
Step 4: Remove Stains and Residue
Once you have cleaned the stovetop surface in the previous step, it’s time to tackle any stubborn stains or residue that may still be lingering. This step will ensure that your stove top is pristine and free from any noticeable marks.
Start by identifying any stains or residue that require extra attention. It could be burnt-on food, grease stains, or stubborn residue that was not fully removed during the initial cleaning.
To remove these stains and residue, create a paste by mixing baking soda with a small amount of water. The consistency should be thick enough to spread onto the affected areas.
Apply the baking soda paste directly onto the stains or residue and let it sit for a few minutes. Baking soda is a gentle abrasive that will help to break down the stubborn marks without scratching the surface.
Using a soft sponge or cloth, gently scrub the stained areas in a circular motion. Apply light pressure and continue scrubbing until the stains start to fade.
If the stains are particularly stubborn, you can add a few drops of vinegar onto the baking soda paste. The vinegar will react with the baking soda, creating a fizzing effect that helps to dissolve tough stains and residue.
Continue scrubbing until the stains and residue have been fully removed. You may need to repeat the process for heavily stained areas, adjusting the amount of baking soda and vinegar as needed.
Once you are satisfied with the stain removal, wipe away the baking soda paste and any loosened residue with a damp cloth or sponge. Rinse the cloth or sponge frequently to ensure you are not spreading the residue around.
Finally, use a clean, dry cloth or paper towel to thoroughly dry the stovetop surface. This will prevent any water or moisture from causing new stains or marks.
By targeting and removing stubborn stains and residue, your stove top will be left looking pristine and free from any noticeable marks. This step ensures that your hard work pays off, resulting in a stove top that looks as good as new.
Step 5: Polish and Shine Stove Top
After removing stains and residue, it’s time to give your stove top a final polish and shine. This step will ensure that your stove top looks immaculate and sparkles like new.
Start by preparing a mixture of equal parts water and vinegar in a spray bottle. This simple solution will act as a natural cleaner and polish.
Lightly spray the mixture onto the stovetop surface, ensuring even coverage. Avoid spraying excessively, as too much liquid can leave streaks or marks.
Take a clean, microfiber cloth or paper towel and gently buff the stove top in circular motions. The polishing action will remove any remaining residue, leaving a smooth and shiny surface behind.
If there are any stubborn smudges or marks, you can use a small amount of rubbing alcohol on a cloth to spot clean those areas. Rubbing alcohol is effective in breaking down grease and stubborn residue.
Continue to buff and polish the entire stove top surface until it gleams. Pay attention to any visible streaks or marks and ensure they are completely removed.
Once you are satisfied with the shine, use a clean, dry cloth or paper towel to wipe away any excess moisture. This will prevent water spots from forming and ensure a flawless finish.
For an added touch, you can use a designated stainless steel cleaner or polish to further enhance the shine of your stove top. Simply follow the instructions on the product label for best results.
Remember to also clean the surrounding areas, such as the control knobs and burner rings, to complete the polished look of your stove top.
By polishing and shining your stove top, you are adding the finishing touch to your cleaning process. Your stove will look impeccable and be ready to impress.
Step 6: Clean Control Knobs and Burner Rings
As we near the end of the scrubbing process, it’s important not to overlook the control knobs and burner rings of your stove. These areas can accumulate grease and food residue over time, affecting their functionality and overall appearance. Follow this step to ensure they are clean and in top condition.
Start by removing the control knobs from the stove. Depending on your stove model, they may pull off easily or require a gentle twist to release. Check the manufacturer’s instructions for guidance if needed.
Prepare a mixture of warm water and mild dish soap in a bowl or sink. Dip a soft cloth or sponge in the soapy solution and gently clean each control knob. Pay attention to the crevices and edges to remove any grease or residue.
For stubborn stains or built-up grime, you can use a small brush or a cotton swab dipped in the soapy water solution. This will allow for more precise cleaning in hard-to-reach areas.
Once the control knobs are clean, rinse them thoroughly with water to remove any soap residue. Dry them completely before reattaching them to the stove.
Now, let’s move on to cleaning the burner rings. These are the metal rings that sit on the stovetop around the burner areas.
Remove the burner rings and soak them in a mixture of warm water and mild dish soap. Allow them to soak for a few minutes to loosen any grease or food particles.
After soaking, use a soft brush or sponge to gently scrub the burner rings, paying close attention to any areas with visible stains or residue. Rinse them thoroughly with water to remove any soapy residue.
Once clean and dry, reattach the burner rings to their respective positions on the stove.
By cleaning the control knobs and burner rings, you are ensuring that every part of your stove is well-maintained and free from grease and grime. This step contributes to the overall cleanliness and functionality of your stove, leaving it looking and performing its best.
Step 7: Reassemble Burner Grates and Drip Pans
Now that you have successfully cleaned all the components of your stove top, it’s time to reassemble the burner grates and drip pans. This final step will bring everything together and ensure that your stove is fully functional and ready for use.
Start by taking the burner grates out of their soaking solution. Give them a final rinse with water to remove any remaining soap or residue.
Place the burner grates back onto their designated positions on the stovetop surface. Ensure they fit securely and align with the burner openings.
If your stove has individual drip pans, insert them underneath each burner element. Make sure they are properly aligned to catch any spills or drips during cooking.
If your stove has a single griddle-style grate, ensure that it is positioned securely in place.
Double-check that all the components are correctly reassembled and sitting level on the stove top. This guarantees a safe and efficient cooking experience.
Take a moment to appreciate the freshly scrubbed appearance of your stove top. Admire the gleaming burner grates and drip pans as they add a touch of sophistication to your kitchen.
Now you are ready to start cooking on a clean and well-maintained stove top. Enjoy the satisfaction of preparing meals in a pristine environment.
Remember to regularly clean your stove top to prevent the buildup of grease and grime. This will make future cleaning tasks quicker and easier.
Congratulations! You have successfully completed the process of scrubbing your stove top and reassembling all the components. Your hard work and attention to detail have resulted in a sparkling clean and ready-to-use stove top. Keep up with regular maintenance, and your stove will continue to shine.
Read more: How To Store Scrubs
Conclusion
Cleaning and scrubbing your stove top may seem like a daunting task, but with the right materials and a systematic approach, it can be a straightforward and satisfying process. By following the steps outlined in this article, you can achieve a sparkling clean stove top that not only looks great but also functions optimally.
From removing burner grates and drip pans to tackling stubborn stains and residue, each step plays a crucial role in achieving a thorough clean. By using mild dish soap, baking soda, vinegar, and warm water, you can harness the power of natural cleaning agents to effectively remove grease, stains, and food residue from your stove top.
Don’t forget to pay attention to the control knobs and burner rings, as they can accumulate grease and grime over time. By giving them a gentle cleaning, you ensure that every part of your stove is in top condition.
Once all the components are scrubbed and cleaned, reassembling them on the stove top completes the process. Now you can admire your sparkling stove top and enjoy cooking in a fresh and inviting kitchen environment.
Remember, regular maintenance is key to keeping your stove top clean and functional. Incorporate these cleaning steps into your routine to prevent the buildup of stubborn stains and residue.
With a clean and well-maintained stove top, you’ll not only enjoy a pleasant cooking experience but also create a hygienic and inviting space in your kitchen.
So, gather your materials, follow the steps carefully, and let the transformation begin. Say goodbye to a grimy stove top and hello to a pristine cooking surface that will make your kitchen shine.
Frequently Asked Questions about How To Scrub Stove Top
Was this page helpful?
At Storables.com, we guarantee accurate and reliable information. Our content, validated by Expert Board Contributors, is crafted following stringent Editorial Policies. We're committed to providing you with well-researched, expert-backed insights for all your informational needs.


0 thoughts on “How To Scrub Stove Top”