Articles
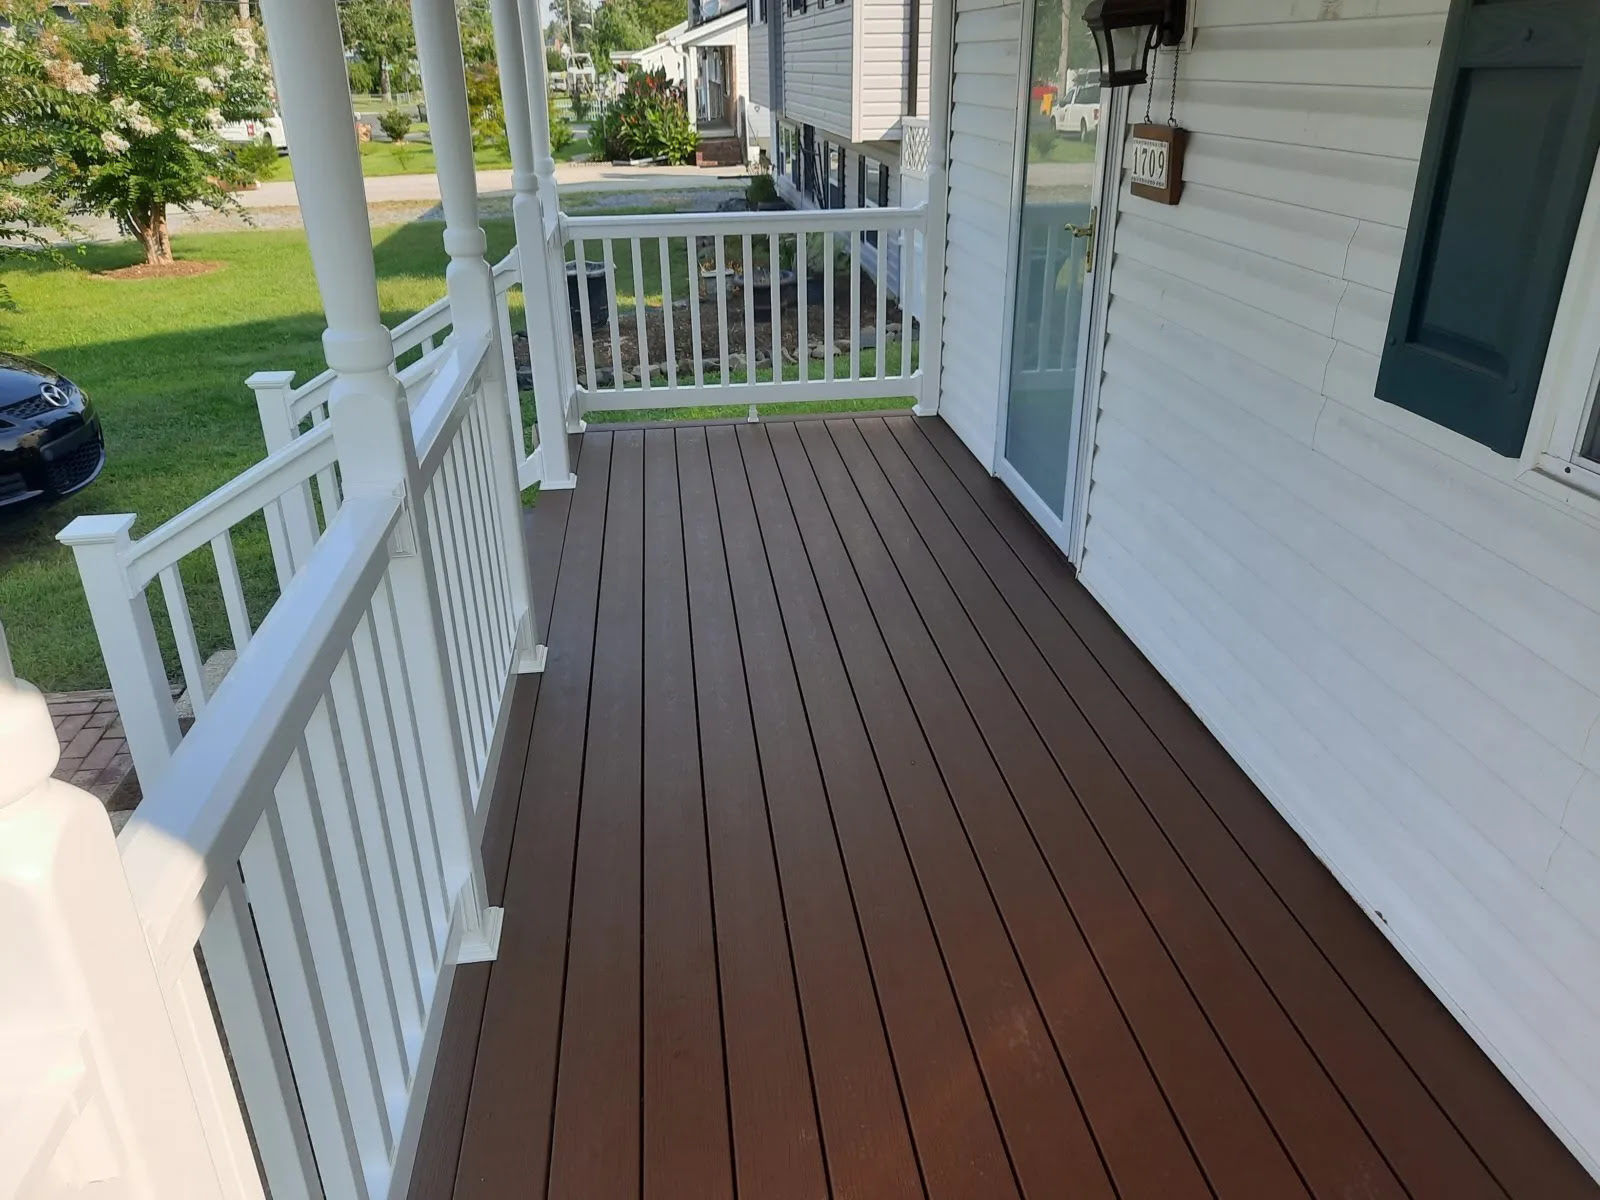
How To Stain A Front Porch
Modified: December 7, 2023
Learn how to stain your front porch with our informative articles. Transform your porch into a beautiful space with our step-by-step guides and expert tips.
(Many of the links in this article redirect to a specific reviewed product. Your purchase of these products through affiliate links helps to generate commission for Storables.com, at no extra cost. Learn more)
Introduction
Welcome to our comprehensive guide on how to stain a front porch. A front porch is not only a functional space, but it also serves as an extension of your home’s curb appeal. Over time, the elements can take a toll on the appearance of your porch, leaving it weathered and worn. Staining your front porch is a cost-effective way to revive its beauty and protect it from further damage.
In this article, we will provide you with step-by-step instructions on how to stain your front porch, along with important tips and considerations to ensure a successful and long-lasting finish. Whether you are a seasoned DIY enthusiast or a beginner, this guide will equip you with the knowledge and confidence you need to tackle this project.
Please note that the specific steps and materials required may vary depending on the type of porch surface you have, such as concrete, wood, or composite. It is important to determine the appropriate stain and preparation techniques for your particular porch material.
So, grab your supplies and let’s get started on transforming your front porch into a beautiful and inviting space!
Key Takeaways:
- Revive your front porch’s beauty and protect it from damage by following our comprehensive guide on staining. Choose the right materials, prepare the surface, and apply the stain methodically for a professional, long-lasting finish.
- Achieve a beautiful, inviting front porch with proper preparation, careful stain selection, and meticulous application. Regular maintenance ensures your stained porch maintains its allure and protection for years to come.
Read more: How To Stain A Concrete Porch
Materials Needed
Before you begin staining your front porch, gather the necessary materials to ensure a smooth and efficient process. Here is a list of the essential items you will need:
- Stain: Choose a high-quality exterior stain suitable for your porch surface. Consider the type of material and desired finish when selecting the stain. Options include oil-based stains, water-based stains, and solid color stains.
- Primer (if required): Some porch materials, such as bare wood or porous concrete, may require a primer before applying the stain. Check the stain’s instructions or consult a professional to determine if a primer is necessary.
- Cleaner: Depending on the condition of your porch, you may need a cleaner to remove dirt, debris, mildew, or previous finishes. Look for a cleaner specifically formulated for your porch material.
- Protective equipment: Ensure your safety by wearing protective gear such as gloves, safety goggles, and a mask. Staining can be messy, so wearing old clothes or an apron is also recommended.
- Applicators: Select appropriate applicators based on your porch material and the type of stain you are using. Common options include brushes, rollers, pads, or sprayers. Check the stain’s instructions for recommended applicators.
- Drop cloths or plastic sheeting: Protect surrounding areas from stains and drips by covering them with drop cloths or plastic sheeting.
- Sandpaper or a sander: If your porch surface has rough spots, old stain, or imperfections, you may need to sand it down before staining. Choose the appropriate grit sandpaper or use a sander for larger areas.
- Tape: Use painter’s tape to protect adjacent surfaces, such as walls or railings, from accidental staining.
- Stir stick: Ensure that the stain is properly mixed by using a stir stick, especially if it has been sitting for a while.
- Clean water and a bucket: You will need water for cleaning purposes, as well as a bucket for diluting cleaners or rinsing applicators.
Make sure you have all these materials on hand before starting the staining process. Having everything prepared will save you time and minimize any interruptions during the project. Now that you have gathered your materials, let’s move on to the next step: preparing the porch.
Preparing the Porch
Before you start staining your front porch, it’s crucial to prepare the surface properly. Proper preparation ensures that the stain adheres well, resulting in a more durable and attractive finish. Follow these steps to prepare your porch:
- Clean the porch: Remove any furniture, plants, or other items from the porch. Sweep away loose dirt, debris, and leaves using a broom or leaf blower. For more stubborn stains or dirt, use a cleaner specifically formulated for your porch material. Follow the manufacturer’s instructions for mixing and applying the cleaner. Rinse the porch with clean water and allow it to dry completely.
- Repair any damage: Inspect the porch for any signs of damage, such as cracks, loose boards, or chipped paint. Address these issues before proceeding with the staining process. Fill cracks with an appropriate filler and allow it to dry. Replace any loose or damaged boards. Sand down any rough areas or chipped paint to create a smooth surface.
- Sand the porch (if needed): If your porch surface has an existing stain or rough spots, consider sanding it. Sanding will help remove old stain, smooth rough areas, and promote better stain absorption. Use a medium or fine-grit sandpaper and sand in the direction of the wood grain. Alternatively, use a sander for larger areas. After sanding, remove the dust with a broom or vacuum.
- Protect adjacent surfaces: Use painter’s tape to protect adjacent surfaces such as walls, railings, or steps from accidental staining. Be thorough in applying the tape, ensuring that it adheres well and creates a barrier between the porch and surrounding areas.
- Prime the porch (if necessary): Depending on your porch material and the type of stain you are using, you may need to apply a primer before staining. Priming helps seal the surface, enhance stain absorption, and provide a more uniform finish. Consult the stain’s instructions or a professional to determine if a primer is required.
By properly preparing your porch, you are creating a clean and smooth canvas for the stain. This step is essential for achieving a professional and long-lasting result. With your porch now prepared, let’s move on to the next crucial aspect: choosing the right stain for your front porch.
Choosing the Stain
Choosing the right stain for your front porch is an important decision that will impact both its appearance and durability. There are several factors to consider when selecting a stain:
- Type of porch material: The type of material your porch is made of will influence the type of stain you should choose. Common porch materials include wood, concrete, and composite. Wood stains are typically oil-based or water-based, while concrete stains are usually acid-based or water-based. Ensure that the stain you choose is suitable for your porch material.
- Desired finish: Consider the look you want to achieve with your front porch. Stains come in various finishes, such as transparent, semi-transparent, and solid color. Transparent stains provide a natural look and allow the wood grain to show through, while solid color stains offer more coverage and can hide imperfections.
- Protection and durability: Look for a stain that offers adequate protection against UV rays, moisture, and other outdoor elements. Ensure that the stain is formulated to withstand the specific challenges your front porch may face, such as heavy foot traffic or extreme weather conditions.
- Ease of application: Some stains may be easier to apply than others. Consider your level of experience and the amount of time you are willing to invest in the staining process. Water-based stains generally dry faster and have less odor, while oil-based stains may require more time for drying and cleanup.
- Color selection: Stains come in a wide range of colors to complement your home’s exterior. Consider the existing color scheme of your house and choose a stain color that enhances its curb appeal. Many stain manufacturers offer sample swatches or digital visualization tools to help you visualize different colors on your front porch.
- Budget: Factor in the cost of the stain and the amount needed for your front porch. Some stains may be more expensive but offer greater durability or longer coverage. Consider your budget and choose a stain that balances quality and affordability.
Take your time to research different stain options, read product reviews, and consult with professionals if necessary. Remember that choosing the right stain is crucial for achieving the desired look and protection for your front porch. With the stain selected, it’s time to move on to the next step: cleaning the porch to ensure a pristine surface for staining.
When staining a front porch, make sure to thoroughly clean and prepare the surface before applying the stain. This will ensure better adhesion and a more even finish.
Cleaning the Porch
Before applying the stain to your front porch, it is essential to thoroughly clean the surface. This step ensures that the stain adheres well and provides a long-lasting finish. Follow these steps to clean your porch:
- Clear the porch: Remove any furniture, decorations, or plants from the porch to have a clear working space.
- Sweep away debris: Use a broom or leaf blower to remove loose dirt, leaves, and other debris from the porch’s surface. Pay attention to corners, crevices, and hard-to-reach areas.
- Prepare cleaning solution: Depending on your porch material, prepare a suitable cleaning solution. For wood porches, a mixture of mild dish soap and warm water will suffice. If you have a concrete porch, choose a cleaner specifically formulated for concrete surfaces.
- Scrub the porch: Dip a long-handled brush or a deck scrub brush into the cleaning solution and scrub the porch surface. Pay extra attention to stained areas, mildew spots, or areas with heavy dirt buildup. Work in small sections to ensure thorough cleaning.
- Rinse with water: After scrubbing, rinse the porch surface with clean water. You can use a hose or a bucket of water. Make sure to remove all traces of the cleaning solution and dirt. Rinse from top to bottom to prevent streaking.
- Allow the porch to dry: Give the porch ample time to dry completely before proceeding with the staining process. This could take a few hours to a full day, depending on the weather conditions. Proper drying ensures that the stain adheres well and prevents any moisture-related issues.
By cleaning your porch thoroughly, you are eliminating any dirt, grime, or contaminants that could interfere with the staining process. Take the time to do this step carefully, ensuring that every nook and cranny is cleaned. Once your porch is dry and ready, it’s time to move on to the exciting part: applying the stain.
Read more: How To Fix A Porch
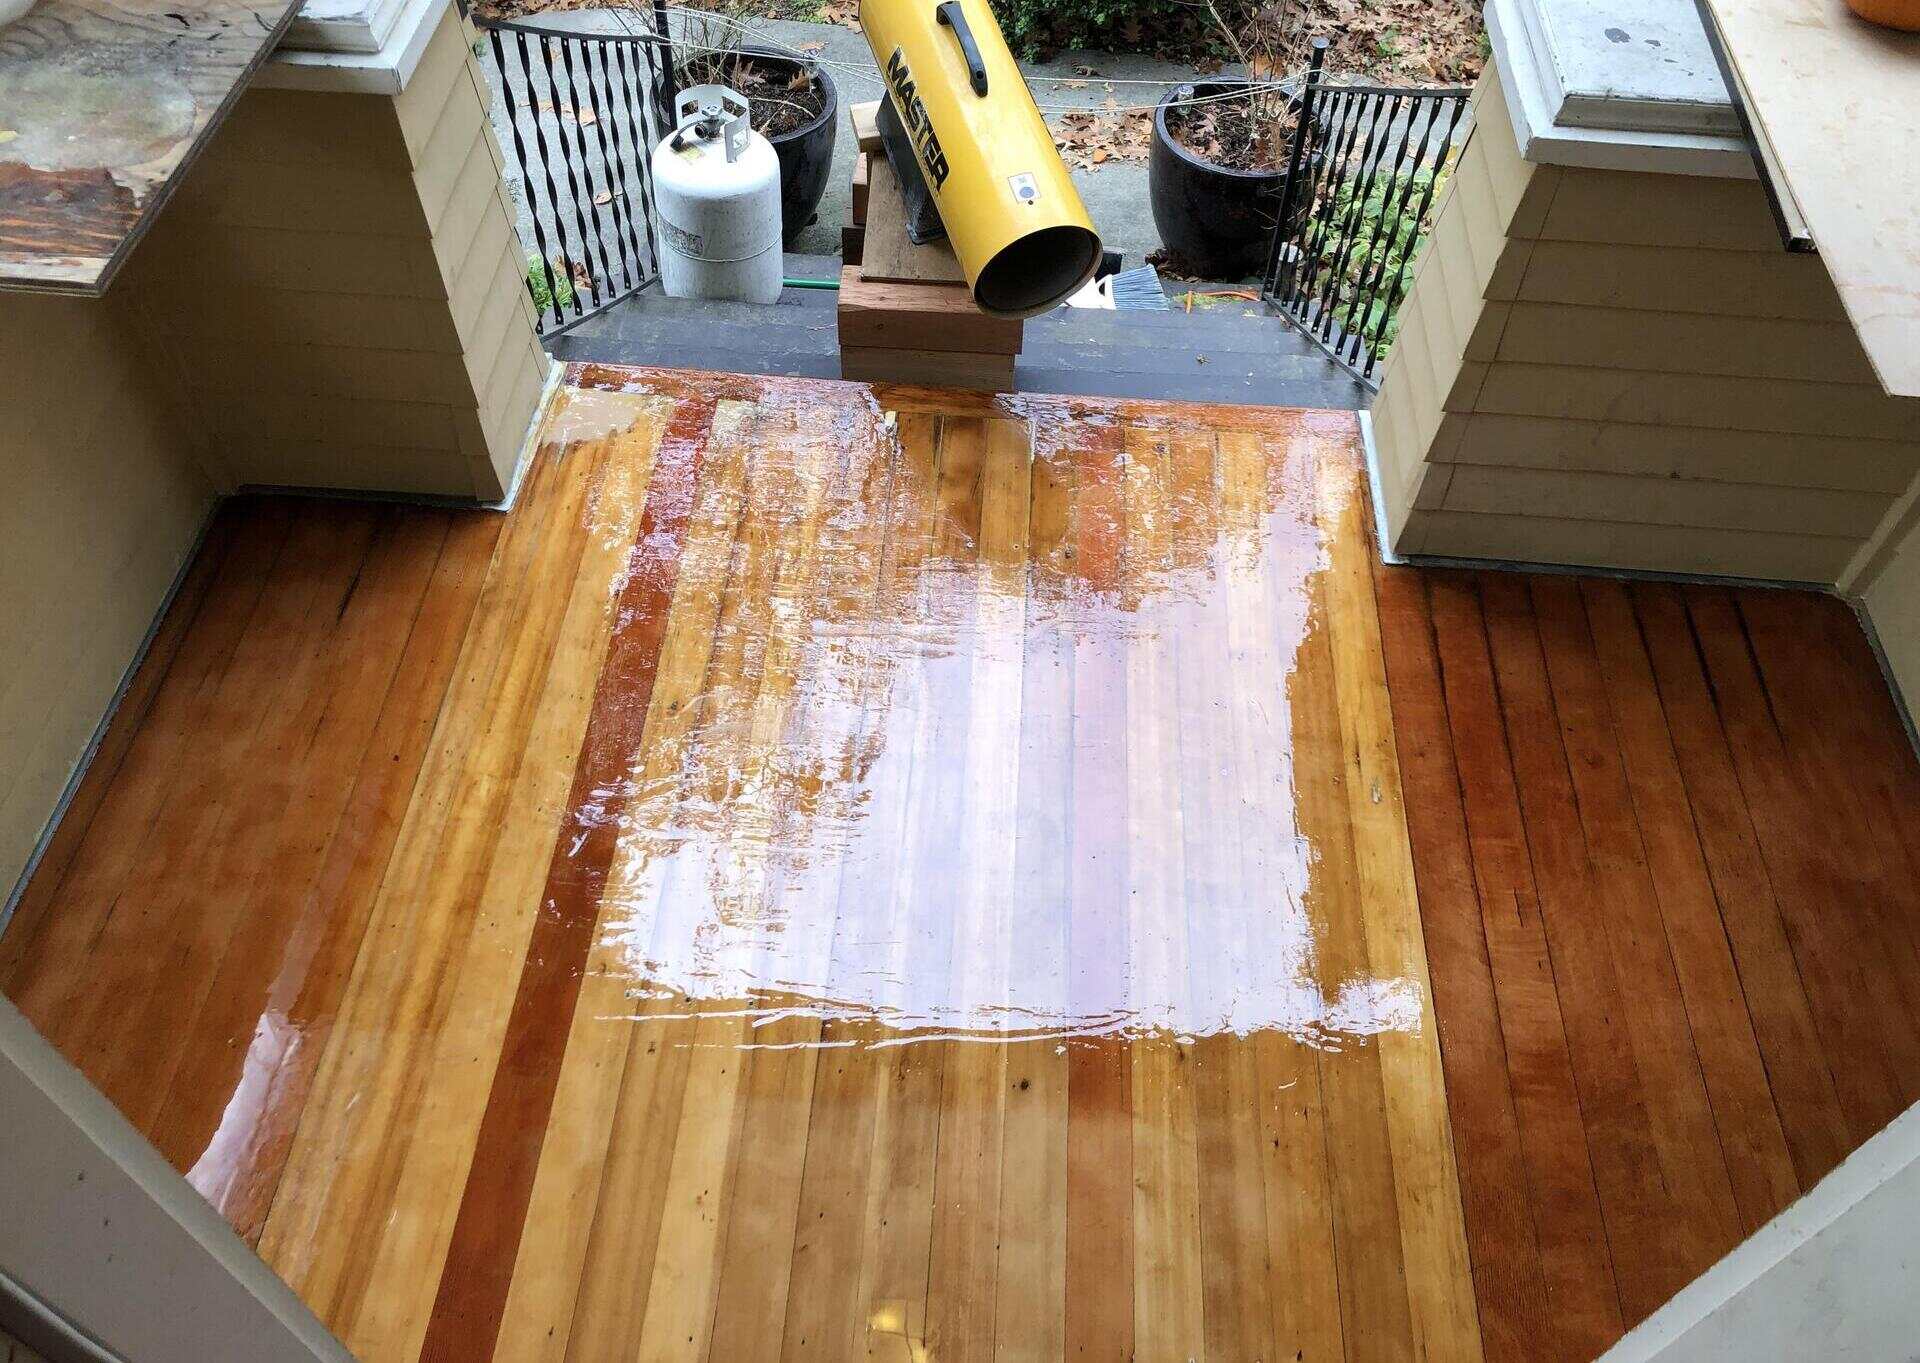
Applying the Stain
Now comes the exciting part – applying the stain to your front porch. Follow these steps to ensure a smooth and beautiful finish:
- Read and follow the instructions: Before you begin applying the stain, carefully read and follow the instructions provided by the stain manufacturer. Pay attention to any specific guidelines or recommendations for your porch material.
- Protect adjacent surfaces: Use painter’s tape and plastic sheeting to protect any adjacent surfaces, such as walls, steps, or railings, from accidental staining.
- Stir the stain: Use a stir stick to thoroughly mix the stain before application. This ensures an even distribution of pigments and other components within the stain.
- Apply the stain: Start applying the stain with a suitable applicator, such as a brush, roller, or sprayer, depending on your porch material and the stain type. Begin at one end of the porch and work your way towards the other end, following the grain or direction of the material.
- Work in small sections: To ensure an even application and avoid any noticeable overlaps or streaks, work in small sections at a time. Apply the stain in smooth and consistent strokes, making sure to cover the entire surface.
- Pay attention to edges and corners: Use a smaller brush or an applicator pad to reach edges, corners, and other hard-to-reach areas. Take your time and be meticulous in applying the stain to ensure comprehensive coverage.
- Allow the stain to penetrate: Depending on the stain type and instructions, let the stain penetrate the porch surface for the recommended amount of time. This allows the stain to properly bond and absorb into the material.
- Remove excess stain: After the recommended time has elapsed, use a clean cloth or rag to gently wipe away any excess stain. This step helps prevent a sticky or tacky finish and ensures a smooth surface.
- Let the stain dry: Allow the stained porch to dry completely according to the stain manufacturer’s instructions. This may take several hours or even a few days, depending on the stain type, porch material, and weather conditions.
- Apply additional coats (if desired): If you prefer a deeper color or enhanced protection, apply additional coats of stain following the same steps mentioned above. However, make sure to allow sufficient drying time between each coat.
Remember to work systematically and methodically, ensuring consistent coverage and following the manufacturer’s recommendations. After applying the stain and allowing it to dry, step back and admire the transformation of your front porch!
However, there are a few additional tips and considerations to keep in mind to help ensure a successful staining project, which we will explore in the next section.
Additional Tips and Considerations
While staining your front porch can be a rewarding DIY project, there are a few additional tips and considerations to keep in mind for a successful outcome. Here are some important factors to consider:
- Check the weather: Choose a time to stain your porch when the weather is dry and mild. Avoid staining on extremely hot or humid days, as it may affect the stain’s drying process and adhesion.
- Apply stain in the shade: If possible, try to apply the stain in the shade or during cooler parts of the day. Direct sunlight can cause the stain to dry too quickly, making it difficult to achieve an even application.
- Test the stain: Before applying the stain to the entire porch surface, it’s a good idea to test it on a small, inconspicuous area. This allows you to ensure that the color and finish are to your liking.
- Maintain a wet edge: When applying the stain, work quickly to maintain a wet edge. This helps to prevent lap marks and ensures a seamless finish.
- Follow drying and curing time: Pay attention to the stain manufacturer’s instructions regarding drying and curing time. Avoid foot traffic or placing furniture on the porch until the stain is fully dried and cured.
- Regular maintenance: To prolong the lifespan of your stained porch, regular maintenance is key. Periodically clean the surface and inspect for any signs of wear or damage. Consider reapplying a fresh coat of stain every few years to maintain its appearance and protection.
- Dispose of materials properly: After completing the staining process, dispose of any used rags, brushes, or leftover stain according to local regulations. Some stains may require special disposal due to their chemical composition.
By following these additional tips and considerations, you can ensure that your stained front porch not only looks beautiful but also stands the test of time. Remember, proper preparation, application techniques, and maintenance are all crucial for a successful staining project.
With your front porch now transformed, you can enjoy the enhanced curb appeal and pride in a job well done!
Remember to validate the HTML encoding to ensure it is valid HTML.
Conclusion
Congratulations! You have reached the end of our comprehensive guide on how to stain a front porch. By following the step-by-step instructions and considering the tips and considerations provided, you are well-equipped to undertake this rewarding DIY project.
Staining your front porch not only rejuvenates its appearance but also adds a layer of protection against the elements. A well-maintained and beautifully stained porch enhances your home’s curb appeal, creating an inviting space for you and your guests to enjoy.
Remember, proper preparation is essential before applying the stain. Cleaning the porch, repairing any damage, and choosing the right stain for your porch material are crucial steps that should not be overlooked. Take the time to select the appropriate materials and follow the instructions provided by the stain manufacturer.
Throughout the staining process, work methodically and mindfully, ensuring even coverage and allowing for sufficient drying time. By following these guidelines, you can achieve a professional finish that will withstand the test of time.
Finally, regular maintenance is key to preserving the beauty and longevity of your stained front porch. Keep an eye out for any signs of wear or damage, and consider reapplying a fresh coat of stain every few years to maintain its appearance and protection.
We hope that this guide has provided you with valuable insights and inspired you to take on the task of staining your front porch. Remember to consult professionals or seek additional resources if you have any specific questions or concerns regarding your porch material or the staining process.
Now, gather your materials, prepare your porch, and let the transformation begin. Get ready to enjoy a beautifully stained front porch that will enhance the overall aesthetic of your home and create a welcoming space for years to come!
Remember to validate the HTML encoding to ensure it is valid HTML.
Frequently Asked Questions about How To Stain A Front Porch
Was this page helpful?
At Storables.com, we guarantee accurate and reliable information. Our content, validated by Expert Board Contributors, is crafted following stringent Editorial Policies. We're committed to providing you with well-researched, expert-backed insights for all your informational needs.


0 thoughts on “How To Stain A Front Porch”