Articles
How To Add A Front Porch
Modified: August 27, 2024
Learn how to add a beautiful and inviting front porch to your home with our informative articles. Enhance your curb appeal and create a cozy outdoor space to relax and entertain.
(Many of the links in this article redirect to a specific reviewed product. Your purchase of these products through affiliate links helps to generate commission for Storables.com, at no extra cost. Learn more)
Introduction
Adding a front porch to your home can not only enhance its curb appeal but also provide a functional and inviting space to relax and socialize. Whether you want to enjoy your morning coffee or greet guests with a warm welcome, a well-designed front porch can create a welcoming atmosphere and increase the overall value of your property.
However, building a front porch requires careful planning, attention to detail, and proper execution. From assessing the available space to obtaining necessary permits, gathering materials, and executing the construction process, each step plays a crucial role in creating a front porch that meets your needs and complements the architectural style of your home.
In this comprehensive guide, we will take you through the step-by-step process of adding a front porch to your home. From concept to completion, you will learn the essential considerations, design options, and construction techniques required to build a front porch that you can be proud of.
Key Takeaways:
- Building a front porch involves careful planning, from assessing the space to obtaining permits, gathering materials, and executing construction. It’s a step-by-step process that adds value and creates a welcoming space for relaxation and socializing.
- The finishing touches, such as lighting, decor, and landscaping, are essential for completing the front porch and creating an inviting atmosphere. Regular maintenance ensures the porch remains a beautiful and functional space for years to come.
Read more: How To Add A Porch To Your House
Step 1: Assessing the Space
Before you start planning your front porch, it’s important to assess the available space and consider how it will integrate with the existing structure of your home. Take measurements of the area where you want to build the porch and consider factors such as the shape of the lot, the proximity to other structures or landscaping features, and the overall aesthetic of your home’s exterior.
Consider the purpose of your front porch. Will it primarily serve as a sitting area, a place for outdoor dining, or a space to showcase potted plants and décor? Understanding the intended use of your porch will help determine the size, layout, and features that are most suitable for your needs.
Additionally, take into account the climate and weather conditions in your area. If you live in an area with harsh winters or frequent precipitation, you may want to consider adding a roof or incorporating elements that provide protection from the elements.
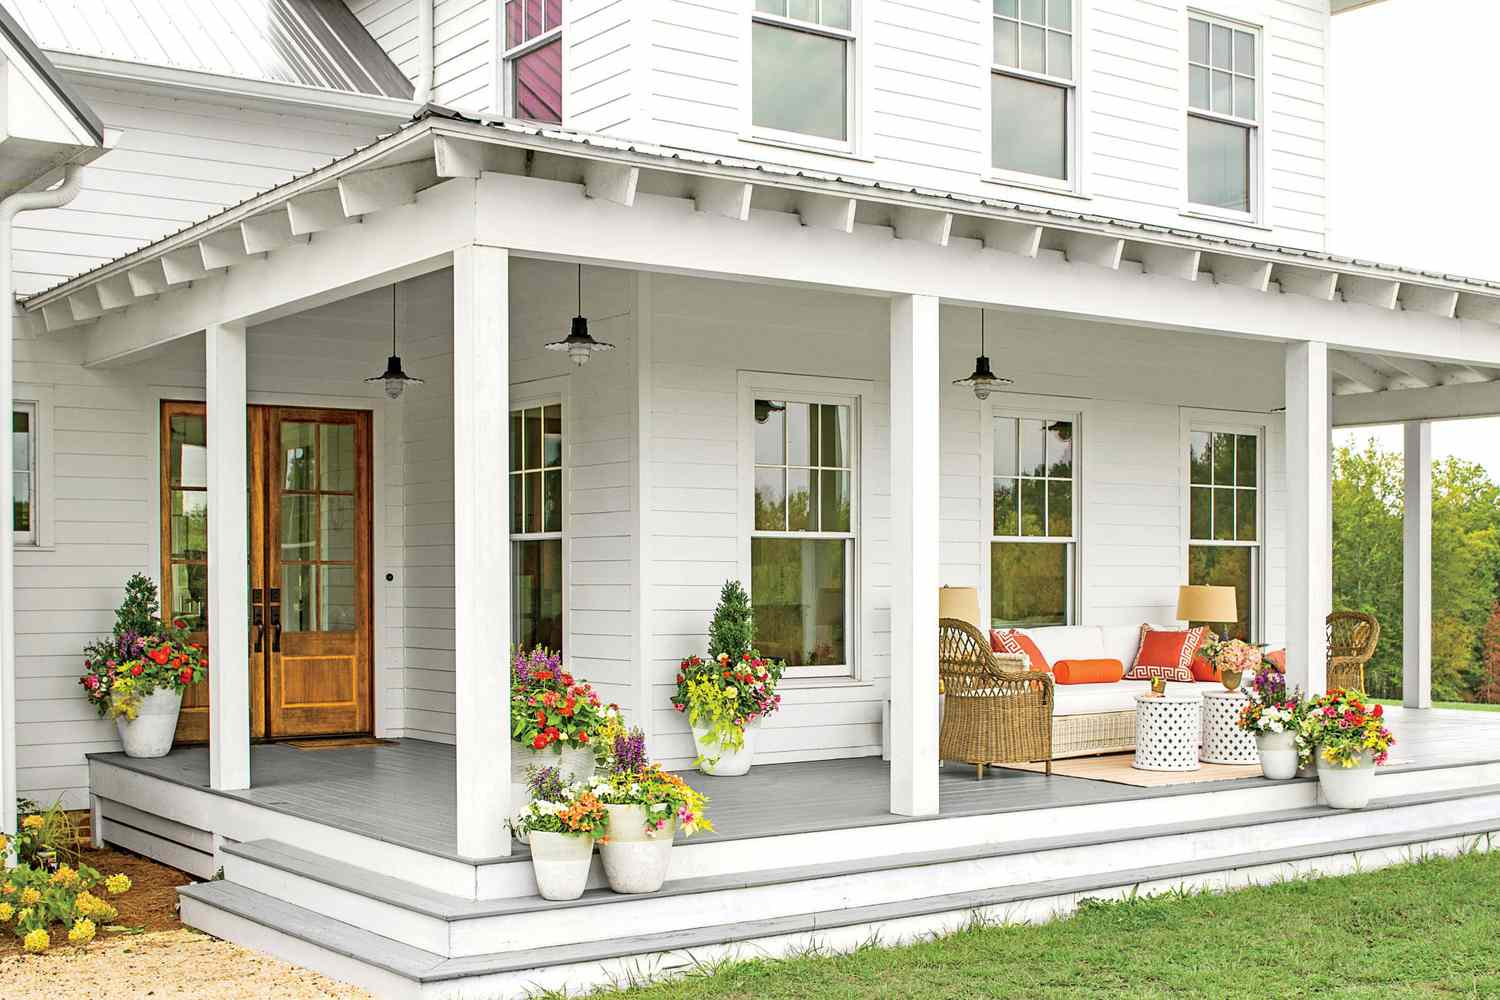
When assessing the space, also consider the architectural style of your home. A front porch should seamlessly blend with the overall design aesthetic to create a cohesive look. For example, a farmhouse-style home may benefit from a traditional, wrap-around porch, while a modern home may call for a sleek and minimalist design.
Take the time to research different porch styles and browse through inspirational images to get an idea of the possibilities. Consider factors such as the roofline, columns or supports, railing styles, and material choices.
Lastly, don’t forget to check with your neighborhood association or local building codes to ensure that your plans comply with any restrictions or regulations. This step is crucial to avoid any legal issues or delays during the construction process.
By carefully assessing the space and considering all relevant factors, you can lay a strong foundation for the successful design and construction of your front porch.
Step 2: Designing the Front Porch
Once you have assessed the space and understood your requirements, it’s time to move on to the exciting step of designing your front porch. This is where you get to let your creativity shine and envision the perfect porch that will enhance the beauty of your home.
Start by creating a rough sketch or using design software to visualize the layout, size, and shape of your porch. Consider the placement of the entrance, the flow of the space, and how the porch will interact with the rest of your home’s architecture.
Take cues from the style of your home and incorporate design elements that complement its aesthetic. This could range from choosing the right materials, such as wood or stone, to selecting a railing style that matches the overall look of your home.
When it comes to porch design, consider both form and function. Think about how you plan to use the space and what amenities you want to include. Are you looking for a cozy sitting area with comfortable furniture? Do you need space for a dining table or a swing for relaxing evenings? These considerations will help determine the layout and features of your porch.
Another important aspect of designing your front porch is selecting the right materials. Choosing durable and weather-resistant materials is essential for ensuring the longevity and maintenance of your porch. Common materials for porch flooring include wood, composite decking, or concrete. For columns and supports, options such as wood, PVC, or aluminum are popular choices. Take into account factors such as cost, durability, and maintenance requirements when making material selections.
Remember to pay attention to the finer details, such as lighting fixtures, décor, and landscaping around the porch. These elements can significantly enhance the ambiance and visual appeal of your front porch.
During the design phase, it is highly recommended to consult with professionals, such as architects or contractors, who can provide expert advice and guidance. They can help ensure that your design adheres to structural integrity, building codes, and safety standards.
By carefully designing your front porch, you can create a space that not only adds value to your home but also reflects your personal style and provides a welcoming atmosphere for you and your guests to enjoy.
Step 3: Obtaining Necessary Permits
Before you can start building your front porch, it is essential to obtain the necessary permits and approvals from the local building authority. This step ensures that your construction project complies with local building codes and regulations, guaranteeing structural safety and adherence to zoning requirements.
Start by contacting your local building department or planning office to inquire about the specific permits required for your front porch construction. Provide them with the details of your project, including the dimensions, design, and materials you plan to use.
The building department may require you to submit architectural drawings and plans for review to ensure that your porch construction meets all safety and building standards. Hiring a professional architect or contractor can be beneficial during this process, as they can assist in creating accurate plans that satisfy the building department’s requirements.
Keep in mind that the permitting process can involve fees, so be prepared to pay for the necessary permits. The cost will vary depending on your location and the scope of your porch construction project.
Once you have submitted your permit application, it will typically go through a review process. The building department will assess your plans and ensure they meet all the necessary criteria. They may suggest changes, additions, or modifications to the design to ensure compliance.
Once your permits are approved, make sure to keep a copy of the permits on-site during the construction process. Building inspectors may visit periodically to inspect the construction and ensure it meets all approved plans and regulations.
It is important to note that proceeding with porch construction without the required permits can result in legal consequences, including fines and the need to tear down any work that has been completed. Therefore, it is essential to follow the proper permit application and approval process to avoid any complications down the line.
By obtaining the necessary permits, you can proceed with the construction of your front porch with the peace of mind that it meets all safety and regulatory requirements.
Step 4: Gathering Materials and Tools
With the necessary permits obtained, it’s time to gather the materials and tools required to bring your front porch construction project to life. Having all the materials and tools ready in advance will help streamline the construction process and ensure a smooth workflow.
Start by creating a comprehensive list of all the materials needed for your front porch. This will include items such as lumber for framing, decking boards, concrete for the foundation, columns or supports, roofing materials, and any additional features you have planned, such as handrails or balusters.
Consider the quality and durability of the materials you choose. It is recommended to invest in high-quality materials to ensure the longevity and structural integrity of your front porch. If you are unsure about the right materials to use, consult with professionals or do thorough research to make informed decisions.
Once you have the list of materials, it’s time to gather the necessary tools. The tools you require will depend on the complexity of your front porch design, but some common tools you will likely need include:
- – Measuring tape
- – Level
- – Hammer
- – Screwdriver
- – Circular saw
- – Power drill
- – Nail gun
- – Shovel
- – Concrete mixer
- – Safety equipment (goggles, gloves, ear protection, etc.)
Ensure that you have all the necessary tools in good working condition. If any tools require maintenance or replacement, take care of it before starting the construction process.
It’s also a good idea to gather all the necessary hardware, such as screws, nails, brackets, and connectors, to ensure smooth progress during the construction phase. Having everything on hand will minimize delays and help you stay organized.
Before you begin construction, consider creating a designated storage area or a temporary roofed structure to protect your materials from the elements. This will ensure that the materials remain in good condition and are easily accessible throughout the construction process.
Gathering all the required materials and tools in advance will save you time and effort during the construction phase. It allows for efficient progress, reduces the chances of delays caused by missing items, and ensures that you have everything you need to build a sturdy and beautiful front porch.
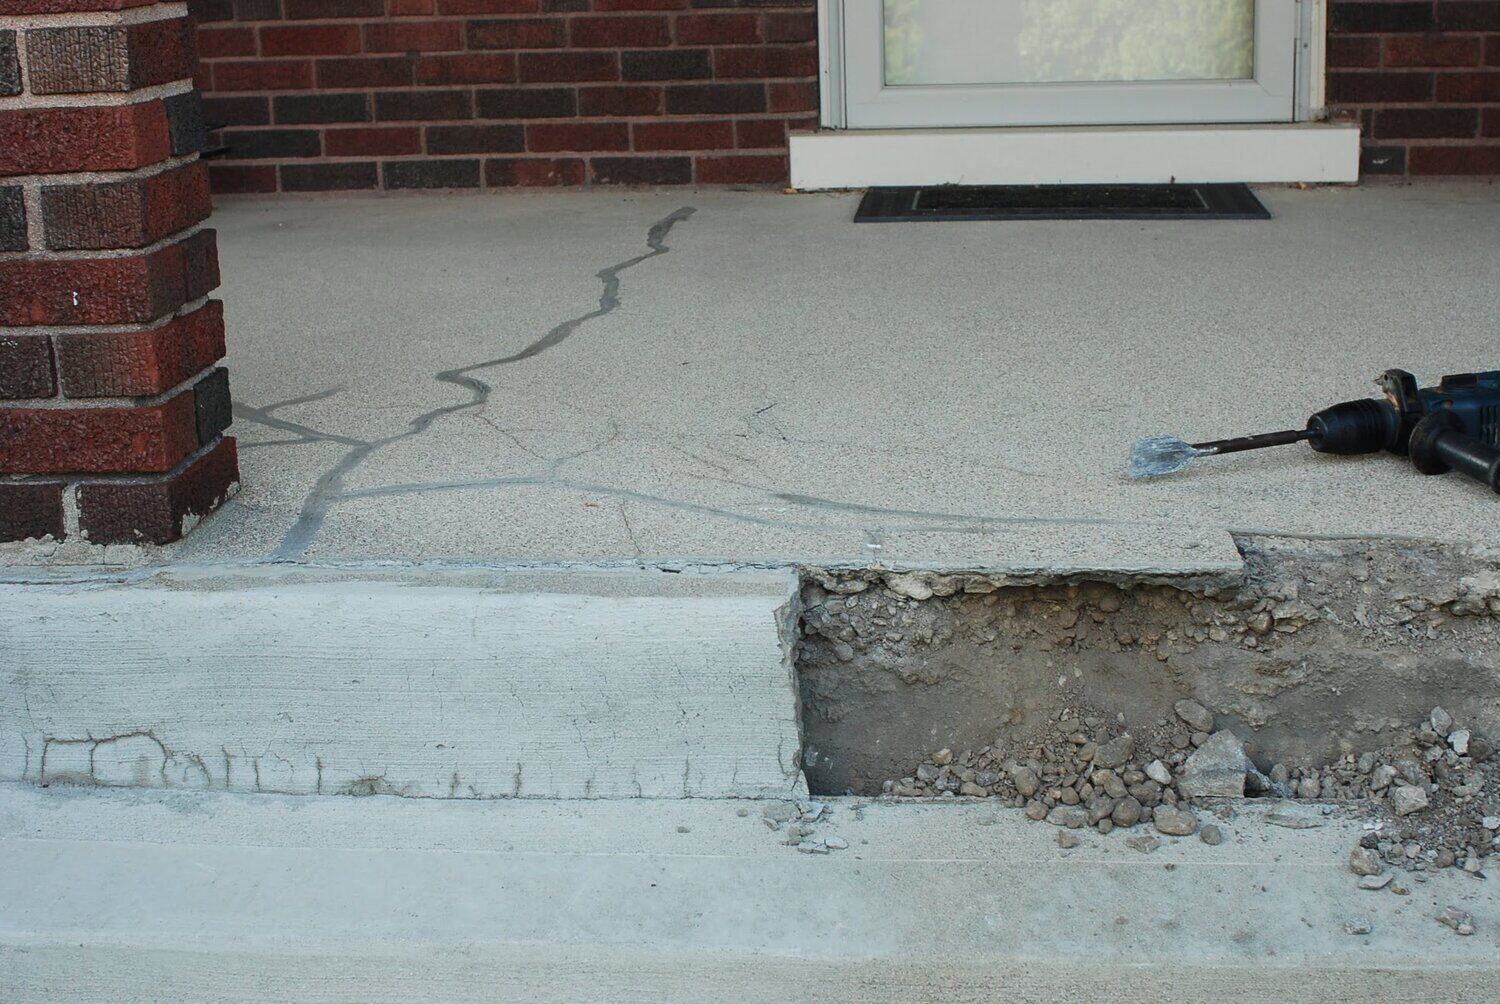
Step 5: Preparing the Site
Before you can begin the actual construction of your front porch, it’s crucial to properly prepare the site. This step involves clearing the area, leveling the ground, and making necessary adjustments to ensure a stable and solid foundation for your porch.
Start by removing any existing structures, debris, or vegetation from the area where your front porch will be built. This may involve demolishing an old porch or removing shrubs, trees, or other obstacles that are in the way. Additionally, ensure that any underground utilities, such as water or gas lines, are properly marked and avoid excavation in those areas.
Once the area is clear, thoroughly inspect the ground for any variations or unevenness. Use a level or a string line to identify any high or low spots that may need to be addressed. Proper site preparation is essential for ensuring a stable foundation and preventing future issues such as shifting or sinking.
If the area is not level, you may need to do some grading. This can be done by adding or removing soil to create a smooth and even surface. Use a rake or shovel to distribute the soil effectively and compact it to provide a solid base.
Next, it’s time to mark the boundaries and layout of your front porch. Use stakes and string lines to outline the shape and dimensions of your porch. This will serve as a guide during the construction process and help ensure accurate placement.
Consider installing some concrete footings or piers as part of the foundation for your porch. These will provide stability and support for the structure. Dig holes for the footings and pour concrete into the holes, making sure they are level and at the correct depth. Allow the concrete to cure before moving on to the next steps.
During site preparation, it’s also important to consider drainage. Proper drainage is crucial to prevent water pooling and potential damage to your porch. Ensure that the site slopes away from your home and that you plan for appropriate drainage systems, such as installing French drains or downspouts.
Finally, take necessary precautions to protect the construction site. If the construction process is going to take some time, consider fencing off the area to prevent accidents or unauthorized access. It’s also a good idea to cover the site with tarps or protective sheets to keep the area free from debris, water, or other environmental factors that could impact the construction process.
By properly preparing the site, you are ensuring a solid foundation and setting the stage for a successful front porch construction. This step sets the groundwork for the next phases of the project, bringing you one step closer to enjoying your new and inviting front porch.
Step 6: Building the Foundation
With the site prepared, it’s time to move on to the construction of the foundation for your front porch. The foundation is a critical component as it provides stability and support for the entire structure.
Start by placing the necessary footings or piers in the designated locations. These footings will serve as the base for your porch’s foundation. Follow the specifications outlined in your architectural plans to ensure proper spacing and sizing of the footings.
Next, you will need to construct the framework for your porch foundation. This typically involves building a series of walls or installing support beams that will bear the weight of the porch. Use treated lumber or pressure-treated wood, as it is more resistant to decay and rot.
Properly measure and cut the lumber according to your design plans. Attach the pieces using appropriate hardware, such as screws or nails, to create a sturdy and secure foundation framework. Ensure that everything is level and plumb to prevent any structural issues or uneven surfaces in the future.
If your front porch is elevated, you may need to install support posts and beams to create the necessary structural support. These posts should be securely anchored to the footings or piers. Double-check the alignment and stability of the posts to ensure the integrity of the porch foundation.
Consider using joist hangers to attach the floor joists to the foundation framework. This will provide additional support and stability to your porch flooring. Follow the recommended spacing and layout provided in your design plans.
Once the basic framework is in place, you can proceed to install the subflooring. This will serve as the base for the final porch flooring. Use weather-resistant plywood or composite decking boards and secure them to the joists using appropriate fasteners. Be sure to leave a gap between the boards for proper ventilation and expansion.
Throughout the construction process, it’s crucial to regularly check the level and plumb of the foundation and framework. This will help you identify and correct any issues early on, ensuring a strong and structurally sound front porch.
Remember to refer to building codes and regulations specific to your area to ensure compliance with safety standards during the construction of the foundation. If you are unsure about any aspect of the process, consult with a professional contractor or architect for guidance.
Building a solid and well-constructed foundation is a crucial step towards constructing a front porch that is safe, durable, and built to last. With the foundation in place, you can move on to the next steps of the construction process, bringing your vision of a beautiful front porch closer to reality.
When adding a front porch, consider the architectural style of your home and choose materials and design elements that complement it. This will ensure a cohesive and visually appealing addition to your home.
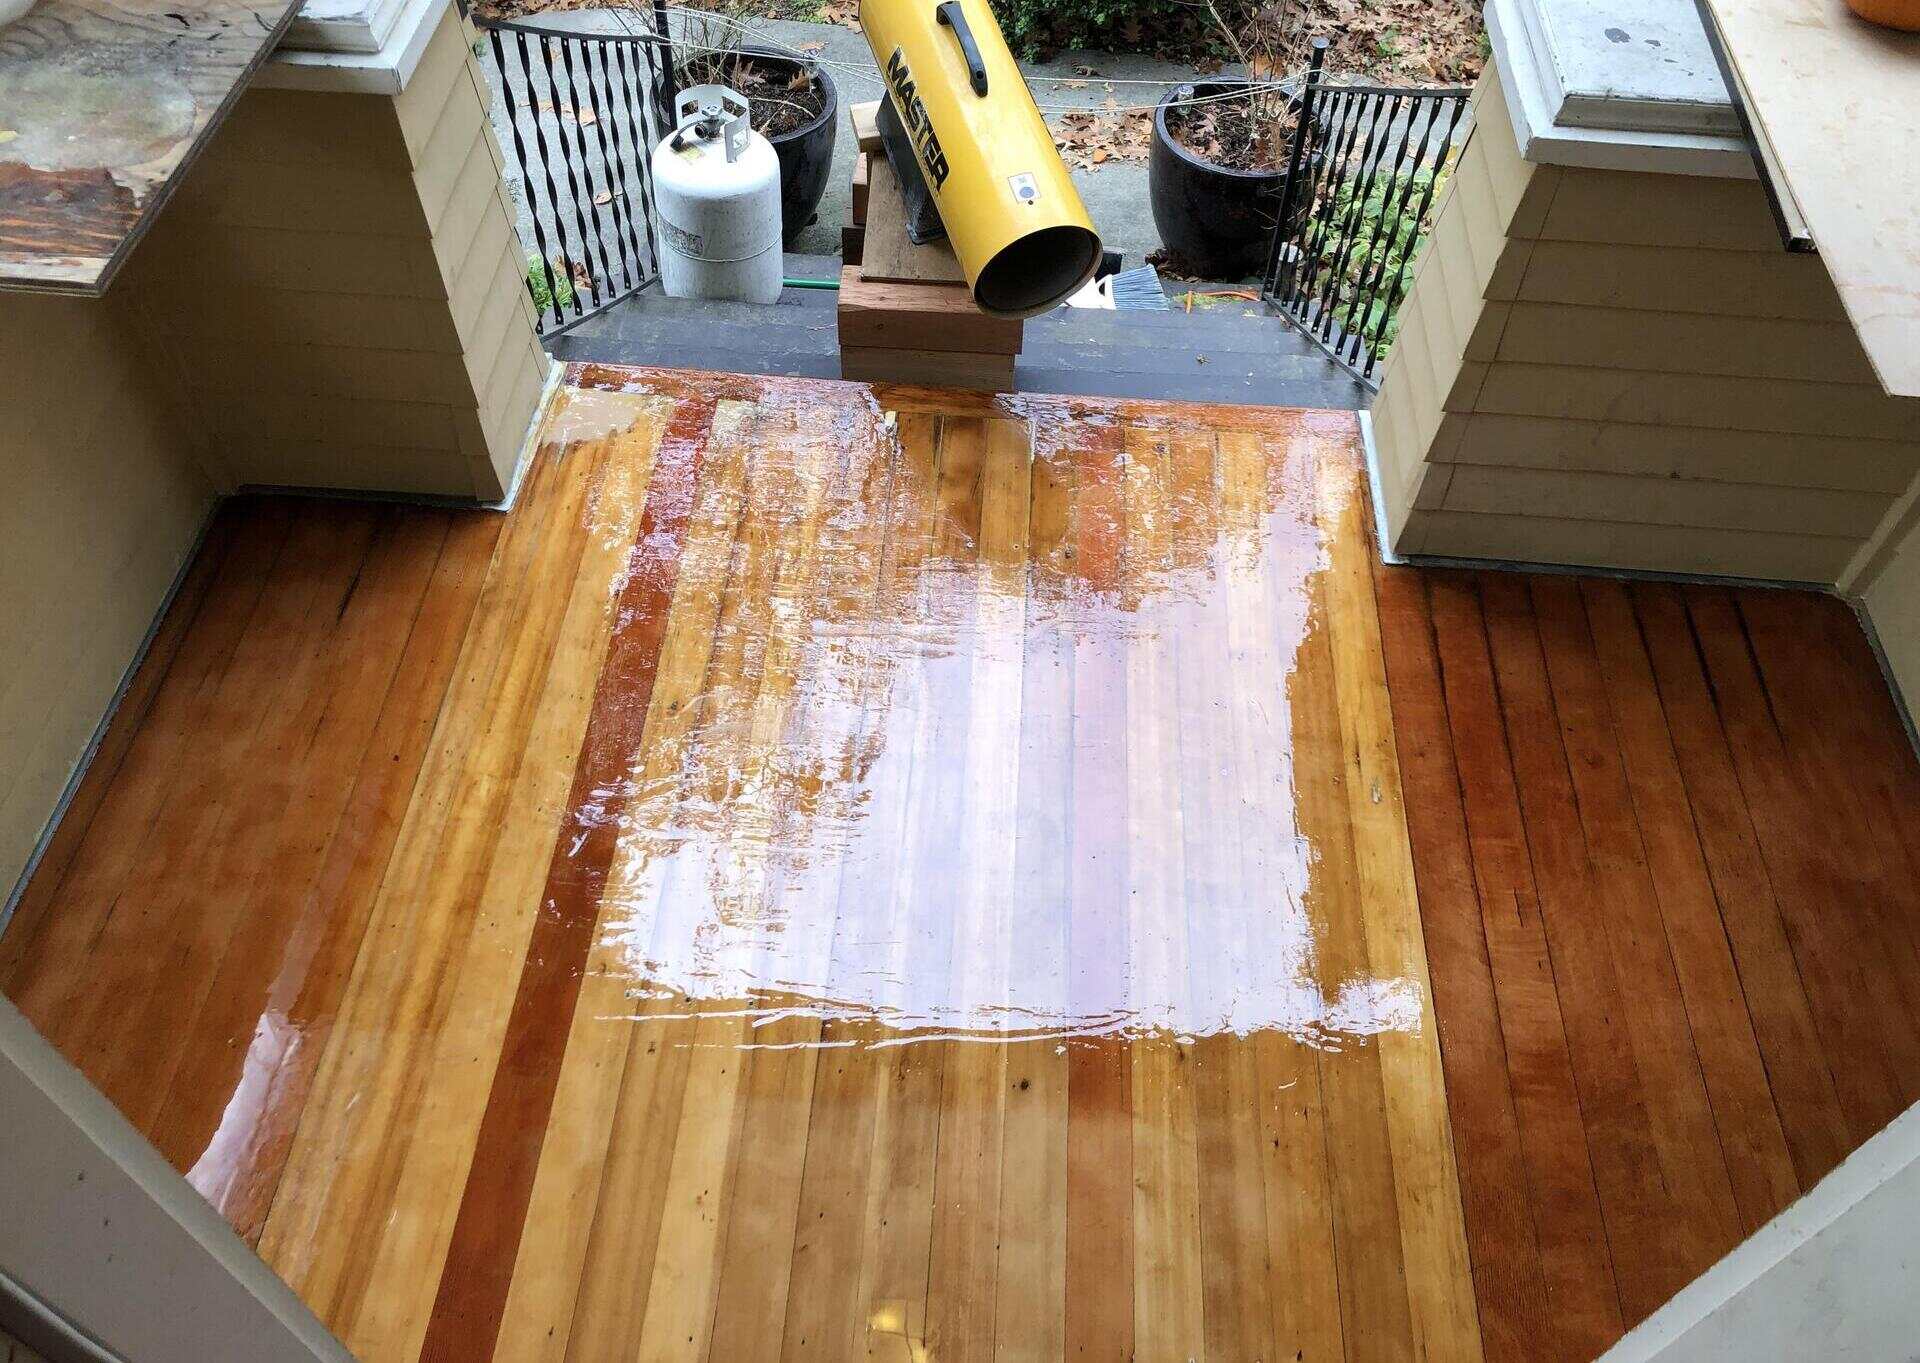
Step 7: Constructing the Porch Flooring
With the foundation completed, it’s time to move on to constructing the porch flooring. The porch flooring not only provides a functional surface for walking and seating but also adds aesthetic appeal to your front porch.
Begin by selecting the material for your porch flooring. Common options include wood, composite decking, or even tile, depending on your preferences and budget. Consider factors such as durability, maintenance requirements, and how well the material complements the overall design of your porch.
If you choose wood flooring, ensure that it is properly treated or sealed to protect it from the elements. Composite decking offers a low-maintenance option that is resistant to rot and insect damage.
Before installing the porch flooring, make sure the subflooring is stable and in good condition. Repair or replace any damaged or weak sections, as these can affect the integrity of your porch flooring.
Start by laying the first row of flooring boards along one edge of the porch, perpendicular to the joists. Use appropriate fasteners, such as screws or nails, to securely attach the boards to the subflooring. Space the boards evenly, leaving a small gap between each board for ventilation and to allow for natural expansion.
Continue installing subsequent rows of flooring boards, making sure to stagger the joints for added stability. Use a carpenter’s square or a straightedge to ensure that the boards are aligned and straight as you progress.
If you are using tongue and groove boards, apply a thin bead of construction adhesive to the tongue of each board before fitting it into the groove. This will provide additional strength and stability to the porch flooring.
Throughout the installation process, regularly check the level and alignment of the porch flooring. Adjust as necessary to ensure a smooth and even surface.
Once the porch flooring is in place, consider applying a protective sealant or finish to further enhance its durability and appearance. Consult the manufacturer’s instructions for the specific material you are using to determine the most appropriate sealant or finish.
Remember to take necessary safety precautions during the installation of the porch flooring. Wear appropriate safety gear, such as eye protection and gloves, and use caution when handling tools and materials.
By carefully constructing the porch flooring, you are creating a solid and visually appealing surface for your front porch. With this step complete, your porch is taking shape and moving closer to becoming a functional and inviting space.
Step 8: Installing Porch Columns
Installing porch columns is an important step in constructing your front porch. Not only do columns provide structural support, but they also play a significant role in defining the style and character of your porch. Whether you’re going for a traditional, rustic, or contemporary look, the installation of porch columns will contribute to the overall aesthetic appeal of your front porch.
Start by selecting the style and material of your porch columns. Common options include wood, fiberglass, vinyl, or aluminum. Consider factors such as durability, maintenance requirements, and how well the material blends with the design of your porch.
Before installation, measure and mark the desired height of your porch columns. Make sure they are level and in line with your porch’s architectural design. If your porch is elevated, consider installing a concrete base for each column for added stability.
For load-bearing columns, such as those supporting a roof or overhead structure, it’s crucial to follow proper guidelines and consult with professionals who can assess the structural requirements and offer recommendations.
Once you have determined the placement and dimensions of the columns, it’s time to install them. Depending on the material you’ve chosen, installation methods may vary.
If you’re using wood columns, position them in place and secure them to the porch floor and the overhead structure using appropriate brackets or hardware. Ensure that they are plumb and securely fastened to provide adequate support.
For fiberglass, vinyl, or aluminum columns, follow the manufacturer’s instructions for installation. Typically, this involves attaching the columns to decorative bases and capitals, and then securing them to the porch floor and the overhead structure.
During the installation process, regularly check the alignment and stability of the columns. Adjust as necessary to ensure that they are straight and evenly spaced.
After installing the porch columns, take the time to properly finish or paint them to protect them from the elements. This will enhance their longevity and maintain their appearance over time.
Remember to adhere to proper safety precautions during the installation of porch columns. Use appropriate tools, such as a level and a drill, and work with a partner if needed.
By installing porch columns, you not only provide structural support for your front porch but also add visual interest and architectural appeal. With the columns in place, your front porch is one step closer to becoming the inviting and charming space you envision.
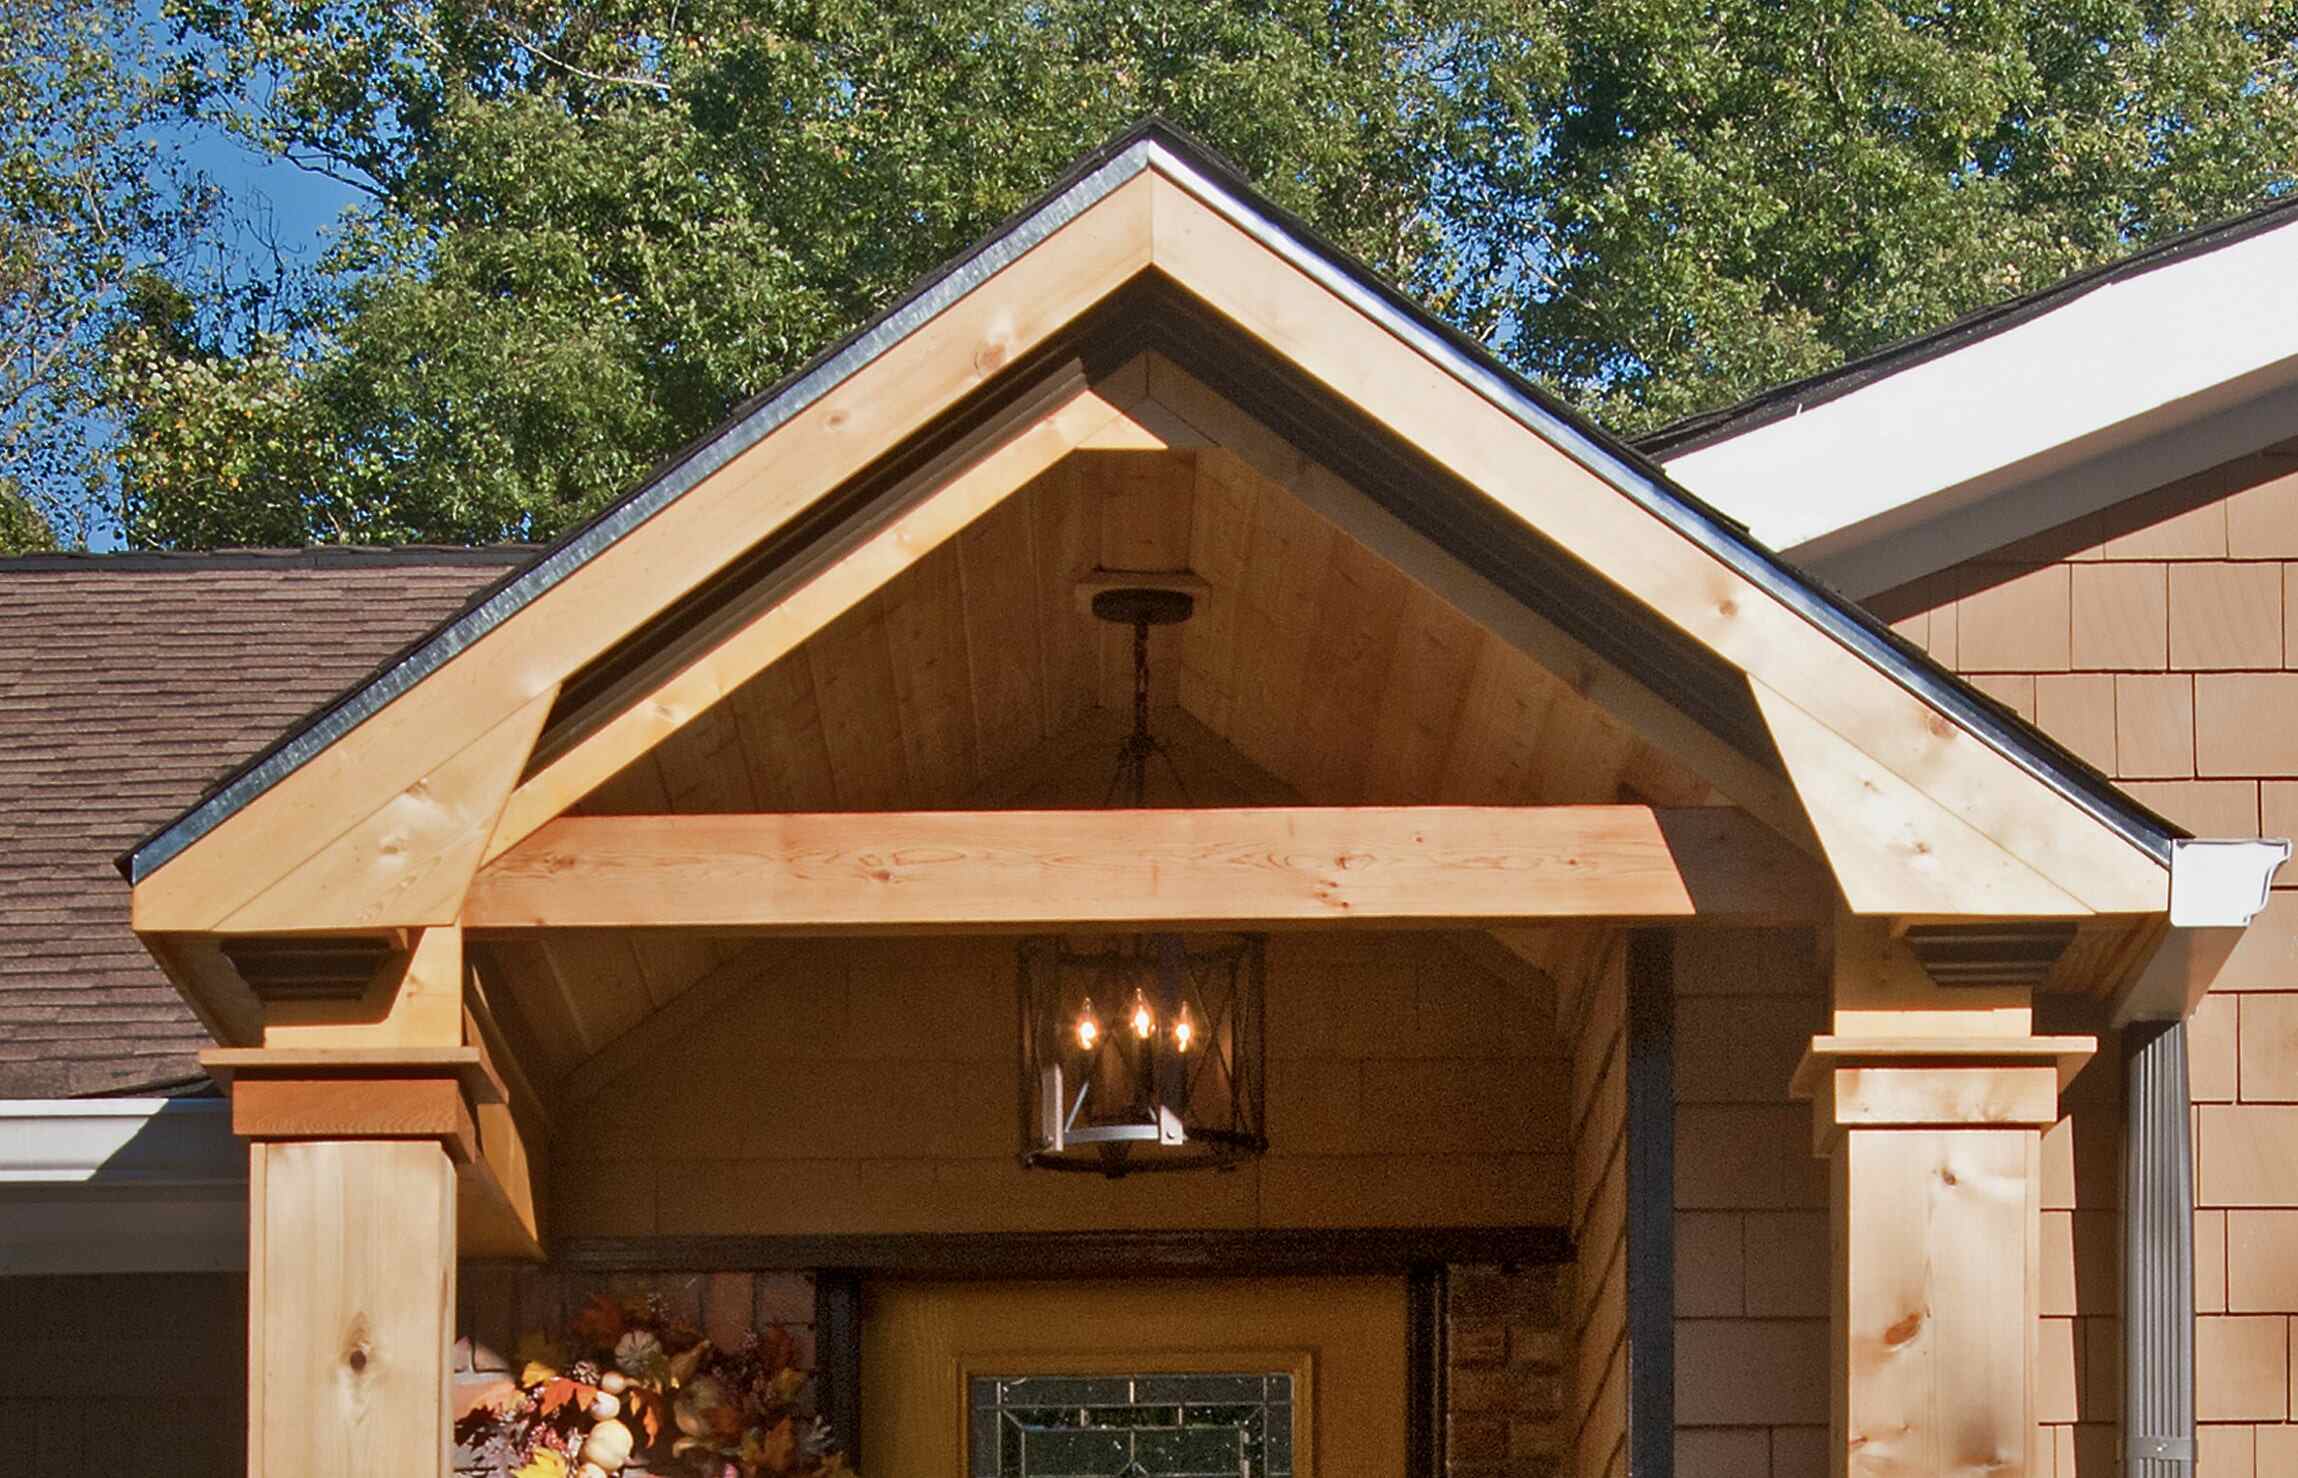
Step 9: Building the Porch Roof
Building the porch roof is a significant step in completing your front porch construction. The roof provides shelter, protection from the elements, and adds a finishing touch to your porch design. It’s important to carefully plan and execute this step to ensure a functional and aesthetically pleasing roof that complements your home’s architecture.
Start by determining the type of roof you want for your porch. Common options include gable, hip, shed, or even a combination of styles. Consider factors such as the overall design of your home, the available space, and your personal style preferences.
Consult with professionals or use design software to create a detailed plan and obtain accurate measurements for your porch roof. This plan should include the pitch, slope, and dimensions of the roof, as well as any additional features such as overhangs or decorative elements.
Once you have the plan in place, gather the necessary materials for your roof construction. This may include roofing materials such as shingles or metal panels, as well as supporting elements such as rafters, sheathing, and flashing.
Start by installing the roof rafters based on the measurements and design plan. These rafters will support the weight of the roof and provide the structure for the roof’s shape.
Attach the rafters to the porch columns or other support structures using appropriate connectors, brackets, or hardware. Ensure that the rafters are securely fastened and positioned at the correct angles according to the roof design.
Next, install the sheathing on top of the rafters. This provides a solid base for the roof covering and helps to distribute the weight evenly across the roof structure.
Follow the manufacturer’s instructions to properly install the roofing material of your choice. This may include laying shingles or attaching metal panels. Take care to apply any necessary underlayment or waterproofing materials to ensure a watertight roof.
During the roof installation process, check for proper ventilation to prevent issues such as moisture buildup or heat accumulation. Install roof vents or other ventilation systems as needed.
Once the roof is complete, thoroughly inspect for any gaps, leaks, or loose components. Make any necessary adjustments or repairs to ensure the roof is secure and efficiently diverting water away from your porch.
Remember to prioritize safety during the roof construction process. Use appropriate safety equipment, such as harnesses and fall protection, and seek assistance when working at heights or handling heavy materials.
By skillfully constructing the porch roof, you add a vital element that not only provides protection but also enhances the overall aesthetics and functionality of your front porch. With the roof in place, your porch is nearing completion and ready for the final steps.
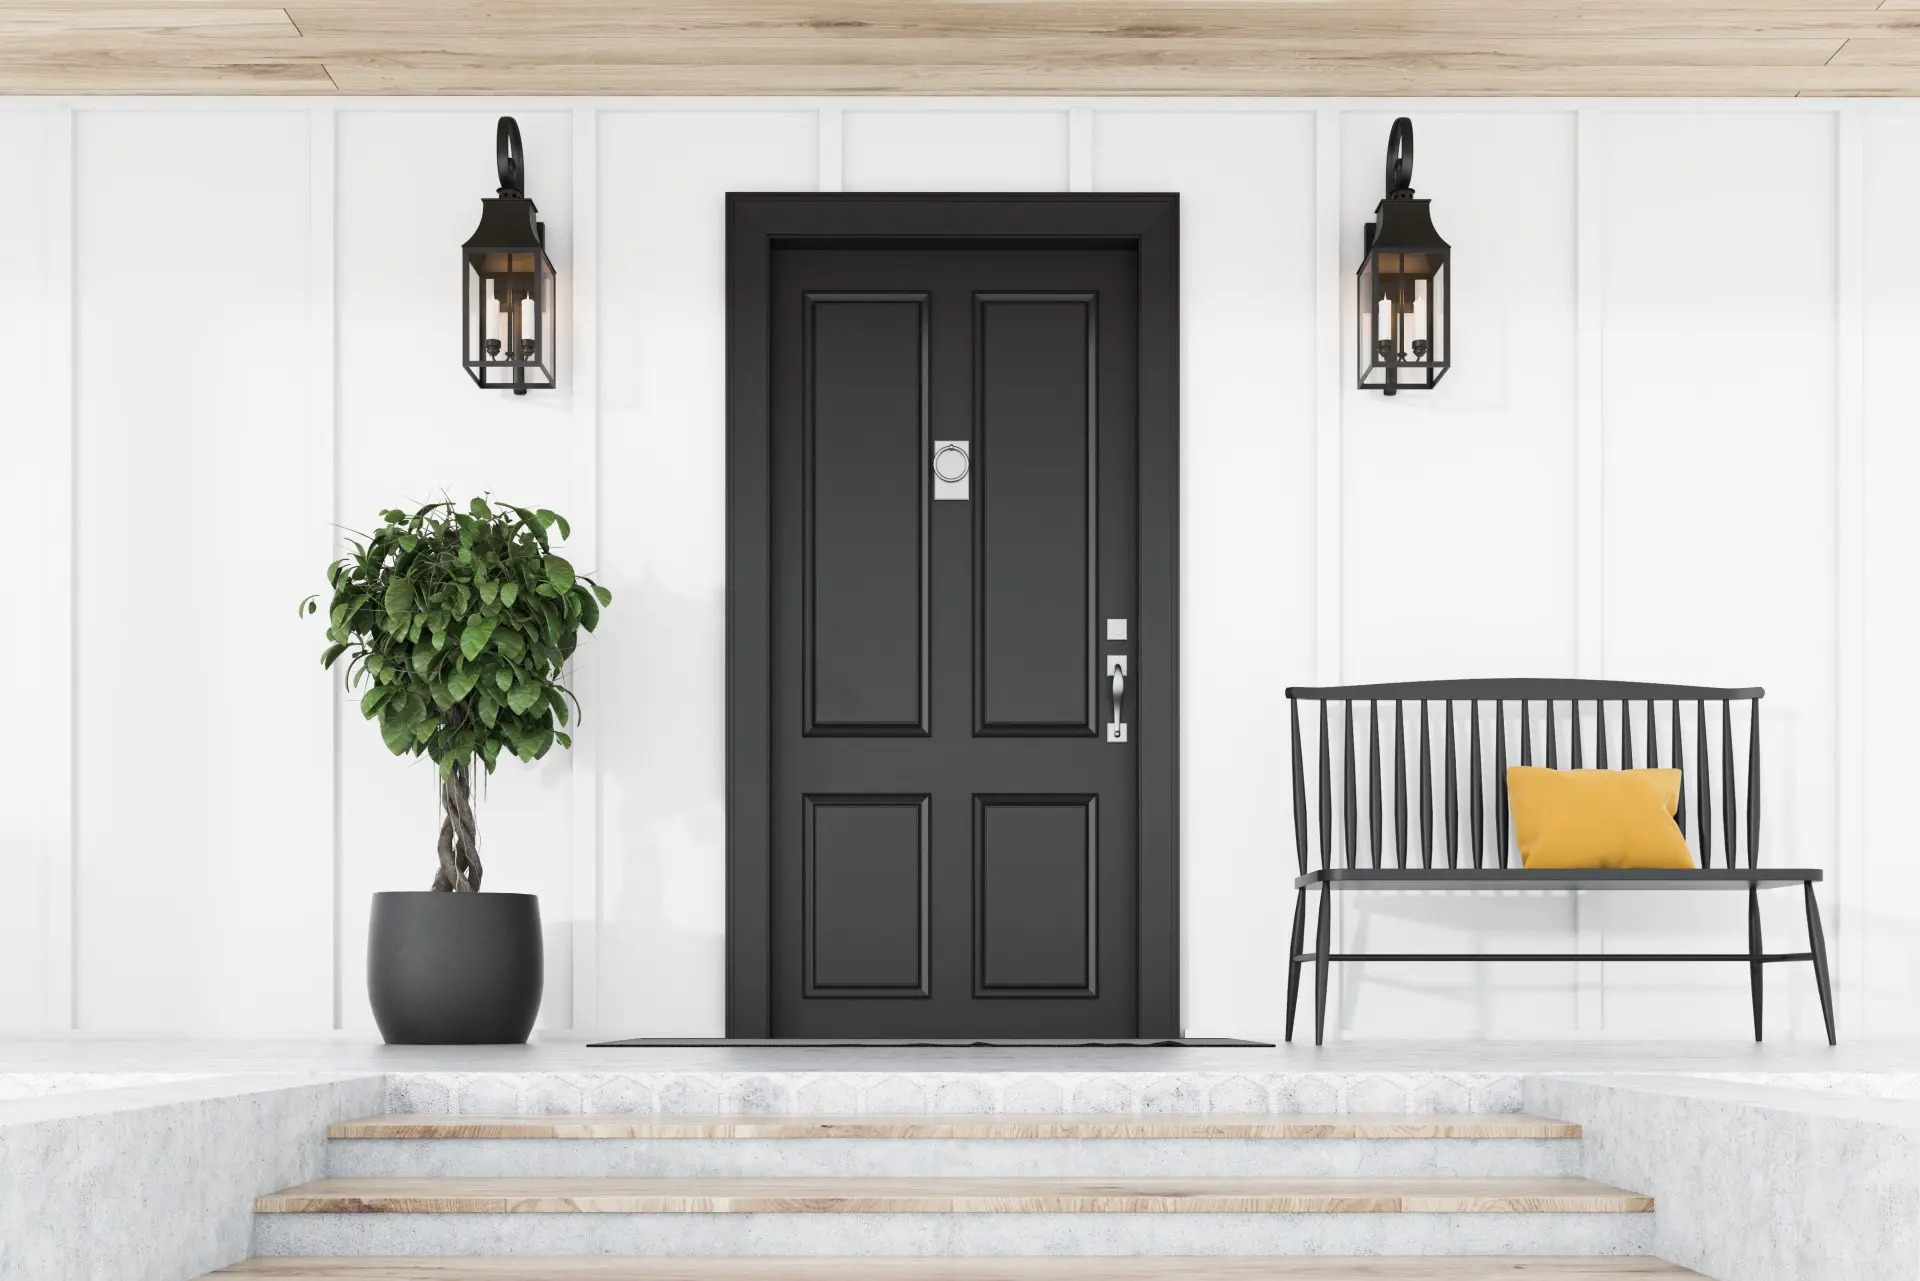
Step 10: Adding Handrails and Balusters
Adding handrails and balusters to your front porch is an important step that enhances safety, provides support, and adds a decorative element to your porch design. Handrails and balusters not only serve as essential safety features but also contribute to the overall aesthetics and charm of your front porch.
Begin by determining the appropriate height and placement of the handrails. This will depend on local building codes and regulations, as well as the design and layout of your porch. Measure and mark the desired height of the handrails along the porch columns or other support structures.
Next, choose the material for your handrails and balusters. Common options include wood, metal, vinyl, or composite materials. Consider durability, maintenance requirements, and the overall style and design of your porch when selecting the materials.
If using wood handrails, cut them to the appropriate length and shape them accordingly. Sand and finish the handrails to ensure a smooth surface and protection against weather elements.
Attach the handrails securely to the porch columns or support structures using appropriate brackets or hardware. Be sure they are aligned properly and follow the desired contour of the porch.
For balusters, measure the desired spacing and height based on safety guidelines and local building codes. Cut the balusters to the appropriate length, ensuring they are consistent in size and properly aligned.
Secure the balusters to the handrails and the porch floor using connectors or screws. Make sure they are fastened tightly, providing a stable and secure barrier.
If using metal or vinyl handrails and balusters, follow the manufacturer’s instructions for installation. They may come in pre-cut and pre-assembled sections, making the installation process simpler.
Throughout the installation, check for the levelness and stability of the handrails and balusters. Adjust and tighten any necessary components to ensure a secure and even placement.
Consider adding decorative elements to the handrails and balusters, such as finials or decorative caps, to add a personal touch and further enhance the visual appeal of your front porch.
Lastly, thoroughly inspect all the installed handrails and balusters for any loose or defective parts. Make any necessary adjustments or repairs to ensure that they are secure and functioning properly.
Always prioritize safety when installing handrails and balusters. Follow local safety guidelines, use appropriate safety equipment, and consider consulting with professionals if you are unsure about any aspect of the installation process.
By adding handrails and balusters, you are not only ensuring the safety of your front porch but also enhancing its overall beauty and providing a finishing touch to your porch construction project. With these elements in place, your front porch is nearly complete, ready for the final steps of the construction process.
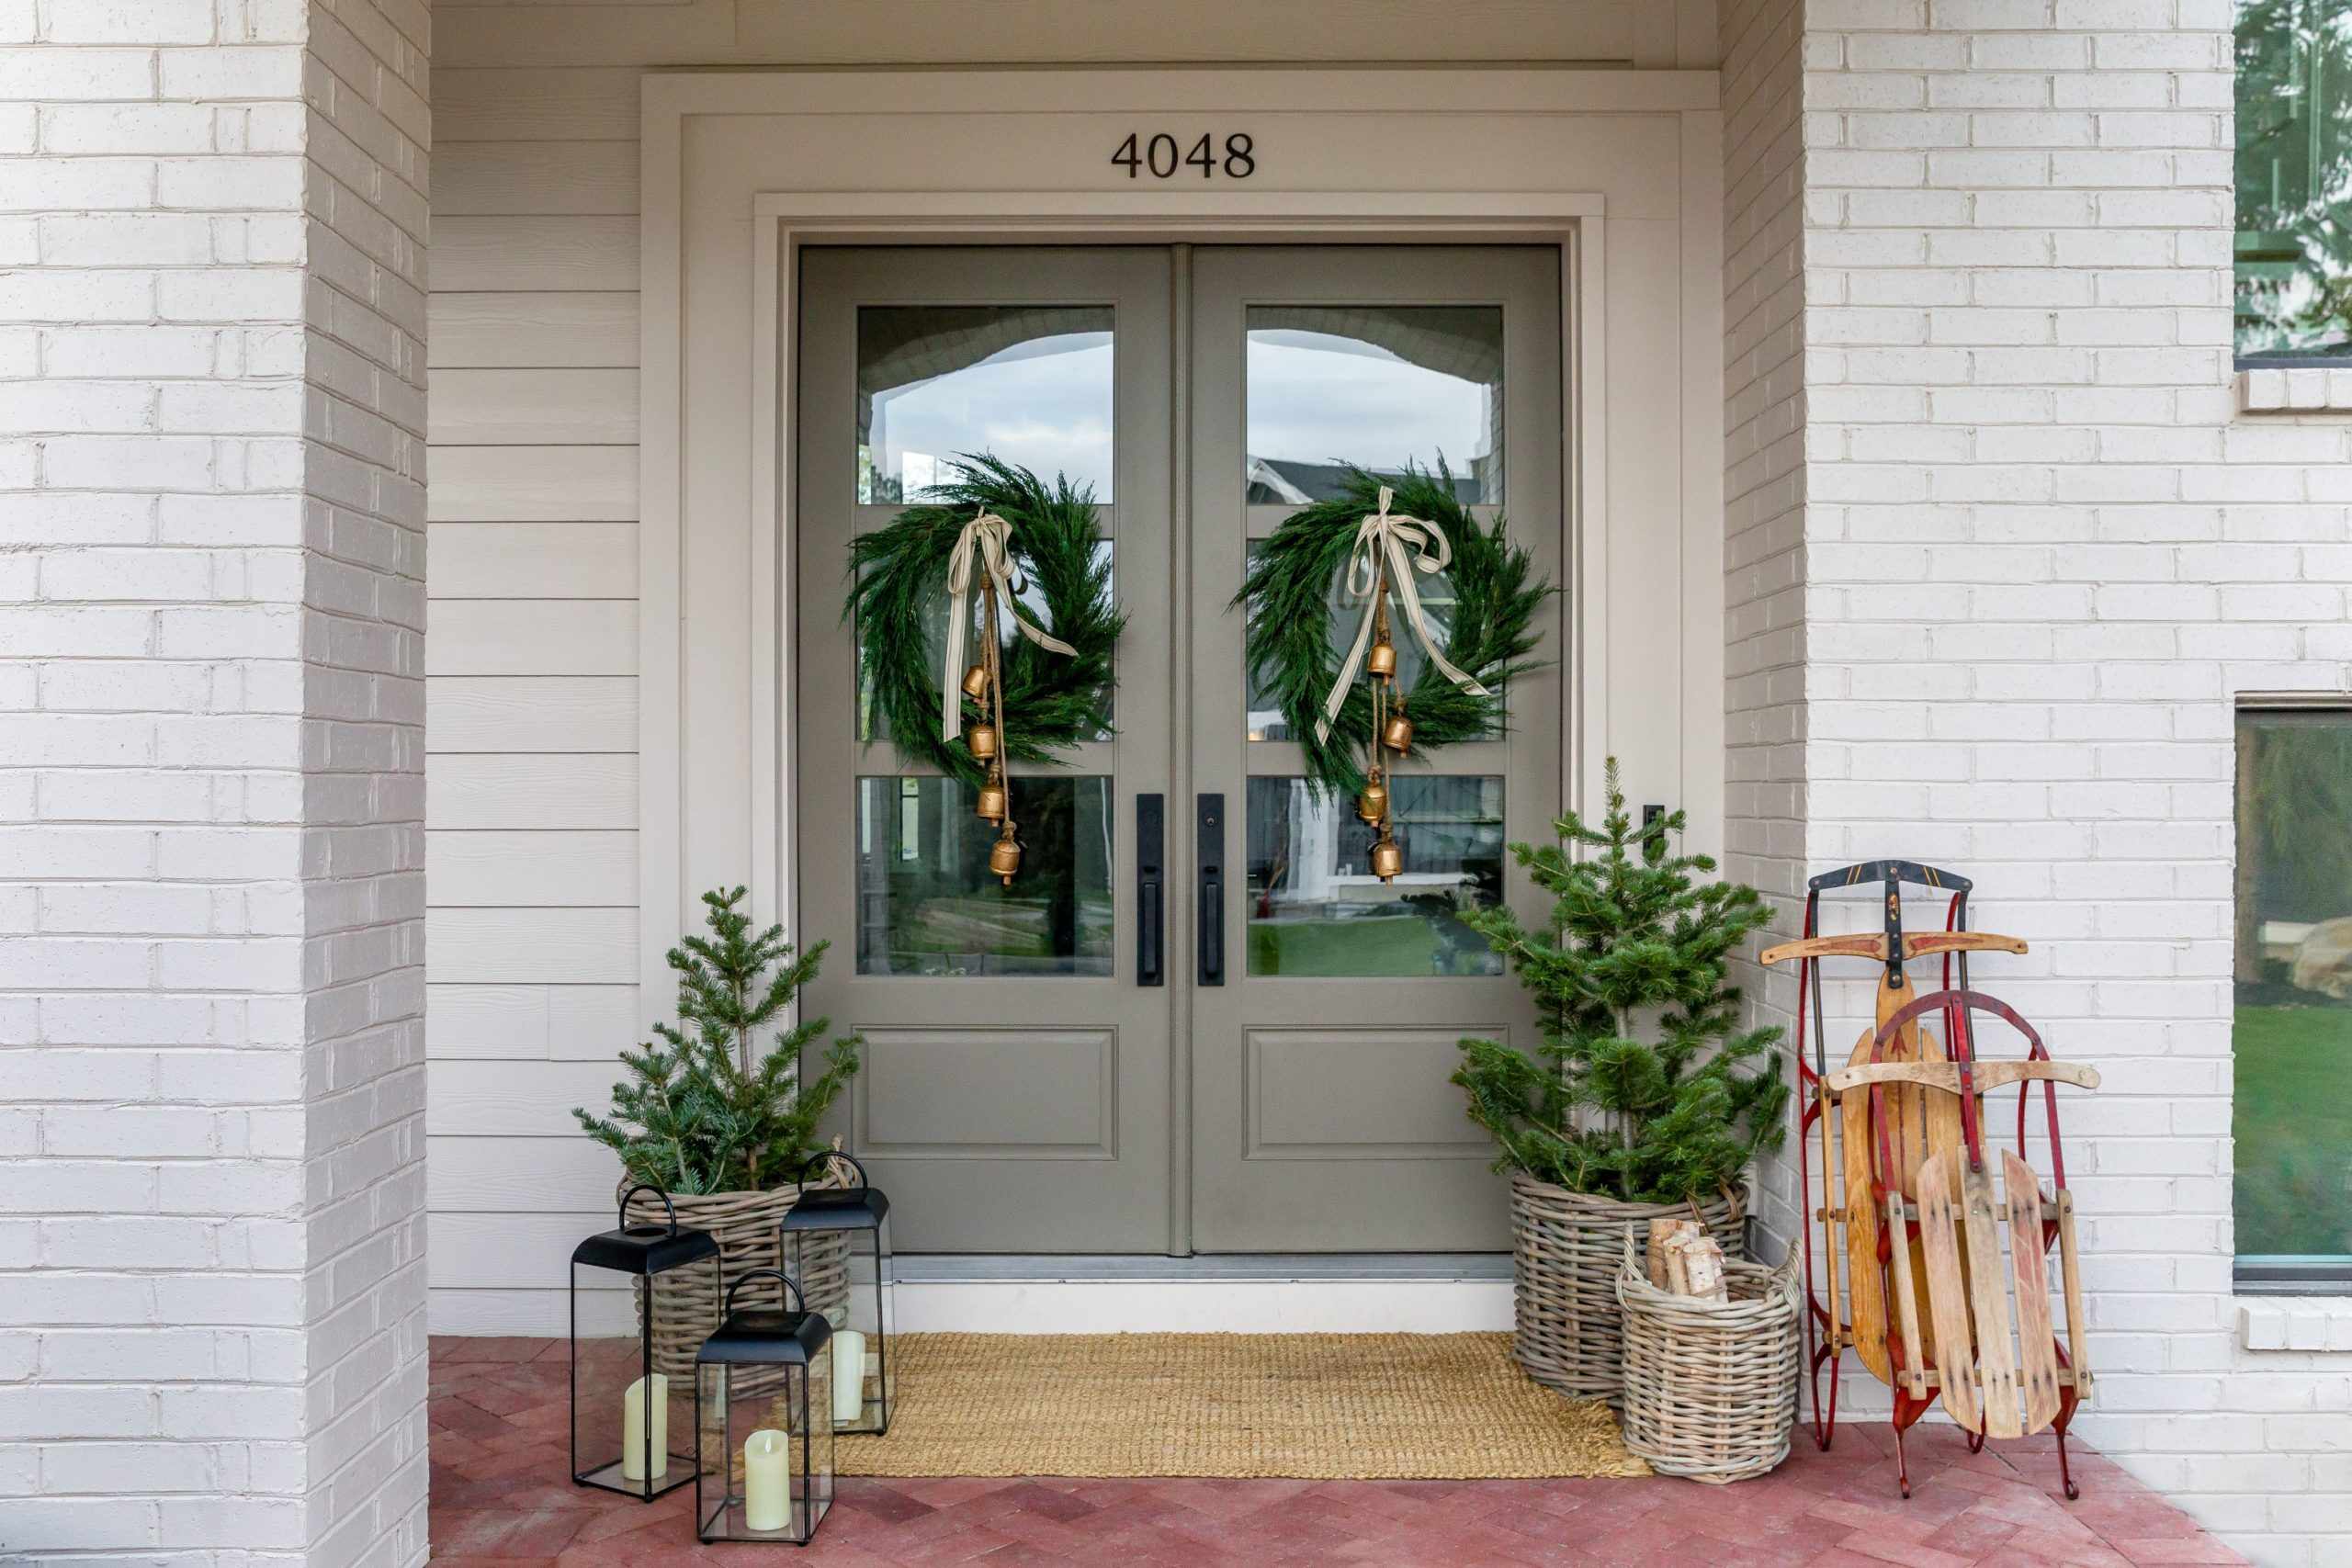
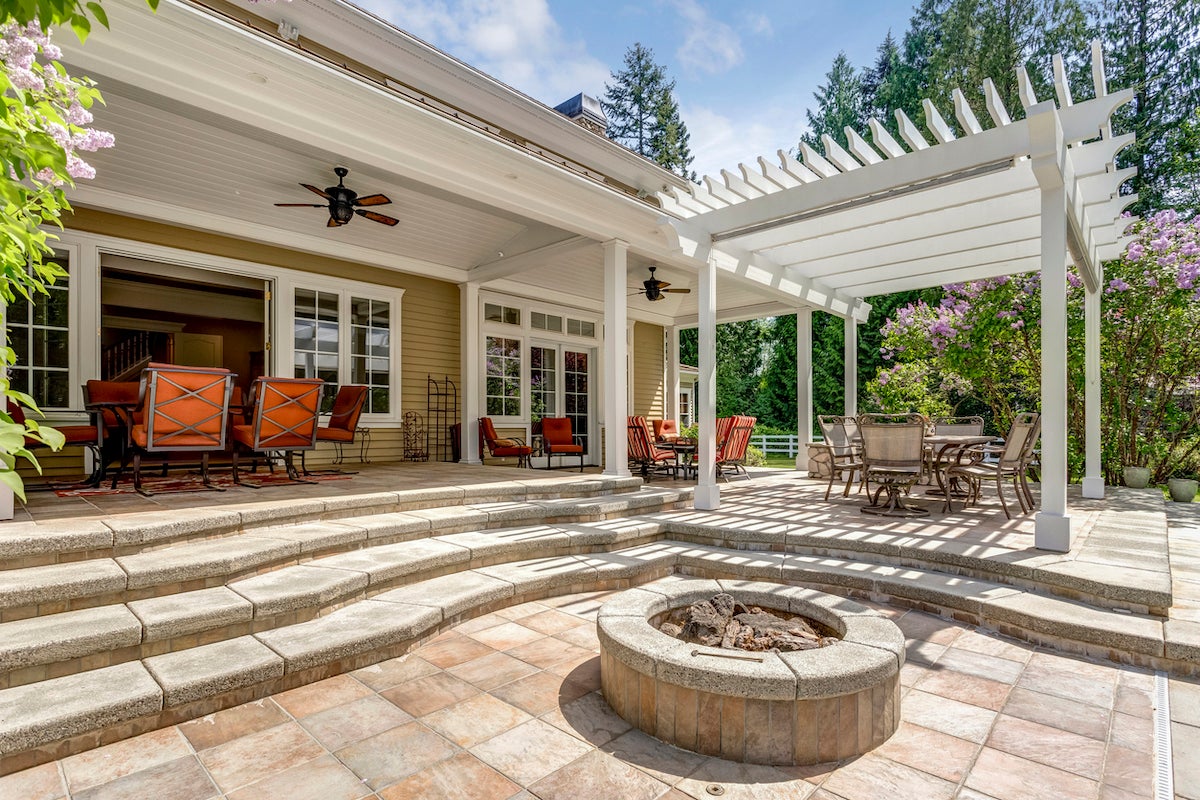
Step 11: Finishing Touches
After completing the major construction steps of your front porch, it’s time to focus on the finishing touches. These final details will add the perfect polish and make your porch feel complete and inviting. Here are some important considerations for this step:
1. Lighting: Install appropriate lighting fixtures to illuminate your front porch during the evening hours. Choose fixtures that complement the style of your porch while providing adequate lighting for safety and ambiance.
2. Decorative Accents: Add personal touches and decorative elements to make your porch feel warm and welcoming. This can include potted plants, outdoor furniture, throw pillows, and other accessories that reflect your style and create a cozy atmosphere.
3. Paint or Stain: Apply a fresh coat of paint or stain to the porch flooring, handrails, and columns if desired. Choose a color that coordinates with your home’s exterior and enhances the overall aesthetic appeal of your front porch.
4. Landscaping: Consider landscaping around your front porch to enhance its overall appeal. Add plants, shrubs, or flowers to soften the edges of your porch and create a visually pleasing environment. Incorporate focal points such as garden beds or decorative stones for added interest.
5. Seating and Furniture: Select comfortable and durable seating options for your front porch. This can include chairs, benches, or even a porch swing. Ensure the furniture is weather-resistant and fits well within the available space. Don’t forget to add cushions and outdoor textiles for extra comfort and style.
6. Welcome Mat and Signage: Place a welcome mat at the entrance of your front porch to greet guests. Consider adding a personalized sign or plaque to showcase your family name or a welcoming message, adding a personal touch to the overall design.
7. Maintenance and Seasonal Care: Establish a regular maintenance routine for your front porch. This can include sweeping, cleaning, and inspecting for any wear and tear. Additionally, adjust your porch decor seasonally to reflect different holidays or themes.
Remember to consider your personal style and preferences when adding the finishing touches to your front porch. The aim is to create a space that not only enhances your home’s exterior but also reflects your unique personality and taste.
By paying attention to these final details, your front porch will become an inviting and enjoyable space for you, your family, and your guests to relax and appreciate the beauty of your home.
Conclusion
Building a front porch is not only a practical addition to your home but also a way to enhance its curb appeal and create a warm and inviting space. Throughout this comprehensive guide, we have walked you through the step-by-step process of adding a front porch to your home, from assessing the space to the finishing touches.
Assessing the available space and designing your porch according to your needs and personal style is the crucial first step. Obtaining the necessary permits ensures that your construction complies with local regulations and building codes. Gathering the materials and tools in advance and preparing the site create a solid foundation for your porch construction.
The process continues with building the foundation and constructing the porch flooring, which provide the essential structure and functionality. Installing porch columns and a roof not only enhance the architectural appeal but also provide crucial support and protection. Adding handrails and balusters ensures safety and adds a decorative element to your porch design.
Finally, the finishing touches, such as lighting, landscaping, and personal decor, complete the look and create an inviting space to relax and enjoy. Regular maintenance and seasonal care will keep your front porch in top shape for years to come.
Remember, while following this guide can help you in building a front porch, it is important to consult professionals, such as architects or contractors, for expert advice and guidance especially when it comes to structural integrity and building regulations.
With careful planning, attention to detail, and a touch of creativity, you can successfully build a front porch that not only enhances the beauty and value of your home but also provides a welcoming space for you and your loved ones to enjoy for years to come.
Frequently Asked Questions about How To Add A Front Porch
Was this page helpful?
At Storables.com, we guarantee accurate and reliable information. Our content, validated by Expert Board Contributors, is crafted following stringent Editorial Policies. We're committed to providing you with well-researched, expert-backed insights for all your informational needs.


0 thoughts on “How To Add A Front Porch”