Articles
How To Use A Harbor Freight Laser Level
Modified: October 27, 2024
Learn how to effectively use a Harbor Freight laser level with our informative articles. Find helpful tips, techniques, and recommendations for precision leveling.
(Many of the links in this article redirect to a specific reviewed product. Your purchase of these products through affiliate links helps to generate commission for Storables.com, at no extra cost. Learn more)
Introduction
When it comes to construction and home improvement projects, precision and accuracy are crucial. Whether you are hanging a picture frame, installing shelves, or laying tiles, having a tool that helps you ensure level alignments is essential. This is where a Harbor Freight laser level comes in handy.
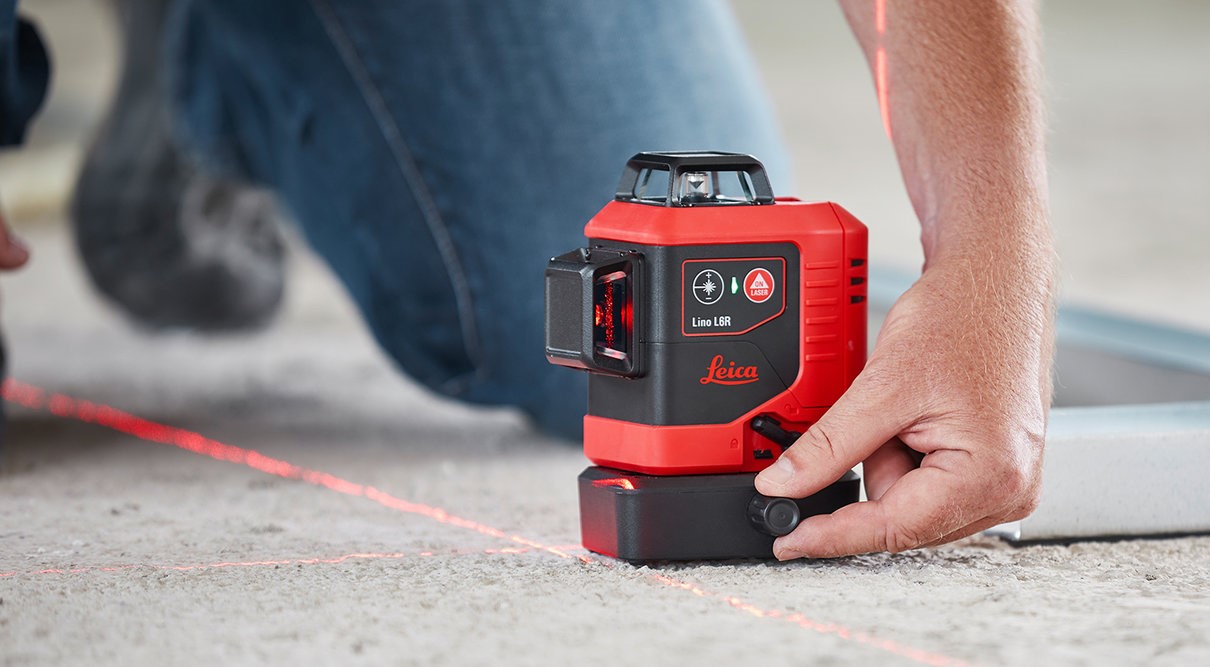
A Harbor Freight laser level is a versatile tool that uses laser technology to project a straight line or a dot onto surfaces, allowing you to easily determine if something is level or plumb. It eliminates the need for traditional bubble levels and ensures a much higher level of accuracy.
In this article, we will guide you through the process of using a Harbor Freight laser level effectively. We will cover the initial set up, leveling the laser level itself, adjusting the laser to your desired alignment, and utilizing it for both horizontal and vertical applications.
Whether you are a DIY enthusiast or a professional contractor, mastering the use of a Harbor Freight laser level will greatly enhance your productivity and accuracy, saving you time and effort.
So, let’s dive in and discover how to unlock the full potential of this powerful tool. Follow these step-by-step instructions, and soon you’ll be able to achieve precise and professional results in your projects.
Key Takeaways:
- Mastering the use of a Harbor Freight laser level empowers DIY enthusiasts and professional contractors to achieve precise and professional results in construction and home improvement projects, enhancing productivity and accuracy.
- Leveraging the additional features and tips provided, such as the locking mechanism, magnetic base, and visibility enhancements, optimizes the performance of the Harbor Freight laser level, leading to even better project outcomes.
Read more: How To Use A Laser Level
Overview of Harbor Freight Laser Level
Harbor Freight offers a variety of laser levels suitable for different tasks and budgets. Their laser levels are known for their affordability and reliability, making them a popular choice among DIYers and professionals alike.
Harbor Freight laser levels typically utilize Class II laser diodes, which emit a visible laser beam that is highly visible indoors and moderately visible outdoors, depending on lighting conditions. These laser levels are designed to provide accurate leveling and alignment for a range of applications, including hanging pictures, installing shelves, laying tiles, aligning cabinets, and more.
Many Harbor Freight laser levels feature self-leveling functionality. This means that the device automatically levels itself by adjusting the internal pendulum when placed on a surface within its leveling range. This helps to ensure accurate measurements and saves you time and effort in manually leveling the device.
Most Harbor Freight laser levels also come with additional features such as a locking mechanism to keep the laser level in a fixed position, a magnetic base for easy mounting options, and a tripod mount for added stability during use.
It’s important to note that while Harbor Freight laser levels offer great value for money, they may not have the same level of precision and durability as higher-end professional-grade laser levels. However, for most DIY projects and smaller-scale professional tasks, they perform admirably.
Now that you have an understanding of what to expect from a Harbor Freight laser level, let’s move on to the next section where we will guide you through the initial setup process.
Step 1: Unpacking and Setting Up the Laser Level
Before you can start using your Harbor Freight laser level, you’ll need to unpack it and set it up properly. Here’s how:
- Begin by carefully unpacking the laser level from its packaging. Take note of any included accessories such as a tripod or mounting bracket.
- Inspect the laser level for any visible damage. If you notice any major damage or defects, contact Harbor Freight customer support for assistance.
- Next, install the batteries or charge the built-in battery, depending on the model of your laser level. Follow the manufacturer’s instructions to ensure proper battery installation or charging.
- Once the batteries are installed or the built-in battery is charged, turn on the laser level. Most models will have a power button or switch to activate the laser.
- Now, select the desired mode on the laser level. Some models offer different modes such as horizontal, vertical, or cross-line projection. Consult the user manual to understand how to switch between modes.
- For added stability and convenience, you may choose to mount the laser level on a tripod or attach it to a magnetic base. Ensure that the mounting option is compatible with your laser level and securely attach it according to the manufacturer’s instructions.
- Position the laser level on a stable surface or mount it at the desired height using the tripod. Make sure it is placed on a surface that is relatively level, as this will affect the accuracy of the laser projection.
- Lastly, ensure that the area where you will be working is well-lit. The visibility of the laser beam depends on the lighting conditions, so adequate lighting will help you see the laser line more clearly.
By following these simple steps, you will have successfully unpacked and set up your Harbor Freight laser level. Now you’re ready to move on to the next step, which is leveling the laser level itself.
Step 2: Leveling the Laser Level
Ensuring that your laser level is leveled itself is crucial for accurate measurements and alignments. Follow these steps to level your Harbor Freight laser level:
- Place the laser level on a stable surface or mount it at the desired height using a tripod.
- Turn on the laser level and allow it to self-level if it has a self-leveling feature. If not, use the leveling screws or knobs provided to manually level the laser.
- Observe the bubble vials or digital indicators on the laser level. These indicators will help you determine if the laser level is perfectly level in both the horizontal and vertical axes.
- Adjust the leveling screws or knobs as necessary to center the bubble vials or obtain a level reading on the digital indicators. Make small adjustments and check the level again until it is perfectly leveled.
- Once the laser level is properly leveled, lock the position using the locking mechanism, if available. This will prevent the laser level from accidentally moving during use.
- Double-check the levelness of the laser level by rotating it 180 degrees and observing the bubble vials or digital indicators again. If the readings remain consistent, your laser level is properly leveled.
It’s important to note that some Harbor Freight laser levels have a leveling range. This means that they can only self-level within a certain range of angles. Make sure to check the manufacturer’s specifications for the leveling range of your specific laser level.
By taking the time to level your laser level correctly, you will ensure accurate measurements and alignments in your projects. Now that your laser level is leveled, it’s time to move on to the next step – adjusting the laser itself.
Step 3: Adjusting the Laser Level
Adjusting the laser level properly is essential to ensure that the projected laser line or dot is aligned precisely where you need it. Here’s how you can adjust your Harbor Freight laser level:
- Identify the adjustment controls on your laser level. These controls may vary depending on the model and features of your particular laser level.
- Refer to the user manual to understand how to adjust the specific parameters of your laser level, such as the horizontal and vertical alignment.
- For horizontal alignment, use the horizontal adjustment control to move the laser beam left or right until it aligns exactly where you want it. Some laser levels have a fine adjustment feature, allowing you to make small, precise adjustments as needed.
- For vertical alignment, use the vertical adjustment control to move the laser beam up or down until it lines up perfectly with your reference point or target. Again, use the fine adjustment feature if available for precise adjustments.
- Take your time to fine-tune the laser alignment, ensuring that the projected line or dot is exactly where you need it. Adjust as necessary until you are satisfied with the alignment.
- If your laser level has additional features such as cross-line projections or multiple laser dots, follow the specific instructions provided in the user manual to adjust and align each feature properly.
- Once the laser alignment is adjusted to your desired position, lock the adjustment controls or use any locking features provided to secure the laser in place. This will prevent accidental movements and ensure consistent alignment throughout your project.
Remember, the accuracy of your laser level relies on proper adjustment. Take the time to adjust it correctly, and you’ll achieve precise and reliable results in your leveling and alignment tasks. With the laser level adjusted, you’re now ready to move on to using it for horizontal alignment, which will be covered in the next step.
When using a Harbor Freight laser level, make sure to calibrate it before each use to ensure accurate measurements. This will help you achieve precise and reliable results for your projects.
Read more: How To Use A Self Leveling Laser Level
Step 4: Using the Laser Level for Horizontal Alignment
The Harbor Freight laser level is an invaluable tool for achieving precise horizontal alignment in your projects. Follow these steps to use the laser level for horizontal alignment:
- Position the laser level at one end of the area where you want to establish a level line. Make sure it is securely mounted or placed on a stable surface.
- Turn on the laser level and ensure that the projected laser line is visible and aligned at the desired height.
- Using a reference point, such as a mark on the wall or an existing level surface, move the laser level along the length of the area where you want to establish the level line.
- Adjust the position of the laser level as necessary to ensure that the projected line remains level and aligned according to your reference point.
- Use a pencil or marker to mark the level line on the surface as you move along with the laser level.
- Continue this process until you have established a straight and level line across the desired area.
- Double-check the accuracy of the level line by using a bubble level or another reliable measuring tool to validate the alignment.
- Once you are satisfied with the horizontal alignment, you can proceed with your construction or installation tasks, using the laser-projected line as a guide.
The Harbor Freight laser level makes horizontal alignment tasks quick and easy. By utilizing the laser line projection, you can achieve precise results and save time compared to traditional methods.
Now that you have mastered horizontal alignment, let’s move on to the next step, where we will explore using the laser level for vertical alignment.
Step 5: Using the Laser Level for Vertical Alignment
In addition to horizontal alignment, the Harbor Freight laser level can also assist you in achieving accurate vertical alignments. Follow these steps to use the laser level for vertical alignment:
- Position the laser level at the desired starting point for your vertical alignment. Ensure it is securely mounted or placed on a stable surface.
- Turn on the laser level and ensure that the projected laser dot or line is visible and aligned with your reference point.
- Using a plumb line or a level, align the laser level in the vertical direction. This will help you establish a perfectly vertical line on the surface.
- Adjust the position of the laser level as necessary to ensure that the projected line or dot remains aligned in a straight line vertically.
- Use a pencil or marker to mark the vertical line on the surface as you move along with the laser level.
- Continue this process until you have established a straight and vertical line across the desired area.
- Double-check the accuracy of the vertical line using a plumb line or another measuring tool to validate the alignment.
- Once you are satisfied with the vertical alignment, you can proceed with your construction or installation tasks, using the laser-projected line as a guide.
The Harbor Freight laser level simplifies vertical alignment tasks, allowing you to achieve precise vertical lines with ease. By using the laser projection, you can ensure accuracy and save time compared to conventional methods.
Now that you have mastered both horizontal and vertical alignments, let’s move on to the next step, where we will explore additional features and tips for using the Harbor Freight laser level.
Step 6: Additional Features and Tips
Aside from its primary functions of horizontal and vertical alignment, the Harbor Freight laser level also offers additional features and tips that can further enhance your experience and improve your results. Here are some to keep in mind:
- Locking Mechanism: Utilize the locking mechanism, if available, to keep the laser level securely fixed in position during use. This ensures stability and prevents accidental movements that could affect your measurements.
- Magnetic Base: If your laser level comes with a magnetic base, take advantage of it. It allows you to easily attach the laser level to metal surfaces, providing flexibility in positioning and freeing up your hands for other tasks.
- Tripod Mount: Consider investing in a tripod for your laser level. A tripod provides stability and adjustability, allowing you to position the laser level at various heights and angles. This is particularly useful for larger projects or when working alone.
- Visibility Enhancements: In situations where the laser beam is difficult to see due to lighting conditions, consider using a laser enhancement tool such as a laser detector. This will help you accurately detect the laser beam’s position, even in bright sunlight.
- Calibration: Regularly check and calibrate your laser level to maintain accuracy. Calibration may vary depending on the model, so refer to the user manual for specific instructions on how to calibrate your particular laser level.
- Store Properly: When not in use, store your laser level in a safe and dry place to protect it from dust, moisture, and potential damage. This will help prolong its lifespan and ensure its reliability for future projects.
- Battery Life: To maximize battery life, turn off the laser level when not in use. Consider keeping spare batteries or a charger on hand to avoid interruptions during projects.
- Read the Manual: Familiarize yourself with the user manual that comes with your Harbor Freight laser level. It contains important information such as safety guidelines, maintenance instructions, and specific features of your laser level.
By making use of these additional features and following these tips, you can optimize the performance of your Harbor Freight laser level and achieve even better results in your projects.
With the completion of Step 6, we have covered all the essential steps, features, and tips for using a Harbor Freight laser level. Now you are equipped with the knowledge and skills to utilize this powerful tool with confidence and precision. Remember, practice makes perfect, so don’t hesitate to experiment and refine your technique as you gain more experience with your laser level.
Happy leveling!
Conclusion
Congratulations! You’ve reached the end of this comprehensive guide on how to use a Harbor Freight laser level effectively. By now, you should feel confident in unpacking, setting up, leveling, adjusting, and utilizing the laser level for horizontal and vertical alignments.
With its affordable price and reliable performance, the Harbor Freight laser level is a valuable tool for DIY enthusiasts, homeowners, and professional contractors. It allows you to achieve precise and accurate leveling and alignment, saving you time and effort in your construction and home improvement projects.
Remember to take the time to properly set up and level the laser level before each use. This will ensure accurate measurements and aligned projections. Additionally, make use of the additional features and tips to enhance your experience and optimize your results.
Always refer to the manufacturer’s instructions and safety guidelines, and be mindful of the limitations of your particular Harbor Freight laser level. While it may not have the same level of precision as higher-end professional-grade models, it still provides exceptional value and performance for most DIY and small-scale professional tasks.
As you gain more experience with your Harbor Freight laser level, you’ll become more proficient in achieving precise and professional results. Seize the opportunity to experiment and refine your technique to further enhance your skills.
Now that you have all the knowledge and know-how, it’s time to put your Harbor Freight laser level to good use. So, grab your tool, start your project, and enjoy the satisfaction of achieving accurate and level alignments!
Happy leveling!
After mastering your Harbor Freight laser level, why not dive deeper into the world of creativity and self-reliance with our next feature? Discover the joys and benefits of tackling projects yourself in our engaging article on DIY projects. From saving money to customizing your living space, find out how these endeavors boost not only your skills but also your home's charm and functionality.
Frequently Asked Questions about How To Use A Harbor Freight Laser Level
Was this page helpful?
At Storables.com, we guarantee accurate and reliable information. Our content, validated by Expert Board Contributors, is crafted following stringent Editorial Policies. We're committed to providing you with well-researched, expert-backed insights for all your informational needs.


0 thoughts on “How To Use A Harbor Freight Laser Level”