Articles
Why Does My Washer Not Drain
Modified: October 20, 2024
Discover why your washer is not draining and learn effective troubleshooting tips in this informative article.
(Many of the links in this article redirect to a specific reviewed product. Your purchase of these products through affiliate links helps to generate commission for Storables.com, at no extra cost. Learn more)
Introduction
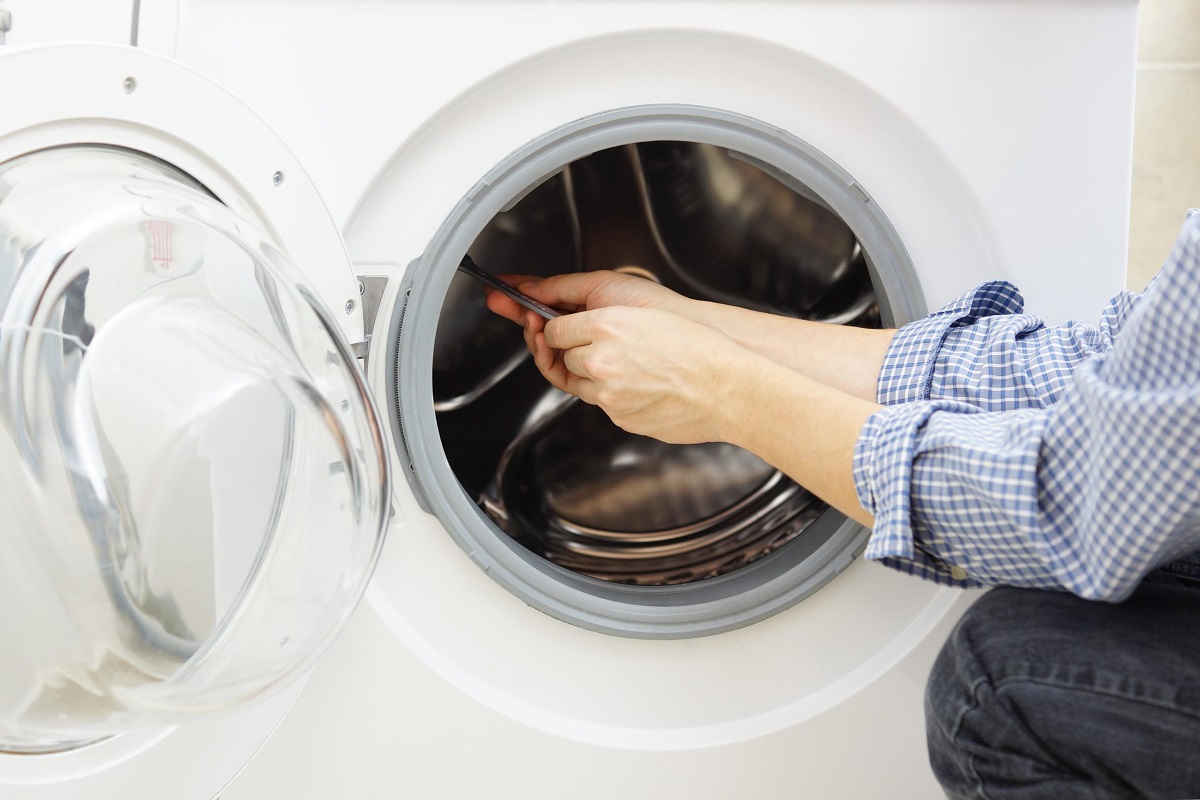
Having a washer that does not drain properly can be a frustrating and inconvenient problem. It can leave your clothes soaking wet, prolong your laundry routine, and even lead to potential water damage in your home. Understanding why your washer is not draining is the first step in resolving the issue and getting your laundry routine back on track.
In this article, we will explore the common causes of a washer not draining and provide solutions to help you troubleshoot and fix the problem. Whether it’s a clogged drain hose, a faulty drain pump, or a blocked drain filter, we will guide you through the steps to identify and resolve the issue.
So, let’s dive in and discover why your washer is not draining and how to fix it!
Key Takeaways:
- Regular maintenance and cleaning of the drain hose, filter, and pressure switch can prevent drainage issues and ensure efficient water removal in your washer.
- If your washer is not draining properly, check for common culprits such as a clogged drain hose, faulty drain pump, or defective lid switch assembly. Regular maintenance and timely repairs can keep your laundry routine running smoothly.
Common Causes of Washer Not Draining
When your washer fails to drain properly, there can be several underlying causes. Understanding these common causes will help you diagnose the problem and take the necessary steps to resolve it. Here are the main culprits behind a washer not draining:
- Clogged Drain Hose: One of the most common causes of a washer not draining is a clogged drain hose. Over time, the drain hose can become blocked with lint, debris, or even small items like socks or coins. This blockage prevents the water from draining out of the machine properly. Inspect the drain hose for any obstructions and clear them if necessary.
- Faulty Drain Pump: The drain pump is responsible for removing the water from the washer drum. If the pump becomes faulty, it may not be able to effectively pump out the water, resulting in a drainage issue. Listen for any unusual noises coming from the pump or check if it is running but not pumping out the water. If the pump is faulty, it may need to be replaced.
- Defective Lid Switch Assembly: The lid switch assembly is a safety feature that prevents the washer from spinning or draining when the lid is open. If the lid switch is defective or not functioning properly, it may cause the washer to not drain. Ensure that the lid switch is engaging properly when the lid is closed, and consider replacing it if necessary.
- Blocked or Faulty Drain Filter: Many washers have a drain filter that catches lint, debris, and other particles during the wash cycle. If this filter becomes blocked or damaged, it can impede the draining process. Locate the drain filter on your washer and clean it thoroughly. If the filter is damaged, replace it to restore proper drainage.
- Problems with the Drainage System: Issues with the drainage system, such as a blocked or damaged drain pipe, can also cause a washer not to drain. Inspect the drain pipe for any clogs or blockages and clear them if necessary. If the drain pipe is damaged, it may need to be repaired or replaced.
- Malfunctioning Pressure Switch: The pressure switch, also known as the water level switch, detects the water level in the washer and controls the draining process. If the pressure switch is malfunctioning, it may not signal the washer to drain the water, causing a drainage problem. Test the pressure switch for continuity with a multimeter and replace it if needed.
Now that you are aware of the common causes of a washer not draining, you can move on to the solutions that will help you resolve the issue.
Clogged Drain Hose
A clogged drain hose is one of the most common causes of a washer not draining. Over time, lint, debris, and small objects like socks or coins can accumulate in the drain hose, obstructing the flow of water out of the washer. If your washer is not draining, it’s essential to check the drain hose for any blockages and clear them to restore proper drainage.
Here are the steps to check and clear a clogged drain hose:
- Disconnect the power: Before working on your washer, always unplug it from the power source to ensure your safety.
- Locate the drain hose: The drain hose is typically located at the back of the washer. It is connected to the back of the machine and leads to either a drain pipe or a laundry sink. Find the hose and inspect it for any kinks or bends that may be causing a blockage.
- Remove any visible blockages: If you can see any debris or objects stuck in the drain hose, carefully remove them using a pair of pliers or tweezers. Avoid using excessive force that could damage the hose.
- Detach the drain hose: If you cannot clear the blockage from the visible end of the hose, you may need to detach it from the washer. Refer to your washer’s manual for specific instructions on how to disconnect the drain hose properly.
- Check for blockages: Once the drain hose is detached, inspect both ends for any clogs or obstructions. Use a flashlight to see into the hose and remove any debris or foreign objects that may be causing the blockage.
- Clean the drain hose: If the hose is dirty or has a significant buildup of residue, you can clean it by running water through it. Use a garden hose or place it under a faucet with running water to flush out any remaining debris.
- Reattach the drain hose: Once the drain hose is clear and clean, reattach it to the washer following the manufacturer’s instructions. Make sure it is securely connected.
- Test the washer: After clearing the drain hose, plug the washer back in and run a test cycle to ensure that the water drains properly. Monitor the draining process to confirm that there are no more issues.
By checking and clearing a clogged drain hose, you can often resolve the problem of a washer not draining. If the issue persists, it may be necessary to explore other potential causes, such as a faulty drain pump or a defective lid switch assembly.
Faulty Drain Pump
The drain pump is an essential component of your washer’s drainage system. It is responsible for removing the water from the washer drum during the draining process. If the drain pump becomes faulty, it may not be able to effectively pump out the water, leading to a washer that does not drain properly.
If you suspect that the drain pump is the cause of the drainage issue, here are the steps to test and potentially replace a faulty drain pump:
- Disconnect the power: Before working on your washer, ensure that it is unplugged to prevent any accidents or electrical shocks.
- Locate the drain pump: The drain pump is typically located at the bottom of the washer, near the front or rear. Refer to your washer’s manual or online resources for its exact location.
- Access the drain pump: Depending on your washer model, you may need to remove a panel or access hatch to reach the drain pump. Follow the manufacturer’s instructions for safe access.
- Inspect the drain pump: Once you have gained access to the drain pump, visually inspect it for any signs of damage or blockages. Look for cracks, wear, or foreign objects that may be obstructing the pump or its impeller.
- Test the drain pump: With the washer still unplugged, use a multimeter to test the continuity of the drain pump. This will help determine if the pump is functioning properly. Follow the multimeter’s instructions and compare the readings with the manufacturer’s specifications.
- Replace the drain pump: If the drain pump fails the continuity test or shows other signs of malfunction, it may need to be replaced. Consult your washer’s manual or contact a professional technician for guidance on finding and installing a compatible replacement drain pump.
- Reassemble and test: Once the new drain pump is installed, reassemble any panels or access hatches on your washer. Plug the washer back in and run a test cycle to ensure that the water drains properly. Monitor the draining process to confirm that the issue has been resolved.
By testing and potentially replacing a faulty drain pump, you can restore proper drainage to your washer. If the problem persists, it is advisable to consult a professional technician for further assistance, as there may be other underlying issues contributing to the drainage problem.
Defective Lid Switch Assembly
The lid switch assembly is a safety feature in washing machines that prevents the washer from spinning or draining when the lid is open. If the lid switch is defective or not functioning properly, it can cause the washer to not drain despite the lid being closed. This can be a common cause of drainage issues in washers.
If you suspect that the lid switch assembly is the culprit behind your washer not draining, follow these steps to inspect and potentially fix the issue:
- Disconnect the power: Before working on your washer, always unplug it from the power source to ensure your safety.
- Locate the lid switch assembly: The lid switch assembly is usually located near the top of the washer’s cabinet. It is connected to the lid by a small actuator or switch mechanism.
- Inspect the lid switch: Take a close look at the lid switch assembly for any visible signs of damage, such as cracks or loose connections. If the switch appears to be damaged, it may need to be replaced.
- Test the lid switch for continuity: Using a multimeter set to continuity mode, test the lid switch to determine if it is functioning properly. Follow the multimeter instructions and compare the readings with the manufacturer’s specified range. If the lid switch fails the continuity test, it is likely defective and requires replacement.
- Replace the lid switch assembly: If the lid switch is defective, you will need to replace the entire lid switch assembly. Consult your washer’s manual or contact the manufacturer for the appropriate replacement part. Disconnect the old switch assembly and connect the new one according to the provided instructions.
- Test the washer: Once the new lid switch assembly is installed, plug the washer back in and run a test cycle. Ensure that the lid is closed properly and observe if the washer now drains as expected. The lid switch should engage and allow the draining process to proceed.
If, after following these steps, your washer still does not drain properly, it is recommended to seek professional assistance. There may be other underlying issues contributing to the drainage problem that require advanced knowledge and expertise to diagnose and repair.
Fixing a defective lid switch assembly can often resolve the issue of a washer not draining. However, if other components or systems within the washer are malfunctioning, additional troubleshooting and repairs may be necessary.
Blocked or Faulty Drain Filter
Many washing machines have a drain filter or pump filter that prevents lint, debris, and other particles from entering the drain pump. Over time, this filter can become clogged, leading to drainage issues in the washer. If you suspect that a blocked or faulty drain filter is causing your washer not to drain properly, follow these steps to inspect and resolve the problem:
- Disconnect the power: Ensure that the washer is unplugged from the power source before performing any maintenance or repairs.
- Locate the drain filter: The drain filter is typically located at the bottom front of the washing machine. It may be concealed by a small access panel or cover.
- Prepare for water spillage: Placing a towel or bucket underneath the filter area is advisable, as there may be water that spills out during the cleaning process.
- Remove the drain filter: Carefully open or remove the access panel or cover to access the drain filter. Depending on the washer model, the filter may twist or pull out. Refer to your washer’s manual for specific instructions.
- Inspect and clean the filter: Once the filter is removed, inspect it for any visible blockages, such as lint, debris, or small objects. Clean the filter thoroughly by rinsing it under running water or scrubbing it with a brush to remove any accumulated residue.
- Check the filter housing: While the filter is removed, inspect the filter housing for any signs of damage or debris that may be obstructing the drain flow. Use a flashlight to look for any blockages or foreign objects in the housing.
- Replace the drain filter: If the drain filter is damaged, cracked, or cannot be cleaned effectively, it may need to be replaced. Contact the manufacturer or an appliance parts store to purchase a compatible replacement filter.
- Reinstall the drain filter: Once the filter is clean or replaced, reinsert it back into the filter housing. Ensure that it is securely in place.
- Test the washer: Plug the washer back in and run a test cycle to ensure that the water drains properly. Monitor the draining process to confirm that there are no more issues.
By checking and clearing a blocked or faulty drain filter, you can often resolve the problem of a washer not draining. It is recommended to clean the drain filter regularly as part of your washer’s maintenance routine to prevent future blockages and improve overall performance.
If the issue persists after cleaning or replacing the drain filter, there may be other underlying issues with the washer’s drainage system that require professional attention.
Problems with the Drainage System
If your washer is not draining properly, there may be issues with the drainage system itself. A blocked or damaged drain pipe, improper installation, or other related factors can lead to drainage problems. Here are some steps to help you identify and address issues with the drainage system:
- Inspect the drain pipe: Start by examining the drain pipe connected to your washer. Look for any obvious blockages, such as lint, debris, or foreign objects. Remove any visible obstructions carefully using a cloth or gloved hand.
- Check for kinks or bends: Ensure that the drain pipe is not twisted, kinked, or bent sharply. These bends can restrict the flow of water and cause drainage problems. Straighten the pipe if necessary to allow for proper drainage.
- Clear the drain pipe: If you suspect a blockage further down the drain pipe, try using a plumber’s snake or a long, flexible brush to clear the debris. Carefully insert the snake or brush into the pipe and move it back and forth to dislodge any blockages.
- Inspect the drain hose connection: Check the connection between the drain hose and the drain pipe. Ensure that the hose is inserted securely into the drain pipe and that there are no leaks or loose connections. Tighten any hose clamps if necessary.
- Inspect the washer standpipe: If your washer drains into a standpipe, check if the standpipe is properly installed and meets the necessary height requirements. Improper installation can lead to drainage issues. Refer to the manufacturer’s recommendations or seek professional assistance if needed.
- Consider a drain pump check valve: If your washer shares a drain pipe with another appliance, such as a sink or dishwasher, installing a drain pump check valve can help prevent backflow and potential drainage problems. Consult a plumber for advice and installation.
- Consult a professional: If you have performed the above steps and are still experiencing drainage issues, it may be necessary to consult a professional plumber or appliance technician. They can assess the drainage system, identify any underlying problems, and recommend appropriate solutions.
Addressing problems with the drainage system can often resolve drainage issues in your washer. By conducting regular inspections and maintenance, you can prevent future problems and ensure smooth and efficient drainage.
Remember, if you are unsure about any aspect of the drainage system or encounter complex issues, it is always best to seek professional help to avoid causing further damage to your washer or your home’s plumbing.
Malfunctioning Pressure Switch
The pressure switch, also known as the water level switch, plays a crucial role in your washer’s drainage process. It detects the water level inside the washer and controls when the draining process should occur. If the pressure switch malfunctions, it may fail to signal the washer to drain, resulting in drainage issues. Here are the steps to examine and fix a malfunctioning pressure switch:
- Disconnect the power: Prior to any maintenance or repairs, ensure that your washer is unplugged to avoid any potential electrical hazards.
- Locate the pressure switch: The pressure switch is typically located near the top of the washer, close to the tub. It is connected to a small hose that runs from the tub to the switch.
- Inspect the pressure switch: Visually examine the pressure switch for any signs of damage, such as cracks, loose wires, or corrosion. Any visible issues may indicate a malfunctioning switch.
- Test the pressure switch for continuity: Using a multimeter set to continuity mode, test the pressure switch to determine if it is functioning correctly. Follow the multimeter instructions and compare the readings with the manufacturer’s specified range. If the pressure switch fails the continuity test, it may need to be replaced.
- Check the hose for blockages: Inspect the hose connected to the pressure switch for any obstructions or blockages. A clogged hose may affect the pressure in the system and interfere with the proper functioning of the pressure switch. Clear any debris or blockages carefully.
- Replace the pressure switch: If the pressure switch is faulty and cannot be fixed, it will need to be replaced. Contact the manufacturer or an appliance parts store to purchase a compatible replacement pressure switch. Follow the manufacturer’s instructions to properly install the new switch.
- Reassemble and test the washer: After installing the new pressure switch, reassemble any components or panels you removed. Plug the washer back in and run a test cycle to ensure that the water drains properly. Monitor the draining process to confirm that the issue has been resolved.
Fixing a malfunctioning pressure switch can often resolve drainage problems in your washer. However, if the issue persists or you encounter other complications, it is advisable to seek professional assistance. A qualified appliance technician will have the expertise to diagnose and repair any complex issues with the pressure switch or other components of your washer.
Regular maintenance and cleaning of the pressure switch and associated hoses can help prevent future malfunctions and ensure smooth drainage in your washer.
Check for clogs in the drain hose or pump, and ensure the lid switch is functioning properly. If these are not the issue, it may be a problem with the motor or belt.
Solutions to Washer Not Draining
When your washer is not draining properly, it can be frustrating and disrupt your laundry routine. Fortunately, there are several solutions that can help you troubleshoot and fix the problem. Here are some steps you can take to address a washer not draining:
- Checking and Clearing the Drain Hose: Start by inspecting the drain hose for any blockages or kinks. Remove any visible debris or objects that may be obstructing the flow of water. Clean the drain hose and ensure it is properly connected to the washer and drain pipe.
- Testing and Replacing the Drain Pump: If the drain pump is malfunctioning and not effectively removing the water from the washer drum, it may need to be tested and replaced. Check the pump for any visible signs of damage or blockages. Use a multimeter to test its continuity and replace it if necessary.
- Inspecting and Fixing the Lid Switch Assembly: A defective lid switch assembly can prevent the washer from draining. Ensure that the lid switch is functioning properly and engaging when the lid is closed. If the switch is faulty, consider replacing it to restore proper drainage
- Cleaning or Replacing the Drain Filter: Many washers have a drain filter that can become clogged with lint, debris, or foreign objects. Remove the filter and clean it thoroughly. If the filter is damaged or cannot be cleaned effectively, consider replacing it to improve drainage.
- Ensuring Proper Drainage System: Check the drain pipe, hose connections, and standpipe for any blockages, kinks, or improper installation. Clear any obstructions, straighten the hose, and ensure proper height requirements to allow for smooth drainage.
- Examining and Repairing the Pressure Switch: The pressure switch detects the water level in the washer and controls the draining process. Test the switch for continuity, check the associated hose for blockages, and replace the switch if necessary.
By following these solutions, you can often resolve the issue of a washer not draining. It is important to perform the necessary checks and repairs carefully and safely.
If the problem persists after attempting these solutions, it is recommended to seek the assistance of a professional appliance technician. They can diagnose and repair any complex issues and ensure that your washer is operating optimally.
Remember, regular maintenance and cleaning of your washer can help prevent future drainage problems. Keep the drain hose and filter clean, and follow the manufacturer’s recommendations for maintenance to ensure the proper functioning of your washer’s drainage system.
Checking and Clearing the Drain Hose
One of the most common causes of a washer not draining is a clogged or obstructed drain hose. Over time, the drain hose can accumulate lint, debris, and foreign objects, impeding the flow of water. To resolve this issue, it is important to check and clear the drain hose. Follow these steps to ensure the proper functioning of the drain hose:
- Disconnect the power: Before performing any maintenance or repairs, unplug the washer from the power source to ensure your safety.
- Locate the drain hose: The drain hose is typically located at the rear of the washing machine. It is connected to the back of the machine and goes either into a drain pipe or a laundry sink.
- Inspect the drain hose: Carefully examine the drain hose for any visible signs of blockage. Look for kinks, twists, or bends that may be obstructing the flow of water. Check for lint, debris, or small objects that might be lodged inside the hose.
- Remove the drain hose: If you suspect a blockage further within the drain hose, detach it from the washing machine. Refer to the manufacturer’s instructions for your specific model on how to safely disconnect the drain hose.
- Clear the blockage: Once the drain hose is removed, gently shake it or use a long brush or cloth to clear any accumulated debris or objects. You can also run water through the hose to flush out any remaining particles.
- Check the connection points: Inspect the ends of the drain hose and ensure they are securely connected to both the washing machine and the drain pipe or sink. Tighten any hose clamps, if applicable, to ensure a snug fit.
- Reattach the drain hose: Once the blockage is cleared and the hose is clean, reattach it to the washing machine and secure it properly. Ensure that there are no kinks or bends in the hose that could impede the draining process.
- Test the washer: Plug the washing machine back in and run a test cycle to verify that the water drains properly. Watch the draining process closely to ensure there are no leaks or further issues.
By checking and clearing the drain hose, you can often resolve the problem of a washer not draining. If the issue persists, it is advisable to explore other potential causes, such as a faulty drain pump or a malfunctioning pressure switch.
Regular maintenance, including periodic checks and cleaning of the drain hose, can help prevent future blockages and ensure the proper functioning of your washer’s drainage system.
Testing and Replacing the Drain Pump
If your washer is not draining properly, a faulty drain pump may be the cause. The drain pump is responsible for removing water from the washer drum during the draining process. If the pump fails to function effectively, it can result in drainage problems. Here are the steps to test and potentially replace a malfunctioning drain pump:
- Disconnect the power: Prior to performing any maintenance or repairs, unplug the washer from the power source to ensure your safety.
- Locate the drain pump: The drain pump is typically located at the bottom of the washing machine, near the front or rear. Consult your washer’s manual or online resources to find its exact location.
- Access the drain pump: Depending on your washer model, you may need to remove a panel or access hatch to reach the drain pump. Follow the manufacturer’s instructions to access the pump safely.
- Inspect the drain pump: Once you have access to the drain pump, visually examine it for any signs of damage, such as cracks, leaks, or foreign objects obstructing the impeller. Clean out any debris if present.
- Test the drain pump for continuity: Use a multimeter set to the continuity or ohms setting to test the electrical continuity of the drain pump. Follow the multimeter’s instructions and compare the readings with the manufacturer’s specifications. If the pump fails the continuity test, it is likely faulty and needs to be replaced.
- Order a replacement drain pump: If the drain pump is malfunctioning and requires replacement, contact the manufacturer or an appliance parts store to order the appropriate replacement pump. Ensure that you have the correct model number and manufacturer information before purchasing the new part.
- Replace the drain pump: Once you have the new drain pump, follow the manufacturer’s instructions or consult a professional technician for guidance on how to install the replacement pump correctly. Disconnect the wiring harness and plumbing connections from the old pump, and then connect them to the new pump.
- Test the washer: After replacing the drain pump, reconnect the power supply and run a test cycle to verify that the water drains properly. Monitor the draining process to ensure that the issue has been resolved.
If your washing machine still does not drain after replacing the drain pump, it is advisable to consult a professional technician. They can diagnose any underlying issues and perform further repairs or maintenance as needed.
Regular maintenance and cleaning of the drain pump can help prevent future issues and ensure the efficient functioning of your washer’s drainage system.
Inspecting and Fixing the Lid Switch Assembly
A defective lid switch assembly can cause your washer to not drain properly. The lid switch is a safety feature that prevents the washer from spinning or draining when the lid is open. If the switch is faulty or not functioning correctly, it can disrupt the draining process. Here are the steps to inspect and potentially fix a malfunctioning lid switch assembly:
- Disconnect the power: Before starting any maintenance or repairs, unplug the washer from the power source to ensure your safety.
- Locate the lid switch assembly: The lid switch assembly is typically situated near the top of the washing machine, close to the lid. Refer to your washer’s manual or identify its location based on online resources.
- Inspect the lid switch: Examine the lid switch and its components for any visible signs of damage, such as cracks, loose connections, or worn-out parts. If you notice any visible issues, it is likely that the switch needs to be fixed or replaced.
- Test the lid switch for continuity: Using a multimeter set to the continuity or ohms setting, test the electrical continuity of the lid switch. Follow the multimeter instructions and compare the readings with the manufacturer’s specified range. If the lid switch fails the continuity test, it is likely faulty and needs to be replaced.
- Replace the lid switch assembly: If the lid switch is defective and cannot be fixed, you will need to replace the entire lid switch assembly. Contact the manufacturer or an appliance parts store to purchase a compatible replacement lid switch assembly. Disconnect the wiring harness and mounting screws from the old switch, and then connect them to the new assembly.
- Reassemble the washer: Once the new lid switch assembly is installed, reassemble any components or panels you removed in the process. Make sure that everything is securely fastened.
- Test the washer: Plug the washer back in and run a test cycle to ensure that the water drains properly with the lid switch functioning correctly. Close the lid and monitor the draining process to confirm that the issue has been resolved.
If your washer still does not drain properly after inspecting and fixing the lid switch assembly, it is advisable to consult a professional technician. They can further diagnose any underlying issues and perform the necessary repairs or replacements.
It is beneficial to regularly clean the lid switch assembly and ensure its proper functioning to prevent future drainage problems in your washer.
Cleaning or Replacing the Drain Filter
Many washing machines are equipped with a drain filter or pump filter that helps prevent lint, debris, and other particles from entering the drain pump. Over time, this filter can become clogged, leading to drainage issues in the washer. To resolve this problem, you can either clean or replace the drain filter. Here’s how:
- Disconnect the power: Before performing any maintenance or repairs, unplug the washer from the power source to ensure your safety.
- Locate the drain filter: The drain filter is typically located at the front of the washing machine, behind a small access panel or cover. Refer to your washer’s manual to find the exact location of the drain filter on your model.
- Prepare for water spillage: Place a towel or a shallow pan beneath the filter area to catch any water that may spill out during the cleaning process.
- Remove the drain filter: Carefully open or remove the access panel or cover to reveal the drain filter. Some models may require a screwdriver or a coin to unscrew or unlock the filter. Keep in mind that there may be some residual water, so be prepared to catch it with the towel or pan.
- Inspect and clean the drain filter: Examine the drain filter for any visible debris or clogs. Remove any lint, hair, or other obstructions using your hands or a soft brush. Rinse the filter with warm water to remove any remaining debris. If the buildup is too severe or if the filter is damaged, it may need to be replaced.
- Check the filter housing: While the filter is removed, take a moment to inspect the filter housing for any debris or buildup. Clean the housing with a soft brush or cloth to ensure that there are no blockages.
- Replace the drain filter: If the drain filter is damaged, cracked, or cannot be adequately cleaned, it is advisable to replace it. Contact the manufacturer or an appliance parts store to find a compatible replacement filter. Follow the manufacturer’s instructions to install the new filter properly.
- Reassemble the washer: Once the drain filter is cleaned or replaced, reattach the access panel or cover. Ensure that it is securely fastened.
- Test the washer: Plug the washer back in and run a test cycle to verify that the water drains properly with the newly cleaned or replaced drain filter. Monitor the draining process to confirm that the problem has been resolved.
Regularly cleaning the drain filter, ideally every few months, can help prevent future clogs and ensure smooth drainage in your washer. Remember to follow the manufacturer’s recommendations for maintenance to keep your washer running efficiently.
If the washer continues to have drainage issues after cleaning or replacing the drain filter, it is recommended to consult a professional technician for further diagnosis and repair.
Read more: 35 Daybeds You Should Never Miss
Ensuring Proper Drainage System
Proper drainage is crucial for your washer to function effectively. Issues in the drainage system can lead to a washer not draining properly. To ensure proper drainage, follow these steps to inspect and address common problems:
- Inspect the drain pipe: Begin by examining the drain pipe connected to your washer. Look for any visible signs of blockages, such as lint, debris, or foreign objects. Remove any obstructions carefully, using a cloth or gloved hand.
- Check for kinks or bends: Ensure that the drain pipe is not twisted, kinked, or bent sharply. These bends can restrict the flow of water and cause drainage issues. Straighten the pipe if necessary to allow for proper drainage.
- Clear the drain pipe: If you suspect a blockage further down the drain pipe, try using a plumber’s snake or a long, flexible brush to clear the debris. Carefully insert the snake or brush into the pipe and move it back and forth to dislodge any blockages.
- Inspect the drain hose connection: Check the connection between the drain hose and the drain pipe. Ensure that the hose is inserted securely into the drain pipe and that there are no leaks or loose connections. Tighten any hose clamps if necessary.
- Inspect the washer standpipe: If your washer drains into a standpipe, check if the standpipe is properly installed and meets the necessary height requirements. Improper installation can lead to drainage issues. Refer to the manufacturer’s recommendations or seek professional assistance if needed.
- Consider a drain pump check valve: If your washer shares a drain pipe with another appliance, such as a sink or dishwasher, installing a drain pump check valve can help prevent backflow and potential drainage problems. Consult a plumber for advice and installation.
- Verify proper venting: Check if the drain pipe is adequately vented. A vent allows air to flow freely, preventing any suction or airlocks that may hinder drainage. Ensure that the vent is not blocked or obstructed.
- Consult a professional: If you have performed the above steps and continue to experience drainage issues, it may be necessary to consult a professional plumber or appliance technician. They can assess the drainage system, identify any underlying problems, and recommend appropriate solutions.
By inspecting and addressing potential issues with the drainage system, you can optimize the proper functioning of your washer’s drainage. Regular maintenance and cleaning of the drain pipe and hose can help prevent future blockages and ensure efficient water removal.
Remember, if you are unsure about any aspect of the drainage system or encounter complex issues, it is best to seek professional help to avoid causing further damage to your washer or your home’s plumbing.
Examining and Repairing the Pressure Switch
The pressure switch, also known as the water level switch, is an essential component of your washer’s drainage system. It detects the water level in the machine and controls the draining process accordingly. If the pressure switch malfunctions, it can lead to drainage issues. Here are the steps to examine and potentially repair a faulty pressure switch:
- Disconnect the power: Before performing any maintenance or repairs, unplug the washer from the power source to ensure your safety.
- Locate the pressure switch: The pressure switch is typically situated near the top of the washer, close to the tub. Refer to your washer’s manual or online resources to find its exact location.
- Inspect the pressure switch: Examine the pressure switch and its connections for any obvious signs of damage, such as cracks, loose wires, or corrosion. Make sure all the wires are securely connected to the switch.
- Test the pressure switch for continuity: Using a multimeter set to the continuity or ohms setting, test the electrical continuity of the pressure switch. Follow the multimeter instructions and compare the readings with the manufacturer’s specified range. If the pressure switch fails the continuity test, it is likely faulty and needs to be repaired or replaced.
- Inspect the air hose: The pressure switch is connected to an air hose that runs from the tub to the switch. Check the air hose for any blockages or damage. Remove any debris and ensure that the hose is securely attached to both the tub and the pressure switch.
- Repair or replace the pressure switch: If the pressure switch is malfunctioning, there are a few options for repair. First, try cleaning the connections and contacts on the switch. Use a toothbrush or a small brush dipped in electrical contact cleaner to remove any dirt or debris. If cleaning does not resolve the issue, you may need to replace the pressure switch. Order a compatible replacement from the manufacturer or an appliance parts store.
- Reassemble the washer: Once the pressure switch is repaired or replaced, reassemble any components or panels you removed. Ensure that all connections are secure.
- Test the washer: Plug the washer back in and run a test cycle to confirm that the water drains properly with the repaired or replaced pressure switch. Monitor the draining process to ensure that the issue has been resolved.
If the pressure switch continues to malfunction even after repair or replacement, it is advisable to seek the assistance of a professional technician. They have the expertise to diagnose complex issues and perform advanced repairs on your washer’s pressure switch or other related components.
Regular maintenance and periodic cleaning of the pressure switch and associated air hose can help prevent future malfunctions and ensure the proper functioning of your washer’s drainage system.
Conclusion
A washer not draining properly can disrupt your laundry routine and cause frustration. It is important to understand the common causes of this issue and take steps to address them. By checking and clearing a clogged drain hose, testing and replacing a faulty drain pump, inspecting and fixing a defective lid switch assembly, cleaning or replacing a blocked drain filter, ensuring a proper drainage system, and examining and repairing a malfunctioning pressure switch, you can often resolve the problem and restore efficient drainage to your washer.
Regular maintenance, such as cleaning the drain hose and filter, checking the drain pump, and inspecting the pressure switch, can help prevent future drainage issues. It is also essential to follow the manufacturer’s instructions, perform periodic checks, and address any maintenance needs promptly.
If you encounter complex issues or are unsure about any aspect of troubleshooting and repairing your washer, it is recommended to seek the help of a professional technician. They have the expertise to diagnose and resolve more intricate problems, ensuring the optimal performance of your washer’s drainage system.
Remember, taking care of your washer and addressing drainage issues promptly will not only extend its lifespan but also keep your laundry routine running smoothly. With proper maintenance and timely repairs, you can enjoy a hassle-free and efficient washing experience for years to come.
Frequently Asked Questions about Why Does My Washer Not Drain
Was this page helpful?
At Storables.com, we guarantee accurate and reliable information. Our content, validated by Expert Board Contributors, is crafted following stringent Editorial Policies. We're committed to providing you with well-researched, expert-backed insights for all your informational needs.


0 thoughts on “Why Does My Washer Not Drain”