Home>Construction & Tools>Building Materials>How To Hang A Shelf On A Brick Wall
Building Materials
How To Hang A Shelf On A Brick Wall
Modified: August 28, 2024
Learn how to hang a shelf on a brick wall with our step-by-step guide. Find the best building materials and tips for a sturdy and stylish installation.
(Many of the links in this article redirect to a specific reviewed product. Your purchase of these products through affiliate links helps to generate commission for Storables.com, at no extra cost. Learn more)
Introduction
Hanging a shelf on a brick wall can be a challenging yet rewarding task. Whether you're looking to add storage space, display decorative items, or simply enhance the aesthetics of your living space, installing a shelf on a brick wall requires careful planning and precise execution. With the right tools, materials, and a methodical approach, you can successfully mount a shelf that not only serves its practical purpose but also adds a touch of elegance to your surroundings.
In this comprehensive guide, we will walk you through the step-by-step process of hanging a shelf on a brick wall. From gathering the necessary tools and materials to determining the ideal placement and executing the installation, each stage is crucial in ensuring a secure and visually appealing result. By following these instructions and leveraging the tips provided, you'll be equipped with the knowledge and confidence to tackle this project with finesse.
So, roll up your sleeves, gather your tools, and let's embark on this journey to transform your brick wall into a functional and stylish display area. Whether you're a seasoned DIY enthusiast or a novice looking to expand your home improvement skills, this guide is designed to empower you with the expertise needed to accomplish this task with precision and flair. Let's dive in and discover the art of hanging a shelf on a brick wall.
Key Takeaways:
- Transform your brick wall into a functional and stylish display area by following a meticulous process that ensures a secure and visually appealing shelf installation.
- Careful planning and precise execution are key to hanging a shelf on a brick wall, creating a seamless fusion of form, function, and personalized flair.
Read more: How To Hang A Banner On A Brick Wall
Step 1: Gather the necessary tools and materials
Before embarking on the project of hanging a shelf on a brick wall, it's essential to gather all the required tools and materials. Having the right equipment at your disposal will not only streamline the installation process but also ensure a secure and professional outcome. Here's a comprehensive list of the items you'll need:
Tools:
-
Power Drill: A reliable power drill equipped with masonry drill bits is indispensable for creating holes in the brick wall. Ensure that the drill is fully charged or has a spare battery on hand to avoid interruptions during the drilling process.
-
Level: A high-quality level is crucial for ensuring that the shelf is installed perfectly horizontal. This tool will help you achieve a visually appealing and structurally sound result.
-
Measuring Tape: Accurate measurements are key to determining the precise placement of the shelf and ensuring symmetrical alignment. A durable measuring tape will be your trusted companion throughout the installation.
-
Pencil or Marker: Marking the drilling points on the brick wall requires a reliable pencil or marker. Opt for a tool with a fine tip to make clear and precise markings.
-
Screwdriver: Depending on the type of screws and fasteners you'll be using, have a compatible screwdriver ready for attaching the shelf brackets and securing the shelf in place.
-
Hammer: In some cases, you may need a hammer to gently tap the wall anchors into the drilled holes, ensuring a snug fit for maximum stability.
Materials:
-
Shelf Brackets: Select sturdy and visually appealing shelf brackets that complement the design of your shelf. Ensure that the brackets are suitable for brick wall installation and capable of supporting the intended weight.
-
Wall Anchors: High-quality wall anchors designed for masonry applications are essential for securely fastening the shelf brackets to the brick wall. Opt for anchors that are compatible with the size of the screws you'll be using.
-
Screws: Choose durable screws that are appropriate for masonry installations. The length and diameter of the screws should be compatible with the wall anchors and shelf brackets to ensure a robust and reliable attachment.
-
Spirit Level: While not a physical material, a spirit level is crucial for maintaining the horizontal alignment of the shelf during installation. Ensure that you have a reliable spirit level on hand to achieve a perfectly balanced result.
By assembling these tools and materials, you'll be well-prepared to proceed with the subsequent steps of determining the shelf placement, marking the drilling points, and executing the installation with confidence and precision. With your arsenal of equipment at the ready, you're poised to transform your brick wall into a functional and visually captivating display space.
Step 2: Determine the placement of the shelf
Before drilling into the brick wall, it's crucial to carefully consider the placement of the shelf to ensure both functionality and aesthetic appeal. The ideal location for the shelf will depend on various factors, including the intended use of the shelf, the surrounding decor, and the structural characteristics of the wall. Here's a detailed exploration of the steps involved in determining the optimal placement of the shelf on a brick wall.
Read more: How To Hang Lights On A Brick Wall
Consider Functionality and Accessibility
First and foremost, assess the intended purpose of the shelf. Will it serve as a display area for decorative items, a storage space for books and essentials, or a combination of both? Consider the items that will be placed on the shelf and ensure that the chosen location allows for easy access and visibility. Additionally, take into account the height at which the shelf will be installed to ensure that it remains within convenient reach.
Evaluate Visual Harmony
The placement of the shelf should harmonize with the overall aesthetic of the room. Consider the existing decor, furniture arrangement, and architectural features to determine the most visually appealing location for the shelf. Aim to create a balanced composition that complements the surrounding elements while adding a touch of sophistication to the space.
Structural Considerations
Assess the structural integrity of the brick wall to identify suitable areas for mounting the shelf. Avoid installing the shelf near electrical outlets, light switches, or any concealed wiring or plumbing. Additionally, be mindful of load-bearing considerations and ensure that the chosen location can support the weight of the shelf and its contents without compromising the stability of the wall.
Test Placement Options
To visualize the potential placement of the shelf, use a spare shelf or a cardboard cutout to experiment with different positions on the wall. This hands-on approach allows you to assess various placement options and determine the most optimal location before committing to the installation process. Take into account the surrounding furniture and fixtures to ensure that the chosen placement enhances the overall functionality and visual appeal of the space.
By meticulously considering functionality, visual harmony, and structural factors, you can confidently determine the ideal placement of the shelf on the brick wall. This thoughtful approach sets the stage for a successful installation that seamlessly integrates the shelf into the existing environment, elevating both form and function.
Read more: How To Hang A Picture On A Brick Wall
Step 3: Mark the drilling points on the brick wall
With the ideal placement of the shelf determined, the next crucial step is to accurately mark the drilling points on the brick wall. This process requires precision and attention to detail to ensure that the shelf brackets are securely anchored in place. Here's a detailed exploration of the methodical approach to marking the drilling points on the brick wall.
-
Measurements and Alignment: Begin by using a measuring tape and a pencil to mark the exact positions where the shelf brackets will be installed. Use a level to ensure that the markings are perfectly aligned and level with each other. This step is essential for achieving a visually pleasing and structurally sound result.
-
Spacing and Symmetry: If you're installing multiple shelf brackets, maintain consistent spacing between the markings to ensure symmetrical placement. This not only enhances the aesthetic appeal of the installation but also contributes to the overall balance and stability of the shelf.
-
Account for Bracket Dimensions: Take into consideration the dimensions of the shelf brackets when marking the drilling points. Ensure that the markings allow for sufficient space to accommodate the brackets without any overcrowding or interference with adjacent elements on the wall.
-
Double-Check the Markings: Before proceeding to the drilling stage, carefully review the markings to confirm their accuracy and alignment. Make any necessary adjustments to ensure that the drilling points are precisely positioned according to the predetermined placement of the shelf brackets.
-
Visualize the Installation: Stand back and visually assess the marked drilling points to envision the final placement of the shelf brackets. This step allows you to confirm that the markings align with your initial vision and the functional requirements of the shelf.
By meticulously marking the drilling points on the brick wall, you set the stage for a seamless and precise installation process. These carefully placed markings serve as the foundation for securely anchoring the shelf brackets, ensuring that the shelf is not only visually appealing but also structurally robust. With the drilling points accurately marked, you're ready to proceed to the next stage of the installation process, bringing you one step closer to transforming your brick wall into a functional and stylish display area.
Step 4: Drill holes into the brick wall
With the drilling points accurately marked on the brick wall, the next critical step in the process of hanging a shelf is to drill holes that will accommodate the wall anchors. This stage requires precision, patience, and the right tools to ensure that the holes are created with the necessary depth and alignment for secure anchoring. Here's a detailed exploration of the methodical approach to drilling holes into the brick wall.
Select the Appropriate Drill Bit
Begin by selecting a masonry drill bit that is suitable for drilling into brick. The diameter of the drill bit should correspond to the size of the wall anchors being used. It's essential to use a high-quality drill bit designed specifically for masonry applications to ensure efficient drilling and clean hole formation.
Wear Personal Protective Equipment
Before commencing the drilling process, prioritize safety by wearing appropriate personal protective equipment, including safety goggles and work gloves. This precautionary measure helps safeguard against potential eye injuries from debris and ensures a secure grip while handling the drill.
Read more: How To Hang A Sign On A Brick Wall
Position the Drill and Maintain Stability
Position the drill at the first marked drilling point on the brick wall. Hold the drill firmly and perpendicular to the wall to maintain stability and prevent slippage during the drilling process. It's crucial to exert steady and consistent pressure while drilling to achieve smooth and precise hole formation.
Initiate the Drilling Process
Activate the power drill and initiate the drilling process, applying moderate pressure to penetrate the brick surface. It's important to maintain a steady pace and avoid rushing the drilling process to prevent overheating of the drill bit and ensure controlled advancement into the brick.
Monitor Depth and Clean Debris
As the drill penetrates the brick wall, periodically pause to monitor the depth of the hole and clear away any accumulated debris using a brush or compressed air. This practice helps maintain the cleanliness of the drilled hole and allows for accurate assessment of the depth reached.
Repeat the Process for Each Drilling Point
Once the first hole is drilled to the required depth, repeat the process for each marked drilling point, ensuring consistent depth and alignment for all holes. Exercise patience and precision to achieve uniformity in the drilled holes, setting the stage for seamless insertion of the wall anchors.
By methodically drilling holes into the brick wall with precision and care, you pave the way for the secure installation of the shelf brackets. This meticulous approach ensures that the wall anchors will be firmly seated, providing a stable foundation for mounting the shelf. With the holes expertly drilled, you're ready to proceed to the next stage of the installation process, bringing you closer to the successful completion of this home improvement project.
Read more: How To Hang A Balloon Arch On A Brick Wall
Step 5: Insert wall anchors into the drilled holes
With the precisely drilled holes serving as the designated receptacles, the next pivotal step in the process of hanging a shelf on a brick wall involves the insertion of wall anchors. These anchors play a fundamental role in providing a secure and stable foundation for attaching the shelf brackets, ensuring that the shelf is firmly anchored to the wall. Here's a detailed exploration of the methodical approach to inserting wall anchors into the drilled holes.
Select the Appropriate Wall Anchors
Begin by selecting wall anchors that are specifically designed for masonry applications and compatible with the size of the drilled holes. Opt for high-quality anchors that offer robust support and reliable fastening capabilities. It's essential to choose anchors that align with the weight-bearing requirements of the shelf and are capable of withstanding the intended load.
Align and Insert the Wall Anchors
Position the first wall anchor at the entrance of a drilled hole, ensuring that it aligns perfectly with the opening. With a gentle yet firm touch, begin inserting the anchor into the hole, exerting consistent pressure to facilitate smooth and secure insertion. It's crucial to maintain alignment and avoid any lateral movement that may compromise the integrity of the anchor's positioning.
Utilize a Hammer for Assistance
In cases where the wall anchors require additional assistance to achieve a snug fit within the drilled holes, a lightweight hammer can be used to gently tap the anchors into place. Exercise caution and precision when employing the hammer, ensuring that the force applied is controlled and evenly distributed to avoid damage to the anchors or the surrounding brick surface.
Read more: How To Hang Things On Brick
Verify Secure Seating of the Anchors
Once the wall anchors are inserted into the drilled holes, visually inspect and verify their secure seating within the brick wall. Confirm that the anchors are flush with the surface and exhibit no signs of instability or misalignment. This visual assessment is crucial for ensuring that the anchors are poised to provide a reliable anchoring point for the subsequent attachment of the shelf brackets.
Repeat the Process for Each Anchor
Proceed to insert wall anchors into each drilled hole, adhering to the same meticulous approach for every anchor. Consistency in the insertion process is paramount, as it ensures uniform support and stability across all attachment points. Exercise patience and precision to guarantee that each anchor is securely positioned, laying the groundwork for the final stage of attaching the shelf brackets.
By methodically inserting wall anchors into the drilled holes with precision and care, you establish a robust foundation for the secure attachment of the shelf brackets. These meticulously placed anchors serve as the linchpin of the installation, providing the necessary support to uphold the shelf and its contents with confidence. With the wall anchors expertly inserted, you're poised to proceed to the subsequent stage of attaching the shelf brackets, bringing you one step closer to the successful completion of this home improvement project.
Step 6: Attach the shelf brackets to the wall
With the wall anchors securely in place, the subsequent pivotal step in the process of hanging a shelf on a brick wall involves attaching the shelf brackets to the wall. This stage marks the transition from groundwork preparation to the tangible manifestation of the shelf installation, bringing you closer to the realization of a functional and visually captivating display area. Here's a detailed exploration of the methodical approach to attaching the shelf brackets to the wall.
-
Positioning the Shelf Brackets: Begin by aligning the shelf brackets with the installed wall anchors, ensuring that they are positioned accurately and level with each other. The level serves as a valuable tool in this stage, allowing you to confirm that the brackets are perfectly horizontal, contributing to the overall symmetry and visual appeal of the installation.
-
Securing the Brackets with Screws: Once the brackets are aligned, proceed to secure them to the wall anchors using the appropriate screws. Utilize a compatible screwdriver to drive the screws through the holes in the brackets and into the wall anchors, exerting controlled force to achieve a snug and secure fit. It's essential to maintain uniform tension across all screws, ensuring that the brackets are firmly attached to the wall.
-
Double-Check Alignment and Stability: After securing the brackets, take a moment to double-check their alignment and stability. Use the level to verify that the brackets have maintained their horizontal orientation and make any necessary adjustments to ensure uniformity. Additionally, gently test the stability of the brackets by applying light pressure, confirming that they are securely fastened to the wall.
-
Evaluate Weight Distribution: If the shelf brackets are designed to support a substantial load, consider the distribution of weight across the brackets and the corresponding wall anchors. Assess the structural integrity of the installation, ensuring that the combined support provided by the brackets and anchors aligns with the intended use and load-bearing requirements of the shelf.
-
Visualize the Completed Installation: Stand back and visualize the completed installation, envisioning the shelf in its designated space and assessing the overall visual impact. This step allows you to confirm that the attached brackets fulfill both the functional and aesthetic objectives, seamlessly integrating into the surrounding environment and contributing to the cohesive design of the space.
By meticulously attaching the shelf brackets to the wall with precision and care, you bring the installation process to its tangible culmination, setting the stage for the final step of installing the shelf onto the brackets. This methodical approach ensures that the brackets serve as reliable supports, poised to uphold the shelf with confidence and stability. With the brackets securely attached, you're ready to proceed to the culminating stage of installing the shelf, bringing you one step closer to the successful completion of this home improvement project.
Step 7: Install the shelf onto the brackets
With the shelf brackets securely attached to the wall, the final and gratifying step in the process of hanging a shelf on a brick wall involves the installation of the shelf onto the brackets. This transformative stage marks the culmination of meticulous planning and precise execution, bringing the vision of a functional and visually captivating display area to fruition. Here's a detailed exploration of the methodical approach to installing the shelf onto the brackets.
-
Positioning the Shelf: Begin by carefully placing the shelf onto the installed brackets, ensuring that it aligns seamlessly with the brackets' support arms. Take a moment to verify that the shelf sits evenly on the brackets, maintaining a level orientation and a secure fit. This initial positioning sets the stage for the final attachment of the shelf, ensuring a stable and visually appealing result.
-
Securing the Shelf to the Brackets: Once the shelf is positioned on the brackets, proceed to secure it in place using the appropriate fastening method. Depending on the design of the shelf and brackets, this may involve inserting screws through the underside of the shelf and into the brackets or employing an alternative fastening mechanism. Exercise caution and precision to ensure that the shelf is firmly and securely attached to the brackets, ready to bear the intended load.
-
Assessing Stability and Alignment: After securing the shelf to the brackets, take a moment to assess its stability and alignment. Gently apply pressure to the shelf, confirming that it remains steadfast and level on the brackets. Utilize a level to verify that the shelf maintains a horizontal orientation, contributing to the overall symmetry and visual appeal of the installation. Make any necessary adjustments to achieve uniform stability and alignment.
-
Load-Bearing Verification: If the shelf is intended to support a substantial load, such as books, decorative items, or other essentials, take a moment to verify its load-bearing capacity. Assess the distribution of weight across the shelf and its attachment to the brackets, ensuring that the installation is structurally sound and capable of accommodating the intended contents. This verification step is crucial for confirming the functionality and reliability of the installed shelf.
-
Final Visual Assessment: Stand back and visually assess the completed installation, taking in the sight of the shelf seamlessly integrated into the designated space. Envision the shelf in its functional capacity, adorned with decorative items or serving as a practical storage area. This final visual assessment allows you to confirm that the installed shelf fulfills both its functional purpose and its contribution to the overall aesthetic of the environment.
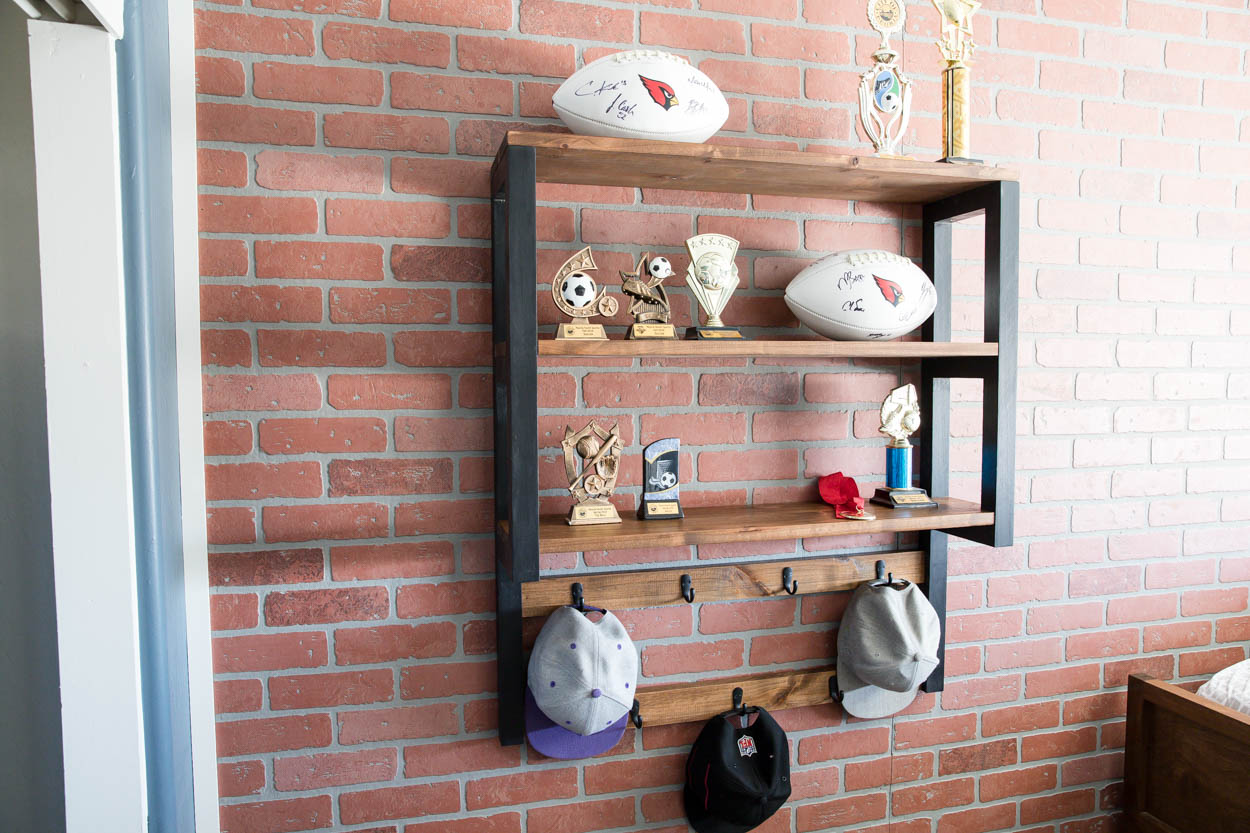
By methodically installing the shelf onto the brackets with precision and care, you bring the installation process to its tangible culmination, realizing the transformation of your brick wall into a functional and visually captivating display area. This methodical approach ensures that the shelf serves as a reliable and visually appealing addition to your living space, enhancing both form and function. With the shelf securely installed, you've successfully completed this home improvement project, achieving a seamless and rewarding result.
Read more: How To Hang A Wreath On Brick
Conclusion
In conclusion, the process of hanging a shelf on a brick wall encompasses a series of meticulous steps that culminate in the transformation of a bare wall into a functional and visually captivating display area. From the initial gathering of tools and materials to the final installation of the shelf onto the brackets, each stage demands precision, patience, and a keen eye for detail. By following the comprehensive guide outlined in this article, DIY enthusiasts and home improvement aficionados can embark on this rewarding endeavor with confidence and expertise.
The journey begins with the thoughtful consideration of the shelf's placement, taking into account functionality, visual harmony, and structural considerations. This deliberate approach sets the stage for a seamless and visually appealing installation, ensuring that the shelf not only serves its practical purpose but also enhances the overall aesthetic of the space. The subsequent steps of marking the drilling points, drilling holes, inserting wall anchors, and attaching the shelf brackets to the wall demand meticulous attention to detail, laying the groundwork for a secure and stable foundation.
The culmination of the installation process is realized in the final step of installing the shelf onto the brackets, bringing the vision of a functional and visually captivating display area to fruition. This transformative stage marks the tangible manifestation of meticulous planning and precise execution, resulting in a seamless and rewarding outcome. The installed shelf serves as a testament to the fusion of form and function, enhancing the living space with its practical utility and visual appeal.
Ultimately, the art of hanging a shelf on a brick wall transcends the mere act of installation; it embodies the fusion of creativity, craftsmanship, and practicality. Whether the shelf serves as a showcase for cherished mementos, a repository for literary treasures, or a platform for decorative accents, its presence enriches the living space with both utility and elegance. By embracing the art of shelf installation, individuals can infuse their surroundings with personalized flair, transforming blank walls into dynamic expressions of style and functionality.
In essence, the process of hanging a shelf on a brick wall is a testament to the transformative power of thoughtful design and meticulous execution. It empowers individuals to reimagine their living spaces, infusing them with personalized touches and practical solutions. As the installed shelf takes its place on the brick wall, it stands as a symbol of creativity, craftsmanship, and the seamless integration of form and function.
Frequently Asked Questions about How To Hang A Shelf On A Brick Wall
Was this page helpful?
At Storables.com, we guarantee accurate and reliable information. Our content, validated by Expert Board Contributors, is crafted following stringent Editorial Policies. We're committed to providing you with well-researched, expert-backed insights for all your informational needs.


0 thoughts on “How To Hang A Shelf On A Brick Wall”