Home>Construction & Tools>Building Materials>How To Hang A Balloon Arch On A Brick Wall
Building Materials
How To Hang A Balloon Arch On A Brick Wall
Modified: February 18, 2024
Learn how to securely hang a balloon arch on a brick wall using the right building materials. Follow our step-by-step guide for a stunning display.
(Many of the links in this article redirect to a specific reviewed product. Your purchase of these products through affiliate links helps to generate commission for Storables.com, at no extra cost. Learn more)
Introduction
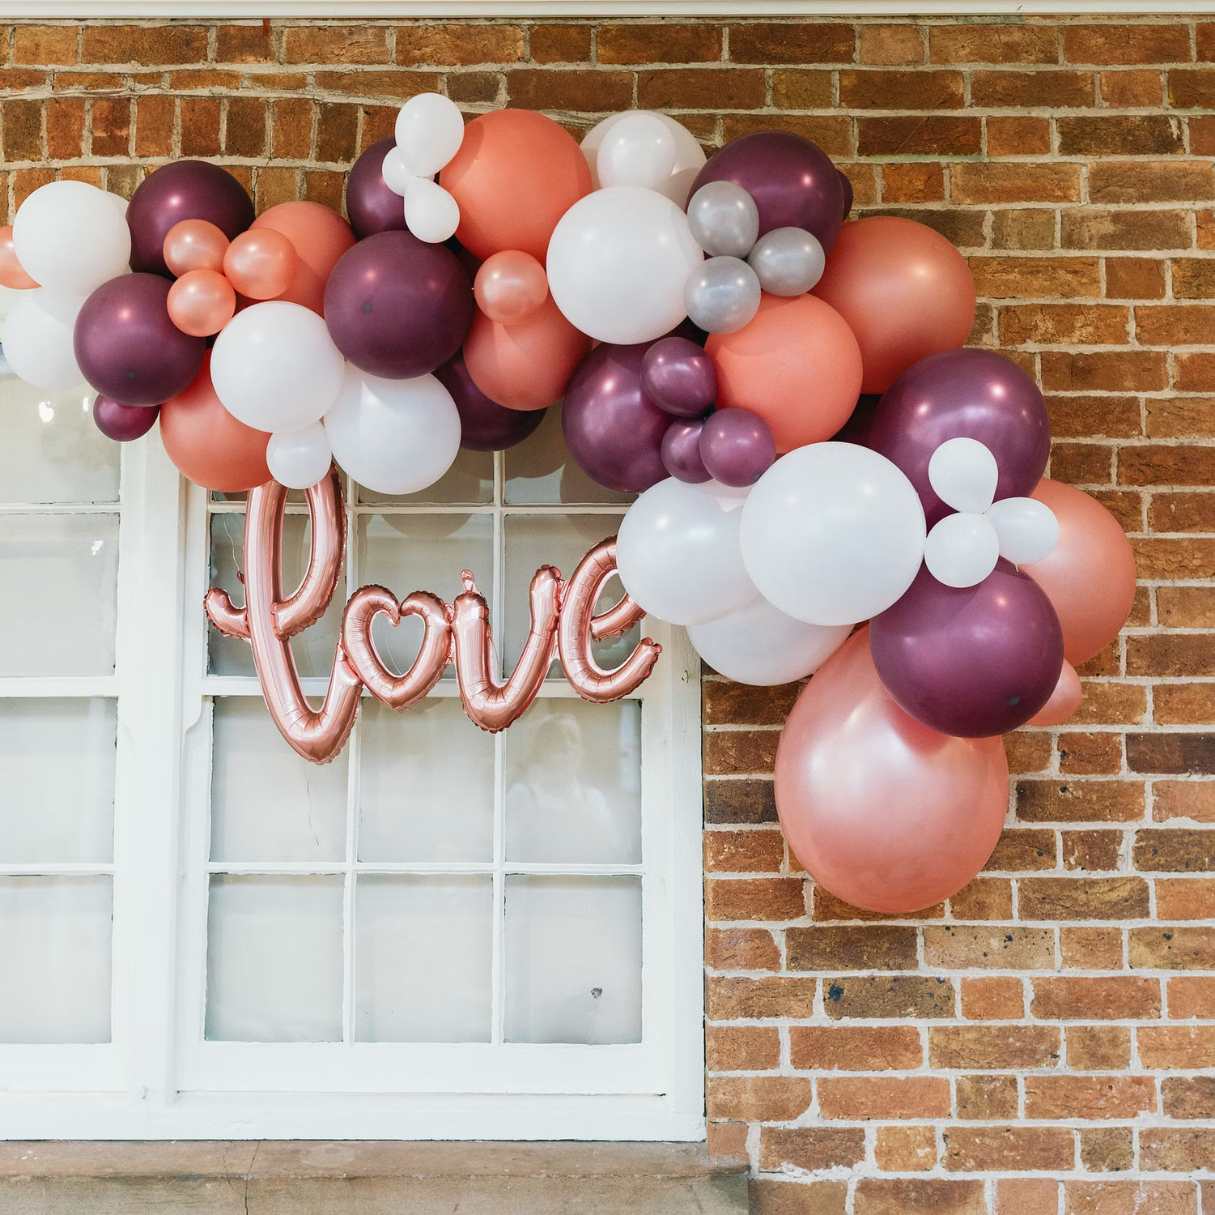
So, you've got a fabulous balloon arch and a stunning brick wall, and you're ready to create a captivating display that will leave everyone in awe. Whether it's for a wedding, birthday party, or any other special event, hanging a balloon arch on a brick wall can add a touch of whimsy and charm to the occasion. In this comprehensive guide, we'll walk you through the process step by step, ensuring that your balloon arch is securely and beautifully displayed.
Hanging a balloon arch on a brick wall may seem like a daunting task, but with the right materials, a clear plan, and a bit of creativity, it can be a straightforward and rewarding endeavor. By following the steps outlined in this guide, you'll be able to showcase your balloon arch with confidence, knowing that it's securely fastened and visually striking.
Let's dive into the materials you'll need to get started on this delightful DIY project.
Key Takeaways:
- Hanging a balloon arch on a brick wall is a creative and rewarding DIY project that can add whimsy and charm to any special event, from weddings to birthday parties.
- By following the step-by-step guide, you can confidently and securely display a visually striking balloon arch, infusing spaces with enchantment and joy for unforgettable celebrations.
Read more: How To Build A Brick Arch
Materials Needed
Before you embark on hanging your balloon arch on a brick wall, it’s essential to gather the necessary materials. Here’s what you’ll need:
- Balloon arch kit: This will typically include balloons, archline, and any necessary hardware for constructing the arch.
- Brick wall hangers: These are specialized hangers designed to securely attach objects to brick walls without causing damage.
- Measuring tape: To ensure precision when marking the wall for anchor placement.
- Pencil or chalk: For marking the anchor points on the brick wall.
- Drill and masonry bit: To create holes for the anchors.
- Anchors and screws: These will be used to securely attach the balloon arch to the brick wall.
- Optional: Level, ladder, and a second pair of hands for assistance during the installation process.
With these materials in hand, you’ll be well-equipped to move on to the next step: measuring and marking the brick wall for the installation of the balloon arch.
Step 1: Measure and Mark
Before you start drilling or hanging anything on your beautiful brick wall, it’s crucial to take accurate measurements and make precise marks to ensure that the balloon arch is positioned exactly as you envision it. Here’s how to proceed:
Begin by deciding where you want the balloon arch to be positioned on the brick wall. Take into consideration the overall layout of the event space and any other decorations or focal points that the arch will complement. Once you’ve chosen the ideal location, use a measuring tape to determine the exact placement for the anchors.
With the help of a second person, hold the balloon arch against the wall at the desired height and width. Use a pencil or chalk to mark the spots where the anchors will be installed. It’s essential to ensure that the arch is level and centered during this step, so take your time to make accurate markings.
After marking the anchor points, step back and visually confirm that the placement looks balanced and aesthetically pleasing. This is the foundation of the installation process, so it’s important to double-check the markings before proceeding to the next step.
Once you’re satisfied with the positioning of the marks, you’re ready to move on to the next step: attaching the anchors to the brick wall.
Step 2: Attach Anchors
Now that you’ve marked the spots for the anchors, it’s time to prepare the brick wall for their installation. This step is crucial for ensuring that your balloon arch will be securely fastened and beautifully displayed. Here’s a detailed guide on how to attach the anchors:
Begin by selecting the appropriate drill bit for your masonry wall. It’s essential to choose a bit that is suitable for drilling into brick and can create holes that accommodate the anchors you’ll be using.
With the drill bit secured in the drill, carefully create holes at the marked anchor points on the brick wall. Be sure to drill to the appropriate depth to accommodate the anchors, and use a vacuum or brush to clear away any dust or debris from the holes.
Next, take the brick wall hangers and insert them into the drilled holes. Depending on the type of hangers you’re using, you may need to gently tap them into place with a hammer. Ensure that the hangers are snug and secure within the holes, as they will provide the foundation for supporting the weight of the balloon arch.
Once all the hangers are in place, it’s time to attach the archline or any other hardware provided in the balloon arch kit to the hangers. Follow the instructions included with the kit to ensure that the archline is securely fastened to the hangers, providing a stable support system for the balloon arch.
With the anchors firmly in position and the archline securely attached, you’re now ready to move on to the exciting stage of hanging the balloon arch on the brick wall. This is where the visual impact of your display will truly come to life.
Use adhesive hooks or clips designed for outdoor use to hang the balloon arch on a brick wall. Make sure to space them evenly and secure the arch to the hooks or clips with zip ties or fishing line for extra support.
Step 3: Hang Balloon Arch
With the anchors securely in place, it’s time to bring your vision to life by hanging the balloon arch on the brick wall. This step is where the magic happens, as you transform your space into a captivating and whimsical setting. Here’s a step-by-step guide on how to hang the balloon arch:
Start by carefully lifting the balloon arch and positioning it in front of the brick wall. Enlist the help of a second person to ensure that the arch is held steadily in place while you connect it to the archline or hardware attached to the anchors. This collaborative effort will help maintain the stability and integrity of the arch during the hanging process.
Align the balloons and the archline with the corresponding anchors on the wall. Depending on the design of the balloon arch, you may need to adjust the placement of individual balloons to achieve the desired look. Take your time to ensure that the arch is positioned evenly and symmetrically against the brick wall.
Once the arch is aligned with the anchors, gently connect it to the archline or hardware. Ensure that each connection point is secure and that the weight of the arch is evenly distributed along the length of the archline. This will help prevent any imbalances or instability once the arch is fully hung.
As the arch begins to take shape against the brick wall, step back and assess its positioning from different angles. This vantage point will allow you to make any necessary adjustments to the arch’s placement and ensure that it complements the overall aesthetic of the space.
With the balloon arch successfully hung on the brick wall, you’re now ready to move on to the final step: adjusting and securing the arch to enhance its visual impact and stability.
Read more: How To Hang A Banner On A Brick Wall
Step 4: Adjust and Secure
Now that the balloon arch is gracefully adorning the brick wall, it’s time to make any final adjustments and ensure that it is securely fastened. This step is essential for perfecting the display and guaranteeing that the arch remains stable throughout the event. Here’s how to adjust and secure the balloon arch:
Begin by carefully inspecting the arch to ensure that it is level and symmetrically positioned against the brick wall. Make any necessary adjustments to the placement of individual balloons or the archline to achieve a balanced and visually appealing display. Taking the time to finesse the details will elevate the overall impact of the balloon arch.
If the balloon arch kit includes any additional decorative elements, such as ribbons or foliage, use this opportunity to embellish the arch and enhance its aesthetic appeal. Incorporating these elements can add a touch of elegance and cohesiveness to the display, tying in with the theme of your event.
Once you’re satisfied with the positioning and aesthetics of the balloon arch, it’s time to secure it in place to ensure that it remains steadfast throughout the event. Double-check the connections between the arch and the archline or hardware attached to the anchors, confirming that each attachment point is stable and resilient.
If necessary, use additional fasteners or clips to reinforce the connections and prevent any unintended movement of the balloon arch. This added security will provide peace of mind, knowing that your stunning display is well-prepared to withstand any gentle breezes or enthusiastic guests.
Finally, step back and admire your handiwork, taking in the enchanting sight of the balloon arch gracefully suspended against the brick wall. Revel in the delightful ambiance it creates and the joy it brings to the event space, knowing that your efforts have resulted in a captivating and memorable display.
With the balloon arch expertly adjusted and securely fastened, you’ve successfully completed the process of hanging a balloon arch on a brick wall. Your attention to detail and creative flair have culminated in a visually stunning addition to your event, setting the stage for a truly unforgettable occasion.
Conclusion
Congratulations! You’ve successfully learned how to hang a balloon arch on a brick wall, transforming an ordinary space into a whimsical and enchanting setting. By following the step-by-step guide outlined in this article, you’ve gained the knowledge and confidence to create a captivating display for a variety of special events and celebrations.
From meticulously measuring and marking the wall to securely attaching the anchors and delicately hanging the balloon arch, each step has contributed to the seamless and visually striking presentation of your creation. Your attention to detail and creative vision have undoubtedly elevated the ambiance of the event space, leaving a lasting impression on all who behold the enchanting display.
As you reflect on the process, take pride in the artistry and care you’ve invested in hanging the balloon arch. The joy and wonder it evokes serve as a testament to your dedication to creating memorable and delightful experiences for those around you.
Whether it’s a wedding, birthday celebration, or any other special occasion, the addition of a balloon arch on a brick wall has the power to captivate hearts and spark joy. As you bask in the admiration and delight of your guests, revel in the knowledge that your creativity has contributed to a truly magical atmosphere.
With this newfound expertise, you’re well-equipped to continue infusing spaces with charm and elegance, using the versatile and enchanting allure of balloon arches to create moments of wonder and delight. Embrace the opportunity to bring your imaginative visions to life, knowing that your skillful touch can transform any space into a captivating and joyous environment.
So, go forth with confidence, armed with the knowledge and inspiration to craft breathtaking displays that enchant and inspire. Your creativity knows no bounds, and the world is your canvas for creating moments of pure magic and delight.
Frequently Asked Questions about How To Hang A Balloon Arch On A Brick Wall
Was this page helpful?
At Storables.com, we guarantee accurate and reliable information. Our content, validated by Expert Board Contributors, is crafted following stringent Editorial Policies. We're committed to providing you with well-researched, expert-backed insights for all your informational needs.


0 thoughts on “How To Hang A Balloon Arch On A Brick Wall”