Home>Construction & Tools>Building Materials>How To Install Thin Brick
Building Materials
How To Install Thin Brick
Modified: October 20, 2024
Learn how to install thin brick, a versatile building material that adds character to any space. Discover step-by-step instructions and tips for a successful installation.
(Many of the links in this article redirect to a specific reviewed product. Your purchase of these products through affiliate links helps to generate commission for Storables.com, at no extra cost. Learn more)
Introduction
Welcome to the world of thin brick installation! Whether you’re looking to revamp your interior space or add a touch of charm to your exterior walls, installing thin brick is a fantastic way to achieve that timeless, rustic look. Thin brick offers the aesthetic appeal of traditional brick without the weight and cost associated with full-sized bricks, making it a popular choice for both DIY enthusiasts and professional contractors.
In this comprehensive guide, we’ll walk you through the step-by-step process of installing thin brick, covering everything from preparing the surface to adding those final finishing touches. By the end of this article, you’ll have the knowledge and confidence to embark on your own thin brick installation project.
So, roll up your sleeves, gather your tools, and let’s dive into the wonderful world of thin brick installation!
Key Takeaways:
- Installing thin brick is a fantastic way to achieve a timeless, rustic look without the weight and cost of traditional bricks. With the right materials and tools, meticulous surface preparation, and expert mortar mixing and application, you can transform your space with the enduring allure of thin brick.
- By following the step-by-step process of installing thin brick, you can bring the classic appeal of brick into your space, creating a visually captivating and enduring feature. The craftsmanship and attention to detail that go into the installation are a testament to your dedication, creativity, and skill.
Read more: How Thick Is Thin Brick
Materials and Tools Needed
Before you begin your thin brick installation project, it’s essential to gather all the necessary materials and tools. Here’s a comprehensive list to ensure you’re well-prepared for the task at hand:
Materials:
- Thin brick veneers
- Primer (if required for the specific type of surface)
- Mortar mix
- Water
- Grout (for finishing)
- Sealer (optional, for added protection)
Tools:
- Measuring tape
- Level
- Trowel
- Bucket for mixing mortar
- Grout float
- Tile spacers
- Tile saw or masonry blade (for cutting bricks)
- Sponge
- Brush
- Protective gear (gloves, safety goggles, dust mask)
Having these materials and tools at your disposal will streamline the installation process and ensure that you’re fully equipped to achieve professional-looking results. Now that you’ve gathered everything you need, it’s time to prepare the surface for the thin brick application.
Preparing the Surface
Before diving into the exciting process of installing thin brick, it’s crucial to prepare the surface to ensure optimal adhesion and a long-lasting finish. The surface preparation phase sets the foundation for a successful installation, so be sure to follow these steps diligently:
Read more: How To Grout Thin Brick
1. Clean the Surface:
Start by thoroughly cleaning the surface where the thin brick will be applied. Remove any dirt, dust, grease, or debris using a suitable cleaner and allow the surface to dry completely.
2. Apply Primer (if necessary):
Depending on the type of surface you’re working with, it may be necessary to apply a primer to enhance adhesion. Follow the manufacturer’s instructions for the specific primer you’re using.
3. Measure and Mark:
Use a measuring tape and level to mark the area where the thin brick will be installed. This step is crucial for ensuring a straight, even application.
By meticulously preparing the surface, you’re setting the stage for a seamless and durable thin brick installation. With the surface ready, it’s time to move on to the next step: mixing the mortar.
Mixing Mortar
Now that the surface is prepped and ready, it’s time to mix the mortar. The mortar serves as the adhesive that will bond the thin brick veneers to the surface, so achieving the right consistency is crucial for a successful installation. Here’s how to mix mortar like a pro:
Read more: How To Install Brick Siding
1. Gather Your Materials:
Before mixing the mortar, ensure that you have your mortar mix, water, a trowel, and a bucket for mixing. Follow the manufacturer’s instructions on the mortar mix packaging for the recommended water-to-mix ratio.
2. Mix the Mortar:
Pour the appropriate amount of mortar mix into your mixing bucket. Slowly add water while mixing the mortar with the trowel. Aim for a smooth, lump-free consistency. It’s essential to achieve a workable mortar that isn’t too runny or too thick.
3. Test the Consistency:
Once you’ve mixed the mortar, perform a quick test by spreading it on a scrap piece of wood or a spare tile. The mortar should hold its shape without slumping or being too stiff to work with.
4. Let It Rest:
Allow the mortar to rest for a few minutes, then give it a final stir before use. This resting period allows the ingredients to fully combine and ensures a consistent texture throughout the application process.
With the mortar mixed to perfection, you’re now ready to move on to the exciting phase of applying the mortar and installing the thin brick veneers. Let’s keep the momentum going as we delve into the next steps of the installation process!
Read more: How To Install Exterior Brick Veneer
Applying Mortar
With the mortar mixed and ready to go, it’s time to apply it to the surface in preparation for the thin brick installation. Proper application of the mortar is essential for ensuring a strong bond and a professional finish. Here’s how to expertly apply the mortar:
1. Start with a Trowel:
Using a trowel, scoop up a generous amount of mortar and begin spreading it onto the prepared surface. Work in small sections to prevent the mortar from drying out before you can install the thin bricks.
2. Create a Level Surface:
Use the flat edge of the trowel to spread the mortar evenly, creating a level surface for the thin brick veneers. A consistent layer of mortar is crucial for achieving a uniform and professional-looking installation.
3. Apply Grooves:
After spreading the mortar, use the notched edge of the trowel to create grooves in the mortar. These grooves enhance the bond between the mortar and the thin brick, ensuring a secure attachment.
Read more: How To Install Fireplace Doors On Brick
4. Work in Sections:
As you apply the mortar, work in manageable sections to ensure that the mortar remains workable throughout the installation process. This approach helps maintain the ideal consistency for adhering the thin brick veneers.
5. Clean as You Go:
Keep a damp sponge or cloth on hand to promptly clean up any excess mortar that may get on the surface of the thin bricks. This will help maintain a clean and polished appearance as you work through the installation.
With the mortar expertly applied, it’s time for the exciting part: installing the thin brick veneers. Let’s delve into the next phase of the process and bring your vision to life with the timeless charm of thin brick!
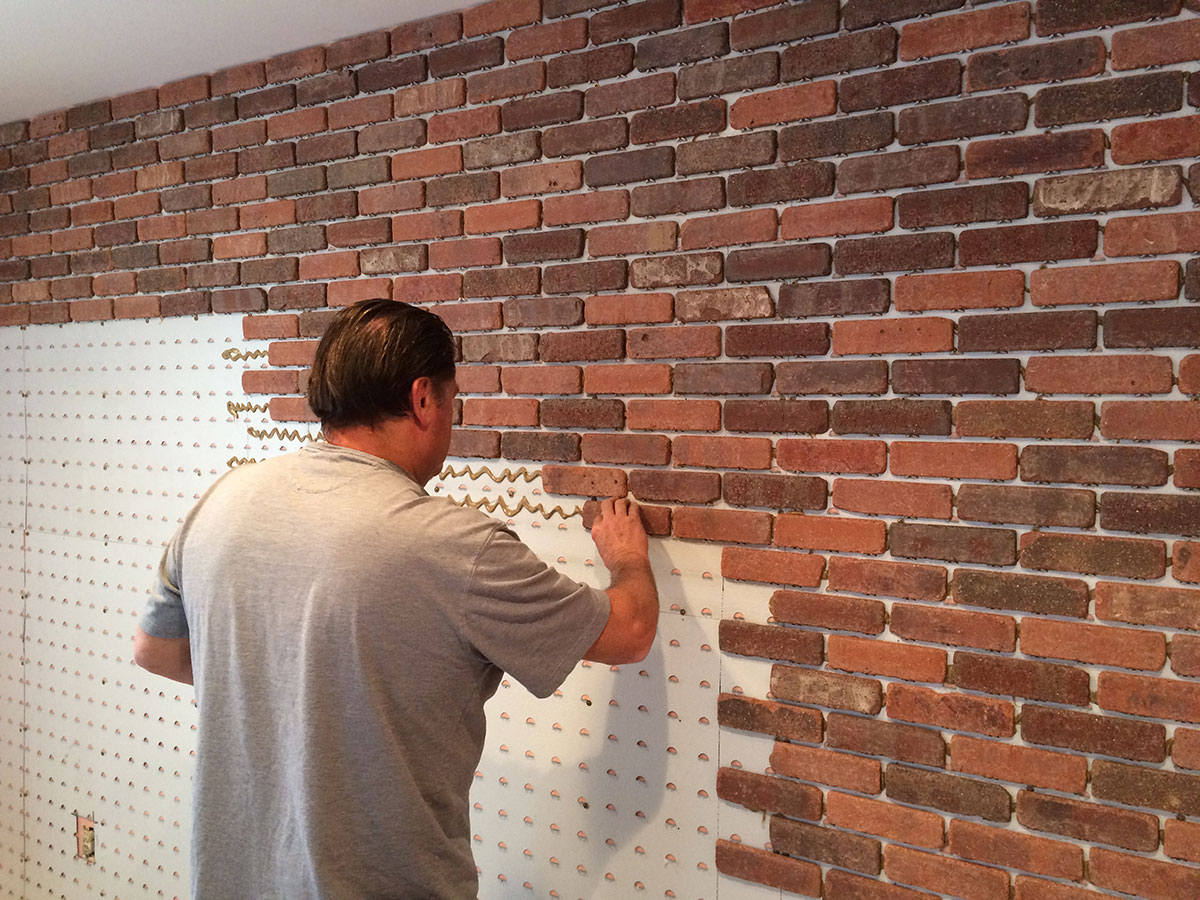
Installing Thin Brick
As you embark on the installation of thin brick veneers, you’re on the brink of transforming your space with the classic appeal of brick. This phase of the process requires precision and attention to detail to achieve a stunning result. Let’s dive into the steps for installing thin brick like a seasoned professional:
1. Lay Out the Bricks:
Start by laying out the thin brick veneers in the desired pattern. This allows you to visualize the arrangement and make any necessary adjustments before applying them to the mortar.
Read more: How To Thin Out Grass
2. Apply Bricks to Mortar:
Place the first brick onto the mortar, pressing gently and wiggling it slightly to ensure a secure bond. Use tile spacers to maintain consistent spacing between the bricks as you work.
3. Cut Bricks as Needed:
When reaching the edges or corners, you may need to cut the bricks to fit the space. A tile saw or a masonry blade can be used to make precise cuts, ensuring a seamless fit.
4. Check for Level and Alignment:
Use a level to ensure that the bricks are being installed evenly and are aligned correctly. Making adjustments as you go will result in a polished and professional-looking installation.
5. Continue the Installation:
Work systematically, applying mortar and installing the thin bricks in manageable sections. This approach allows you to maintain control over the process and ensures that the mortar remains workable.
Read more: How To Install Sawtooth Brick Edging
6. Clean Excess Mortar:
As you progress with the installation, periodically clean off any excess mortar from the surface of the bricks using a damp sponge or cloth. This step contributes to a clean and refined final appearance.
By following these steps with precision and care, you’re well on your way to completing a stunning thin brick installation. With the bricks in place, it’s time to add those finishing touches that will bring your project to fruition.
Finishing Touches
As you near the completion of your thin brick installation, it’s time to add those final touches that will elevate the overall look and ensure a professional, polished outcome. These finishing touches contribute to the durability, aesthetics, and overall impact of your thin brick project. Let’s explore the essential steps for adding those finishing touches:
1. Apply Grout:
Once the thin brick veneers are securely in place, it’s time to fill the gaps between the bricks with grout. Use a grout float to press the grout into the spaces, ensuring even coverage and a uniform appearance.
2. Clean Excess Grout:
After applying the grout, use a damp sponge to gently clean off any excess grout from the surface of the bricks. This step helps achieve a clean and tidy finish while the grout is still pliable.
Read more: How To Install Ring Doorbell On Brick
3. Allow for Drying Time:
Allow the grout to dry according to the manufacturer’s instructions. This is a crucial step in the process, as it allows the grout to set and ensures long-term durability.
4. Seal the Bricks (Optional):
For added protection and longevity, consider applying a sealer to the thin brick veneers. This step can help safeguard the bricks against stains and moisture, enhancing their resilience over time.
5. Clean and Inspect:
Once the grout has fully dried and any optional sealing is complete, thoroughly clean the surface of the bricks to remove any residual grout or sealer. Inspect the installation to ensure that it meets your standards of quality and craftsmanship.
6. Stand Back and Admire:
Now that the finishing touches are complete, take a step back and admire the transformation. Revel in the timeless beauty of your newly installed thin brick, and take pride in the skill and dedication you’ve invested in this project.
With the finishing touches in place, your thin brick installation project is now a stunning reality. The enduring allure of brick has been seamlessly integrated into your space, adding warmth, character, and a touch of timeless elegance. Congratulations on a job well done!
Read more: How To Install A Mantel On A Brick Fireplace
Conclusion
Congratulations on successfully navigating the intricate process of installing thin brick! By following the steps outlined in this guide, you’ve brought the timeless charm of brick into your space, creating a visually captivating and enduring feature. As you reflect on your journey, remember that the allure of thin brick lies not only in its classic aesthetic but also in the craftsmanship and attention to detail that go into its installation.
Through meticulous surface preparation, expert mortar mixing and application, precise brick installation, and thoughtful finishing touches, you’ve transformed your vision into a tangible, enduring reality. The result is more than just a beautiful surface – it’s a testament to your dedication, creativity, and skill.
As you enjoy the fruits of your labor, take pride in the knowledge that your thin brick installation stands as a testament to your commitment to quality and craftsmanship. Whether it’s an interior accent wall, an exterior facade, or any other application, the enduring appeal of thin brick will continue to enrich your space for years to come.
As you bask in the warmth and character that thin brick brings to your environment, remember that the knowledge and skills you’ve gained can be applied to future projects, further enhancing your surroundings with the timeless allure of brick. Your journey with thin brick installation is not just a singular accomplishment, but a stepping stone to future creative endeavors.
So, as you admire the beauty and character of your newly installed thin brick, take a moment to appreciate the journey that has led you here. Your dedication, craftsmanship, and creativity have woven a timeless element into the fabric of your space, enriching it with the enduring allure of thin brick.
Cheers to your successful thin brick installation, and may the warmth and character of brick continue to inspire and enrich your surroundings for years to come!
Frequently Asked Questions about How To Install Thin Brick
Was this page helpful?
At Storables.com, we guarantee accurate and reliable information. Our content, validated by Expert Board Contributors, is crafted following stringent Editorial Policies. We're committed to providing you with well-researched, expert-backed insights for all your informational needs.


0 thoughts on “How To Install Thin Brick”