Home>Construction & Tools>Building Materials>How To Install Herringbone Brick Pattern
Building Materials
How To Install Herringbone Brick Pattern
Modified: August 28, 2024
Learn how to install a herringbone brick pattern with our comprehensive guide. Find the best building materials and step-by-step instructions for a professional finish.
(Many of the links in this article redirect to a specific reviewed product. Your purchase of these products through affiliate links helps to generate commission for Storables.com, at no extra cost. Learn more)
Introduction
Welcome to the world of herringbone brick patterns, where classic elegance meets timeless charm. Whether you’re a seasoned DIY enthusiast or a novice looking to embark on a new project, mastering the art of installing a herringbone brick pattern can elevate the aesthetic appeal of any space. This iconic pattern, characterized by its distinctive V-shaped design, has been adorning floors, walls, and pathways for centuries, adding a touch of sophistication and character to both interior and exterior settings.
Creating a herringbone brick pattern involves meticulous attention to detail and a keen eye for precision. From selecting the right materials to mastering the intricate layout, each step plays a pivotal role in achieving a flawless end result. In this comprehensive guide, we will walk you through the step-by-step process of installing a herringbone brick pattern, ensuring that you are well-equipped with the knowledge and confidence to tackle this endeavor with finesse.
So, roll up your sleeves, gather your tools, and let’s dive into the art of creating a stunning herringbone brick pattern that will stand the test of time.
Key Takeaways:
- Installing a herringbone brick pattern requires meticulous preparation, precise layout, and careful craftsmanship. It adds timeless charm and enduring elegance to any space, showcasing artisanal skills and attention to detail.
- By mastering the art of herringbone brick pattern installation, you can transform a surface into a captivating work of art, leaving an indelible mark of timeless elegance and craftsmanship for generations to come.
Tools and Materials Needed
Before delving into the installation process, it’s essential to gather the necessary tools and materials to ensure a seamless and efficient workflow. Here’s a comprehensive list of what you’ll need:
Tools:
- Tape measure
- Chalk line
- Level
- Masonry saw
- Hammer
- Notched trowel
- Grout float
- Rubber mallet
- Tile spacers
- Bucket
- Mixing paddle
- Grout sponge
- Safety goggles
- Dust mask
- Work gloves
- Knee pads
Materials:
- Bricks (ensure adequate quantity, plus extras for cuts and replacements)
- Mortar mix
- Grout
- Primer (if working on a concrete surface)
- Sealer (optional, for added protection)
By having these tools and materials at your disposal, you’ll be well-prepared to commence the herringbone brick pattern installation process with confidence and precision.
Preparing the Surface
Before diving into the exhilarating process of laying the herringbone brick pattern, it’s crucial to ensure that the surface is properly prepared. Whether you’re working on a floor, wall, or pathway, the following steps will set the foundation for a durable and visually appealing result:
1. Clean and Clear: Begin by thoroughly cleaning the surface, removing any debris, dust, or existing flooring materials. For concrete surfaces, consider using a primer to promote better adhesion for the mortar and bricks.
2. Level and Smooth: Use a level to check the evenness of the surface. If there are any uneven areas, consider using a self-leveling compound to create a smooth and level base for the brick installation.
3. Layout Planning: Determine the starting point and layout of the herringbone pattern. This step is crucial for visualizing the pattern and ensuring that it fits the space seamlessly. Use a chalk line to mark the layout and guide the placement of the bricks.
4. Mortar Mixing: Prepare the mortar mix according to the manufacturer’s instructions. The consistency of the mortar is key to achieving a strong bond between the bricks and the surface.
By meticulously preparing the surface, you’ll pave the way for a successful herringbone brick pattern installation, ensuring longevity and visual appeal for years to come.
Laying the Foundation
With the surface meticulously prepared, it’s time to lay the foundation for the herringbone brick pattern. This foundational stage sets the stage for the intricate and visually captivating layout that will follow. Here’s a step-by-step guide to laying the foundation:
1. Applying Mortar: Using a notched trowel, apply a layer of mortar to a small section of the prepared surface. The layer should be even and of sufficient thickness to accommodate the bricks.
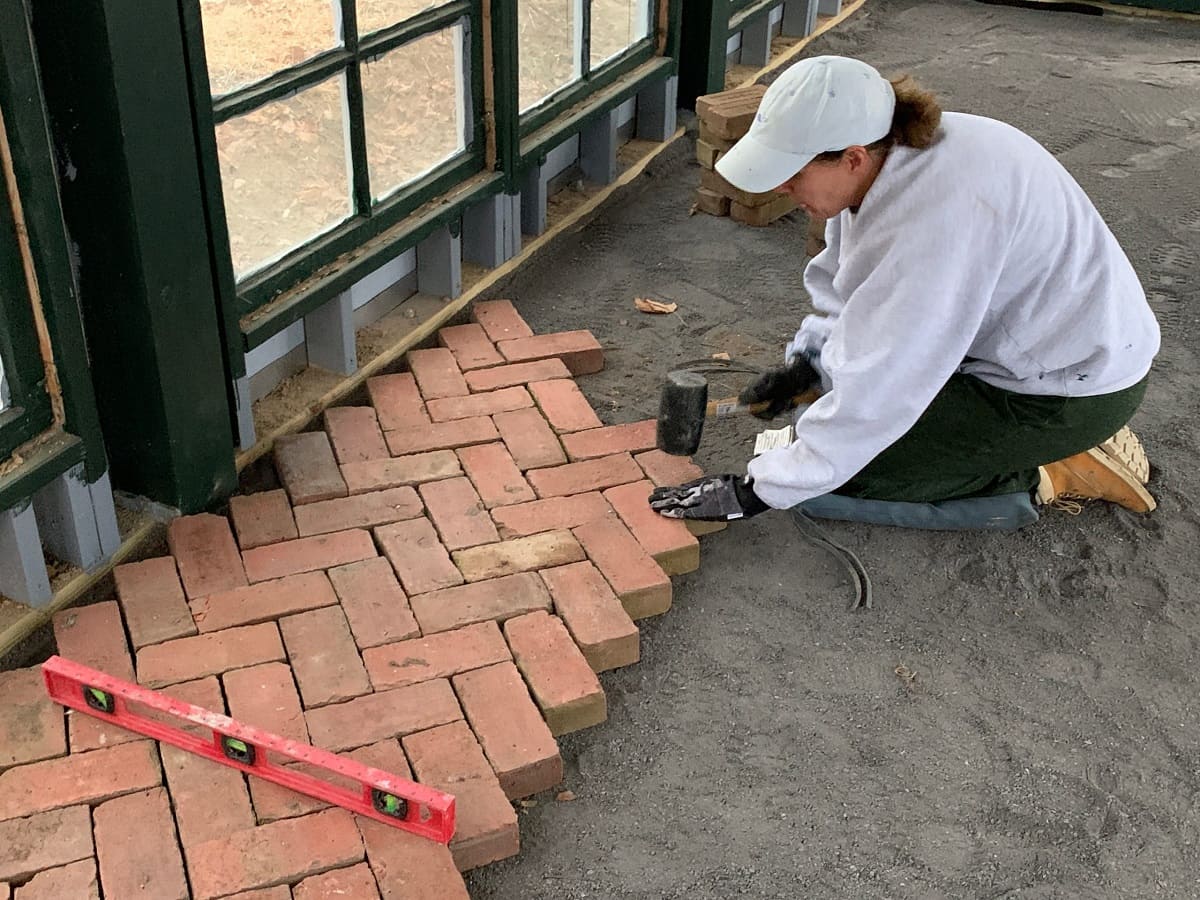
2. Placing the Bricks: Carefully press the bricks into the mortar, ensuring a snug fit and uniform spacing. Use tile spacers to maintain consistent gaps between the bricks, contributing to a polished and professional finish.
3. Checking Alignment: Use a level to ensure that the bricks are aligned and level. Making adjustments at this stage will prevent issues with the pattern as you progress.
4. Creating the V-shaped Pattern: As you lay the bricks, the characteristic V-shaped herringbone pattern will begin to take form. Pay close attention to the orientation of each brick, ensuring that the pattern remains consistent and visually striking.
5. Securing the Foundation: Once the initial section is complete, gently tap the bricks with a rubber mallet to ensure they are firmly set in the mortar. This step is crucial for the stability and longevity of the pattern.
By meticulously laying the foundation, you’ll establish a solid base for the herringbone brick pattern, setting the stage for the captivating visual impact that this timeless pattern embodies.
Creating the Herringbone Pattern
As the foundation takes shape, the next phase involves the meticulous creation of the herringbone pattern, infusing the space with a sense of timeless elegance and visual intrigue. This step-by-step process will guide you through the art of bringing the classic herringbone pattern to life:
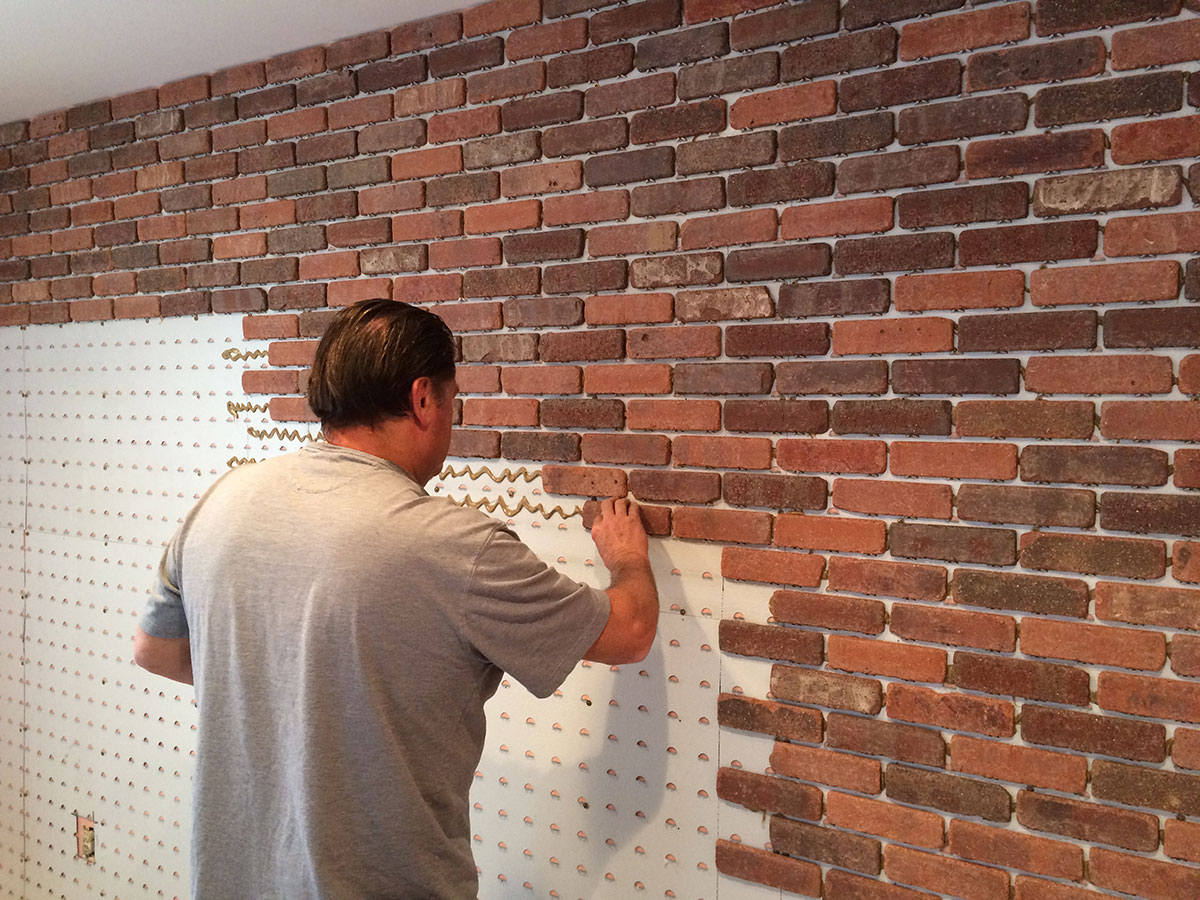
1. Continuing the Pattern: As you progress, continue to apply mortar and lay the bricks, ensuring that the V-shaped pattern unfolds seamlessly. The precision and alignment of each brick are essential in maintaining the integrity of the pattern.
2. Staggering the Bricks: To achieve the iconic herringbone look, stagger each row of bricks, creating a captivating interlocking effect. This meticulous arrangement adds depth and dimension to the pattern, elevating its visual appeal.
3. Consistent Spacing: Pay close attention to the spacing between the bricks, ensuring uniformity throughout the pattern. This attention to detail contributes to a polished and professional finish, showcasing the artistry of the herringbone layout.
4. Adhering to the Layout: Refer to the initial layout plan, using the chalk lines as a guide for maintaining the symmetry and balance of the pattern. This visual roadmap will ensure that the herringbone design unfolds harmoniously across the surface.
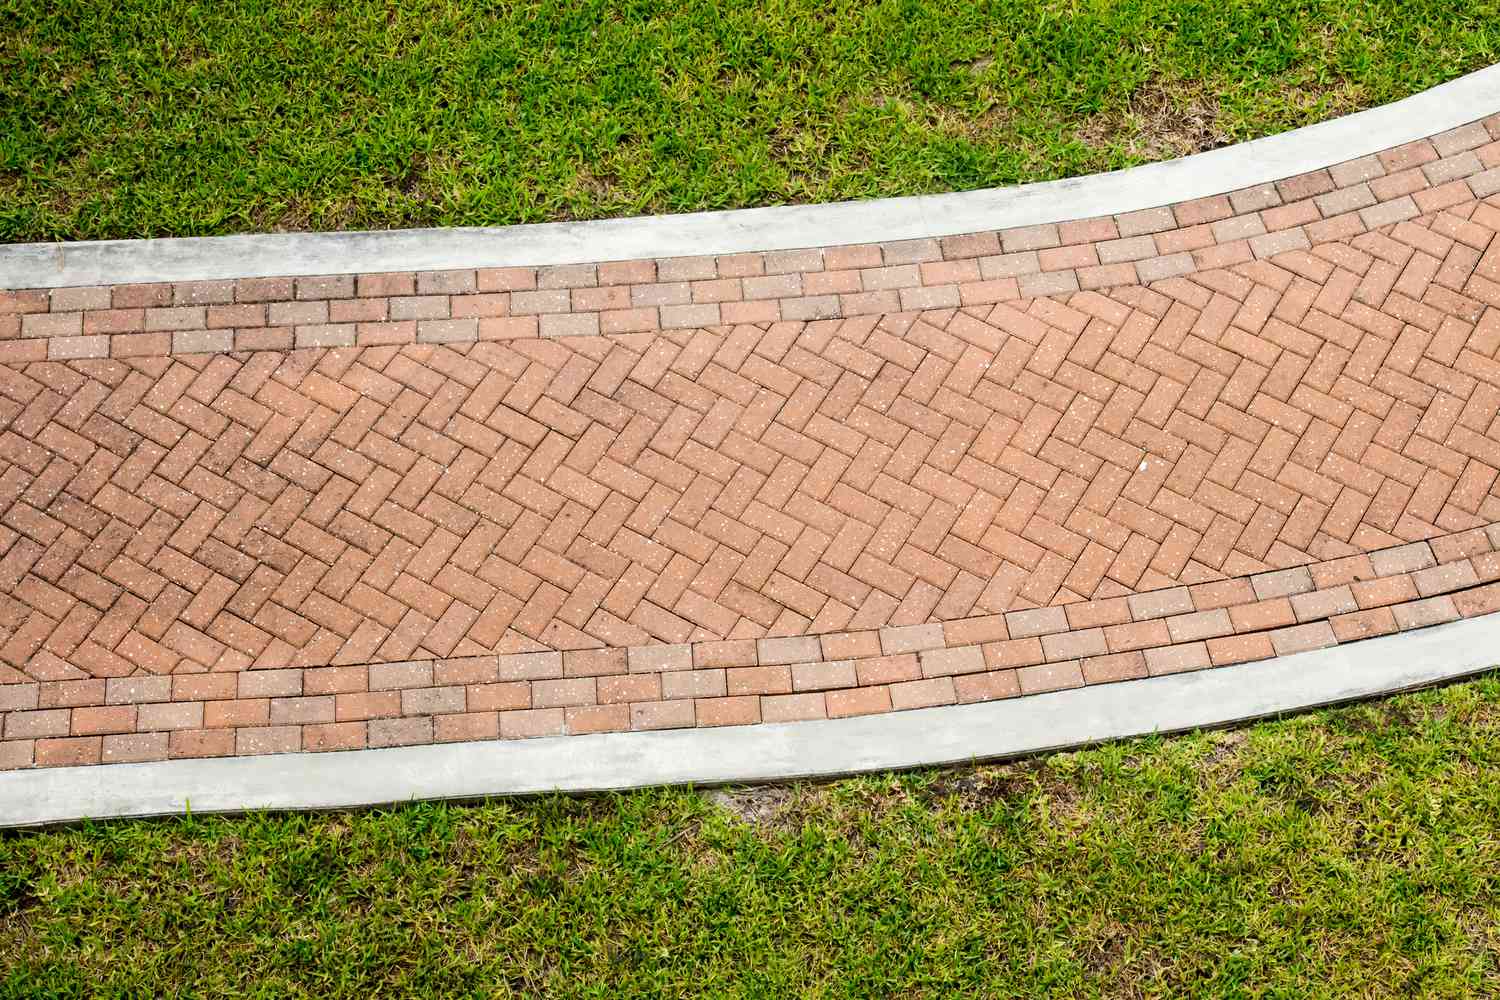
5. Admiring the Progress: As the herringbone pattern takes shape, take a moment to admire the timeless allure and captivating visual impact that this classic layout exudes. Each meticulously placed brick contributes to the artistry and sophistication of the overall design.
By meticulously creating the herringbone pattern, you’ll infuse the space with a sense of enduring charm and aesthetic allure, setting the stage for the final stages of the installation process.
When installing a herringbone brick pattern, start by laying a center line and then work outwards, placing bricks at a 45-degree angle to create the herringbone pattern. Use a square to ensure the pattern stays straight.
Cutting Bricks for the Edges
As the herringbone pattern unfolds across the surface, attention to detail becomes paramount, especially when approaching the edges and corners. This phase involves the precise art of cutting bricks to fit seamlessly within the layout, ensuring a cohesive and visually stunning result. Here’s a detailed guide to cutting bricks for the edges:
1. Measurement and Marking: Begin by carefully measuring the space where the edge bricks will be placed. Mark the cutting lines on the bricks using a pencil or marker, ensuring accuracy and precision in the measurements.
2. Utilizing a Masonry Saw: With the marked lines as a guide, use a masonry saw to carefully cut the bricks to the required size and shape. Exercise caution and patience during this process to achieve clean and accurate cuts.
3. Dry Fitting: After cutting the bricks, perform a dry fit to ensure that they seamlessly integrate with the existing pattern. Make any necessary adjustments to the cuts to achieve a precise and snug fit within the layout.
4. Finessing the Edges: Use a rubbing stone or sandpaper to smooth any rough edges resulting from the cutting process. This step ensures that the cut bricks blend seamlessly with the rest of the pattern, maintaining a cohesive and polished appearance.
5. Admiring the Seamless Integration: Take a moment to appreciate the meticulous integration of the cut bricks into the herringbone pattern, marveling at the seamless cohesion and visual impact that these tailored pieces bring to the overall design.
By masterfully cutting bricks for the edges, you’ll ensure that the herringbone pattern maintains its captivating allure and cohesive integrity, setting the stage for the final touches that will complete the installation process.
Finishing Touches
As the herringbone brick pattern nears completion, it’s time to add the finishing touches that will elevate the overall aesthetic and ensure the longevity of the installation. These final steps will contribute to the seamless integration and enduring appeal of the pattern, culminating in a visually stunning and resilient result. Here’s a detailed guide to the finishing touches:
1. Grouting the Joints: Once the bricks are firmly set in place, it’s time to apply grout to the joints. Use a grout float to fill the spaces between the bricks, ensuring that the grout is evenly distributed and level with the brick surfaces.
2. Cleaning the Surface: After grouting, use a grout sponge to gently clean the surface, removing any excess grout and smoothing the joints. This step contributes to the polished and professional appearance of the herringbone pattern.
3. Sealing (Optional): Depending on the location and intended use of the herringbone pattern, consider applying a sealer to protect the bricks and grout from stains and moisture. This optional step can enhance the longevity and resilience of the installation, especially in high-traffic areas.
4. Admiring the Artistry: Take a moment to step back and admire the artistry and timeless allure of the completed herringbone brick pattern. The seamless integration of the bricks, meticulous grouting, and optional sealing culminate in a visually captivating and enduring installation.
5. Celebrating the Achievement: Embrace the sense of accomplishment that comes with bringing the herringbone pattern to life. Whether it adorns a floor, wall, or pathway, the installation stands as a testament to your dedication to craftsmanship and the timeless appeal of this iconic pattern.
By adding the finishing touches, you’ll ensure that the herringbone brick pattern exudes a sense of enduring charm and visual allure, creating a captivating focal point within any space.
Read more: How To Paint A Brick Pattern
Conclusion
Congratulations on mastering the art of installing a herringbone brick pattern! Through meticulous preparation, precise layout, and careful craftsmanship, you have brought to life a timeless and visually captivating design that will stand the test of time. As you reflect on the journey from the initial layout planning to the final finishing touches, it’s evident that the herringbone pattern embodies a sense of enduring elegance and artisanal craftsmanship.
The herringbone pattern, with its characteristic V-shaped layout, has graced architectural spaces for centuries, leaving an indelible mark of sophistication and visual allure. By embracing this classic pattern and embarking on the installation process, you have not only added a touch of timeless charm to the space but also honed your skills as a craftsman with an eye for precision and artistry.
As you admire the seamless integration of each brick, the meticulous grouting, and the optional sealing, take pride in the enduring appeal and resilience of the herringbone pattern. Whether it adorns a floor, wall, or pathway, the installation serves as a testament to your dedication to craftsmanship and your ability to transform a space into a captivating work of art.
May the herringbone brick pattern serve as a source of inspiration and admiration, inviting others to appreciate the artistry and allure of this timeless layout. Your mastery of this installation process exemplifies a harmonious blend of tradition and craftsmanship, ensuring that the herringbone pattern continues to captivate and inspire for generations to come.
As you embark on future projects, may the artistry and precision demonstrated in the installation of the herringbone brick pattern guide you in creating spaces that exude enduring charm and visual intrigue.
With the completion of this installation, you have not only transformed a surface but also left an indelible mark of timeless elegance and craftsmanship.
Frequently Asked Questions about How To Install Herringbone Brick Pattern
Was this page helpful?
At Storables.com, we guarantee accurate and reliable information. Our content, validated by Expert Board Contributors, is crafted following stringent Editorial Policies. We're committed to providing you with well-researched, expert-backed insights for all your informational needs.


0 thoughts on “How To Install Herringbone Brick Pattern”