Articles
How To Install Ring Doorbell On Brick
Modified: August 26, 2024
Learn how to install a Ring Doorbell on brick with these step-by-step articles. Enhance your home security easily and efficiently.
(Many of the links in this article redirect to a specific reviewed product. Your purchase of these products through affiliate links helps to generate commission for Storables.com, at no extra cost. Learn more)
Introduction
The Ring Doorbell is a popular smart home device that allows you to monitor and answer your doorbell from anywhere using your smartphone. If you have a brick exterior on your house, you may be wondering how to install the Ring Doorbell on brick. In this article, we will guide you through the installation process, step by step, so you can enjoy the convenience and security that the Ring Doorbell offers.
Installing the Ring Doorbell on brick requires a few additional steps compared to other types of surfaces due to the durability and density of brick. However, with the right tools and materials, you can successfully install the doorbell on your brick exterior without any issues.
Please note: Before starting the installation process, make sure you have a stable internet connection and have already set up your Ring Doorbell account. Also, always follow the manufacturer’s instructions and guidelines for a safe and proper installation.
Now, let’s move on to the tools and materials you will need for the installation.
Key Takeaways:
- Installing a Ring Doorbell on a brick exterior requires careful preparation, precise mounting, and proper wiring. Following the step-by-step guide and using the right tools will ensure a successful installation process.
- Connecting the Ring Doorbell to a smartphone for remote monitoring and troubleshooting any potential issues post-installation are crucial steps to ensure optimal functionality and home security.
Read more: How To Install A Wired Ring Doorbell
Tools and materials needed
Before you begin the installation process, gather the following tools and materials:
Tools:
- Drill
- Masonry drill bit
- Hammer
- Screwdriver
- Level
- Tape measure
- Pencil
- Masking tape
- Wire strippers
Materials:
- Ring Doorbell kit (including the doorbell, mounting bracket, and screws)
- Masonry anchors
- String or wire
- Battery or power supply
- Wi-Fi network
- Smartphone with the Ring app
Having these tools and materials ready will ensure a smooth and efficient installation process. It’s important to use the appropriate tools for working with brick to prevent any damage to the surface or the doorbell itself.
Once you have gathered all the necessary tools and materials, you are ready to prepare for the installation. In the next section, we will discuss the steps to take before mounting the Ring Doorbell on your brick.
Preparation before installation
Before you start installing the Ring Doorbell on brick, it’s important to take a few preparatory steps to ensure a successful installation:
Read more: How To Install Ring Doorbell In An Apartment
1. Choose the right location
Take your time to select the optimal location for your Ring Doorbell on the brick surface. Consider factors such as visibility, accessibility, and Wi-Fi signal strength. Choose a spot near your front door that provides a clear view of the area you want to monitor.
2. Check your Wi-Fi signal
Make sure your Wi-Fi signal is strong enough in the chosen location. A weak Wi-Fi signal can affect the performance of your Ring Doorbell. You can use a Wi-Fi analyzer app on your smartphone to check the signal strength at different areas around your front door.
3. Charge the doorbell battery
If you are using a battery-powered Ring Doorbell, ensure that the battery is fully charged before the installation. Follow the manufacturer’s instructions on how to charge the battery.
4. Measure and mark the position
Use a tape measure to determine the distance from the ground to where you want to mount the doorbell. Mark the position on the brick using a pencil. Use a level to ensure that the mark is straight.
Read more: How To Install A Wireless Ring Doorbell
5. Create a template
To make the installation process easier, create a template by tracing around the mounting bracket on a piece of cardboard or paper. Cut out the template and use it as a guide to mark the hole locations on the brick surface.
By taking these preparatory steps, you will be ready to proceed with mounting the Ring Doorbell on your brick. In the next section, we will discuss the process of mounting the mounting bracket.
Mounting the mounting bracket
After completing the necessary preparations, it’s time to mount the mounting bracket for your Ring Doorbell on the brick surface:
1. Position the bracket
Hold the mounting bracket against the marked position on the brick. Ensure that it is level and aligned with the surrounding area. Use a pencil to mark the hole locations on the brick through the bracket’s mounting holes.
2. Attach the bracket
Remove the bracket and set it aside. Using a masonry drill bit, drill pilot holes into the brick at the marked locations. The size of the drill bit should match the size of the masonry anchors you will be using. Insert the anchors into the pilot holes until they are flush with the surface of the brick.
Read more: How High To Install Ring Doorbell
3. Secure the bracket
Place the bracket back onto the brick surface, aligning it with the pilot holes and anchors. Insert the provided screws through the mounting bracket and into the anchors. Use a screwdriver or drill with a screwdriver bit to tighten the screws securely.
4. Check the stability
Ensure that the mounting bracket is securely attached to the brick surface and does not wobble or move. Use a level to double-check that the bracket is still level after securing it.
By following these steps, you have successfully mounted the mounting bracket for your Ring Doorbell on the brick surface. In the next section, we will discuss the process of drilling holes in the brick to run the necessary wiring for the doorbell.
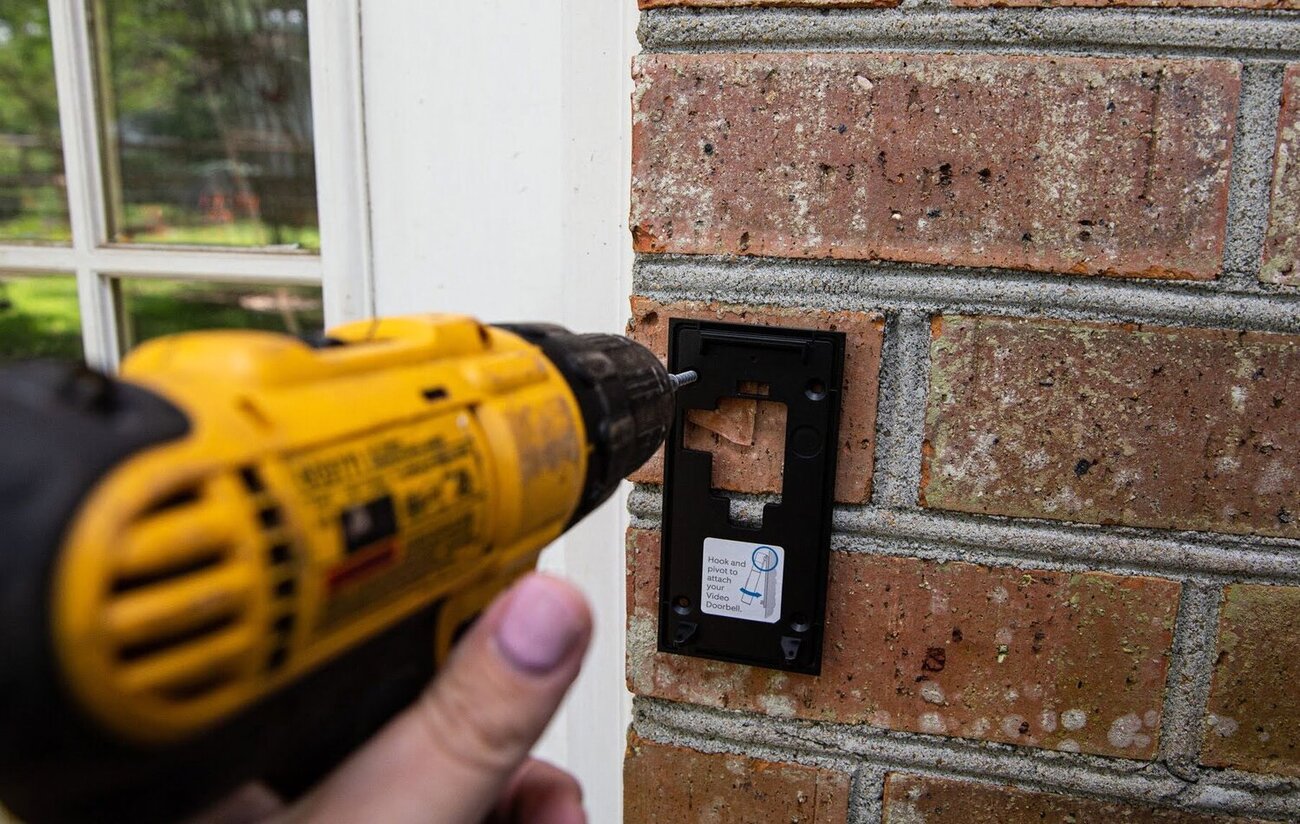
Drilling holes in the brick
Once you have securely mounted the mounting bracket for your Ring Doorbell on the brick surface, the next step is to drill holes in the brick to run the necessary wiring for the doorbell:
1. Mark the hole locations
Using the mounting bracket as a guide, mark the hole locations on the brick surface where you will be drilling. It’s best to position the holes near the bottom of the bracket, ensuring that they will be hidden by the doorbell.
Read more: How To Install Ring Doorbell On Siding
2. Use the proper drill bit
Choose a masonry drill bit that matches the size of the wiring hole for your Ring Doorbell. Attach the drill bit to your drill securely.
3. Start drilling
Position the drill bit on one of the marked hole locations and firmly press against the brick surface. Start drilling at a slow speed to create a starter hole. Gradually increase the speed as you continue drilling until you penetrate the brick completely. Be mindful of applying even pressure to prevent the drill bit from slipping or causing damage to the brick.
4. Repeat for additional holes
Repeat the drilling process for any additional hole locations you have marked on the brick surface. Take your time to ensure that each hole is drilled straight and at the proper depth.
5. Clean the holes
After drilling, use a brush or compressed air to clean out any debris or dust from the holes. This will ensure a secure and proper fit for the wiring.
By following these steps, you have successfully drilled the necessary holes in the brick surface for running the wiring for your Ring Doorbell. In the next section, we will discuss the process of attaching the doorbell to the mounting bracket.
Read more: Who Can Install Ring Doorbell
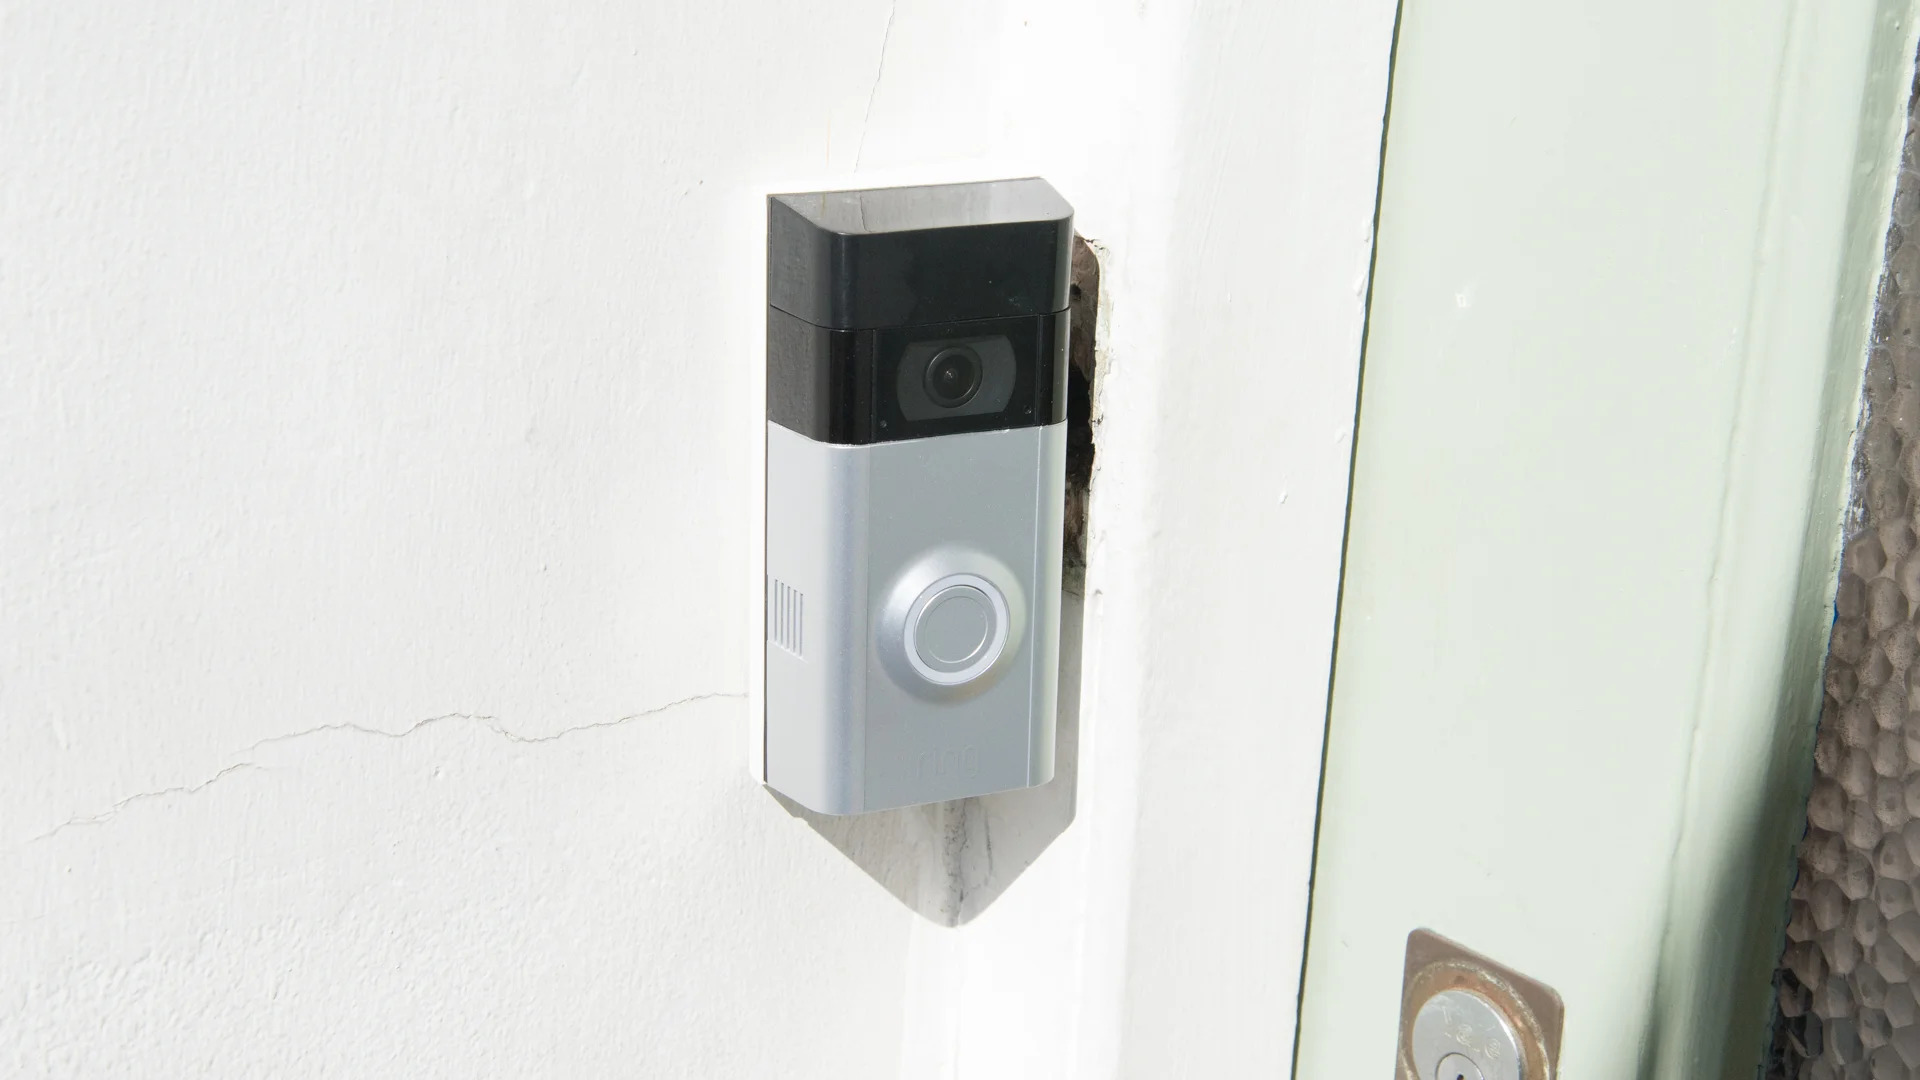
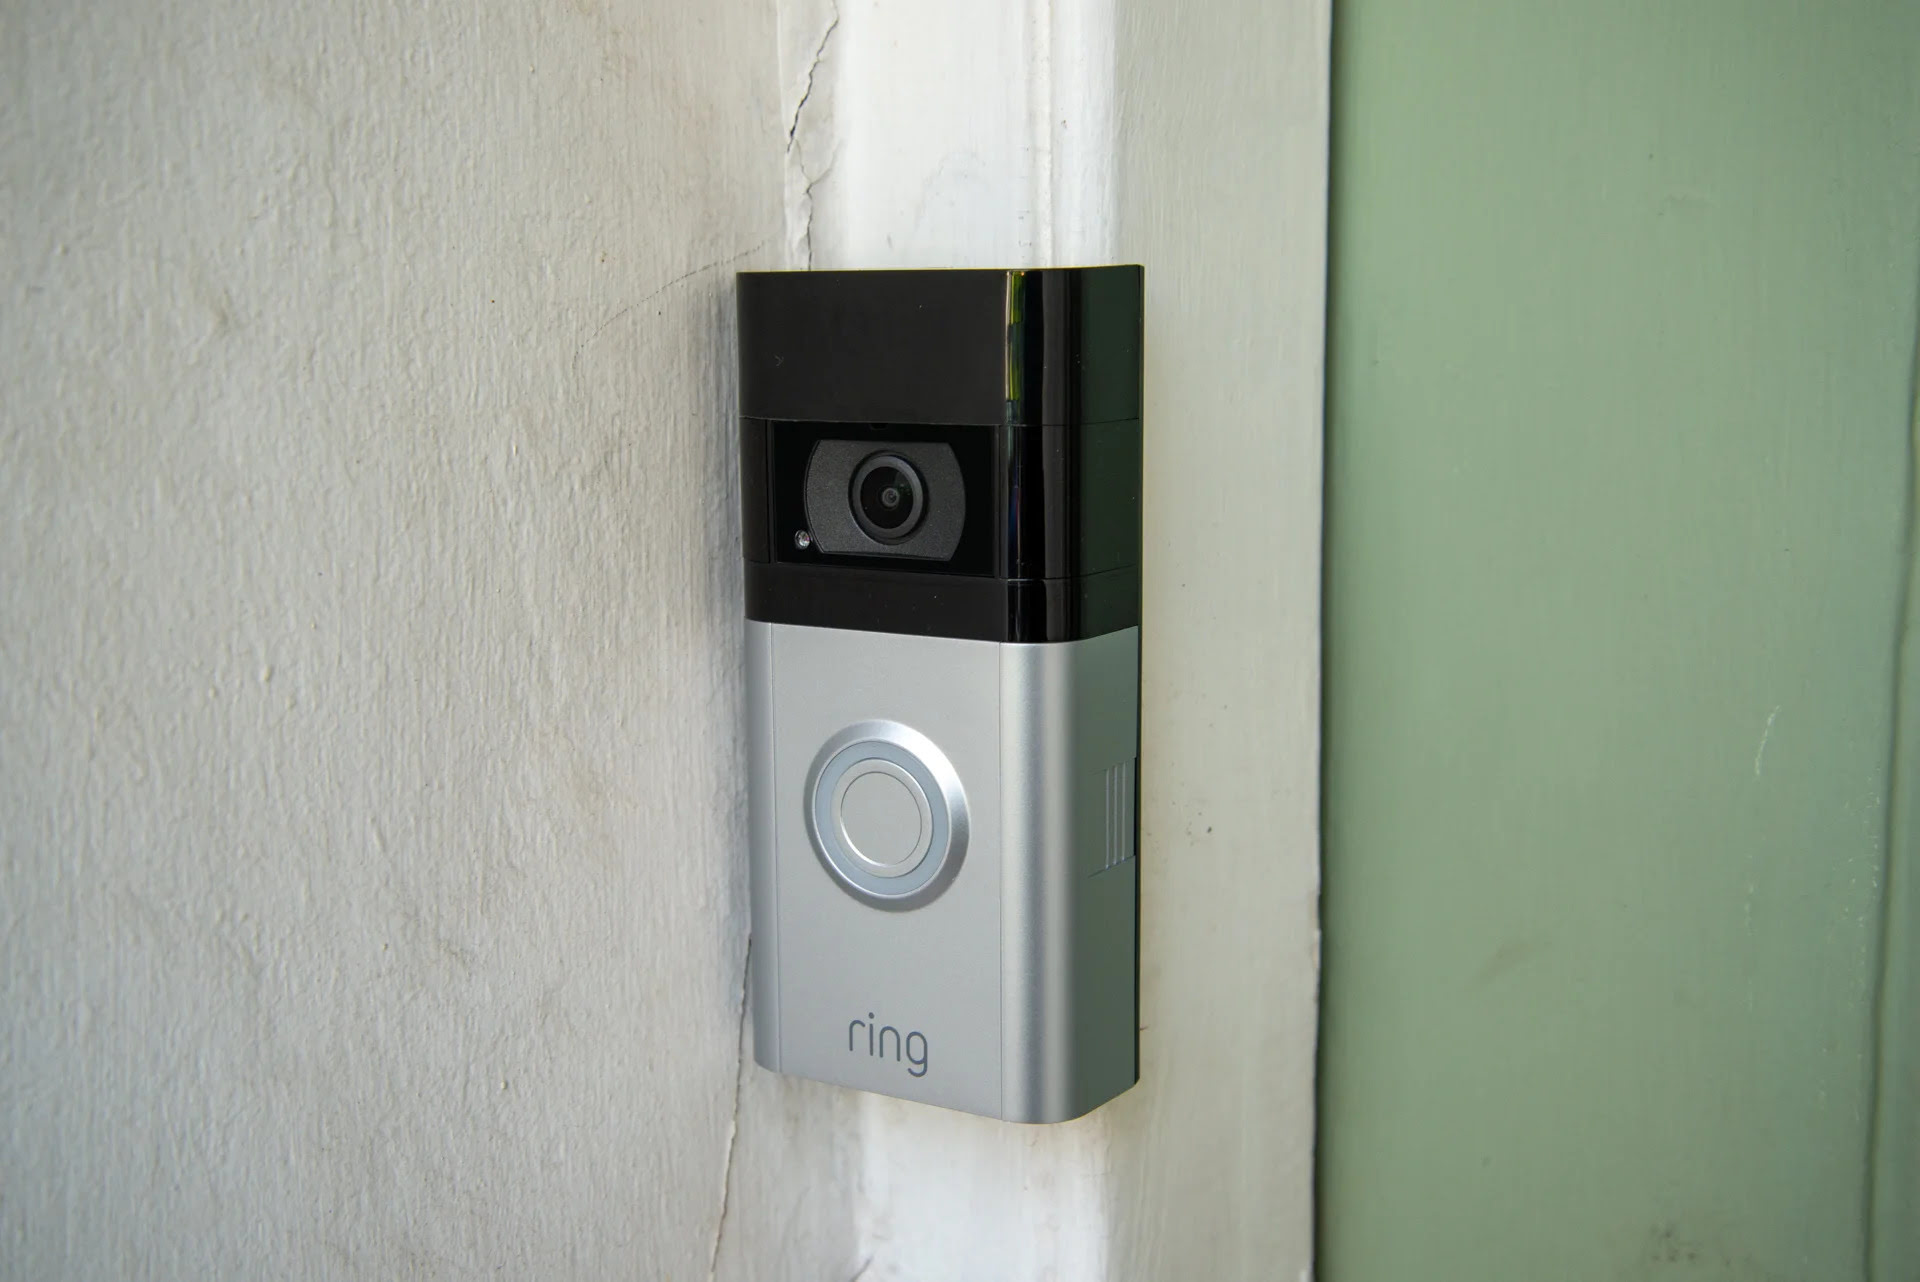
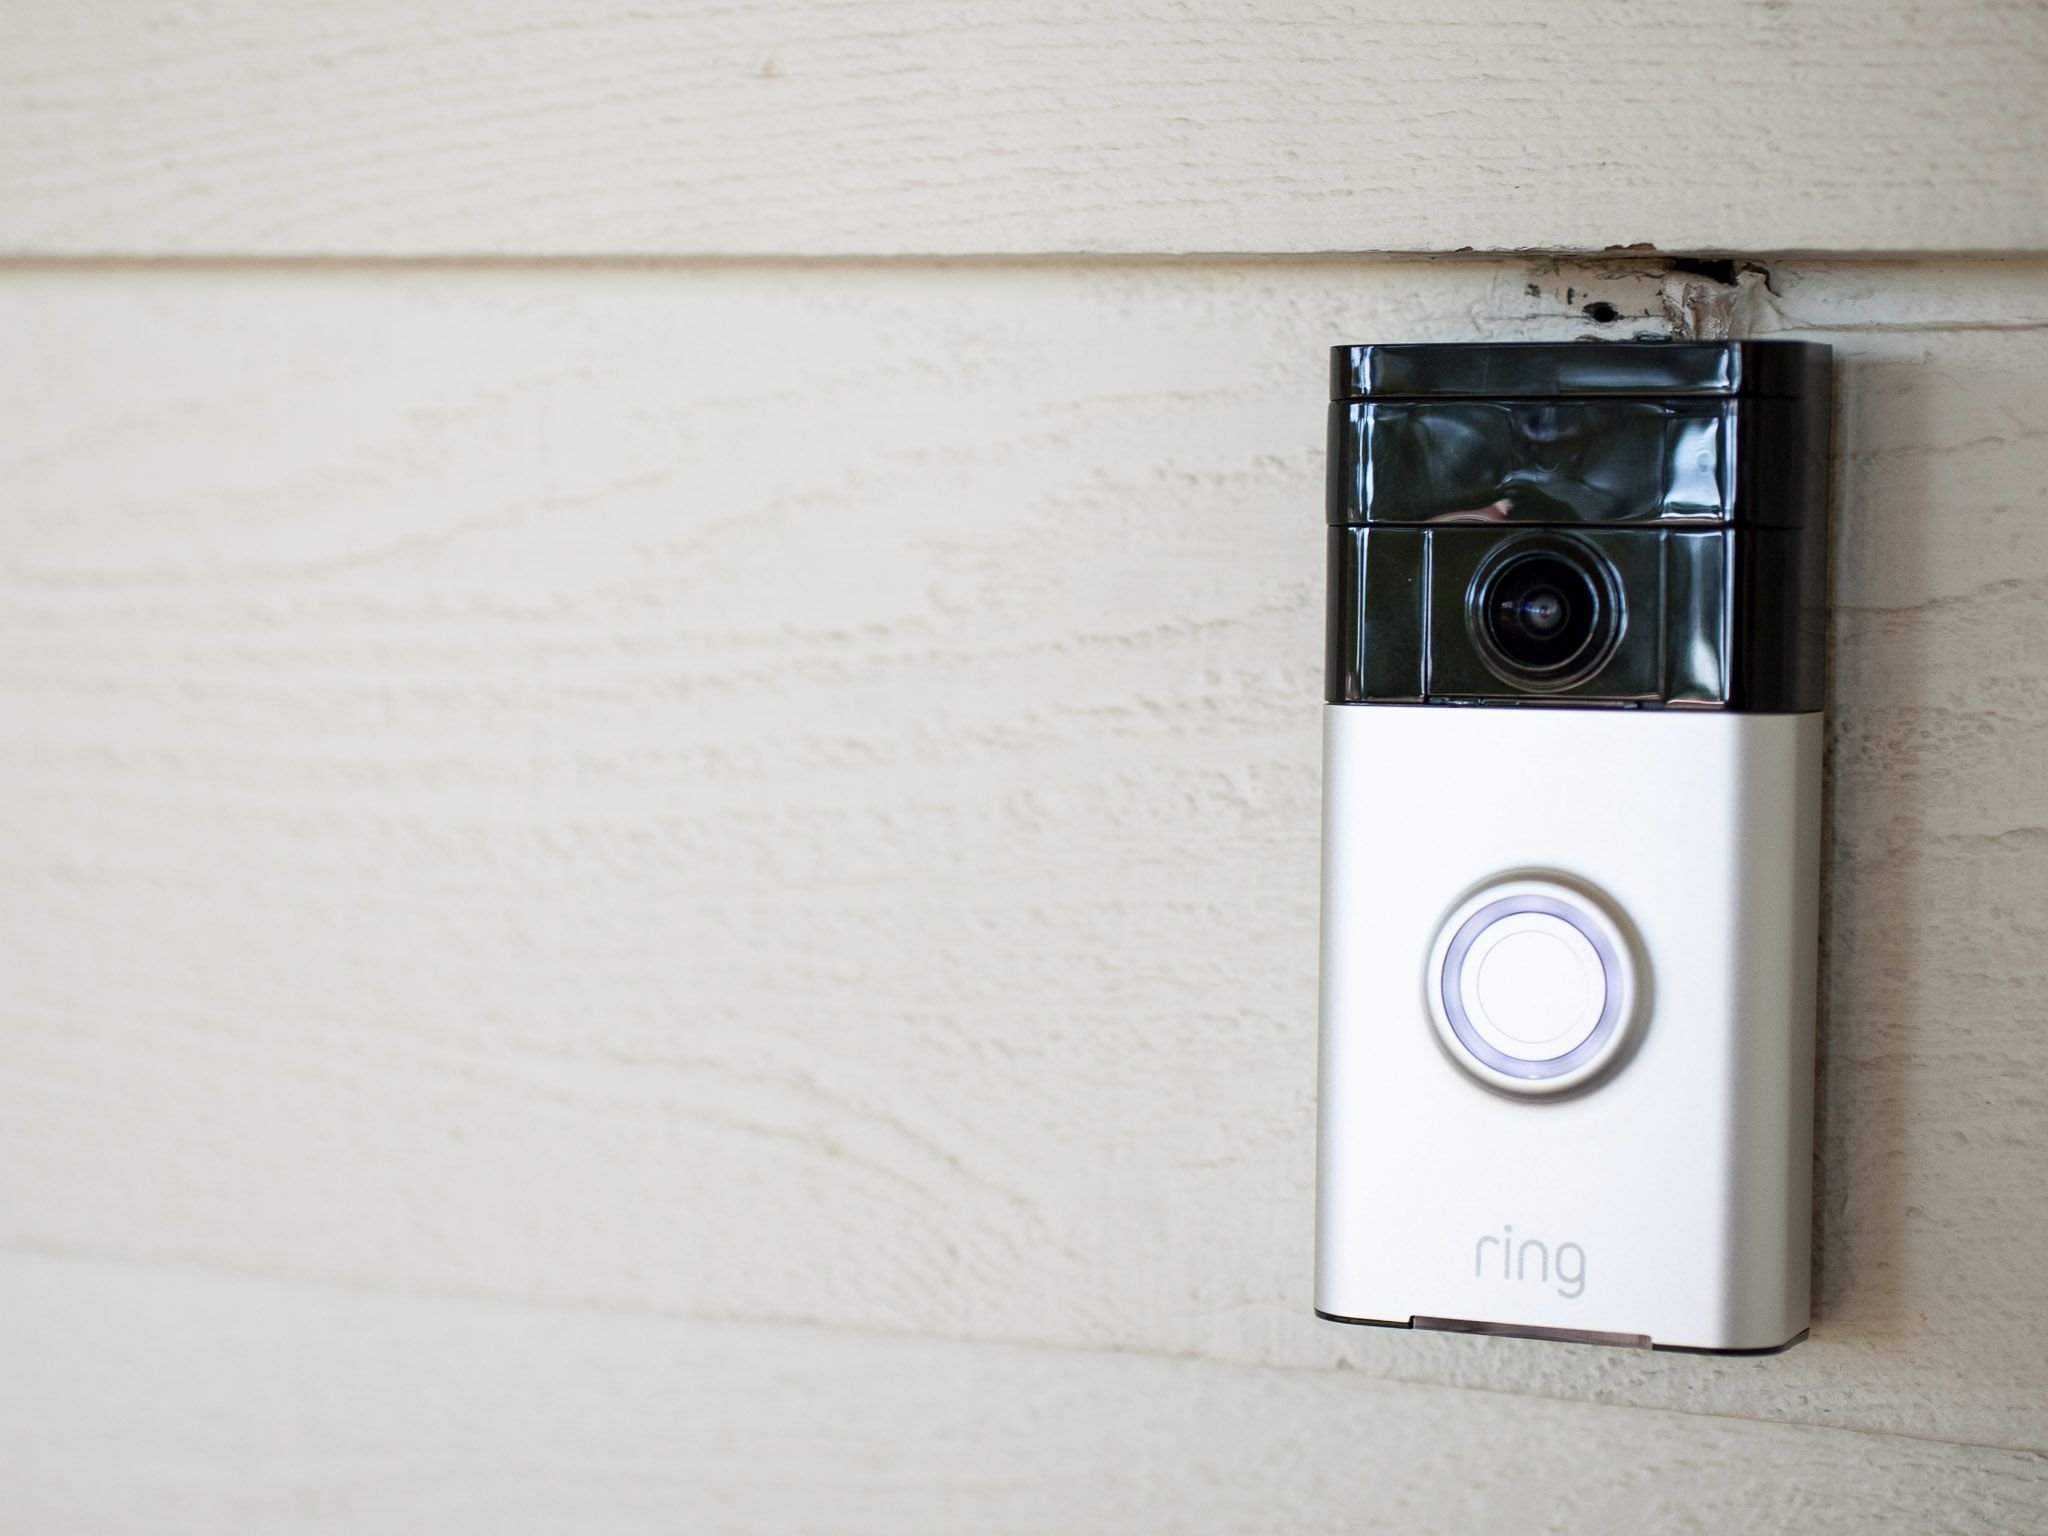
Attaching the doorbell to the bracket
With the mounting bracket securely attached to the brick surface and the necessary holes drilled, it’s time to attach the Ring Doorbell to the bracket:
1. Prepare the doorbell
If you haven’t already done so, remove the protective film from the doorbell unit to reveal the camera lens and buttons. Ensure that the doorbell is fully charged if you are using a battery-powered model.
2. Connect the wiring
If your Ring Doorbell requires wiring, carefully thread the wires through the drilled holes in the brick and into the back of the doorbell unit. Make sure to follow the manufacturer’s instructions for proper wiring connections.
3. Align the doorbell
Position the doorbell unit over the mounting bracket on the brick. Align the screw holes on the back of the doorbell with the screw holes on the bracket. Ensure that the doorbell is level and straight.
Read more: How To Install Ring Camera On Brick Wall
4. Secure the doorbell
Insert the provided screws through the screw holes on the doorbell unit and into the holes on the mounting bracket. Use a screwdriver or drill with a screwdriver attachment to tighten the screws securely. Be careful not to overtighten and damage the doorbell or bracket.
5. Test the doorbell
Once the doorbell is securely attached, give it a gentle push to ensure that it is properly seated on the bracket. Test the doorbell by pressing the doorbell button and verifying that it rings and activates the camera. This will ensure that the installation is successful and the doorbell is functioning correctly.
By following these steps, you have successfully attached the Ring Doorbell to the mounting bracket on the brick surface. In the next section, we will discuss the process of connecting the doorbell to your smartphone for remote monitoring.
Connecting the doorbell to your smartphone
After successfully attaching the Ring Doorbell to the mounting bracket on the brick surface, the next step is to connect it to your smartphone for remote monitoring and control:
1. Download the Ring app
Search for the Ring app in the App Store (for iOS devices) or Google Play Store (for Android devices) and download it to your smartphone. Create an account or log in if you already have one.
2. Set up the doorbell in the app
Open the Ring app and follow the on-screen instructions to set up your Ring Doorbell. This typically involves selecting your device model, connecting to your Wi-Fi network, and naming your doorbell. Make sure your smartphone is connected to the same Wi-Fi network as your doorbell during this process.
3. Enable notifications and customize settings
Once the initial setup is complete, you can customize various settings in the Ring app, such as motion detection sensitivity, notification preferences, and setting up a chime or alert on your smartphone when someone rings the doorbell.
4. Test the remote functionality
To ensure that the connection between your Ring Doorbell and smartphone is working properly, test the remote functionality. Use a different device or ask someone to press the doorbell button while you monitor the live video feed on your smartphone. Verify that you receive a notification and can see and hear the person at your door.
5. Explore additional features
Take some time to explore the additional features and functionalities of the Ring app. This may include options for recording and saving videos, adjusting the motion zones, and integrating the doorbell with other smart home devices or services.
By following these steps, you have successfully connected your Ring Doorbell to your smartphone, allowing you to remotely monitor and control your doorbell from anywhere. In the next section, we will discuss testing and troubleshooting to ensure everything is functioning properly.
Read more: Why Is My Ring Doorbell Not Ringing
Testing and troubleshooting
After completing the installation and connecting your Ring Doorbell to your smartphone, it’s important to test and troubleshoot to ensure everything is functioning properly:
1. Test the video and audio
Use the Ring app to initiate a live video feed from your doorbell and test the two-way audio functionality. Verify that you can see and hear the person at your door clearly. Make adjustments to the settings if necessary to optimize the video and audio quality.
2. Check the motion detection
Walk around your property and ensure that the motion detection feature of your Ring Doorbell is working correctly. You should receive notifications on your smartphone when motion is detected within the specified motion zones. Adjust the sensitivity and motion zone settings in the Ring app as needed.
3. Verify Wi-Fi signal strength
Check the Wi-Fi signal strength near your Ring Doorbell to ensure a stable connection. If the signal is weak, consider repositioning your Wi-Fi router or adding a Wi-Fi extender to improve coverage. A strong Wi-Fi signal is essential for reliable performance.
Read more: How To Program Ring Doorbell
4. Troubleshoot connectivity issues
If you encounter any connectivity issues between your Ring Doorbell and smartphone, try the following troubleshooting steps:
- Ensure your smartphone is connected to the internet and the Ring app is up to date.
- Restart your smartphone.
- Restart your Ring Doorbell by briefly removing and reinserting the battery or power supply.
- Check for any firmware updates for your Ring Doorbell and install them if available.
If the issue persists, reach out to the Ring support team for further assistance.
5. Perform regular maintenance
Periodically clean the camera lens of your Ring Doorbell to ensure clear video footage. Check the battery level if using a battery-powered model and recharge as needed. Keep an eye on the mounting bracket and screws to ensure they remain securely attached to the brick surface.
By testing and troubleshooting any potential issues, you can ensure that your Ring Doorbell is functioning properly and providing you with the desired security and convenience. In the final section, we will conclude this guide on installing the Ring Doorbell on brick.
Conclusion
Installing the Ring Doorbell on a brick surface may require some additional steps compared to other types of surfaces, but with the right tools and materials, it can be done successfully. By following the step-by-step guide outlined in this article, you can enjoy the convenience and security that the Ring Doorbell offers.
From gathering the necessary tools and materials to mounting the bracket, drilling the holes, attaching the doorbell, and connecting it to your smartphone, each step plays a crucial role in ensuring a proper installation. Taking the time to properly prepare, align, and secure the doorbell will result in a reliable and functional setup.
Once your Ring Doorbell is installed, you can take advantage of its features, such as remote video monitoring, two-way audio communication, and motion detection. The ability to monitor your front door from anywhere gives you peace of mind and enhances your home security.
Remember to regularly test the functionality of your Ring Doorbell, including video and audio, motion detection, and Wi-Fi connectivity. Perform any necessary troubleshooting steps if you encounter any issues to maintain optimal performance.
Lastly, don’t forget about regular maintenance, such as cleaning the camera lens and keeping an eye on the battery level (if applicable). This will ensure that your Ring Doorbell continues to operate effectively and provide you with the desired level of home security.
With the installation complete and the doorbell connected to your smartphone, you can now enjoy the convenience of being able to monitor and interact with your visitors from anywhere. The Ring Doorbell on your brick exterior will provide you with peace of mind and an enhanced sense of security for your home.
We hope this guide has been helpful in guiding you through the process of installing the Ring Doorbell on brick. Enjoy the benefits of your new smart doorbell!
Now that you've mastered installing your Ring Doorbell on brick, why stop there? Dive into our comprehensive guide on DIY Home Improvement for more savvy ways to upgrade your living space without breaking the bank. If your home features siding, don't miss our detailed instructions on Ring Doorbell Installation tailored specifically for that material. Security-minded homeowners should also check out our compelling reasons on Home Security to understand why a well-protected home is more than just peace of mind.
Frequently Asked Questions about How To Install Ring Doorbell On Brick
Was this page helpful?
At Storables.com, we guarantee accurate and reliable information. Our content, validated by Expert Board Contributors, is crafted following stringent Editorial Policies. We're committed to providing you with well-researched, expert-backed insights for all your informational needs.


0 thoughts on “How To Install Ring Doorbell On Brick”