Home>diy>Architecture & Design>How To Use FreeCAD To Design A House
Architecture & Design
How To Use FreeCAD To Design A House
Modified: October 20, 2024
Learn how to use FreeCAD, a powerful architecture design software, to create stunning house designs. Master the art of architecture design with FreeCAD and bring your dream house to life.
(Many of the links in this article redirect to a specific reviewed product. Your purchase of these products through affiliate links helps to generate commission for Storables.com, at no extra cost. Learn more)
Introduction
When it comes to designing a house, having a clear and comprehensive plan is essential. A well-designed house not only provides functional spaces but also reflects the aesthetic preferences of the homeowners. In today’s modern world, there are various software tools available to assist in the architectural design process, one of which is FreeCAD.
FreeCAD is a powerful and open-source 3D modeling software that allows users to create detailed designs and prototypes. With its user-friendly interface and extensive set of features, FreeCAD provides architects and designers with the tools necessary to bring their ideas to life. In this article, we will explore how to use FreeCAD to design a house.
Before we dive into the process of using FreeCAD, it is important to note that having a basic understanding of architectural design principles is beneficial. This includes knowledge of spatial planning, construction techniques, and building codes. With that said, let’s get started.
Key Takeaways:
- FreeCAD empowers architects and designers to bring their house design ideas to life with its comprehensive set of tools, allowing for accurate 3D modeling, visualization, and consideration of functional requirements and local building codes.
- By leveraging FreeCAD’s capabilities, users can create visually appealing and well-rounded house designs, incorporating interior and exterior details, and seamlessly collaborate with stakeholders through flexible export options.
Read more: How To Add A Porch To Your House
Setting Up FreeCAD
The first step in using FreeCAD to design a house is to download and install the software. FreeCAD is available for Windows, macOS, and Linux, making it accessible to a wide range of users. Simply visit the official FreeCAD website, www.freecadweb.org, and follow the instructions to download and install the software onto your computer.
Once FreeCAD is installed, open the application and familiarize yourself with the interface. FreeCAD offers a customizable workspace and a variety of tools and menus to assist in the design process. Spend some time exploring the interface and getting comfortable with the different features available.
It is also recommended to go through the documentation and tutorials provided by FreeCAD. These resources will help you understand the software’s capabilities and provide guidance on using specific tools and functions. Additionally, there are numerous online communities and forums where you can seek support or ask questions if you encounter any issues during the design process.
Before we begin designing our house, it is important to set up the units and measurements in FreeCAD according to your preference. To do this, navigate to the “Edit” menu and select “Preferences.” Under the “General” tab, you can adjust the units to match your desired system, such as metric or imperial.
Lastly, ensure that you have a reliable computer system with sufficient memory and processing power to handle the demands of 3D modeling. FreeCAD can be resource-intensive, especially when working with complex designs, so it is important to have a capable computer to ensure smooth and efficient workflow.
With FreeCAD set up and your computer ready, you are now ready to embark on the exciting journey of designing a house. In the next section, we will learn how to import reference images to use as a guide for our design.
Importing Reference Images
Importing reference images into FreeCAD is a crucial step in designing a house. Reference images serve as a visual guide to help you create accurate and proportionate designs. These images can include floor plans, elevations, and any other architectural drawings that you may have.
To import reference images in FreeCAD, follow these steps:
- Locate the reference images that you want to use. These images should be in a digital format, such as JPEG or PNG.
- In FreeCAD, go to the “Insert” menu and select the “Image” option.
- A dialog box will appear, allowing you to browse and select the reference image file.
- Choose the appropriate image file and click “Open” to import it into FreeCAD.
- The image will appear as a new object in the 3D view of FreeCAD. You can then position and scale the image as needed.
It is important to properly scale the reference image to match the desired dimensions of your house design. To do this, you can use the “Scale” tool in FreeCAD to adjust the size of the imported image. Pay attention to any known measurements or dimensions in the reference image and use them as a guide.
Another helpful tip is to create separate objects for different reference images. For example, you can import the floor plan as one object and the elevation drawings as another. This will allow you to easily toggle between different views and reference images as you work on different aspects of the design.
Remember that reference images are meant to guide your design process and provide a visual reference. They should not be considered as exact blueprints or templates. As you progress with the design, you may need to make adjustments or modifications based on other factors such as building codes or structural considerations.
Now that we have our reference images in place, we can move on to creating a rough sketch of the house design. This will serve as the foundation for the detailed design process. Let’s explore this in the next section.
Creating a Rough Sketch
Once you have imported your reference images, it’s time to create a rough sketch of your house design in FreeCAD. This step will help you establish the basic layout and spatial arrangement of the different rooms and areas.
To create a rough sketch in FreeCAD, follow these steps:
- Select the appropriate drawing tools from the toolbar, such as lines, rectangles, and circles.
- Using the reference images as a guide, manually draw the walls, rooms, and other structural elements of the house. You can use the snap and grid options in FreeCAD to ensure accurate alignment and dimensions.
- Pay attention to the proportions and scale of the design. Refer back to the reference images to make sure the overall layout matches the intended floor plan.
- As you sketch, consider factors such as room sizes, traffic flow, and natural light. These elements will influence the functionality and livability of the house.
- Once the rough sketch is complete, you can add labels or annotations to indicate the purpose of each room or area.
It’s important to note that the rough sketch is a starting point and can be modified and refined as you progress with the design. It serves as a visual representation of your initial vision and helps you make informed decisions about the layout and flow of the house.
After creating the rough sketch, it’s time to move on to designing the foundation of the house. The foundation provides the stability and support for the entire structure. We will explore this in the next section.
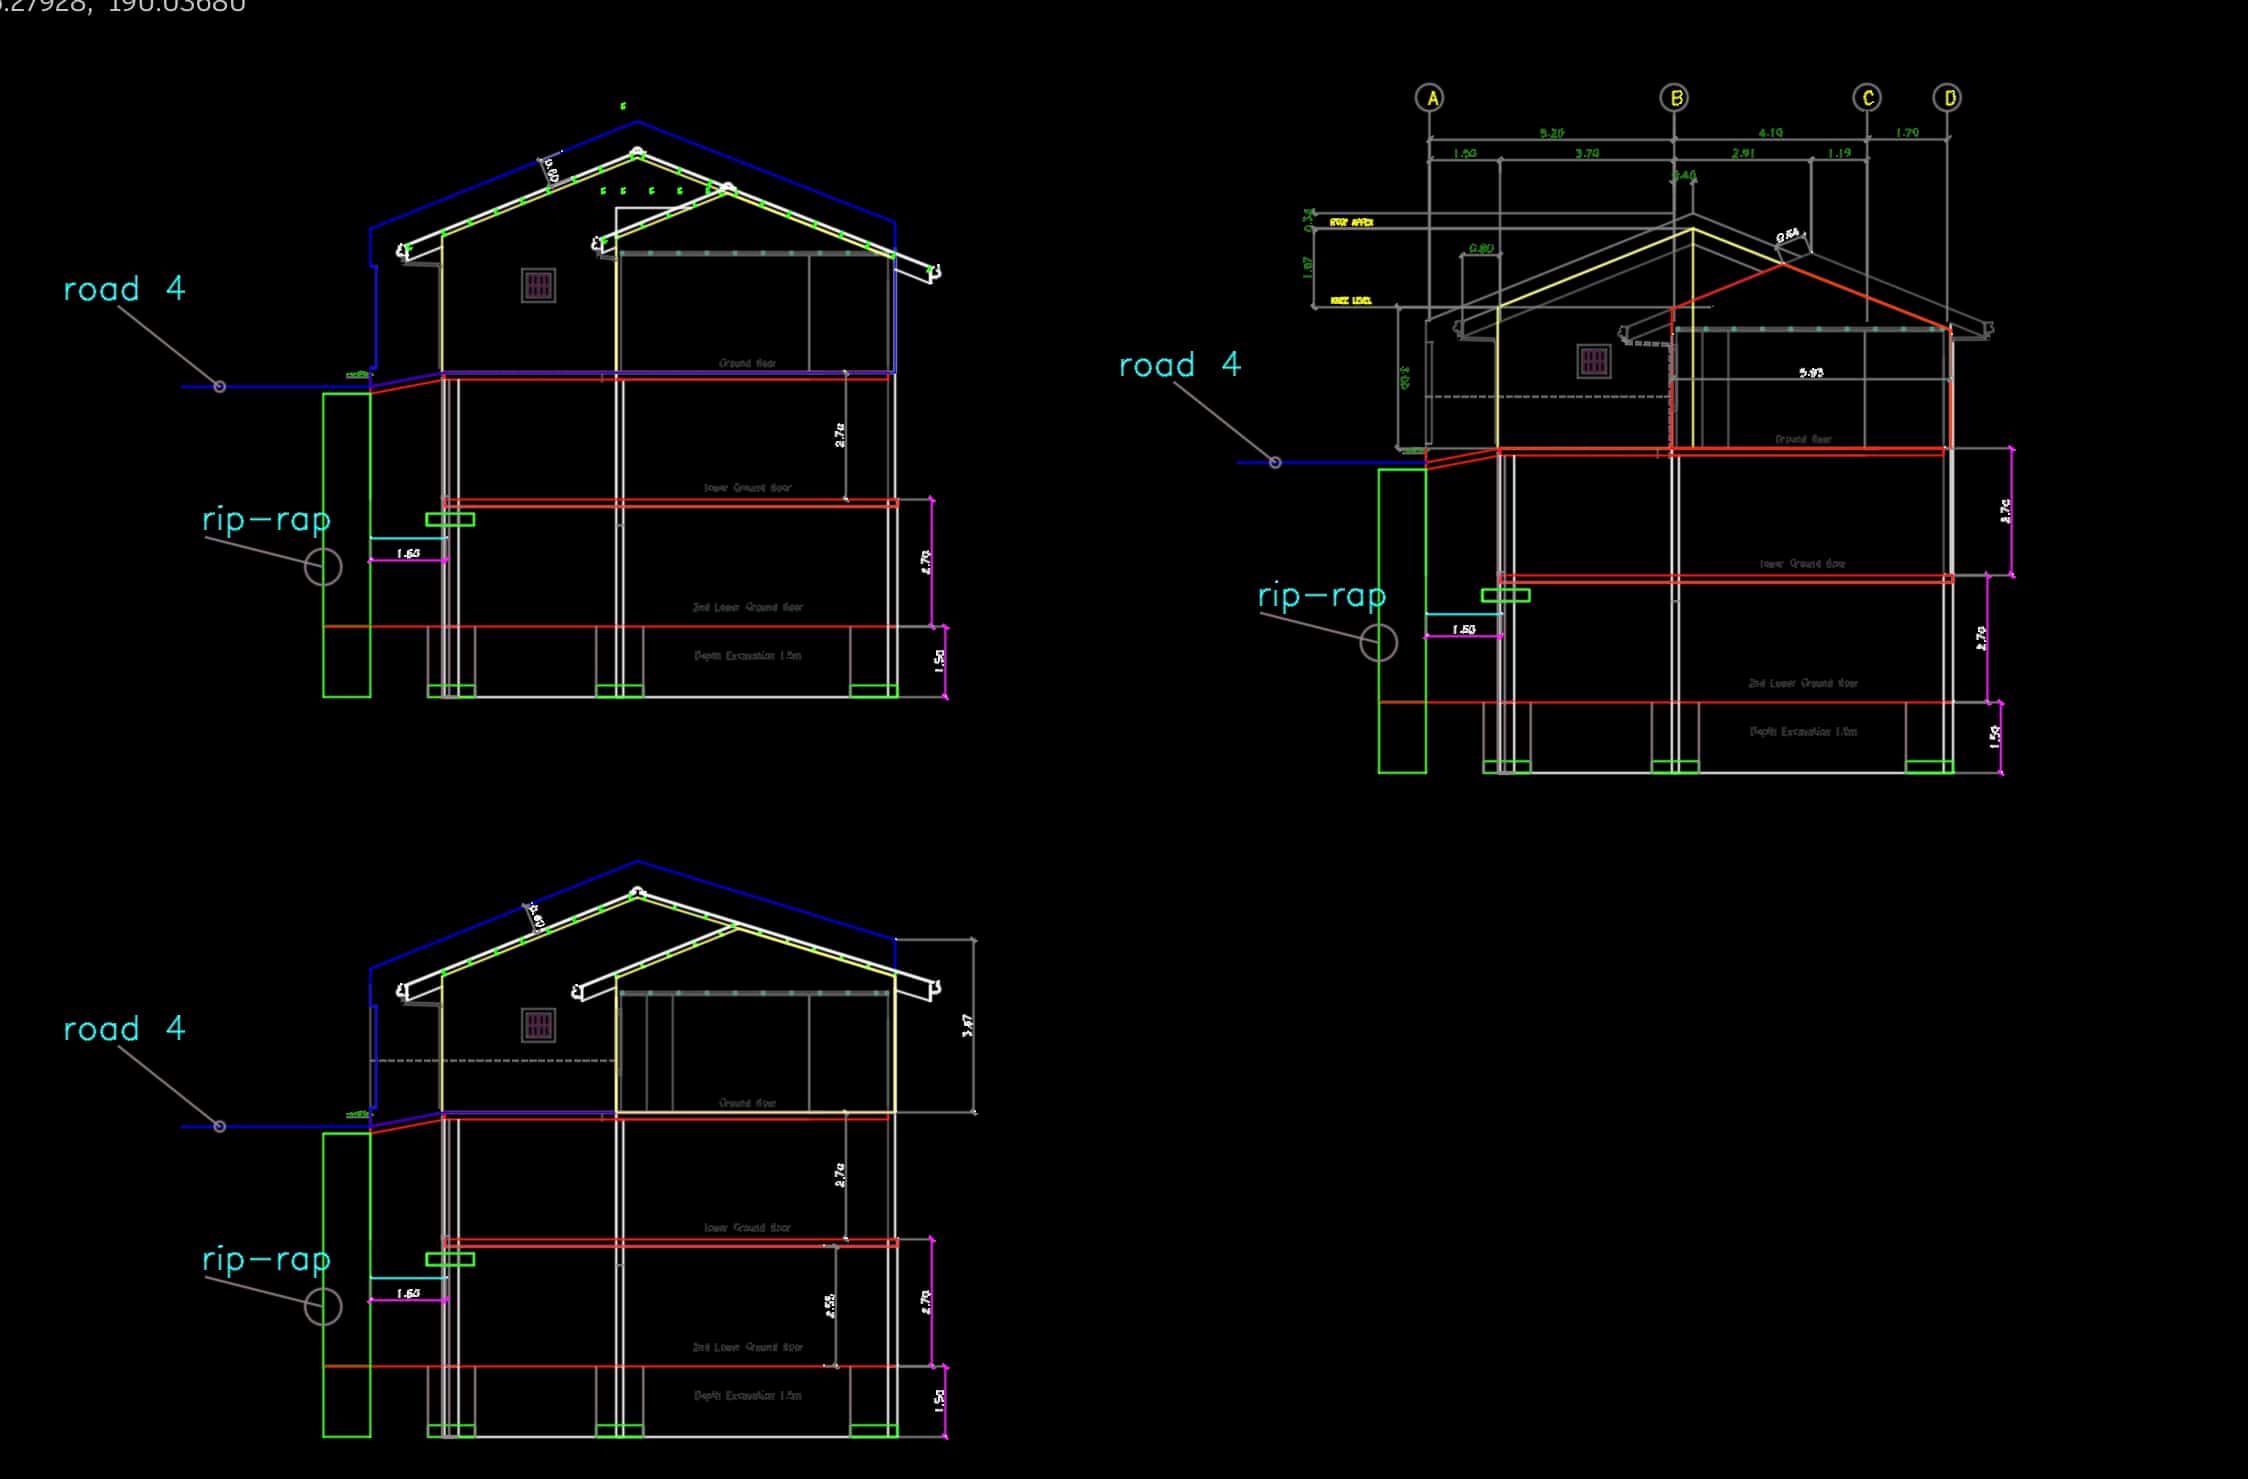
Designing the Foundation
Designing the foundation of a house is a critical step in the architectural design process. The foundation provides stability to the structure and ensures it is supported properly. In FreeCAD, you can create a detailed foundation design using various tools and techniques.
To design the foundation in FreeCAD, follow these steps:
- Select the appropriate tools from the toolbar, such as rectangles or polygons, to create the outline of the foundation.
- Use the reference images and your rough sketch as a guide to accurately position and align the foundation.
- Consider the type of foundation suitable for the specific design and location, such as a slab foundation, crawl space, or full basement.
- Add details to the foundation, such as footing dimensions and reinforcement. This can be done using the drawing tools in FreeCAD or by importing standard building components from external sources.
- Review the design to ensure it meets local building codes and regulations. Pay attention to factors such as soil conditions, weight distribution, and structural integrity.
- Once the foundation design is complete, you can add labels or annotations to indicate the types of materials or any specific construction details.
During the design process, it’s important to continuously check and validate the foundation design for accuracy and stability. FreeCAD provides tools for measuring distances, angles, and areas, which can be used to ensure the dimensions and proportions of the foundation are correct.
Remember that the foundation design is an essential component of the overall house design. It provides the base upon which the rest of the structure is built. A well-designed foundation will lay the groundwork for a sturdy and durable house.
Now that we have designed the foundation, we can move on to the next step, which is designing the walls of the house. This will define the overall shape and structure of the house. We’ll explore this in the following section.
Read more: How To Design Stairs In A House
Designing the Walls
The walls of a house not only provide the enclosure for the internal spaces but also contribute to the overall aesthetics and structural integrity. In FreeCAD, designing the walls involves creating accurate 3D models of the wall components and assembling them to form the complete structure.
To design the walls in FreeCAD, follow these steps:
- Select the appropriate drawing tools from the toolbar, such as rectangles or polygons, to create the outlines of the walls.
- Use the reference images and your rough sketch as a guide to accurately position and align the walls.
- Take into consideration the thickness of the walls and adjust the dimensions accordingly. This will ensure accurate representation and facilitate proper construction.
- Add height to the walls to indicate the number of stories or levels in the house. This can be done by extruding the 2D wall outlines to create 3D representations.
- Consider wall components such as windows, doors, and openings. Use the appropriate tools in FreeCAD to create these elements and position them within the walls.
- Pay attention to wall intersections, corners, and connections with other structural elements. Ensure that these areas are properly joined to maintain structural integrity.
- Review the wall design for any inconsistencies or errors. Modify and adjust as necessary to align with the intended house design.
- Once the wall design is complete, you can assign materials and textures to give the walls a realistic appearance. FreeCAD provides various rendering options to enhance the visual representation of your design.
Throughout the wall design process, it is essential to refer back to your reference images and maintain accurate dimensions. This will help create a faithful representation of the house design and enable efficient communication with contractors or builders.
With the walls designed, we can now move on to the next step of our house design process, which is adding doors and windows. These elements not only provide access and natural light but also contribute to the overall architectural style of the house.
When designing a house in FreeCAD, start by creating a rough floor plan using the Sketcher workbench. Then, use the Part Design workbench to create 3D models of walls, windows, and doors. Finally, use the Arch workbench to add architectural elements like roofs and stairs.
Adding Doors and Windows
Doors and windows play a crucial role in any house design. They provide access, ventilation, and natural light, while also adding aesthetic appeal to the overall architecture. In FreeCAD, you can easily add and customize doors and windows to enhance your house design.
To add doors and windows in FreeCAD, follow these steps:
- Select the appropriate tools from the toolbar, such as rectangles or polygons, to create the outlines of the doors and windows.
- Use the reference images and your wall design as a guide to accurately position and align the doors and windows within the walls.
- Consider the standard sizes and types of doors and windows available, and choose the ones that best suit your design.
- Create accurate 3D models for the doors and windows. Customize the dimensions, materials, and appearance using FreeCAD’s editing tools.
- Ensure that the doors and windows are properly aligned with the walls, with correct openings and clearances.
- Pay attention to details such as handles, hinges, and glass panes. These small elements can greatly enhance the realism and functionality of your design.
- Review the door and window design for any inconsistencies or errors. Make adjustments as necessary to align with the overall house design.
Adding doors and windows can be an iterative process, as you may need to make adjustments based on the spatial requirements and design preferences. It is important to consider factors such as natural light, privacy, and energy efficiency when placing doors and windows.
Additionally, FreeCAD provides options to simulate the opening and closing of doors, as well as the ability to adjust the transparency or visibility of windows. These features enable a more realistic representation of how the doors and windows function in real life.
Now that we have added doors and windows, we can move on to designing the roof. The roof design not only protects the house from the elements but also adds character and architectural style. Let’s explore this in the following section.
Designing the Roof
The roof of a house serves as a protective covering and is a vital component of the overall architectural design. In FreeCAD, designing the roof involves creating a 3D model that accurately represents the shape, pitch, and materials of the roof.
To design the roof in FreeCAD, follow these steps:
- Examine your wall design and determine the shape and slope of the roof based on your desired architectural style.
- Select the appropriate tools from the toolbar, such as lines or polygons, to create the outline of the roof.
- Use the reference images and your wall design as a guide to accurately position and align the roof.
- Consider the materials and textures of the roof, such as shingles, tiles, or metal. Assign the appropriate materials using FreeCAD’s editing tools.
- Create accurate 3D models for the roof components, such as dormers or skylights, and integrate them into the roof design.
- Review the roof design for any inconsistencies or errors. Adjust the shape, pitch, or materials as necessary to align with the overall house design.
Throughout the roof design process, it is important to consider factors such as drainage, insulation, and structural stability. The roof should be designed to withstand weather conditions and support the weight of the materials used.
In addition to the overall shape and materials, FreeCAD allows you to add details such as gutters, eaves, and fascia to enhance the realism and functionality of your roof design.
Once the roof is designed and integrated with the walls, you can utilize FreeCAD’s rendering options to visualize how the roof contributes to the overall appearance of the house. This will help you evaluate the aesthetics and make any necessary adjustments to achieve the desired architectural style.
With the roof design complete, we can now move on to adding interior elements to our house design. These elements include walls, floors, ceilings, and other features that define the internal spaces of the house. Let’s delve into this in the next section.
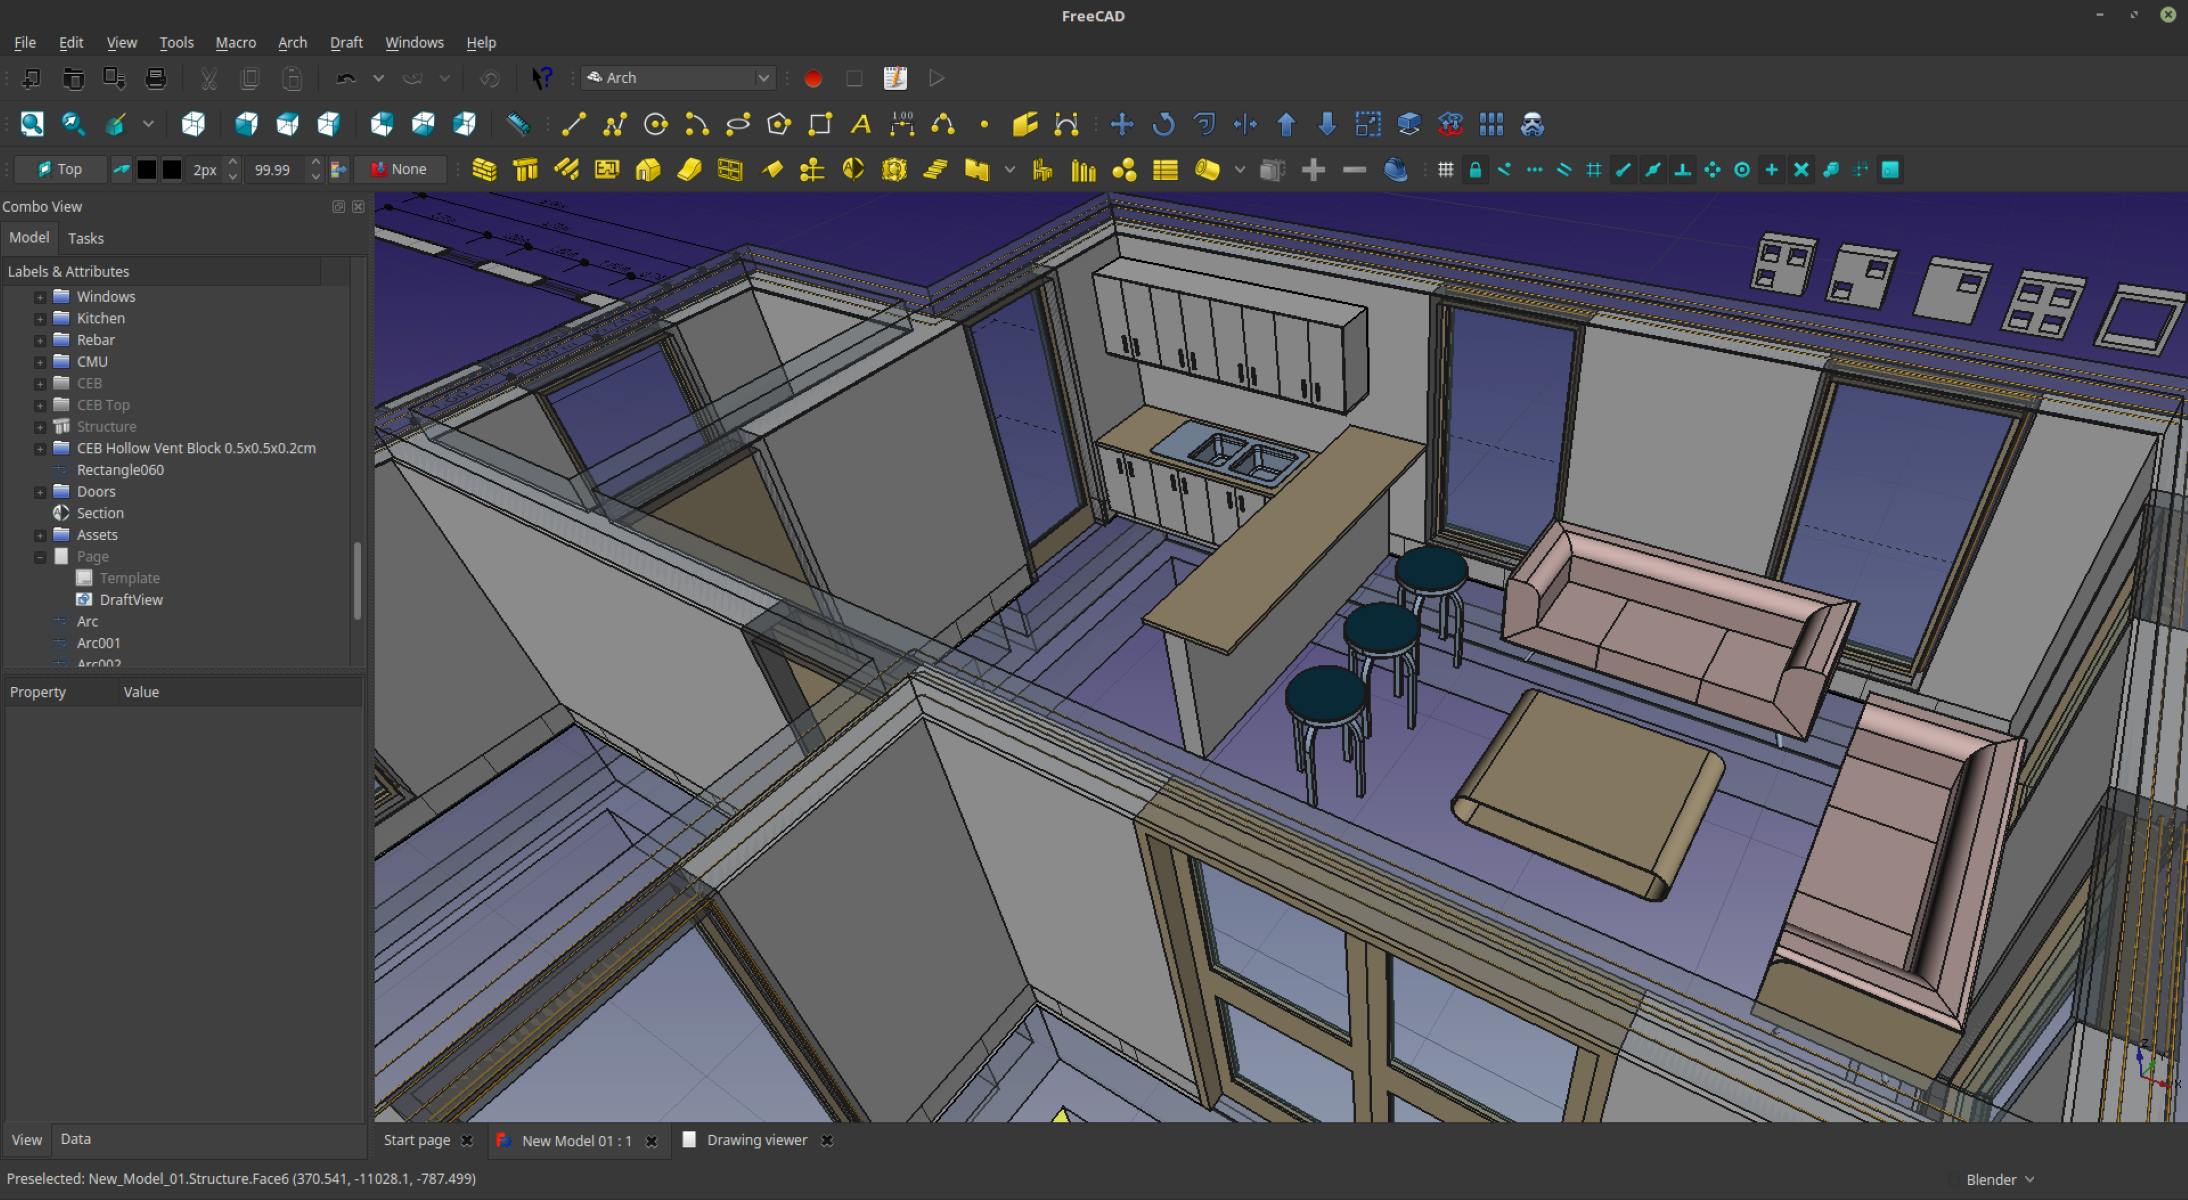
Adding Interior Elements
Designing the interior elements of a house is an important aspect of the overall architectural design. FreeCAD offers tools and features that allow you to create 3D models of walls, floors, ceilings, and other interior features to bring your house design to life.
To add interior elements in FreeCAD, follow these steps:
- Select the appropriate tools from the toolbar, such as rectangles, polygons, or splines, to create the outlines of walls and partitions.
- Use the reference images, your wall design, and any other specifications or floor plans to accurately position and align the interior elements.
- Create 3D models of the walls, considering the appropriate thickness and construction materials.
- Add floors and ceilings to define the different levels or stories of the house. You can use the Extrude tool to convert a 2D floor plan into a 3D model.
- Pay attention to details such as openings for doors, windows, and stairs, as well as any architectural features or decorative elements.
- Consider the placement and layout of rooms and functional areas within the house, ensuring proper circulation and functionality.
- Utilize FreeCAD’s editing tools to adjust and refine the interior elements, making sure they align with the overall house design.
Adding interior elements allows you to visualize the internal spaces of the house and create a realistic representation. It also helps in evaluating the flow and functionality of the different rooms and areas.
During the design process, consider factors such as room sizes, ceiling heights, natural light, and ventilation. These elements contribute to the overall comfort and livability of the house.
Make use of FreeCAD’s rendering options to apply appropriate materials, colors, and textures to the interior elements. This will enhance the visualization of the design and give a better understanding of how the finished spaces will look and feel.
With the interior elements in place, we can now move on to adding exterior details to our house design. These details include landscaping, outdoor areas, and architectural features that enhance the curb appeal. Let’s explore this in the next section.
Read more: How To Attach Gable Porch Roof To House
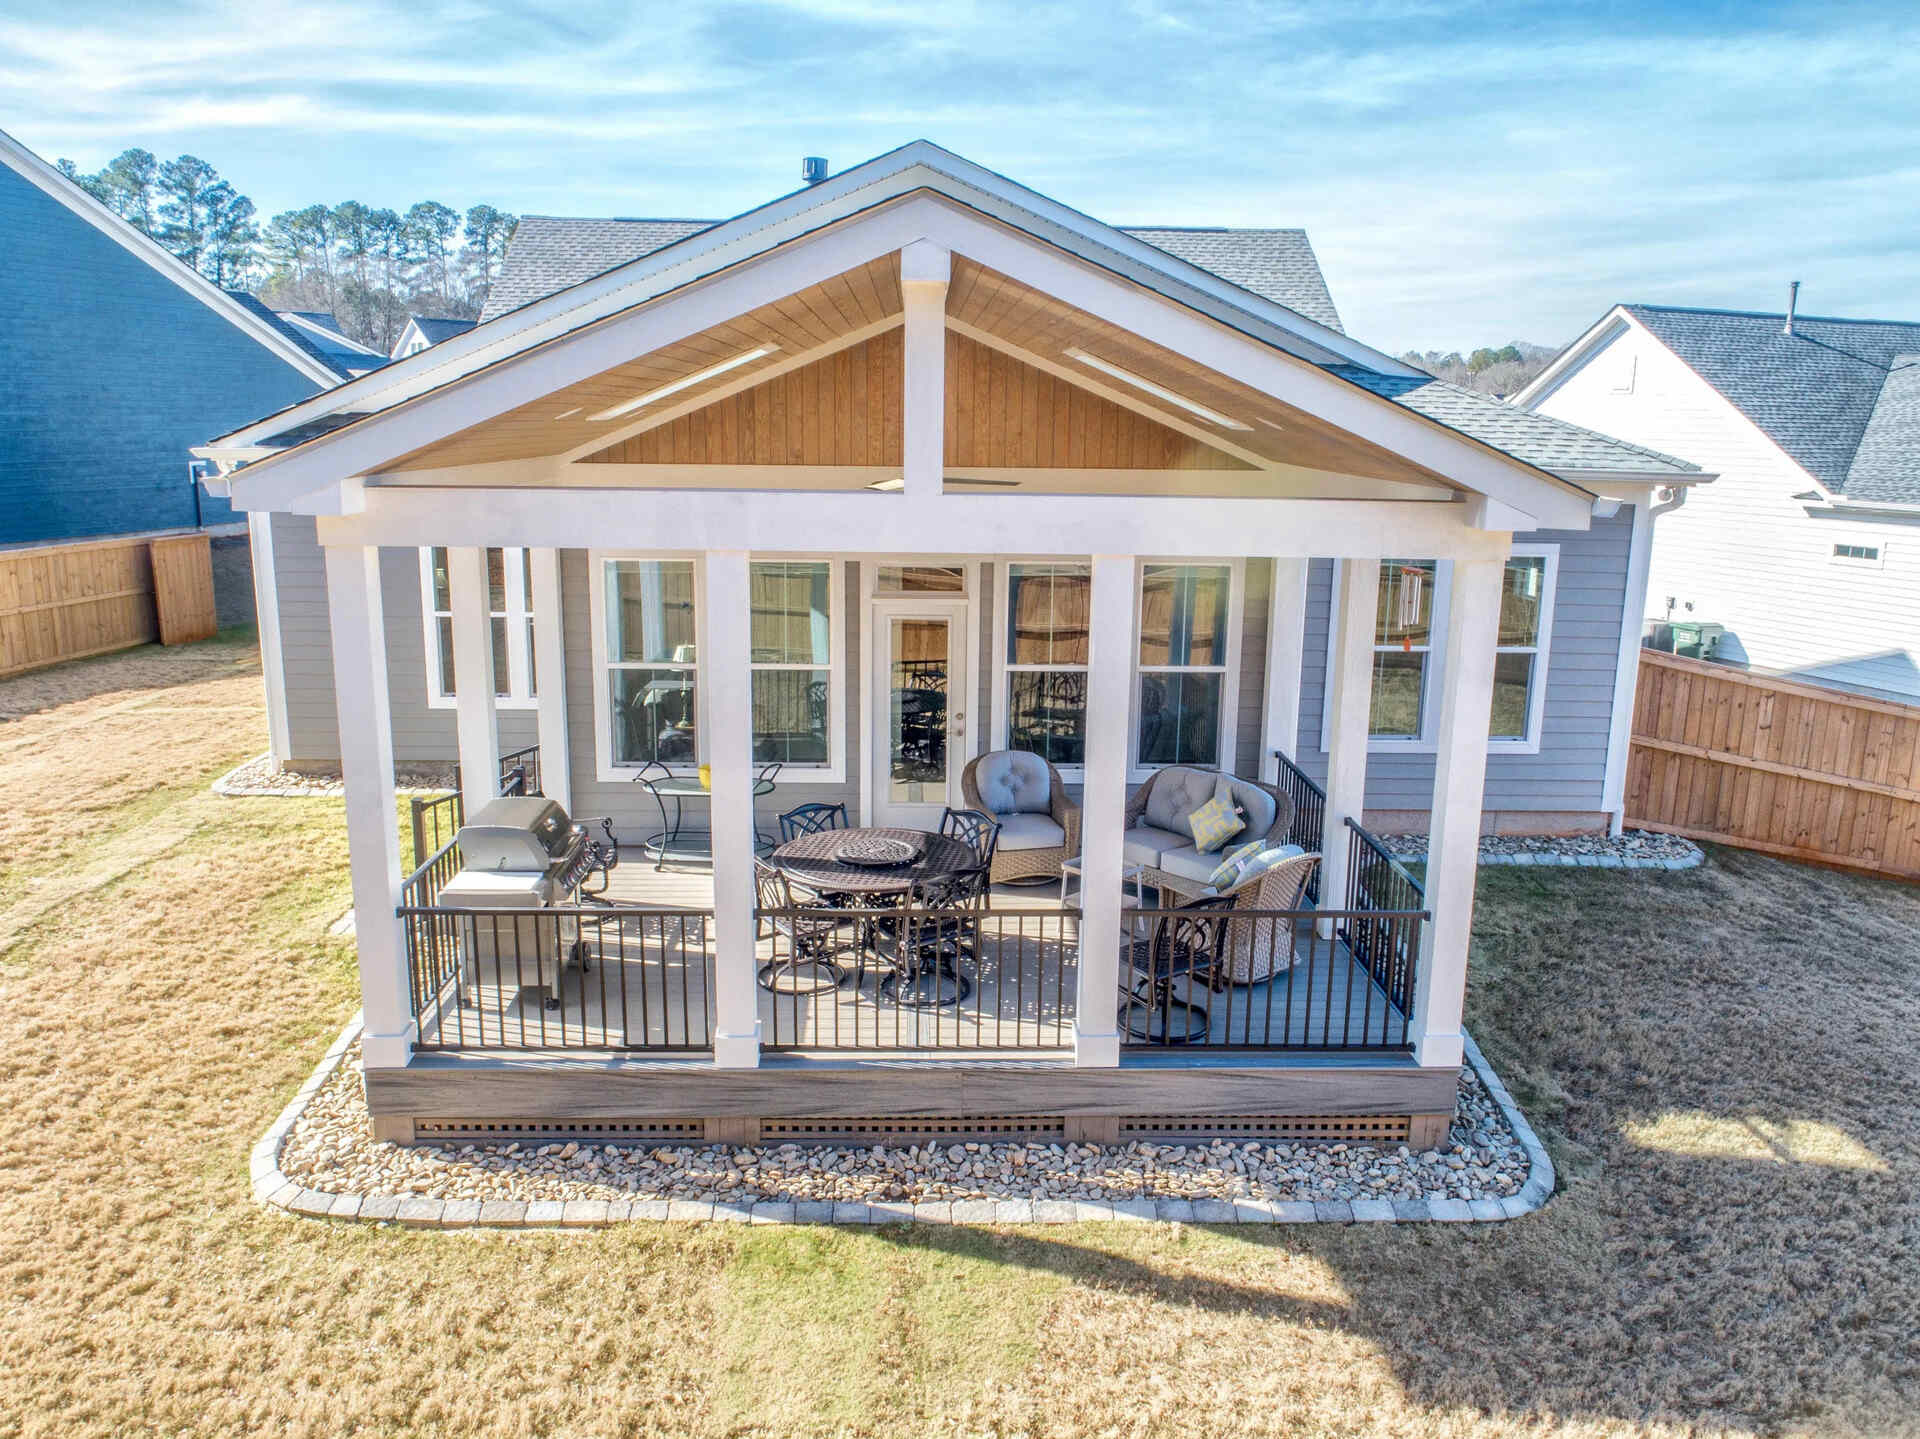
Adding Exterior Details
Adding exterior details to your house design is a crucial step in creating a visually appealing and well-rounded architectural composition. These details include landscaping elements, outdoor areas, and architectural features that enhance the curb appeal and overall aesthetics of the house. In FreeCAD, you can incorporate these exterior details to create a comprehensive design.
To add exterior details in FreeCAD, follow these steps:
- Consider the overall style and theme of your house design. This will guide you in selecting appropriate exterior details that align with the architectural concept.
- Add landscaping elements such as trees, shrubs, and plants around the house using FreeCAD’s 3D modeling tools.
- Create outdoor areas such as patios, decks, or porches, and position them in relation to the layout of the house.
- Incorporate architectural features such as columns, trims, or decorative elements to enhance the facade and overall design.
- Pay attention to materials and textures for exterior finishes. Use FreeCAD’s rendering options to apply appropriate materials and colors to visualize the finished look of the house.
- Consider factors such as functionality, sustainability, and maintenance when adding exterior details. Ensure that they align with the overall design and serve a practical purpose.
- Review the exterior details in relation to the entire house design. Make adjustments as necessary to achieve a harmonious and visually appealing composition.
Adding exterior details in FreeCAD allows you to create a holistic representation of your house design. It helps in visualizing the finished look and assessing the overall impact on the surrounding environment.
Additionally, FreeCAD provides options for creating realistic lighting and shadows to further enhance the visualization of the exterior details. This can help you evaluate the design in different lighting conditions and analyze the play of light and shadow on the structure.
With the exterior details added, it’s time to prepare the final design for presentation or further development. Let’s explore how to export the design in the next section.
Exporting the Design
Once your house design is complete in FreeCAD, it’s time to export and share your work with others. FreeCAD offers several options for exporting your design in different formats, allowing you to collaborate with stakeholders, present your design professionally, or continue working on it in other software.
To export your design in FreeCAD, follow these steps:
- Ensure that your design is saved and all components are properly organized and named for clarity.
- Go to the “File” menu and select the “Export” or “Save As” option.
- Choose the desired file format for export, such as DWG, DXF, STL, or OBJ. The choice of format depends on the intended use of the exported design.
- Select the appropriate export options, such as units, scale, or level of detail, depending on the requirements of the recipient or further workflow.
- Specify the desired file name and destination folder for the exported design.
- Click “Save” to initiate the export process.
Exporting your design allows you to share it with other professionals, such as contractors, engineers, or clients, who may require it for further analysis or implementation. It also enables you to collaborate with others who may be using different software for their respective tasks.
When exporting, it is important to consider compatibility between different software and ensure that the exported file maintains all the necessary information and accuracy of the design. It may be helpful to communicate with the recipient or consult the documentation of the target software for any specific requirements or considerations.
With the design exported, you can share the file digitally or in print, depending on the needs and preferences of the stakeholders. This will enable effective communication and collaboration throughout the construction or development process.
FreeCAD’s export options provide flexibility and versatility in sharing and utilizing your house design, making it a valuable tool in the architectural workflow.
Now that we have successfully exported the design, let’s conclude our journey of using FreeCAD for house design.
Conclusion
Designing a house is an exciting and intricate process that requires careful planning and attention to detail. With the help of FreeCAD, an open-source 3D modeling software, you can bring your house design ideas to life with accuracy and creativity.
Throughout this article, we have explored the various steps involved in using FreeCAD to design a house. From setting up the software and importing reference images to creating a rough sketch, designing the foundation, walls, doors, windows, roof, and adding interior and exterior details, FreeCAD offers a comprehensive set of tools to assist in the architectural design process.
We learned how to leverage the capabilities of FreeCAD to create accurate 3D models, apply materials and textures, and visualize the design in a realistic way. Additionally, we discussed the importance of considering functional requirements, local building codes, and aesthetic preferences when designing a house.
Furthermore, we discussed the process of exporting the design in various file formats to share with stakeholders or continue working on it in other software. This allows for collaboration, presentation, and implementation of the design within the construction or development process.
It is important to remember that FreeCAD is a powerful tool that requires some prior knowledge of architectural design principles and practices. Familiarizing yourself with the software, its interface, and available documentation and tutorials will greatly enhance your experience and proficiency in using FreeCAD for house design.
In conclusion, FreeCAD offers architects, designers, and homeowners a valuable platform to create and visualize their house designs. By diligently following the steps outlined in this article and exercising creativity, accuracy, and attention to detail, you can harness the power of FreeCAD to transform your ideas into a stunning and functional house design that meets your vision and needs.
Frequently Asked Questions about How To Use FreeCAD To Design A House
Was this page helpful?
At Storables.com, we guarantee accurate and reliable information. Our content, validated by Expert Board Contributors, is crafted following stringent Editorial Policies. We're committed to providing you with well-researched, expert-backed insights for all your informational needs.


0 thoughts on “How To Use FreeCAD To Design A House”