
Articles
How To Add A Porch To Your House
Modified: October 21, 2024
Learn how to add a beautiful porch to your house with our informative articles. Enhance your outdoor space and create a welcoming entrance.
(Many of the links in this article redirect to a specific reviewed product. Your purchase of these products through affiliate links helps to generate commission for Storables.com, at no extra cost. Learn more)
Introduction
Welcome to the ultimate guide on how to add a porch to your house! A porch is a wonderful addition that can enhance the aesthetics, functionality, and value of your home. Whether you want a cozy spot to enjoy your morning coffee, a space to entertain guests, or simply a charming entryway, a porch can provide all that and more.
Adding a porch to your house may seem like a daunting task, but with proper planning, the right tools, and a little bit of know-how, it can be a rewarding DIY project. In this comprehensive guide, we will walk you through each step of the process, from assessing your space and obtaining permits to designing your porch and completing the final touches.
Before we dive into the nitty-gritty details, let’s take a moment to appreciate the benefits of adding a porch to your house. Firstly, a porch creates an inviting and welcoming entrance, giving your home a boost in curb appeal. It provides a transitional space between the indoors and outdoors, allowing you to enjoy the beauty of nature while still being protected from the elements.
Moreover, a porch serves as a versatile outdoor living area. You can furnish it with comfortable seating, planters, and outdoor lighting to create a cozy and relaxing environment. It’s the perfect spot to curl up with a book, enjoy a summer barbecue, or watch the sunset with loved ones.
Not only does a porch enhance your lifestyle, but it can also increase the value of your home. Potential buyers often look for homes with appealing outdoor spaces, and a well-designed porch can be a major selling point. So, if you’re considering adding a porch, you’re not only investing in your own enjoyment but also in the long-term value of your property.
Now that we’ve highlighted the many advantages of having a porch, let’s move on to the first step in our journey: assessing your space. By understanding the layout and limitations of your property, you can make informed decisions and create a porch that perfectly complements your house.
Key Takeaways:
- Building a porch involves careful planning, obtaining permits, and executing each step with attention to detail. From assessing space to adding finishing touches, creating a beautiful and functional outdoor space is a rewarding DIY project.
- The process of adding a porch to your house encompasses structural considerations, design choices, and personalization. By following the comprehensive guide, you can create a welcoming and inviting outdoor sanctuary for relaxation and enjoyment.
Read more: How To Add A Front Porch
Step 1: Assessing Your Space
Before you start the process of adding a porch to your house, it’s important to assess your space to determine the feasibility and scope of your project.
1. Evaluate the available area: Begin by measuring the available space where you plan to build your porch. Consider the dimensions of your house and the surrounding landscape. Take note of any obstructions such as trees, utility lines, or uneven terrain that may affect the design and construction of your porch.
2. Consider your needs and preferences: Determine how you envision using your porch. Will it primarily serve as an entryway, a sitting area, or a space for outdoor dining and entertaining? Think about the size, layout, and features you desire. This will help you determine the ideal dimensions and design elements for your porch.
3. Check local building codes and regulations: Research the building codes and regulations in your area to ensure that you comply with all necessary permits and requirements. Some areas may have restrictions on the size, height, or placement of porches.
4. Assess the structural integrity of your house: Examine the structural integrity of your house to ensure that it can support the additional weight of a porch. Consult a professional if needed to assess the load-bearing capacity and make any necessary modifications to ensure the stability of your home.
5. Consider the architectural style: Take into account the architectural style of your house when designing your porch. You want the porch to blend seamlessly with the existing structure and enhance its overall aesthetics. Consider elements such as roofline, materials, and decorative details that align with the style of your home.
6. Set a budget: Determine your budget for the porch project. This will help you make decisions regarding materials, labor, and additional features. Consider the cost of permits, construction materials, and any professional assistance you may require.
By thoroughly assessing your space and considering these factors, you will have a solid foundation for the rest of your porch-building journey. In the next step, we will discuss the permits and approvals necessary to proceed with the construction of your porch. Stay tuned!
Step 2: Obtaining Permits and Approvals
Before you can begin building your porch, it’s essential to obtain the necessary permits and approvals from your local authorities. This ensures that your project complies with building codes and regulations, ensuring safety and adherence to standards.
1. Research local regulations: Start by familiarizing yourself with the building codes and regulations specific to your area. Contact your local building department or visit their website to gather information about the permits required for porch construction. Regulations can vary, so it’s crucial to understand the specific requirements for your location.
2. Determine the permit types: Depending on the scope of your porch construction, you may need different types of permits. Common permits include construction permits, electrical permits (if you plan on adding lighting or outlets), and plumbing permits (if you intend to incorporate water features). Consult with your local building department to determine which permits are necessary for your project.
3. Prepare the necessary documentation: To apply for permits, you typically need to provide specific documentation, such as architectural drawings, site plans, and detailed construction plans. These documents should illustrate the dimensions, materials, and other relevant details of your proposed porch. You may also need to include engineering calculations or soil reports if required by your local building department.
4. Submit your permit application: Once you have gathered the required documentation, submit your permit application to the appropriate local authority. This may involve filling out application forms, paying fees, and providing the necessary supporting documents. It’s important to review your application thoroughly to ensure all required information is included.
5. Wait for approval: Once your permit application is submitted, it will undergo a review process by the building department. This process verifies that your proposed porch construction complies with all applicable regulations. The length of the review period can vary, so it’s important to be patient during this time.
6. Schedule inspections: After obtaining the necessary permits, you will need to schedule inspections at various stages of the construction process. Inspections typically occur after the foundation is poured, framing is complete, electrical and plumbing work is done, and before the final completion. These inspections ensure that your construction meets safety and quality standards.
It’s important to note that working without the required permits and approvals can result in costly fines, legal issues, and potential problems with homeowners’ insurance. It’s always best to follow the proper procedures and obtain the necessary permits to protect yourself and ensure the safety and integrity of your porch construction.
Once you have successfully obtained the permits and approvals, you can proceed with the exciting part: designing your porch! In the next step, we will delve into the creative process of designing a porch that meets your needs and personal style. Stay tuned!
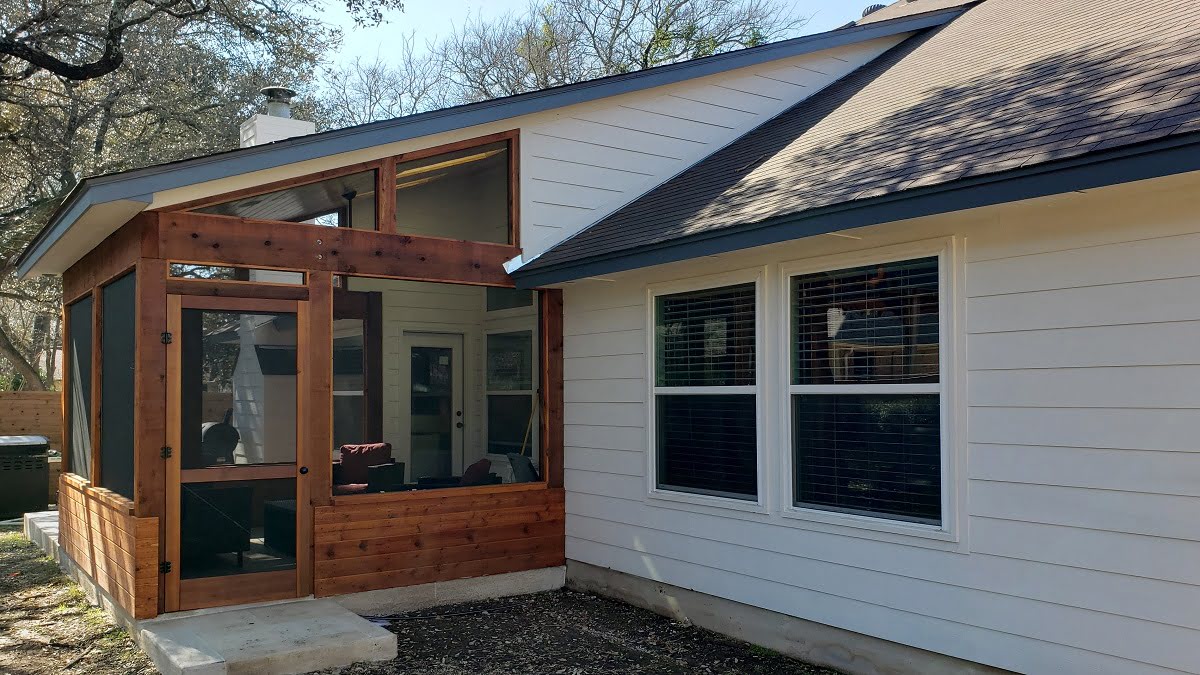
Step 3: Designing Your Porch
Designing your porch is an exciting and creative process that allows you to envision the look and feel of your new outdoor space. By considering your needs, preferences, and the architectural style of your home, you can create a design that perfectly suits your lifestyle and enhances the overall aesthetics of your house.
1. Determine the purpose: Start by clarifying the primary purpose of your porch. Will it be a place for relaxation and leisure, outdoor dining and entertaining, or a combination of both? Understanding how you intend to use the space will help dictate the layout, size, and features of your porch.
2. Consider the size and layout: Take into account the available space and the dimensions of your house when creating your porch design. A porch that is proportionate to the size of your home will provide a harmonious and visually appealing look. Consider the layout of your porch, such as whether it will be enclosed, screened, or open-air.
3. Choose the architectural style: Select an architectural style for your porch that complements the existing design of your house. Whether you have a traditional, modern, Victorian, or farmhouse-style home, the porch should blend seamlessly and enhance the overall curb appeal. Pay attention to details such as the roofline, columns, and decorative elements.
4. Select materials: Decide on the materials to be used for your porch construction. Consider factors such as durability, maintenance requirements, and aesthetic appeal. Common porch materials include wood, composite decking, stone, brick, and concrete. Choose materials that complement your home’s exterior and fit within your budget.
5. Plan for lighting and electrical outlets: Determine the lighting needs of your porch and incorporate them into your design. Consider both functional and decorative lighting options, such as overhead fixtures, wall sconces, and pathway lights. Additionally, plan for the placement of electrical outlets if you plan on using appliances or electronics on your porch.
6. Incorporate seating and furniture: Think about the seating and furniture options that will make your porch comfortable and inviting. If space allows, consider including seating areas with sofas, chairs, and tables. Choose furniture that is weather-resistant and suited for outdoor use. Remember to leave enough space for maneuverability and traffic flow.
7. Add decorative elements: Enhance the aesthetics of your porch by incorporating decorative elements. This can include items such as potted plants, hanging baskets, outdoor rugs, artwork, and accessories. These finishing touches will add personality and charm to your porch, making it a truly inviting and enjoyable space.
During the design process, it can be beneficial to consult with a professional designer or architect who can provide guidance and insights based on their expertise. They can help you create a cohesive and functional design that meets your specific needs and enhances the value of your home.
Once you have finalized your porch design, it’s time to move on to the next step: gathering the necessary materials and tools. In the following section, we will discuss the essentials that you will need to begin the construction process. Stay tuned!
Step 4: Gathering Materials and Tools
Now that you have a solid design plan for your porch, it’s time to gather the materials and tools needed for the construction process. By ensuring you have everything you need in advance, you can streamline the building process and avoid unnecessary delays.
1. Construction Materials:
- Decking materials: Depending on your design and preference, you may need materials such as wood boards, composite decking, or stone tiles for the porch floor. Consider the durability, maintenance requirements, and aesthetics when selecting your decking material.
- Support beams and framing lumber: These will form the skeleton of your porch. Depending on the size and design of your porch, you may need pressure-treated lumber, beams, joists, and rafters to create a solid framework.
- Roofing materials: If you are adding a covered porch, you’ll need roofing materials such as asphalt shingles, metal sheets, or roofing tiles. Consider the style and durability of the roofing material that best suits your design and budget.
- Fasteners and hardware: Gather screws, nails, brackets, and other necessary fasteners for securing the framing and decking materials. Make sure to choose corrosion-resistant fasteners suitable for outdoor use.
- Concrete or foundation materials: If your porch requires a concrete foundation or footings, you’ll need concrete mix, rebar, and formwork. Consult with an engineer or local building department to determine the appropriate specifications for your foundation.
- Other materials: Depending on your design, you may also need materials such as railing systems, post caps, trim boards, and finishing materials.
2. Tools:
- Measuring tape and level: Both of these tools are essential for accurate measurements and ensuring level surfaces during construction.
- Saws: Depending on the materials you’re using, you may need a circular saw, miter saw, or jigsaw for cutting lumber, decking, and other materials.
- Drill and driver: A power drill and screwdriver attachment or a cordless drill will be necessary for driving screws and drilling holes.
- Hammer: For pounding nails and other light-duty tasks.
- Pliers and wrench: These tools will come in handy for tightening bolts, assembling hardware, and making adjustments.
- Leveling and marking tools: A chalk line, speed square, and a laser level can assist with marking and aligning the construction accurately.
- Safety equipment: Always prioritize safety. Wear protective gear such as safety glasses, gloves, and a dust mask during the construction process.
When gathering materials, consider the quantity needed based on your porch design and measurements. It’s always a good idea to purchase a little extra, as it’s better to have more than not enough.
Remember, if you are unsure about any aspect of the materials or tools needed, consult with professionals at your local hardware store or seek advice from experienced contractors. They can help you choose the right materials and recommend any additional tools you may require.
With your materials and tools in hand, you’re ready to move on to the next step: preparing the construction site. In the following section, we will provide guidance on how to prepare the area in order to lay the foundation for your porch. Let’s continue on this exciting journey!
Read more: How To Add A Sunroom To A House
Step 5: Preparing the Construction Site
Before you can begin the actual construction of your porch, it’s essential to properly prepare the site. This step involves clearing the area, ensuring a level foundation, and making any necessary adjustments for a successful build.
1. Clear the area: Remove any obstacles or debris from the site where your porch will be constructed. This includes plants, rocks, old structures, and any other items that may hinder the construction process. Ensure that the site is clean and empty before proceeding.
2. Mark the perimeter: Use stakes and string to mark the outline of your porch. This will help you visualize the exact location and dimensions of the porch and ensure that it aligns with your design plans. Double-check the measurements to confirm that they match your initial assessment.
3. Level the ground: Ideally, your porch site should be level to ensure stability and proper drainage. Use a shovel, rake, or a mechanical compactor to level the ground as much as possible. This will help provide a solid and uniform foundation for your porch.
4. Consider grading and drainage: Proper grading and drainage are crucial to prevent water accumulation and potential damage to your porch. If your site is not naturally sloped away from your house, you may need to create a gentle slope or incorporate drainage solutions such as French drains or swales.
5. Install footings or foundation: Depending on the size and design of your porch, you may need to install footings or a concrete foundation. Consult with an engineer or follow local building codes to determine the appropriate depth and size of your footings. Prepare the area, dig the holes, and pour concrete as per the recommended specifications.
6. Allow for proper curing time: If you have poured concrete footings or a foundation, it’s crucial to allow sufficient time for curing. Follow the manufacturer’s guidelines for the specific type of concrete used. Curing time may take several days, so be patient before proceeding to the next construction phase.
7. Check for utility lines: Before proceeding with any excavation, ensure that the construction site does not interfere with any underground utility lines such as gas, water, or electrical lines. Contact your local utility company to have the area marked to avoid any potential accidents or disruptions.
Taking the time to properly prepare the construction site will ensure a smooth and successful build. It sets the foundation for the rest of the construction process and helps minimize unexpected issues or delays. Once the site is prepared, you can move on to the exciting stage of pouring the foundation or footings for your porch. In the next step, we will guide you through this critical phase of construction. Stay tuned!
Step 6: Pouring Foundation or Footings
Now that the construction site is prepared, it’s time to move on to the important step of pouring the foundation or footings for your porch. This phase of the construction process establishes the stability and structural integrity of your porch.
1. Consult local building codes: Before proceeding with pouring the foundation or footings, it’s crucial to consult local building codes and regulations to ensure compliance. Each area may have specific requirements regarding the depth, width, and reinforcement of the footings or foundation.
2. Determine the dimensions and layout: Based on your porch design and the recommendations from an engineer or building department, determine the dimensions and layout for the footings or foundation. Mark the locations where the footings or foundation will be poured.
3. Excavate the area: Use shovels, a backhoe, or other excavation equipment to dig the holes for the footings or foundation. Ensure that the excavated area is aligned with the layout and dimensions specified in your design plans and follows the local building code requirements.
4. Add reinforcement: Depending on the size and load-bearing requirements, you may need to add reinforcement to the footings or foundation. This typically involves placing steel rebar within the excavated area to strengthen the concrete structure. Follow the recommended guidelines for reinforcing the footings or foundation.
5. Prepare the concrete: Mix the concrete according to the manufacturer’s instructions. Ensure that the proper ratios of cement, aggregate, and water are used. Use a concrete mixer or a mixing trough to achieve a uniform, workable consistency.
6. Pour the footings or foundation: Begin by pouring a minimum 4-inch layer of gravel or crushed stone at the bottom of the excavated area to provide a stable base. Then, pour the concrete mixture into the excavated area and level it using a screed board and a trowel. Fill the area to the required height, taking care to eliminate any air pockets or voids in the concrete.
7. Smooth and finish the surface: Use a float or trowel to smooth out the poured concrete surface. Pay attention to achieving a level and even finish. If desired, you can add decorative textures or patterns to the surface before the concrete starts to set.
8. Allow for curing time: Concrete requires sufficient time to cure and achieve its full strength. Follow the manufacturer’s recommendations for curing time, which may range from a few days to several weeks. During this period, keep the poured footings or foundation protected from extreme temperatures and water exposure.
9. Schedule inspections: Once the footings or foundation have cured, contact your local building department to schedule inspections. Inspections ensure that the poured concrete meets the necessary standards and requirements. It’s important to pass these inspections before proceeding to the next phase of construction.
Pouring the foundation or footings is a critical step in the construction process, as it establishes the stability and strength of your porch. By following local building codes and taking proper care during the pouring and curing process, you can ensure a solid foundation for your porch. In the next step, we will guide you through framing the porch structure. Stay tuned!
When adding a porch to your house, consider the architectural style of your home and choose materials and design elements that complement it for a cohesive look.
Step 7: Framing the Porch
With the foundation or footings in place, it’s time to move on to the exciting step of framing your porch. Framing is the skeletal structure that forms the shape and support of your porch. It’s crucial to carefully plan and execute this step to ensure a sturdy and long-lasting porch.
1. Create a framing plan: Before you begin framing, create a detailed framing plan that includes the dimensions, layout, and materials required. This plan will serve as a guide throughout the framing process and help minimize errors and wasted materials.
2. Measure and mark: Begin by measuring and marking the locations for your porch’s posts and beams. This will establish the framework and layout of your porch structure. Use a level and a tape measure to ensure accurate placement.
3. Install the posts: Depending on your design, you may need to install posts at the designated locations. These posts will support the beams and the overall weight of the porch. Use treated lumber for the posts and follow local building codes for proper post depth and anchoring.
4. Install the beams: Once the posts are securely in place, install the beams that will provide support for the porch floor and roof. Attach the beams to the posts with appropriate hardware such as joist hangers or through-bolts. Ensure that the beams are level and properly aligned.
5. Install the joists: Joists are horizontal beams that connect the posts and beams, providing the framework for the porch floor. Attach the joists to the beams using joist hangers or other suitable fasteners. Space the joists according to your design plans and local building codes.
6. Install the headers and rim joists: Headers and rim joists reinforce the perimeter of the porch and support the porch floor. Install them at the appropriate locations and secure them to the posts and beams. Ensure that they are level and flush with the top of the joists.
7. Secure the framing: Check the entire porch framing for stability and make any necessary adjustments or reinforcements. Double-check all connections and fasteners to ensure they are secure. It’s crucial to have a solid and sturdy framing structure to support the weight of your porch.
8. Consider additional structural elements: Depending on your porch design, you may need to incorporate additional structural elements such as diagonal bracing, ledger boards, and support posts. These elements provide extra stability and ensure the structural integrity of your porch.
When framing your porch, it’s essential to follow local building codes and regulations. Consult with a professional if needed to ensure that your framing construction meets the necessary safety requirements.
Once the framing is complete, you can move on to the next step of installing the porch roof. In the following section, we will guide you through this crucial phase of construction. Stay tuned as your porch begins to take shape!
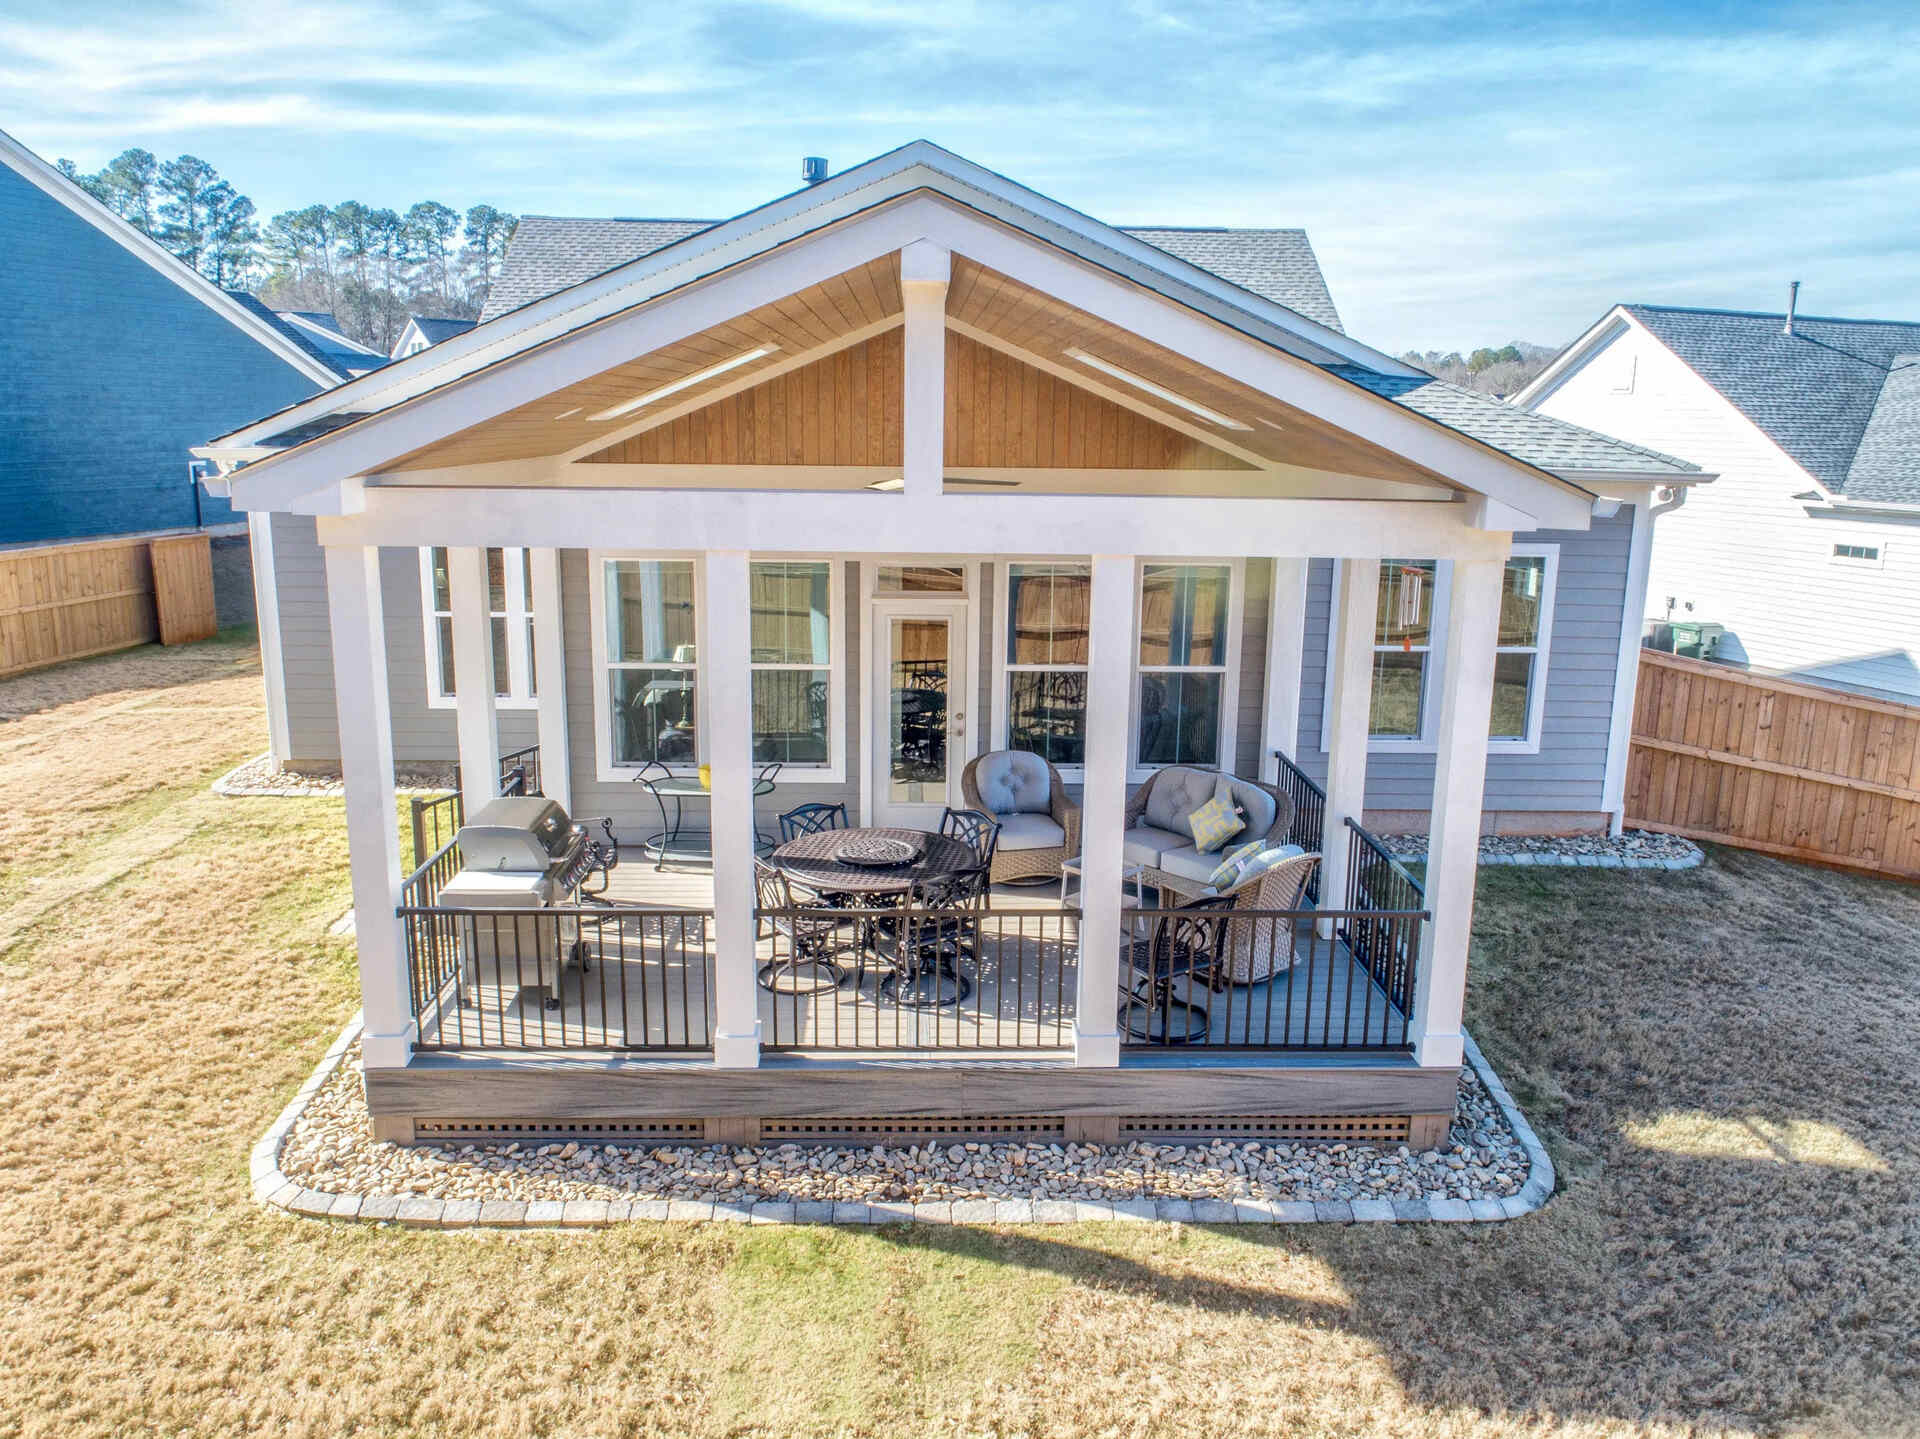
Step 8: Installing the Porch Roof
Now that the framing for your porch is complete, it’s time to move on to the next step: installing the porch roof. The roof not only provides shelter and protection from the elements but also adds to the overall aesthetics of your porch.
1. Plan the roof design: Before you begin, consider the design and style of roof that will best complement your porch and home. Common porch roof styles include gable, hip, shed, or a combination of these. Choose a design that suits your preferences and fits seamlessly with the rest of your house’s architecture.
2. Calculate the roof dimensions: Measure the dimensions of your porch and calculate the pitch and overhang of the roof. These measurements will help you determine the amount of roofing material and the size and placement of roof trusses or rafters.
3. Install the roof trusses or rafters: Roof trusses or rafters are the structural elements that support the roof. Install them according to your roof design and local building codes. Ensure that they are properly secured to the porch framing and aligned with the desired roof pitch.
4. Attach the roof sheathing: Once the trusses or rafters are in place, attach the roof sheathing, typically made of plywood or oriented strand board (OSB). Cut the sheathing to size and fix it securely to the trusses or rafters. Leave appropriate gaps for ventilation, as specified by local building codes.
5. Install the underlayment: The underlayment acts as a barrier against water penetration and provides an extra layer of protection for the roof. Options for underlayment include roofing felt or synthetic materials. Install the underlayment according to the manufacturer’s instructions, ensuring proper overlap and fastening.
6. Add the roofing material: Select the roofing material that best suits the style and durability requirements of your porch. Common options include asphalt shingles, metal panels, or tiles. Install the chosen roofing material according to the manufacturer’s recommendations and industry best practices.
7. Complete the roof edges: Install fascia boards along the edges of the roof to provide a smooth and finished appearance. Attach drip edge flashing along the eaves to prevent water from seeping under the roofing material. Consider adding additional trim elements or decorative features to enhance the visual appeal of the roof.
8. Ensure proper drainage: Optimize the roof’s drainage by installing gutters and downspouts. These will divert rainwater away from the porch and foundation, preventing potential water damage. Make sure that the gutters and downspouts are securely fastened and properly sloped for effective water flow.
Throughout the installation process, consult local building codes and regulations to ensure compliance. If you are unfamiliar with roofing installation, it’s advisable to seek professional assistance or guidance from experienced contractors to ensure a properly installed and watertight roof.
Once your porch roof is complete, you’re one step closer to enjoying your outdoor space. In the following section, we will guide you through the process of adding porch flooring, bringing you even closer to the finished porch. Keep going, and your dream porch will soon be a reality!
Step 9: Adding Porch Flooring
Adding porch flooring is a crucial step in completing your porch construction. The flooring not only serves as a functional surface for walking and sitting but also adds to the overall aesthetic appeal of your outdoor space.
1. Choose the flooring material: Consider the desired look, durability, and maintenance requirements when selecting the flooring material for your porch. Common options include wood decking, composite decking, stone, tile, or concrete. Choose a material that suits your style and budget.
2. Prepare the subfloor: Before installing the porch flooring, ensure that the subfloor is properly prepared. The subfloor may be plywood or oriented strand board (OSB) that should be clean, level, and structurally sound. Repair any damaged areas and make sure the surface is smooth and free from debris.
3. Plan the layout: Determine the layout of the porch flooring, taking into account the dimensions of your porch and the desired pattern or orientation of the flooring material. Plan the layout carefully to minimize the need for difficult cuts or wasted materials.
4. Install the flooring material: Follow the manufacturer’s instructions for your chosen flooring material to install it properly. This may involve cutting the material to size, laying it in a staggered or patterned arrangement, and securing it to the subfloor using appropriate fasteners or adhesives.
5. Maintain proper spacing: Leave a small gap between the flooring boards or tiles to allow for expansion and contraction caused by temperature and moisture changes. This will help prevent buckling or warping of the flooring over time. Refer to the manufacturer’s recommendations for the appropriate spacing for your specific flooring material.
6. Secure the flooring: Use the recommended fasteners or adhesives to ensure that the flooring is securely attached to the subfloor. This will provide stability and prevent movement or shifting of the flooring over time. Follow proper installation techniques for your chosen flooring material.
7. Consider additional features: Depending on your porch design and personal preferences, you may want to consider additional features such as decorative borders, trim, or accent elements. These can enhance the overall look of your porch flooring and add a touch of individuality.
8. Apply a protective finish: Depending on the flooring material, you may want to apply a protective finish or sealer to enhance durability and prolong the life of the flooring. Consult the manufacturer’s recommendations for the appropriate finish or sealer and apply it according to the instructions.
Throughout the process, prioritize safety by using appropriate protective equipment and following safety guidelines for handling and installing the flooring material. If you are unsure about any aspect of the installation, seek professional advice or assistance.
With the porch flooring in place, your porch is beginning to take shape. In the final step, we will guide you through the installation of porch railings to provide safety and add a finishing touch to your outdoor space. Keep up the momentum, and soon you’ll have a fully functional and beautiful porch!
Step 10: Installing Porch Railings
Installing porch railings is not only a practical step to ensure safety but also adds a finishing touch to your porch construction. Railings provide support and create boundaries, enhancing the overall aesthetics of your outdoor space. Follow these steps to properly install porch railings.
1. Determine the style and material: Select a railing style that matches the design and architectural style of your porch. Common materials include wood, metal, vinyl, or composite. Choose a material that complements your porch flooring and overall aesthetic preferences.
2. Measure and plan the railing layout: Measure the length and height of the porch where you intend to install the railings. Determine the number of railing sections needed and the appropriate spacing between them. Also, verify whether any local building codes dictate specific height requirements for your railings.
3. Prepare the railing posts: Install sturdy railing posts at appropriate intervals along the porch edge. Use treated lumber for posts that will be exposed to the elements. Anchor the posts securely to the porch flooring or structural elements using appropriate hardware and techniques.
4. Install the top and bottom rails: Attach the top and bottom rails to the posts and secure them using screws or other recommended fasteners. Ensure that the rails are level and properly aligned along the length of the porch.
5. Insert balusters or spindles: Depending on your chosen railing style, insert balusters or spindles between the top and bottom rails. Space them evenly and securely attach them to both rails. Follow local building codes regarding spacing requirements for the balusters or spindles.
6. Secure the railing components: Check that all railing components, including posts, rails, and balusters or spindles, are secure and stable. Tighten any loose connections and ensure that the railings do not wobble or move when pressure is applied.
7. Finish the railing: If desired, add decorative elements to enhance the appearance of the railings. This can include decorative caps for the railing posts, ornamental inserts for the balusters or spindles, or additional trim details. These finishing touches can elevate the overall look of your porch railings.
8. Apply a protective finish: Depending on the material used for your railings, you may want to apply a protective finish or coating. This will help protect the railings from weathering, UV damage, and other forms of wear and tear. Follow the manufacturer’s recommendations for the appropriate finish for your specific railing material.
When installing porch railings, it’s important to follow local building codes and regulations regarding height requirements, spacing, and other safety considerations. If you are unsure about any aspect of the installation or need assistance, consult with a professional.
Congratulations! With the porch railings installed, your porch is now complete and ready to be enjoyed. In the final step, we will highlight some finishing touches and decoration ideas to add character and personalize your outdoor space. Let’s continue on this journey of creating your dream porch!
Step 11: Finishing Touches and Decoration
Congratulations on completing the construction of your porch! Now it’s time to add the finishing touches and decorations that will truly bring your outdoor space to life. These final touches will add character, functionality, and personalization to your porch.
1. Furnish your porch: Choose comfortable and stylish furniture that suits your porch’s purpose. Whether it’s a cozy seating area, a dining set, or a combination of both, select furniture that is weather-resistant, durable, and fits the style of your porch. Add cushions, pillows, and throws for extra comfort and visual appeal.
2. Add lighting: Enhance the ambiance and functionality of your porch with appropriate lighting. Consider a combination of overhead lighting, such as pendant lights or ceiling fans with built-in lights, and task lighting, such as wall sconces or floor lamps. Include dimmers or adjustable settings to set the right mood for different occasions.
3. Incorporate shade solutions: If your porch is exposed to direct sunlight, it’s essential to incorporate shade solutions for comfort and protection. Install retractable awnings, shade sails, pergolas, or outdoor umbrellas to provide shade during hot summer days. This will allow you to enjoy your porch at any time of day without the discomfort of direct sunlight.
4. Include planters and greenery: Bring life and natural beauty to your porch by incorporating planters filled with flowers, herbs, or seasonal plants. Consider the size and style of your porch when selecting planters and choose plants that thrive in your local climate. Hanging baskets, vertical gardens, or trellises can also be used to maximize vertical space.
5. Personalize with accessories: Add personality and style to your porch with carefully selected accessories. This can include outdoor rugs, decorative lanterns, artwork, throw pillows, wind chimes, and wall decorations. Choose items that reflect your personal taste and enhance the overall aesthetic of your porch.
6. Create a focal point: Consider creating a focal point on your porch to draw attention and create visual interest. This can be achieved through a centerpiece such as a fire pit, water feature, or a statement piece of furniture. A focal point can anchor the space and serve as a conversation starter.
7. Incorporate storage solutions: Make the most of your porch space by including storage options. This can be in the form of built-in benches with hidden compartments, outdoor storage containers, or shelving units. Declutter your porch and keep essentials neatly organized out of sight.
8. Maintain cleanliness and upkeep: Regularly clean and maintain your porch to keep it looking its best. Sweep away debris, wipe down furniture, and clean any outdoor rugs or cushions as needed. Consider applying a protective sealant or finish to the porch flooring and furniture to extend their lifespan and keep them looking fresh.
Remember, the finishing touches and decorations should reflect your personal style and create a welcoming and inviting atmosphere. Experiment with different elements to find the perfect combination that suits your preferences and complements the design of your porch.
By following these steps and adding your personal touch, your porch will become a cherished space where you can relax, entertain guests, and enjoy the beauty of the outdoors. Embrace this final stage of porch creation and transform your outdoor space into a true sanctuary!
Enjoy your newly completed porch, and may it bring you endless joy and memorable moments for years to come.
Conclusion
Congratulations on successfully adding a porch to your house! You have accomplished a remarkable feat by creating a beautiful and functional outdoor space that enhances the aesthetics, functionality, and value of your home.
Throughout this comprehensive guide, we have walked you through each step of the process, from assessing your space and obtaining permits to designing, gathering materials, and constructing your porch. We emphasized the importance of proper planning, adhering to local building codes, and paying attention to the smallest details.
By assessing your space, you ensured that your porch seamlessly integrates with your house, while obtaining permits and approvals guaranteed compliance with regulations. The design phase allowed you to conceptualize your ideal porch, taking into consideration your needs, preferences, and architectural style.
Gathering the necessary materials and tools equipped you for the construction process, while preparing the construction site ensured a solid foundation. Pouring the foundation or footings and framing the porch provided the structural framework, creating a sturdy base for your outdoor sanctuary.
Installing the porch roof added shelter and protection, and the porch flooring provided a beautiful and functional surface. Adding porch railings enhanced safety and added a final touch of elegance.
With finishing touches and decorations, you truly personalized and transformed your porch into a space that reflects your unique style and caters to your outdoor lifestyle.
Remember to maintain and care for your porch regularly, keeping it clean and well-maintained to ensure its longevity and continued enjoyment.
We hope that this guide has been a valuable resource throughout your porch-building journey, providing you with the knowledge and confidence to undertake this rewarding project. Your new porch is now ready to be enjoyed for relaxing evenings, entertaining guests, or simply basking in the beauty of the outdoors.
Sit back, relax, and embrace the joy and tranquility that your newly created porch will bring. Cheers to many unforgettable memories and moments of bliss on your porch!
Frequently Asked Questions about How To Add A Porch To Your House
Was this page helpful?
At Storables.com, we guarantee accurate and reliable information. Our content, validated by Expert Board Contributors, is crafted following stringent Editorial Policies. We're committed to providing you with well-researched, expert-backed insights for all your informational needs.


0 thoughts on “How To Add A Porch To Your House”