Home>diy>Architecture & Design>How To Use Sketchup To Design A Tiny House
Architecture & Design
How To Use Sketchup To Design A Tiny House
Modified: October 20, 2024
Learn how to use Sketchup for architecture design and create your dream tiny house. Step-by-step tutorials and expert tips to help you bring your vision to life.
(Many of the links in this article redirect to a specific reviewed product. Your purchase of these products through affiliate links helps to generate commission for Storables.com, at no extra cost. Learn more)
Introduction
With the ever-growing trend of embracing minimalism and sustainable living, tiny houses have gained immense popularity. These compact and efficient dwellings offer a perfect solution for individuals seeking affordable and environmentally-friendly housing options. However, designing a tiny house requires careful planning and consideration of limited space, functionality, and aesthetics.
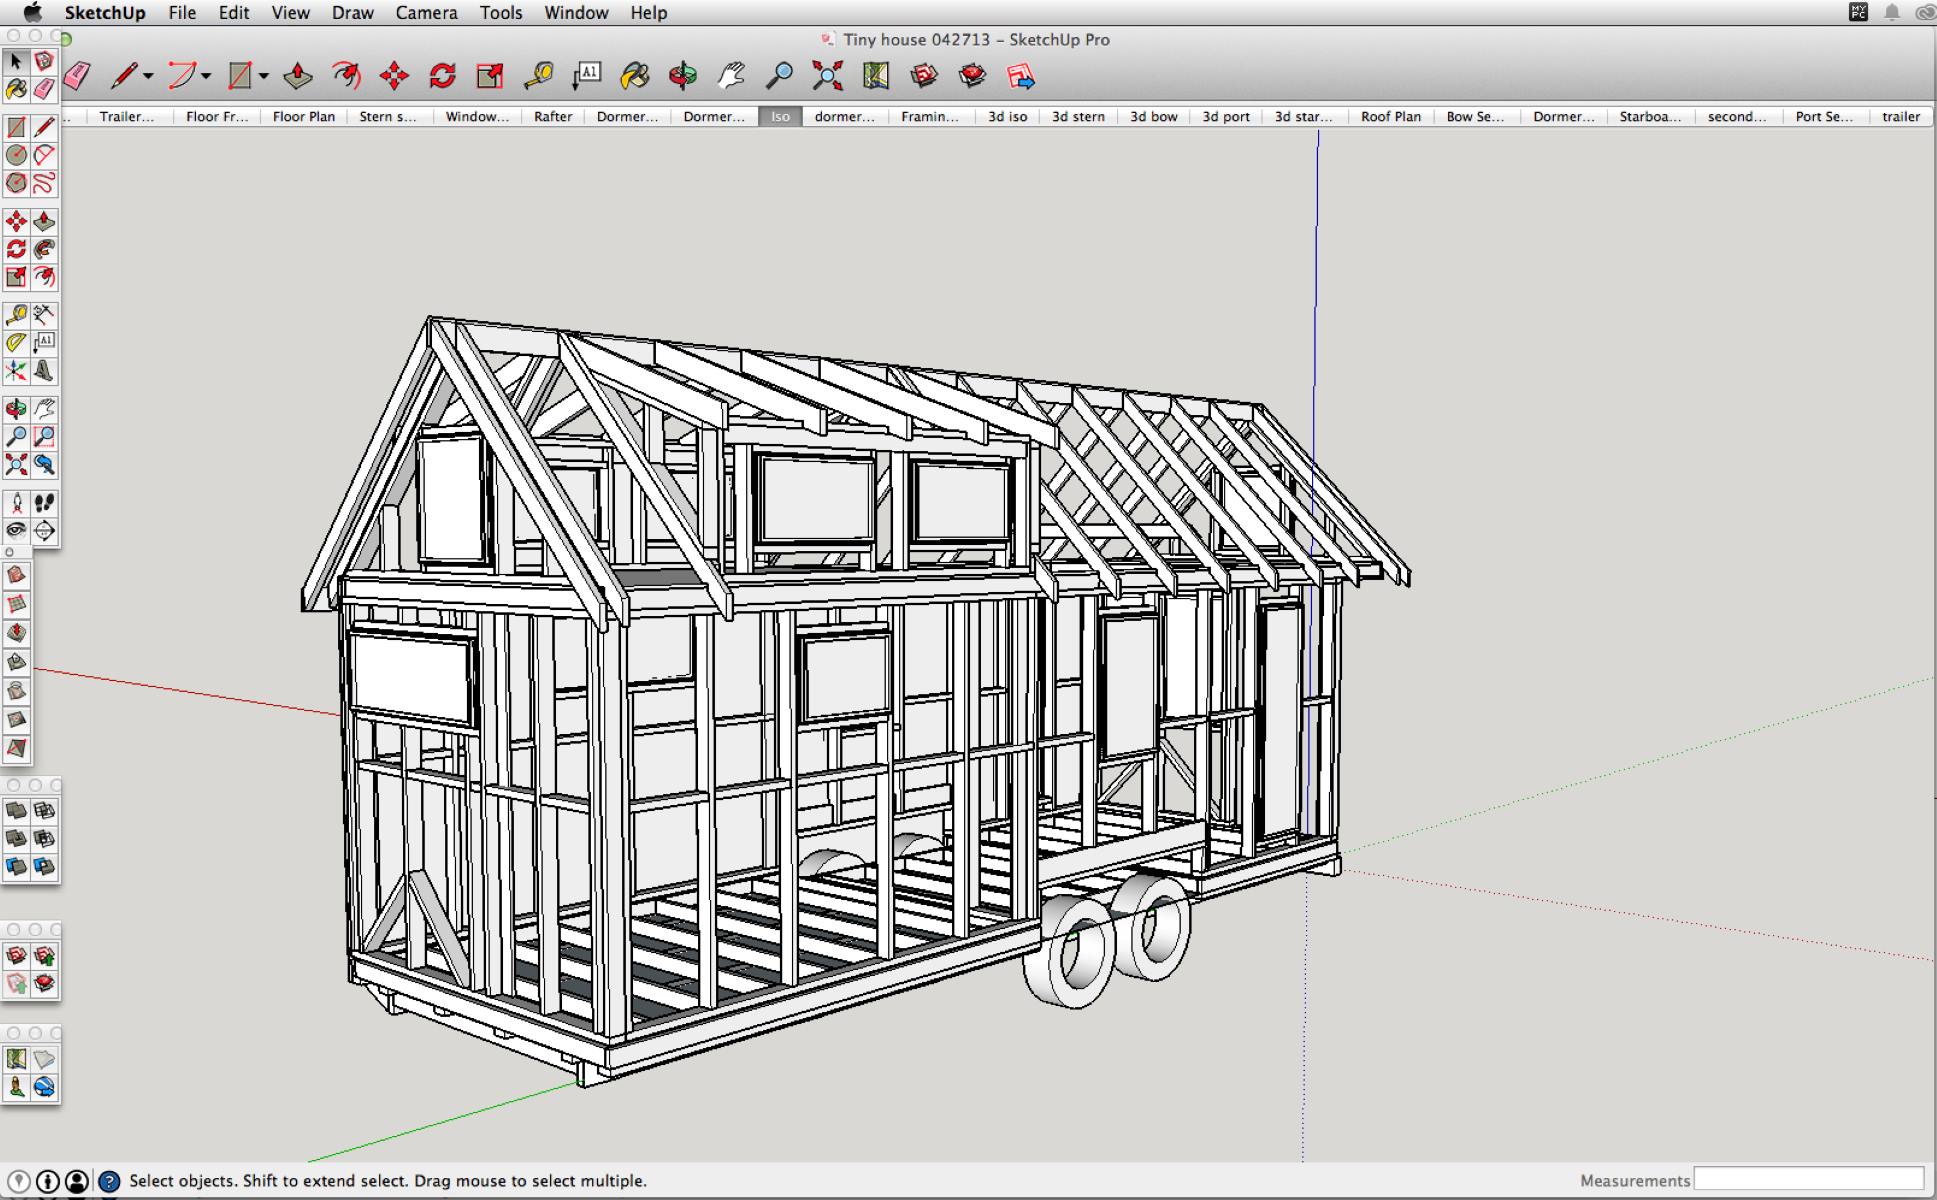
Fortunately, with the help of Sketchup, a powerful 3D modeling software, designing a tiny house has become easier than ever. Sketchup offers a user-friendly interface and a wide range of tools that enable architects, designers, and enthusiasts to visualize and create intricate house designs. In this article, we will explore how to use Sketchup to design a tiny house, from the initial concept to the final layout.
Whether you are a professional architect or a DIY enthusiast, Sketchup’s intuitive tools and functionalities will support your creative vision every step of the way. By following a systematic approach and understanding the basics of tiny house design, you can unleash your architectural prowess and bring your dream tiny house to life.
Throughout this article, we will cover everything you need to know about using Sketchup for designing a tiny house. We will delve into setting up the dimensions and scale, creating the floor plan, designing the exterior, adding doors and windows, incorporating interior elements, working with materials and textures, and utilizing Sketchup tools for efficient design. By the end, you will have a comprehensive understanding of how to leverage Sketchup’s features to design the perfect tiny house that meets your specific requirements.
So, roll up your sleeves, fire up Sketchup, and let’s embark on this exciting journey of designing a functional and visually stunning tiny house!
Key Takeaways:
- Embrace the power of Sketchup to design a functional and visually stunning tiny house, from setting up dimensions to finalizing details. Unleash your creativity and bring your dream tiny house to life with intuitive tools and a systematic approach.
- Efficiently navigate the design process with Sketchup’s powerful tools, experiment with materials and textures, and optimize the functionality of your tiny house design. Embrace the journey of refining and improving your vision to create a well-crafted and personalized space.
Read more: How To Make A House Design With Sketchup
Getting Started with Sketchup
Before diving into designing your tiny house, it’s essential to familiarize yourself with the basics of Sketchup. Whether you are a beginner or have some prior experience, these steps will help you get up and running with the software.
- Download and Install Sketchup: Visit the official Sketchup website and download the appropriate version of the software for your operating system. Follow the installation instructions to complete the setup process.
- Explore the Interface: Once installed, launch Sketchup and take some time to explore the interface. Familiarize yourself with the different panels, toolbars, and menus. The main workspace consists of the viewport, where you will create and manipulate 3D models.
- Get to Know the Tools: Sketchup offers a wide array of tools that allow you to create and modify 3D objects. Some essential tools to begin with include the Select tool, Line tool, Rectangle tool, Push/Pull tool, and the Move tool. Spend time experimenting with these tools to understand their functions and how they can be used in your design.
- Practice with Basic Shapes: Start by creating simple shapes such as rectangles, circles, and polygons. Use the Push/Pull tool to extrude these shapes into 3D objects. This will give you a feel for manipulating and transforming objects in a 3D space.
- Utilize Keyboard Shortcuts: Sketchup offers a wide range of keyboard shortcuts that can significantly speed up your workflow. Take the time to learn and use frequently used shortcuts for commonly performed tasks.
- Refer to Tutorials and Resources: Sketchup has a vast community of users who frequently share tutorials, tips, and resources to help beginners get started. Explore online tutorials, video guides, and forums where you can learn from experienced Sketchup users and gain inspiration for your design.
- Practice, Practice, Practice: The key to mastering Sketchup is practice. Dedicate time to regularly experimenting with new tools and techniques. Challenge yourself to recreate real-world objects or structures to hone your skills.
By following these steps and dedicating time to learn and practice, you will become comfortable with Sketchup and be ready to embark on your tiny house design journey.
Understanding the Basics of Tiny House Design
Designing a tiny house requires a thorough understanding of the principles of small space design. Unlike traditional homes, tiny houses must optimize every inch of available space to ensure functionality and livability. Here are some key considerations to keep in mind when designing a tiny house:
- Maximizing Space Efficiency: The primary goal of tiny house design is to maximize the use of space. This involves carefully planning the layout to ensure efficient circulation and allocation of functional areas. Consider multipurpose furniture, storage solutions, and innovative space-saving techniques to make the most of the limited square footage.
- Emphasizing Natural Light: A well-designed tiny house takes advantage of natural light to create an open and bright interior. Incorporate large windows, skylights, and glass doors to allow ample natural light to flood into the space. This not only creates a spacious feel but also reduces the need for artificial lighting during the day.
- Creating an Open Floor Plan: Open floor plans work exceptionally well in tiny houses as they eliminate unnecessary partitions and create a sense of continuity and flow. By merging the kitchen, living area, and dining space into a single open space, you can make the most of the limited square footage and create a versatile living environment.
- Prioritizing Essential Elements: Due to the limited space in a tiny house, it is crucial to prioritize essential elements such as sleeping areas, bathrooms, and kitchen facilities. Determine the minimum requirements for these areas and allocate space accordingly.
- Utilizing Vertical Space: Vertical space is often underutilized in traditional homes but is a valuable asset in tiny house design. Consider incorporating loft areas for additional sleeping or storage space. Use tall cabinets, shelving units, and wall-mounted storage solutions to maximize the vertical space available.
- Ensuring Proper Ventilation: Proper ventilation is essential in any house, but it becomes even more critical in a small and compact space. Incorporate windows that can be opened for cross ventilation and consider installing a ventilation system to maintain a comfortable living environment.
- Adding Personal Touches: Your tiny house should reflect your personal style and needs. Don’t be afraid to add unique design elements, decor, and color schemes that resonate with your personality. Customization enables you to create a space that feels like home despite its compact size.
By keeping these basic principles in mind, you can lay a solid foundation for designing a functional and aesthetically pleasing tiny house. Understanding the specific needs and challenges associated with small space design is crucial for creating a comfortable and livable environment within limited square footage.
Setting Up the Dimensions and Scale
Before diving into the design process, it is essential to set up the dimensions and scale of your tiny house in Sketchup. Accurate dimensions and scale will ensure that your design accurately represents the real-world proportions of your tiny house. Here’s how to set up dimensions and scale in Sketchup:
- Plan your measurements: Begin by gathering all the essential measurements for your tiny house. This includes the overall length, width, and height, as well as the dimensions of each room, windows, doors, and any other architectural features.
- Set the units of measurement: Open a new Sketchup file and go to “Window” -> “Model Info” -> “Units.” Here, you can select the appropriate units of measurement for your design, such as feet and inches or meters. Make sure to choose a unit that is consistent with your measurements.
- Draw the floor plan: Use the Line tool to sketch the floor plan of your tiny house based on the measurements you gathered. Ensure that your walls, doors, and windows accurately correspond to the real dimensions.
- Scale the drawing: With the floor plan drawn, it’s time to scale the drawing to match the actual dimensions of your tiny house. Select the Tape Measure tool and measure a known reference length, such as the length of a wall. Then, type in the correct dimension in the measurements box and hit Enter. Sketchup will automatically adjust the scale of your drawing to match the desired dimensions.
- Check the scale: After scaling the drawing, it is important to verify if the dimensions are accurate. Use the Tape Measure tool to measure various distances within your design and compare them with the real-world measurements. This step ensures that your model is properly scaled and aligned with your intended dimensions.
By setting up the dimensions and scale correctly in Sketchup, you lay the groundwork for an accurate and realistic representation of your tiny house. This step is crucial for ensuring that your design accurately reflects the physical characteristics of the actual structure.
Remember to save your Sketchup file after defining the dimensions and scale to avoid any unnecessary rework. With the proper setup completed, you can move on to creating the floor plan and bringing your tiny house design to life!
Creating the Floor Plan
The floor plan is the foundation of your tiny house design as it dictates the layout and flow of the space. Creating an effective floor plan will ensure that your tiny house is functional, efficient, and meets your specific needs. Here’s how you can create a floor plan in Sketchup:
- Start with a blank canvas: Open a new Sketchup file or create a new component for the floor plan. This will allow you to work on the floor plan independently and easily integrate it into the overall design later.
- Sketch the exterior walls: Use the Line or Rectangle tool to draw the exterior walls of your tiny house. Refer to your measurements and scale to ensure accuracy and consistency.
- Add interior walls: Based on your design preferences and functional requirements, sketch the interior walls to divide the space into rooms or areas. Remember to consider the flow and circulation within the tiny house, ensuring there is enough space for movement between different areas.
- Include key features: Incorporate doors, windows, and other architectural elements into your floor plan. Use the appropriate Sketchup tools to add these features and adjust their sizes and positions to match your design specifications.
- Consider utilities and fixtures: Plan for the placement of essential utilities and fixtures, such as electrical outlets, switches, plumbing fixtures, and HVAC systems. Ensure that these elements are appropriately located for convenience and functionality.
- Add furniture and fixtures: To get a better sense of the spatial arrangement within your tiny house, consider adding basic furniture and fixtures to the floor plan. This will help you visualize how the space will be utilized and ensure that there is adequate room for movement and usage.
- Review and refine: Once you have created the initial floor plan, take a step back and review it for any potential improvements or modifications. Consider the flow, functionality, and aesthetic appeal of the design. Make necessary refinements to optimize the layout and address any concerns.
Creating the floor plan in Sketchup provides you with a visual representation of your tiny house design. It allows you to assess the overall layout, make necessary adjustments, and ensure that the design aligns with your vision and requirements.
Remember, the floor plan serves as the blueprint for the rest of your design process. Taking the time to create a well-thought-out and functional floor plan will make the subsequent steps of designing the exterior, incorporating interior elements, and finalizing the details much easier and more efficient.
Read more: How To Build A Foundation For A Tiny House
Designing the Exterior
The exterior design of your tiny house is essential as it sets the tone for the overall aesthetic and character. While it’s important to consider your personal style preferences, it’s also crucial to ensure that the exterior design is functional, visually appealing, and in harmony with its surroundings. Here’s how you can design the exterior of your tiny house in Sketchup:
- Consider the architectural style: Determine the architectural style that you want for your tiny house. Research different styles and consider factors such as the climate, your personal taste, and the surrounding environment. Whether it’s modern, farmhouse, contemporary, or something unique, having a clear vision of the architectural style will guide your design decisions.
- Sketch the roof: Select the appropriate roof design that complements your chosen architectural style. Use the tools in Sketchup to sketch and shape the roof, ensuring that it provides sufficient protection from the elements and allows for efficient drainage.
- Add exterior cladding: Choose the exterior cladding materials that best suit your design. This could include options such as wood siding, stucco, metal panels, or brick veneer. Using Sketchup’s materials and texture tools, apply the appropriate cladding to the exterior walls of your tiny house.
- Integrate doors and windows: Incorporate doors and windows into your exterior design. Select the appropriate styles and sizes that are in keeping with the overall aesthetic of your tiny house. Use Sketchup’s tools to position and align the doors and windows within the exterior walls.
- Consider outdoor living spaces: If you have the available space, think about incorporating outdoor living areas such as porches, decks, or balconies. These spaces can extend the usable area of your tiny house and enhance its overall functionality and charm.
- Add architectural details: Enhance the exterior design by incorporating architectural details such as trim, molding, decorative elements, or unique features that add personality and character to your tiny house.
- Experiment with colors: Use Sketchup’s materials and coloring tools to experiment with different color schemes for the exterior of your tiny house. Consider factors such as the surrounding landscape, personal preference, and the desired visual impact when selecting colors.
- Review and refine: Step back and review your exterior design. Assess the overall balance, proportions, and coherence of the elements. Make any necessary refinements or adjustments to achieve a visually pleasing and harmonious exterior for your tiny house.
Remember that the exterior design of your tiny house not only reflects your personal style but also plays a crucial role in its functionality, energy efficiency, and durability. Take the time to carefully consider each element, explore different options, and create an exterior design that speaks to your vision for your tiny house.
By utilizing the tools and capabilities of Sketchup, you can visually bring your exterior design to life and ensure that it aligns with your desired architectural style and aesthetics. With the exterior design complete, you can move on to incorporating interior elements and finalizing the details of your dream tiny house.
When designing a tiny house in Sketchup, start by creating a detailed floor plan to ensure efficient use of space. Use components and groups to easily manipulate and move elements within the design.
Adding Doors and Windows
Doors and windows are essential components of any building, including tiny houses. They not only provide access and light but also contribute to the overall aesthetic appeal of your design. Adding doors and windows to your tiny house in Sketchup is a straightforward process. Here’s how you can do it:
- Select the appropriate door and window styles: Before adding doors and windows to your design, decide on the specific styles that align with your architectural vision. Consider factors such as functionality, energy efficiency, and aesthetics.
- Use the Sketchup Component Warehouse: One of the benefits of Sketchup is its extensive Component Warehouse, which contains a wide range of pre-made 3D models. Utilize this resource to search for and download door and window components that match your chosen styles.
- Import door and window components: Once you have located suitable door and window components, import them into your Sketchup model. Use the “File” -> “Import” option to import the downloaded components into your design.
- Position and place the components: Select the Move tool in Sketchup to position and place the door and window components in the desired locations on your tiny house model. Make sure they align with the dimensions and layout of your floor plan.
- Adjust the size and orientation: Depending on your design requirements, you may need to adjust the size, orientation, or height of the door and window components. Use the Scale tool or the component’s specific editing options to make any necessary modifications.
- Customize the appearance: Sketchup provides various customization options for components, allowing you to tweak the appearance of doors and windows. Experiment with different colors, materials, and textures to achieve the desired look and feel.
- Add details and accessories: To enhance the realism of your design, consider adding additional details and accessories to the doors and windows. This could include handles, locks, trims, or shutters. Sketchup’s extensive library of 3D models can be used to find and incorporate these details.
- Ensure functionality: Verify that the doors and windows are functional and operate as intended. Ensure that they can be opened, closed, and interacted with correctly within the Sketchup model.
By following these steps, you can seamlessly incorporate doors and windows into your tiny house design in Sketchup. Pay attention to the positioning, sizing, and customization of these components to create a visually appealing and functional representation.
Remember that doors and windows play a significant role in the overall aesthetics, natural lighting, ventilation, and accessibility of your tiny house. Thoughtfully choose and place these elements to optimize the functionality and visual impact of your design.
Incorporating Interior Elements
Designing the interior of your tiny house is just as important as the exterior. Carefully incorporating interior elements will ensure that your tiny house is functional, comfortable, and reflects your personal style. Here are some steps to help you effectively incorporate interior elements in Sketchup:
- Plan the layout: Begin by deciding on the layout of your interior space. Consider the different areas you want to include, such as the living area, kitchen, dining space, sleeping quarters, and bathroom. Think about the flow and functionality of each space.
- Create walls and partitions: Use Sketchup tools to draw interior walls or partitions to divide the different areas within your tiny house. Ensure that the walls align with your floor plan and that there is sufficient space for movement between areas.
- Add furniture and fixtures: Sketchup provides a wide range of 3D models for furniture and fixtures that you can incorporate into your design. Place items such as seating, tables, beds, kitchen appliances, and bathroom fixtures in their respective areas. Consider the scale and proportions of these elements to ensure they fit seamlessly into the space.
- Organize storage space: Storage is crucial in a tiny house. Explore options for integrated storage solutions like built-in cabinets, shelves, and hidden compartments. Utilize Sketchup’s component library or create custom storage solutions that maximize functionality while utilizing minimal space.
- Consider multi-purpose furniture: In a tiny house, multi-functional furniture is key to maximizing space. Explore options like sofa beds, convertible dining tables, and folding or collapsible furniture. These versatile pieces help optimize space and offer flexibility in how you use and arrange your interior.
- Pay attention to lighting: Lighting plays a significant role in the overall ambiance and functionality of your interior space. Experiment with different types of lighting fixtures, such as pendant lights, recessed lighting, or track lighting. Consider the placement of windows to maximize natural light and incorporate artificial lighting where needed.
- Add decorative elements: Inject your personal style into the interior by adding decorative elements such as artwork, plants, rugs, or curtains. These elements add personality and create a cozy and inviting atmosphere.
- Review and refine: Step back and review your interior design. Assess the overall functionality, flow, and aesthetics. Make any necessary adjustments or refinements to ensure that the interior elements work harmoniously together and meet your design goals.
By incorporating these steps and utilizing the resources available in Sketchup, you can effectively bring your interior design to life. Visualize and experiment with different arrangements, furniture pieces, and decorative elements to create a comfortable and visually appealing interior space within your tiny house.
Remember to strike a balance between functionality and aesthetics, optimizing every inch of space while maintaining a comfortable and inviting atmosphere. With the interior elements in place, you are one step closer to realizing your dream of a well-designed and livable tiny house.
Working with Materials and Textures
The choice of materials and textures is vital in creating a visually pleasing and realistic representation of your tiny house design. With Sketchup’s robust tools and features, you can experiment with different materials and textures to bring your design to life. Here’s how you can effectively work with materials and textures in Sketchup:
- Select materials: Sketchup provides a wide variety of pre-loaded materials, but you can also import custom materials and textures that align with your design vision. Consider the different surfaces within your tiny house, such as walls, floors, ceilings, and furniture, and select appropriate materials for each.
- Apply materials: Use Sketchup’s Paint Bucket tool to apply materials to specific surfaces. Simply click on the surface you want to apply the material to, then choose the desired material from the material library. This will give your design a realistic look and feel.
- Adjust material properties: Sketchup allows you to customize the properties of each material, such as reflectivity, roughness, color, and texture scale. Experiment with these properties to achieve the desired visual effect and realism in your design.
- Create custom textures: If you can’t find the exact texture you need, you can create custom textures in Sketchup. Use the Texture Tweaker tool to modify existing textures or import your own images to create unique and personalized textures.
- Apply textures: Once you have created or adjusted textures, use the Paint Bucket tool to apply them to specific surfaces. This can be useful for adding intricate details, patterns, or unique finishes to your design.
- Consider material compatibility: When selecting and applying materials, consider their compatibility with the real-world counterparts. For example, ensure that exterior materials are weather-resistant, flooring materials are durable, and wall materials are suitable for the interior climate.
- Preview materials in different lighting conditions: Sketchup allows you to preview your design in different lighting conditions, such as sunlight, shadows, or artificial lighting. This will give you a better understanding of how materials will look under different lighting scenarios.
- Review and refine: Take the time to review your material choices and their application within your design. Ensure that they accurately represent your vision and create the desired ambiance. Make any necessary adjustments or refinements to achieve the desired look and feel.
Working with materials and textures in Sketchup adds depth, realism, and visual interest to your tiny house design. It allows you to showcase different surfaces, finishes, and details to create a cohesive and visually appealing representation of your vision.
Remember to strike a balance between aesthetics and functionality when choosing materials. Consider the durability, maintenance requirements, and environmental impact of each material choice to ensure they align with your values and goals for your tiny house design.
By leveraging Sketchup’s material and texture tools, you can take your tiny house design to the next level, giving it a realistic and captivating appearance that truly reflects your creative vision.
Read more: How To Use Sketchup For Woodworking
Utilizing Sketchup Tools for Efficient Design
Sketchup offers a wide range of tools and features that can significantly enhance your efficiency and productivity when designing your tiny house. Learning to utilize these tools effectively will streamline your design process and allow you to create a detailed and cohesive representation. Here are some key Sketchup tools for efficient design:
- Grouping and Components: Use the Group and Component tools to group related objects or elements together. This allows for easier manipulation, editing, and movement of objects within your design. It also helps keep your model organized and reduces the risk of accidentally modifying parts you don’t want to change.
- Layers: Take advantage of Sketchup’s Layer feature to organize and manage different elements of your design. Assigning objects to different layers allows you to selectively show or hide specific parts of your model, making it easier to focus on specific areas or aspects of your design.
- Copy and Paste: The Copy and Paste tools in Sketchup are powerful time-savers. Use them to duplicate objects, walls, or furniture within your design. This is especially useful when creating symmetrical elements or repeating patterns.
- Follow Me: The Follow Me tool is particularly handy when creating complex shapes or extrusions. With this tool, you can extrude paths along curved or irregular lines, saving you from having to individually draw and push/pull each segment.
- Offset: The Offset tool allows you to create parallel lines or shapes at a fixed distance from an existing edge. This is extremely useful for replicating walls, creating interior spaces, or adding detailing to your design, such as trim or moldings.
- Measurement and Dimension Tools: Accurate measurements are crucial in architectural design. Utilize Sketchup’s measurement and dimension tools to ensure precise dimensions of objects, distances between elements, and overall scale accuracy.
- 3D Warehouse: The 3D Warehouse is an invaluable resource for finding pre-made 3D models to enhance your design. Save time by searching for furniture, appliances, fixtures, or decorative elements that can be easily integrated into your model.
- Outliner: The Outliner is a tool that allows you to view and manage the structure of your model. Use it to easily navigate through the various components and groups within your design, making it easier to select and modify specific objects.
- Plugins and Extensions: Sketchup’s plugin and extension ecosystem offers an array of additional tools and functionalities that can further enhance your design capabilities. Explore the Sketchup Extension Warehouse to find plugins that cater to your specific design needs.
By harnessing the power of these Sketchup tools, you can increase your efficiency, streamline complex tasks, and make your design process more enjoyable and productive. Take the time to explore and become familiar with these tools to unlock their full potential for your tiny house design.
Remember, practice is key to mastering these tools. The more you use them, the more comfortable and proficient you will become. Continuously improving your skillset will result in a more efficient and effective design process.
Finalizing the Design
As you near the completion of your tiny house design in Sketchup, it’s time to focus on finalizing the details and ensuring that your vision is fully realized. This stage involves reviewing and refining your design, making any necessary adjustments, and preparing your model for presentation or construction. Here’s how you can finalize your design:
- Review the overall design: Take a step back and assess your design as a whole. Check if it aligns with your initial concept and if all the elements come together harmoniously. Evaluate the functionality, aesthetics, and practicality of your tiny house.
- Refine the details: Zoom in on specific areas of your design and address any imperfections or inconsistencies. Pay attention to corners, edges, joints, and connections between different elements. Refine the dimensions, proportions, and alignments to ensure precision and coherence throughout the model.
- Check for errors: Run a thorough check for any errors or issues in your design. Look for overlapping surfaces, gaps, reversed faces, or other anomalies. Using Sketchup’s tools like the Solid Inspector extension can help identify and fix any potential errors before moving forward.
- Experiment with materials and colors: Fine-tune the material choices and colors of your design to achieve the desired look and feel. Adjust the properties and textures of the materials to ensure they accurately represent the real-world counterparts. Consider how lighting conditions affect the appearance of materials and make adjustments accordingly.
- Document your design: Create 2D views and sections of your model to document your design intent. This will aid in communicating your design to others, whether it’s for construction purposes or presentation to clients or stakeholders. Use Sketchup’s Layout feature to generate professional-looking drawings and documentation.
- Seek feedback: Share your design with others, such as friends, family, or fellow designers, to gather feedback and fresh perspectives. Constructive criticism can help you identify areas for improvement and make necessary adjustments to enhance your design.
- Finalize the floor plan: Revisit your floor plan and ensure that it meets your functional and lifestyle requirements. Verify the positioning of walls, doors, windows, and fixtures to optimize flow, circulation, and accessibility.
- Celebrate your completed design: Once you are satisfied with your final design, take a moment to celebrate your accomplishment. The effort and creativity you put into designing your tiny house deserve recognition.
By following these finalization steps, you can ensure that your tiny house design in Sketchup is polished, accurate, and ready for the next phase, whether it be construction, sharing with others, or further development.
Remember, the design process is iterative, and it’s natural to make changes and refinements along the way. Embrace the opportunity to continuously improve your design until you achieve your desired result.
Congratulations on reaching this stage of your design journey. Your finalized design is a testament to your creativity, skill, and vision for a beautiful and functional tiny house.
Conclusion
Designing a tiny house is an exciting and rewarding journey that allows you to unleash your creativity while embracing minimalism and sustainable living. With the help of Sketchup, you have the power to bring your design vision to life, incorporating every detail and ensuring a functional and aesthetically pleasing result.
Throughout this article, we have explored the various steps involved in using Sketchup to design a tiny house. From setting up the dimensions and scale to creating a floor plan, designing the exterior, incorporating interior elements, and finalizing the details, we have covered all the essential aspects of the design process.
By utilizing Sketchup’s powerful tools and features, you can efficiently navigate the design process, experiment with different materials and textures, and optimize the functionality of your tiny house design. Remember to strike a balance between aesthetics and practicality, considering factors such as space efficiency, natural lighting, ventilation, and storage solutions.
As you progress through the design stages, don’t hesitate to seek inspiration from architectural resources, online tutorials, or the Sketchup community. Gather feedback from others and embrace the opportunity to refine and improve your design. With each iteration, your vision will become clearer, and your tiny house design will evolve into a well-crafted and personalized space.
Whether you are an architectural professional or a DIY enthusiast, Sketchup empowers you to create a tiny house that truly reflects your unique style, values, and lifestyle. Embrace the process, unleash your creativity, and enjoy the satisfaction of transforming your dream into a tangible and functional design.
So, without further ado, fire up Sketchup, and let your imagination take flight as you embark on the exciting journey of designing your perfect tiny house!
Frequently Asked Questions about How To Use Sketchup To Design A Tiny House
Was this page helpful?
At Storables.com, we guarantee accurate and reliable information. Our content, validated by Expert Board Contributors, is crafted following stringent Editorial Policies. We're committed to providing you with well-researched, expert-backed insights for all your informational needs.


0 thoughts on “How To Use Sketchup To Design A Tiny House”