Home>Furniture & Design>Bathroom Accessories>How To Fix Toilet Seat Hinge
Bathroom Accessories
How To Fix Toilet Seat Hinge
Modified: March 22, 2024
Learn how to fix toilet seat hinge easily with our step-by-step guide. Find the best bathroom accessories for your home.
(Many of the links in this article redirect to a specific reviewed product. Your purchase of these products through affiliate links helps to generate commission for Storables.com, at no extra cost. Learn more)
Introduction
Fixing a loose or broken toilet seat hinge is a common household maintenance task that can be easily accomplished with the right tools and a little know-how. A wobbly toilet seat can be not only annoying but also a potential safety hazard. Whether it's due to wear and tear over time or a faulty installation, addressing this issue promptly is essential to ensure the comfort and stability of your toilet seat.
In this comprehensive guide, we will walk you through the step-by-step process of fixing a toilet seat hinge. From removing the old hinge to installing and securing the new one, we'll cover everything you need to know to tackle this task with confidence. By following these instructions, you can restore the functionality and stability of your toilet seat, providing a more secure and comfortable experience for you and your household.
So, gather your tools, set aside some time, and let's dive into the process of fixing your toilet seat hinge. With a little effort and attention to detail, you can quickly resolve this common household issue and ensure that your bathroom remains a functional and comfortable space for all who use it.
Key Takeaways:
- Easily fix a wobbly toilet seat by removing the old hinge, cleaning the area, and installing a new hinge for a stable and secure bathroom experience.
- Ensure long-term stability and comfort by securing and testing the new hinge, providing a reliable solution to a common household maintenance issue.
Step 1: Remove the old hinge
Before you can install a new toilet seat hinge, it's crucial to remove the old, damaged hinge. This process requires careful attention to detail and the use of the right tools to ensure a smooth transition to the new hinge. Here's a detailed guide on how to remove the old hinge from your toilet seat:
-
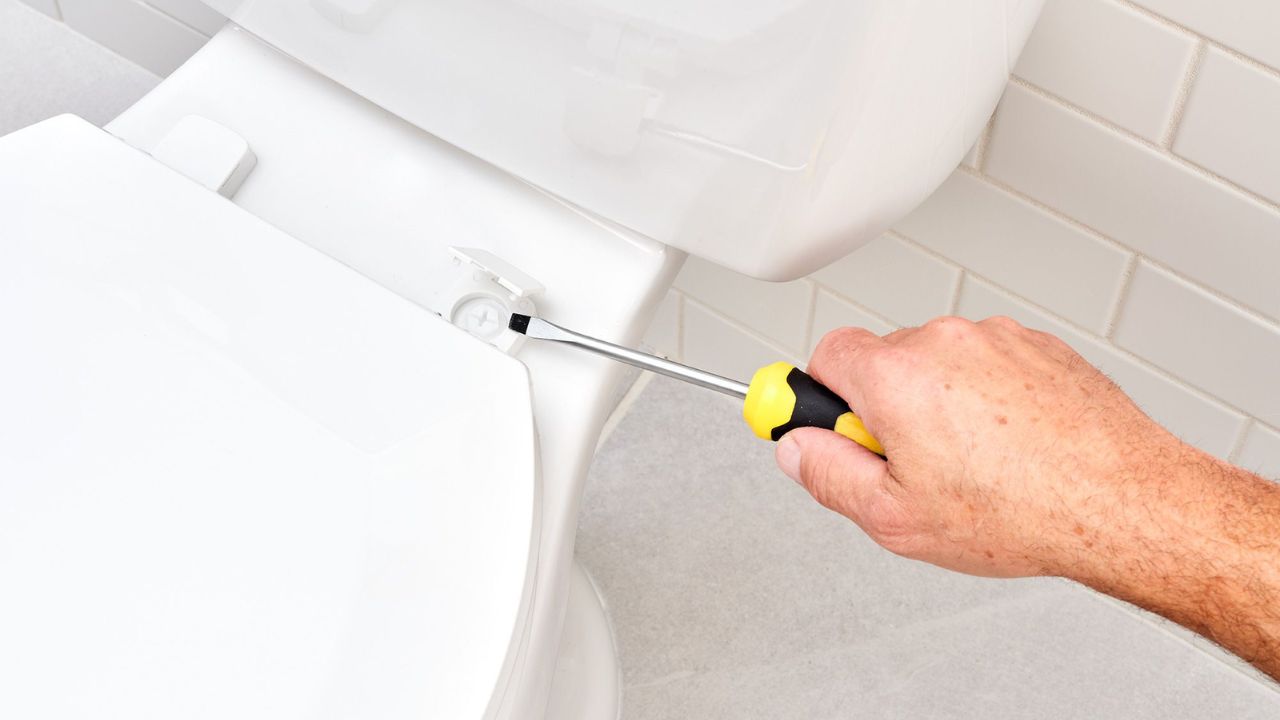
Gather the Necessary Tools: Start by gathering the tools you'll need for this task. You'll typically require a screwdriver, which may be either a flathead or Phillips head, depending on the type of screws used to secure the hinge. Having the appropriate screwdriver on hand will make the removal process much easier and prevent potential damage to the screws.
-
Locate the Screws: Inspect the underside of the toilet seat to locate the screws that secure the hinge to the bowl. These screws are usually positioned at the rear of the seat, attaching it to the hinges. Depending on the design of the toilet seat, there may be plastic caps covering the screws. Use a flathead screwdriver to carefully pry off these caps, revealing the screws beneath.
-
Unscrew the Hinge: Once the screws are exposed, use the appropriate screwdriver to carefully unscrew them from the hinges. It's important to support the seat from above to prevent it from falling when the screws are removed. Slowly and steadily turn the screwdriver counterclockwise to loosen and remove the screws. Be cautious not to apply excessive force, as this could cause damage to the toilet seat or bowl.
-
Remove the Old Hinge: With the screws fully removed, gently lift the old hinge and seat assembly away from the toilet bowl. Take care to handle the components with care, as some parts may be sharp or have rough edges. Place the old hinge and screws aside for proper disposal or recycling.
By following these steps, you can effectively remove the old hinge from your toilet seat, preparing the space for the installation of a new, secure hinge. With the old hinge out of the way, you're ready to proceed to the next step of cleaning the area and preparing for the installation of the new hinge.
Step 2: Clean the area
After removing the old hinge, it's essential to thoroughly clean the area to ensure a smooth and secure installation of the new hinge. Cleaning the toilet seat and bowl surface will not only improve the aesthetics but also provide a clean and stable foundation for the new hinge. Here's a detailed guide on how to effectively clean the area around the toilet seat:
-
Gather Cleaning Supplies: Before starting the cleaning process, gather the necessary cleaning supplies. You'll need mild soap or a gentle bathroom cleaner, a sponge or soft cloth, and warm water. Additionally, having a disinfectant spray or wipes on hand can help sanitize the area, promoting a hygienic environment in your bathroom.
-
Remove Residue and Debris: Inspect the surface of the toilet bowl and seat for any residue or debris left behind after removing the old hinge. Use a damp sponge or cloth to wipe away any dust, grime, or leftover adhesive from the previous hinge. Pay close attention to the areas around the screw holes, ensuring they are free of any obstructions that could affect the installation of the new hinge.
-
Clean and Disinfect: Apply a small amount of mild soap or bathroom cleaner to the sponge or cloth, and gently scrub the surfaces of the toilet seat and bowl. Focus on removing any stains, watermarks, or lingering dirt to restore a clean and polished appearance. After cleaning, use a disinfectant spray or wipes to thoroughly sanitize the area, eliminating any germs or bacteria that may have accumulated.
-
Dry the Area: Once the surfaces are clean and sanitized, use a dry cloth to thoroughly dry the toilet seat and bowl. Ensuring that the area is completely dry will prevent any moisture from interfering with the installation of the new hinge and help maintain the cleanliness of the toilet area.
By following these steps, you can effectively clean the area around the toilet seat, preparing it for the installation of the new hinge. A clean and well-prepared surface will facilitate a secure and stable attachment of the new hinge, ensuring that your toilet seat remains in optimal condition for long-term use. With the area cleaned and prepped, you're now ready to proceed to the next step of installing the new hinge securely.
Step 3: Install the new hinge
With the old hinge removed and the area thoroughly cleaned, you're now ready to install the new hinge for your toilet seat. This step involves carefully positioning and attaching the new hinge to ensure a secure and stable fit. Here's a detailed guide on how to effectively install the new hinge:
-
Inspect the New Hinge: Before installation, carefully examine the new hinge to familiarize yourself with its components and design. Ensure that all necessary parts, including screws and any accompanying hardware, are readily available. Familiarizing yourself with the new hinge will streamline the installation process and help you identify the correct orientation for attachment.
-
Position the Hinge: Place the new hinge in the correct position on the underside of the toilet seat. Align the screw holes on the hinge with the corresponding holes on the seat, ensuring that the hinge is centered and evenly positioned. Take care to orient the hinge in the proper direction, as indicated by any directional markings or instructions provided with the new hinge.
-
Insert and Secure the Screws: With the hinge positioned correctly, insert the screws through the screw holes on the hinge and seat. Use the appropriate screwdriver to tighten the screws, securing the hinge in place. Start by loosely threading the screws to ensure proper alignment before fully tightening them. Avoid over-tightening the screws, as this could potentially damage the hinge or the seat.
-
Check for Stability: Once the screws are securely in place, gently test the stability of the newly installed hinge. Ensure that it is firmly attached to the seat and that there is no wobbling or movement. If necessary, make minor adjustments to the positioning of the hinge to achieve optimal stability and alignment.
-
Double-Check the Fit: After securing the hinge, double-check the fit and alignment of the toilet seat on the bowl. Ensure that the seat rests evenly and securely on the bowl, with the new hinge providing stable support. Test the seat by gently opening and closing it to confirm that the hinge is securely installed and functioning as intended.
By following these steps, you can effectively install the new hinge for your toilet seat, ensuring a secure and stable attachment that enhances the overall functionality and comfort of your bathroom. With the new hinge in place, you're now ready to proceed to the next step of securing the hinge to complete the installation process.
To fix a toilet seat hinge, start by removing the seat and inspecting the hinges for any damage. If the hinges are loose, tighten the screws or bolts holding them in place. If the hinges are broken, replace them with new ones.
Step 4: Secure the hinge in place
Once the new hinge is correctly installed, the next crucial step is to secure it in place to ensure long-term stability and functionality. Properly securing the hinge will prevent any potential loosening or shifting over time, providing a reliable and durable attachment for your toilet seat. Here's a detailed guide on how to effectively secure the hinge in place:
-
Tighten the Screws: Using the appropriate screwdriver, carefully tighten the screws that secure the hinge to the toilet seat. Start by gently tightening each screw, ensuring that they are snugly in place without over-tightening, which could lead to damage. It's essential to achieve a balanced and secure fit for each screw to evenly distribute the pressure and maintain stability.
-
Check for Alignment: As you tighten the screws, periodically check the alignment and positioning of the hinge. Ensure that it remains centered and level, with no visible tilting or misalignment. Adjust the screws as needed to maintain proper alignment, as a securely aligned hinge is essential for the overall stability of the toilet seat.
-
Apply Threadlocker (Optional): For an added layer of security, consider applying a small amount of threadlocker to the screw threads before tightening them. Threadlocker is a specialized adhesive that helps prevent screws from loosening due to vibrations or regular use. However, exercise caution and follow the manufacturer's instructions when using threadlocker to avoid over-application.
-
Test the Stability: Once the screws are securely tightened, test the stability of the hinge by gently applying pressure to the toilet seat. Check for any movement or wobbling, ensuring that the hinge remains firmly in place. If any instability is detected, re-evaluate the tightness of the screws and make necessary adjustments to achieve a secure fit.
-
Inspect the Seat: After securing the hinge, thoroughly inspect the entire toilet seat assembly to confirm that the hinge is securely in place. Check for any signs of shifting or instability, and ensure that the seat rests evenly on the bowl without any rocking or movement. A securely attached hinge will contribute to the overall comfort and safety of the toilet seat.
By following these steps, you can effectively secure the new hinge in place, ensuring a stable and reliable attachment for your toilet seat. With the hinge securely fastened, you can proceed to the final step of testing the new hinge to confirm its functionality and stability.
Read also: 12 Amazing Toilet Seat Hinge for 2024
Step 5: Test the new hinge
After successfully installing and securing the new hinge for your toilet seat, it's essential to thoroughly test its functionality and stability. Testing the new hinge will ensure that it provides the necessary support and durability for the toilet seat, allowing you to identify any potential issues and make adjustments as needed. Here's a detailed guide on how to effectively test the new hinge:
-
Check for Smooth Movement: Begin by gently opening and closing the toilet seat to assess the movement facilitated by the new hinge. The seat should move smoothly without any resistance or unevenness. Pay close attention to any signs of sticking or misalignment, as these could indicate improper installation or fit.
-
Evaluate Stability: Apply gentle pressure to the seat in various directions to evaluate its stability. The seat should remain firmly in place without any wobbling or shifting. Testing the stability of the seat will help confirm that the new hinge provides adequate support and prevents any unwanted movement during regular use.
-
Inspect Screw Tightness: Revisit the screws securing the hinge and ensure that they remain snug and properly tightened. Periodically checking the tightness of the screws will help prevent potential loosening over time, maintaining the stability of the hinge and the overall integrity of the toilet seat.
-
Test Durability: Open and close the seat multiple times to simulate regular usage and assess the durability of the new hinge. The hinge should withstand repeated movement without showing signs of wear or strain. Testing its durability will provide valuable insight into its long-term performance and reliability.
-
Verify Alignment: Confirm that the hinge remains properly aligned with the toilet seat and bowl. Any misalignment could lead to instability or premature wear, so ensuring that the hinge maintains its intended position is crucial for its functionality and longevity.
-
Ensure Comfort: Sit on the toilet seat and assess its comfort and stability. The seat should provide a secure and comfortable experience, with the new hinge contributing to its overall support and reliability.
By thoroughly testing the new hinge, you can confirm its functionality and stability, addressing any potential issues before they escalate. A well-installed and properly functioning hinge will contribute to the comfort and safety of your toilet seat, ensuring a reliable and durable fixture in your bathroom. With the new hinge successfully tested and confirmed, you can rest assured that your toilet seat is in optimal condition for everyday use.
Conclusion
In conclusion, addressing a loose or broken toilet seat hinge is a manageable task that can significantly enhance the comfort and safety of your bathroom. By following the step-by-step process outlined in this guide, you can effectively resolve this common household issue and ensure that your toilet seat remains stable and secure for long-term use.
The process begins with the careful removal of the old hinge, requiring attention to detail and the use of the appropriate tools. Once the old hinge is removed, thorough cleaning of the area sets the stage for the installation of the new hinge, providing a clean and stable foundation for the attachment. Installing the new hinge involves precise positioning and secure attachment, ensuring that it provides the necessary support for the toilet seat.
Securing the new hinge is a critical step that contributes to its long-term stability and functionality. Properly tightening the screws and checking for alignment are essential for maintaining a reliable attachment that withstands regular use. Thoroughly testing the new hinge confirms its smooth movement, stability, and durability, ensuring that it meets the necessary standards for everyday comfort and safety.
By successfully completing the process of fixing your toilet seat hinge, you can enjoy the peace of mind that comes with a secure and stable fixture in your bathroom. The attention to detail and careful execution of each step contribute to the overall functionality and comfort of your toilet seat, providing a reliable and durable solution to a common household maintenance issue.
With the new hinge securely in place and thoroughly tested, you can confidently use your toilet seat without concerns about wobbling or instability. This comprehensive guide empowers you to take proactive measures in maintaining the functionality and safety of your bathroom, ensuring that it remains a comfortable and reliable space for all who use it.
Incorporating these maintenance tasks into your household routine not only enhances the longevity of your bathroom fixtures but also contributes to a well-maintained and enjoyable living environment. By addressing issues such as a loose or broken toilet seat hinge promptly, you can uphold the comfort and functionality of your home, creating a space that promotes convenience and peace of mind for you and your household.
Frequently Asked Questions about How To Fix Toilet Seat Hinge
Was this page helpful?
At Storables.com, we guarantee accurate and reliable information. Our content, validated by Expert Board Contributors, is crafted following stringent Editorial Policies. We're committed to providing you with well-researched, expert-backed insights for all your informational needs.


0 thoughts on “How To Fix Toilet Seat Hinge”