Home>Renovation & DIY>Home Renovation Guides>How To Fix A Storm Door Hinge
Home Renovation Guides
How To Fix A Storm Door Hinge
Modified: October 20, 2024
Learn how to fix a storm door hinge with our comprehensive home renovation guide. Get step-by-step instructions and expert tips.
(Many of the links in this article redirect to a specific reviewed product. Your purchase of these products through affiliate links helps to generate commission for Storables.com, at no extra cost. Learn more)
Introduction
Welcome to the comprehensive guide on fixing a storm door hinge! A storm door serves as an additional barrier against the elements, providing protection and enhancing the energy efficiency of your home. However, a malfunctioning hinge can compromise its functionality and security. Fear not, as this step-by-step tutorial will equip you with the knowledge and skills to address this issue effectively.
Whether your storm door creaks, sags, or fails to close properly, a faulty hinge is often the culprit. By understanding the underlying causes and learning the necessary techniques, you can restore your storm door to its optimal condition, ensuring smooth operation and enhanced durability.
In the following sections, we will delve into the assessment of the problem, the tools and materials required, the step-by-step process of removing, adjusting, and replacing the hinge pins, and finally, testing the door to ensure that it functions seamlessly. With this guide at your disposal, you'll be empowered to tackle this home maintenance task with confidence and precision.
Let's embark on this journey to restore the functionality and aesthetics of your storm door, enhancing the comfort and security of your home in the process. So, roll up your sleeves, gather your tools, and let's dive into the world of storm door hinge repair!
Key Takeaways:
- Fixing a storm door hinge involves assessing the problem, gathering tools and materials, removing and replacing hinge pins, adjusting the hinge, and testing the door for smooth operation. It’s a DIY project that enhances home security and comfort.
- By following the step-by-step guide, you’ll gain valuable skills in home maintenance and repair. Regular care and prompt attention to hinge issues can prevent bigger problems, ensuring a welcoming and secure home environment.
Read more: How To Fix A Cabinet Door Hinge
Assessing the Problem
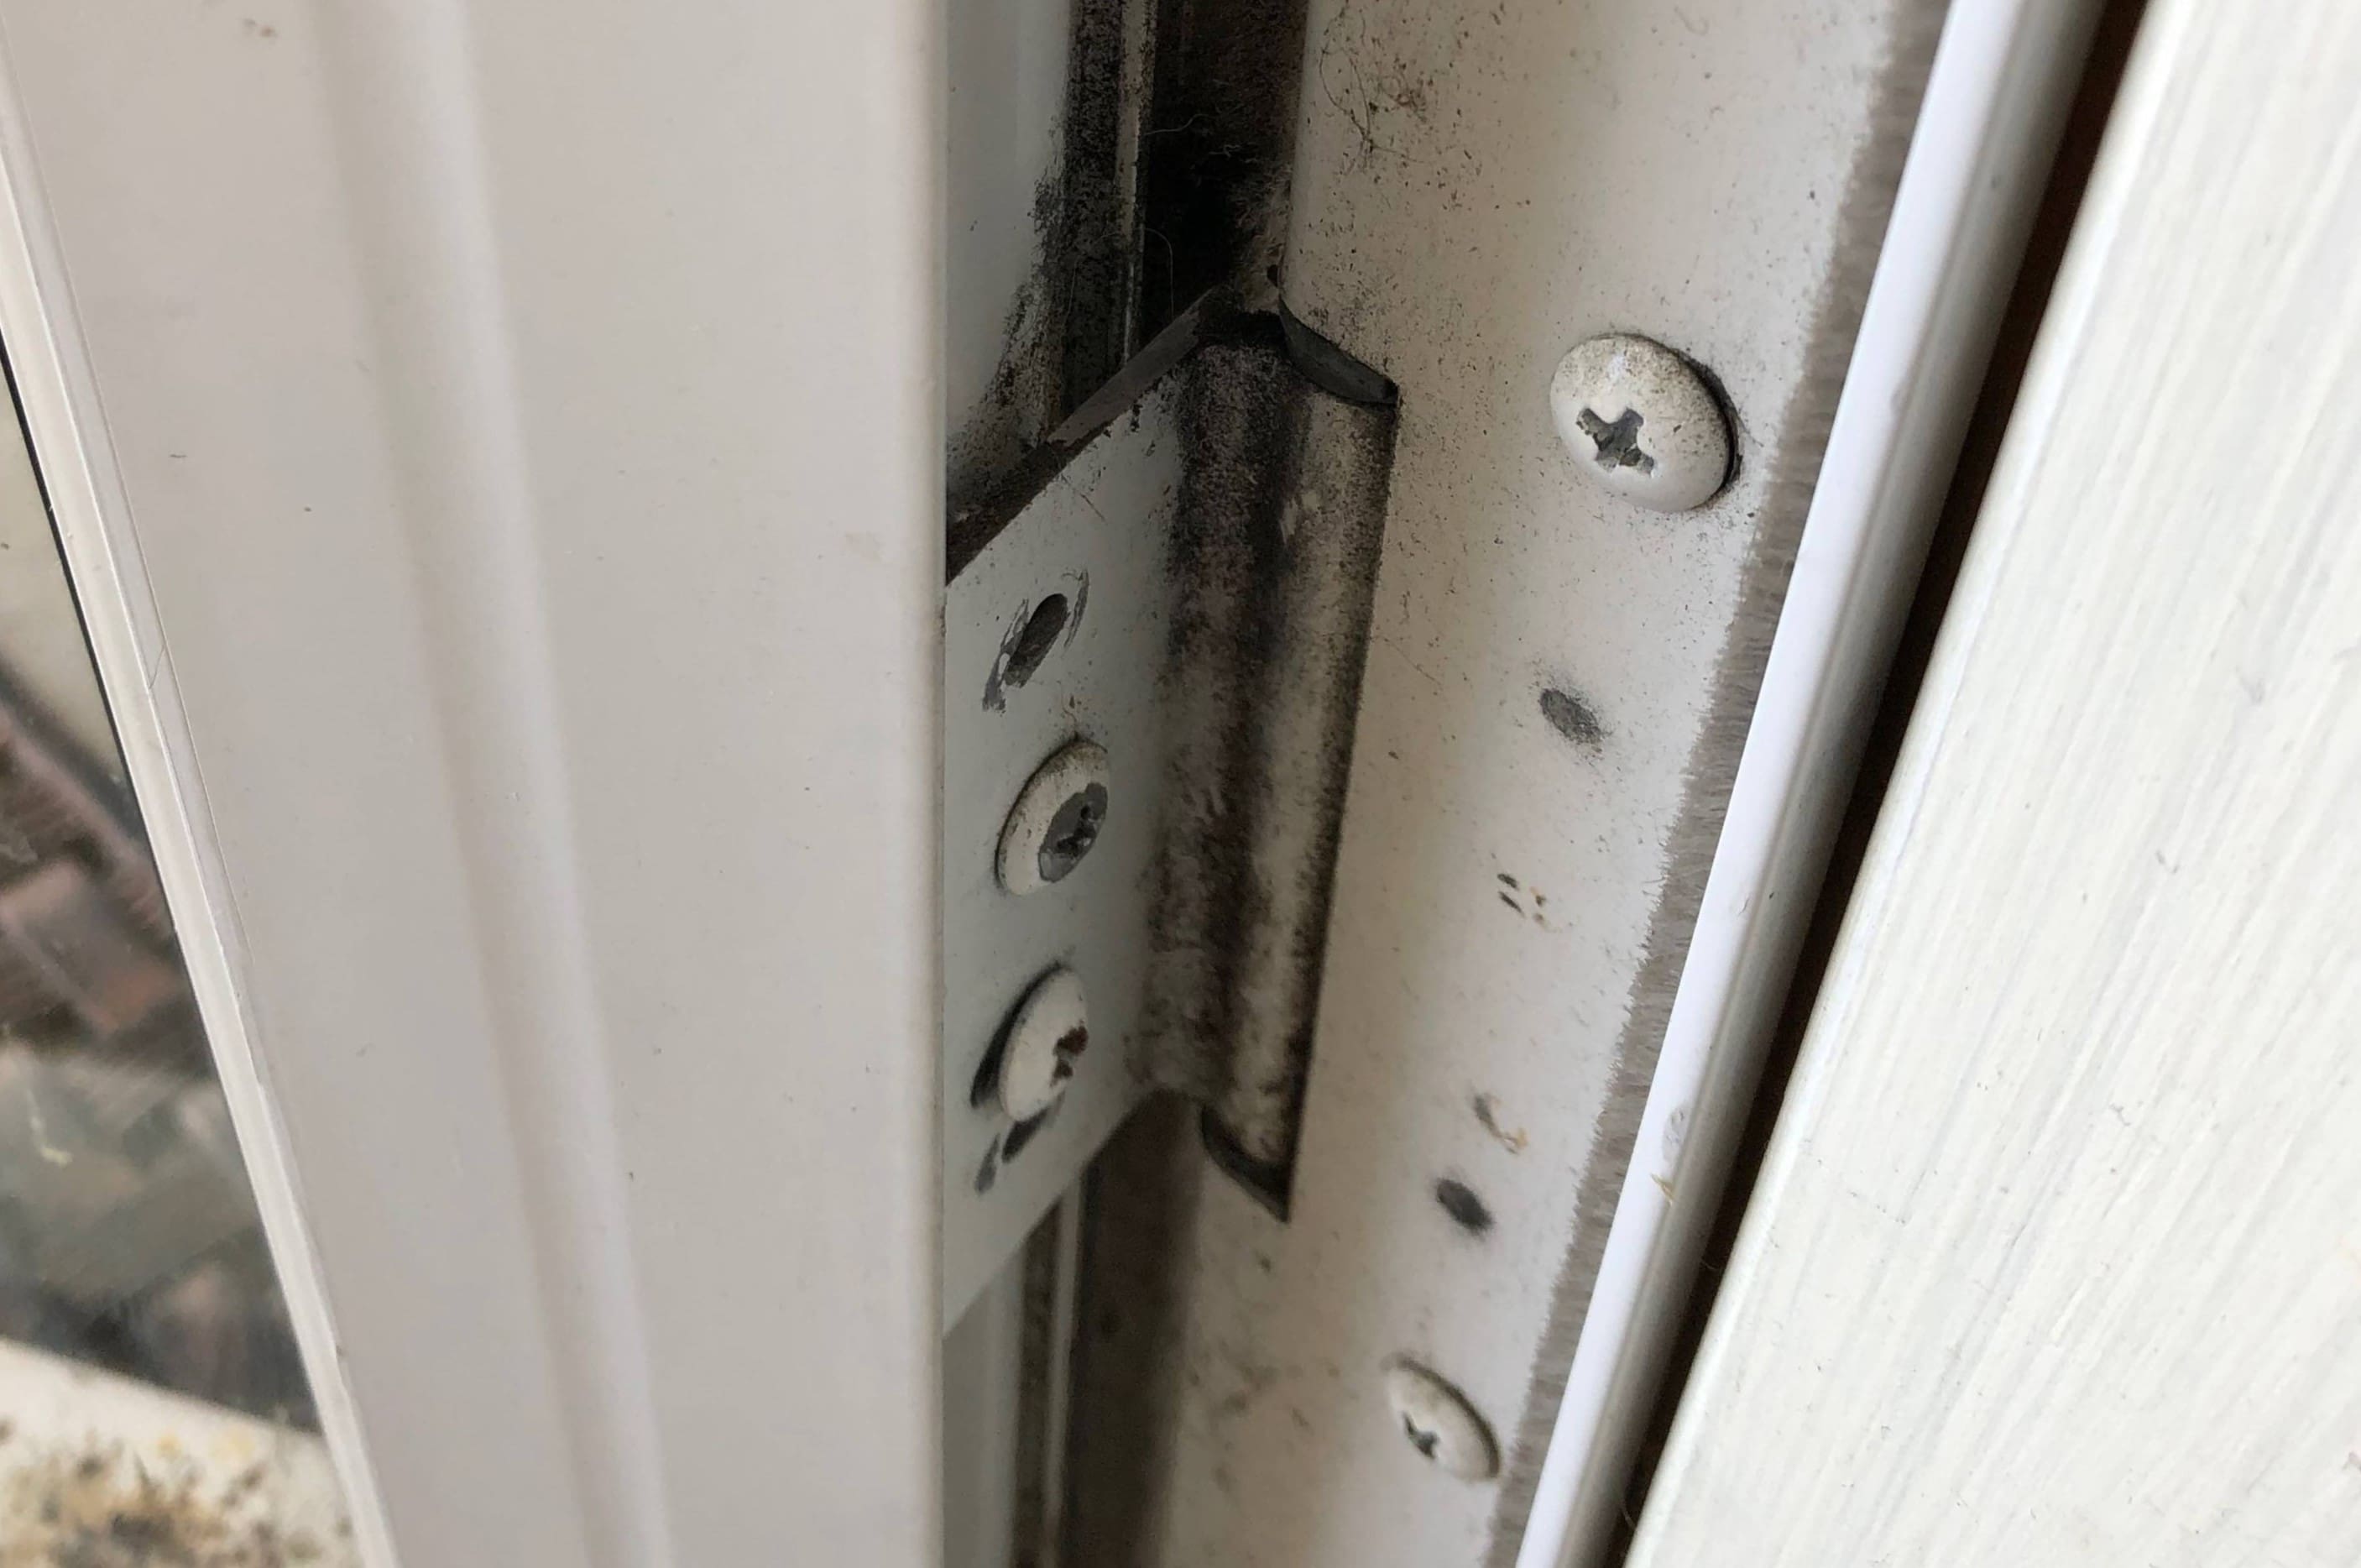
Before diving into the repair process, it’s crucial to assess the specific issues affecting your storm door hinge. Common problems include creaking or squeaking sounds, difficulty in opening or closing the door, misalignment, or visible damage to the hinge components. By carefully observing the door’s behavior and inspecting the hinge mechanism, you can pinpoint the root cause of the malfunction.
Start by opening and closing the storm door several times while paying close attention to any unusual sounds or resistance. Take note of any visible misalignment or gaps between the door and the frame. Additionally, inspect the hinge components for signs of wear, rust, or damage, as these can significantly impact the door’s functionality.
If the door creaks or squeaks, it’s likely that the hinges require lubrication. This can be addressed during the repair process by applying a suitable lubricant to the hinge components. For issues related to misalignment or structural damage, a more comprehensive approach may be necessary, involving adjustments or replacement of specific parts.
By thoroughly assessing the problem, you’ll gain valuable insights into the nature of the hinge issues, enabling you to proceed with the appropriate repair techniques. Understanding the specific challenges your storm door hinge is facing is the first step towards restoring its smooth operation and prolonging its lifespan.
Now that you’ve identified the symptoms affecting your storm door hinge, it’s time to gather the essential tools and materials required for the repair process. With a clear understanding of the problem and the necessary resources at hand, you’re well-prepared to embark on the journey of fixing your storm door hinge.
Tools and Materials Needed
Before initiating the repair of your storm door hinge, it’s essential to gather the necessary tools and materials to ensure a smooth and efficient process. Here’s a comprehensive list of items you’ll need:
Tools:
- Screwdriver (Phillips and flat-head)
- Adjustable wrench
- Hammer
- Pliers
- Power drill (if replacing screws or drilling new holes)
Materials:
- Hinge lubricant or penetrating oil
- Replacement hinge pins (if existing ones are damaged)
- New screws (if the existing ones are stripped or damaged)
- Wood filler (if repairing stripped screw holes)
- Sandpaper
- Paint or wood finish (if touch-ups are needed)
Having these tools and materials readily available will streamline the repair process and enable you to address a wide range of hinge-related issues effectively. Whether it’s lubricating the hinges, adjusting the door’s alignment, or replacing damaged components, you’ll be well-equipped to handle the task at hand.
Additionally, it’s advisable to wear appropriate safety gear, including gloves and protective eyewear, especially when dealing with power tools or handling lubricants and adhesives. Prioritizing safety throughout the repair process is paramount to a successful and injury-free experience.
With the tools and materials assembled, you’re now prepared to delve into the step-by-step process of addressing the specific issues affecting your storm door hinge. From removing the hinge pins to testing the door’s functionality, each stage of the repair journey will be facilitated by the presence of these essential resources.
Read more: How To Fix Gap At Top Of Storm Door
Removing the Hinge Pins
Removing the hinge pins is often the initial step in addressing common storm door hinge issues. These pins secure the hinge components and allow for the smooth movement of the door. Whether you’re dealing with a creaking hinge, misalignment, or the need for hinge lubrication, the following steps will guide you through the process of safely removing the hinge pins:
Step 1: Prepare the Work Area
Ensure that the surrounding area is clear and that there is ample space to maneuver around the door. This will facilitate the unhindered removal of the hinge pins and minimize the risk of accidental damage to the door or surrounding surfaces.
Step 2: Position the Door
With the door in the closed position, locate the hinge pins on the top and bottom hinges. Depending on the hinge design, the pins may be accessible from the top or require the removal of a securing cap or cover.
Step 3: Loosen the Pins
Using a flat-head screwdriver and a hammer, gently tap the bottom of the hinge pin to loosen it from its secured position. Apply consistent but cautious force to avoid bending or damaging the pin during removal. If the pins are stubborn or corroded, a penetrating oil can be applied to facilitate their release.
Read more: How To Fix A Roll-Up Screen On A Storm Door
Step 4: Remove the Pins
Once the pins are loosened, continue tapping them upward until they are completely removed from the hinges. It’s advisable to support the door during this process to prevent it from shifting or becoming unbalanced as the pins are extracted.
Step 5: Store the Pins Safely
Place the removed hinge pins in a secure location, ensuring that they are kept together and away from the work area to prevent tripping hazards or misplacement.
By following these steps, you’ll successfully remove the hinge pins, laying the groundwork for subsequent hinge adjustments, lubrication, or component replacement. With the pins safely extracted, you’re now ready to address the specific issues affecting your storm door hinge with confidence and precision.
Adjusting the Hinge
Adjusting the hinge is a crucial step in restoring the functionality and alignment of your storm door. Whether the door exhibits signs of misalignment, difficulty in closing, or uneven gaps, the following steps will guide you through the process of adjusting the hinge to achieve optimal door operation:
Step 1: Evaluate the Alignment
With the hinge pins removed, carefully assess the alignment of the door within the frame. Look for uneven gaps, areas of friction, or any signs of misalignment that may impede the smooth operation of the door.
Read more: How To Paint A Storm Door
Step 2: Loosen the Hinge Screws
Using an appropriate screwdriver, loosen the screws securing the hinge to the door frame. It’s important to provide enough leeway for adjustments without fully removing the screws at this stage.
Step 3: Make Incremental Adjustments
Gradually shift the position of the hinge to correct the door’s alignment. Depending on the specific issues observed, you may need to raise, lower, or reposition the hinge to achieve optimal alignment and smooth operation.
Step 4: Secure the Hinge
Once the desired adjustment is made, carefully tighten the hinge screws to secure the hinge in its new position. Ensure that the screws are fastened firmly but avoid over-tightening, which can lead to unnecessary strain on the hinge and frame.
Step 5: Test the Door Movement
With the hinge adjustment completed, open and close the door to assess its movement and alignment. Look for smooth operation, even gaps around the frame, and improved functionality compared to the initial state.
Read more: Troubleshooting Door Hinge Problems
Step 6: Fine-Tune as Needed
If further adjustments are required, repeat the process, making incremental changes until the door operates seamlessly and aligns evenly within the frame. Patience and attention to detail are key to achieving optimal results.
By following these steps, you’ll effectively adjust the hinge to address misalignment and improve the functionality of your storm door. With the hinge realigned and secured, you’re one step closer to restoring the smooth operation and aesthetic appeal of your storm door.
Replacing the Hinge Pins
After addressing alignment issues and making necessary adjustments to the hinge, the next step involves replacing the hinge pins to secure the hinge components and ensure the smooth operation of your storm door. Follow these steps to safely and effectively replace the hinge pins:
Step 1: Select the Replacement Pins
Choose replacement hinge pins that are compatible with the specific hinge design and dimensions of your storm door. Ensure that the new pins match the required length and diameter to guarantee a secure fit within the hinges.
Step 2: Position the Door
With the door in the open position, align the hinge knuckles and prepare to insert the replacement pins. If necessary, enlist the assistance of a second person to support the door during this process, especially for heavier storm doors.
Read more: Installing A Storm Door
Step 3: Insert the Pins
Carefully insert the replacement hinge pins into the hinge knuckles, starting from the bottom hinge and progressing to the top hinge. Apply gentle pressure to ensure that the pins slide into place smoothly without causing damage to the hinge or surrounding surfaces.
Step 4: Secure the Pins
Once the replacement pins are in position, verify that they are fully seated within the hinge knuckles. Ensure that the pins align with the hinge components and that they are flush with the hinge barrels to facilitate seamless door movement.
Step 5: Test the Door Movement
With the replacement pins securely in place, open and close the door to confirm that it moves smoothly and without resistance. Verify that the hinge components are aligned and that the door operates as intended following the pin replacement.
Step 6: Apply Lubrication
To further enhance the functionality of the hinge and promote smooth movement, apply a suitable hinge lubricant to the newly replaced pins. This will minimize friction and prolong the lifespan of the hinge components.
By following these steps, you’ll successfully replace the hinge pins, ensuring the secure attachment of the hinge components and the optimal functionality of your storm door. With the pins in place and the door operating smoothly, you’re well on your way to completing the hinge repair process and enjoying the enhanced performance of your storm door.
Read more: How To Unlock A Storm Door
Testing the Door
After completing the necessary repairs and adjustments to the storm door hinge, it’s essential to conduct a comprehensive test to ensure that the door operates smoothly and aligns properly within the frame. Follow these steps to effectively test the functionality of your storm door:
Step 1: Open and Close the Door
Begin by gently opening the door and observing its movement. Note any resistance, uneven gaps, or unusual sounds that may indicate lingering issues with the hinge or door alignment. Close the door and repeat this process to assess its operation from various angles.
Step 2: Check for Even Alignment
As the door opens and closes, inspect the alignment between the door and the frame. Look for consistent gaps along the top, bottom, and sides of the door, ensuring that it maintains even contact with the frame throughout its movement. Uneven gaps may indicate lingering misalignment issues that require further adjustment.
Step 3: Listen for Unusual Sounds
Pay attention to any creaking, squeaking, or grinding noises as the door moves. These sounds may indicate areas of friction or insufficient lubrication within the hinge components. If such sounds persist, consider applying additional lubricant to the hinges to minimize friction and promote smooth operation.
Read more: How To Shim A Storm Door
Step 4: Test the Door Latch
Engage the door latch to secure the door in the closed position. Verify that the latch aligns properly with the strike plate and securely holds the door in place without excessive force or misalignment. If adjustments are needed, revisit the hinge alignment and latch mechanism to ensure proper functionality.
Step 5: Assess Overall Operation
Consider the overall operation of the door, including its ease of movement, alignment, and the absence of unusual sounds or resistance. A well-functioning storm door should open and close smoothly, align evenly within the frame, and secure effectively when latched.
Step 6: Make Further Adjustments if Necessary
If any issues are identified during the testing process, revisit the specific repair steps, such as hinge adjustment or lubrication, to address the lingering concerns. Fine-tune the hinge and door alignment as needed to achieve optimal functionality and smooth operation.
By conducting a thorough test of the storm door, you’ll gain valuable insights into the effectiveness of the hinge repairs and adjustments. With a keen eye for alignment, movement, and overall functionality, you can ensure that your storm door operates seamlessly, providing enhanced security and convenience for your home.
Conclusion
Congratulations on successfully navigating the process of fixing a storm door hinge! By following the step-by-step guidance provided in this comprehensive guide, you’ve acquired the knowledge and skills to address common hinge issues and restore the optimal functionality of your storm door.
Throughout this journey, you’ve assessed the specific problems affecting your storm door hinge, gathered the essential tools and materials, removed and replaced the hinge pins, made necessary adjustments, and thoroughly tested the door to ensure its seamless operation. Your dedication to this repair endeavor has not only enhanced the performance of your storm door but also empowered you with valuable home maintenance skills.
As you reflect on this experience, remember that regular maintenance and attentive care are essential for preserving the longevity and functionality of your home’s components, including storm doors and their hinges. By staying proactive and addressing issues promptly, you can prevent minor problems from escalating and ensure that your home remains a comfortable and secure haven for you and your loved ones.
Furthermore, the confidence and proficiency you’ve gained in repairing a storm door hinge can be applied to future home maintenance endeavors, fostering a sense of self-reliance and accomplishment. Whether it’s addressing other door-related issues, tackling minor repairs, or embarking on new DIY projects, your newfound skills will serve you well in maintaining a welcoming and well-maintained home environment.
As you conclude this repair journey, take pride in your ability to overcome challenges and enhance the functionality of your home. Your dedication to preserving the integrity of your storm door and the comfort of your living space is a testament to your resourcefulness and commitment to a well-maintained home.
With the storm door now operating seamlessly and the hinge-related issues resolved, take a moment to appreciate the impact of your efforts. Your home is now equipped with a fully functional and aesthetically pleasing storm door, providing enhanced security and protection against the elements for years to come.
Now that you've mastered fixing a storm door hinge, why not broaden your DIY skills even more? Our guide on home repair offers invaluable insights and practical advice to tackle various challenges around your house. From leaky faucets to creaky floors, this comprehensive resource ensures you're well-equipped to handle common repairs with confidence. Dive into our home repair guide and start transforming your space today!
Frequently Asked Questions about How To Fix A Storm Door Hinge
Was this page helpful?
At Storables.com, we guarantee accurate and reliable information. Our content, validated by Expert Board Contributors, is crafted following stringent Editorial Policies. We're committed to providing you with well-researched, expert-backed insights for all your informational needs.


0 thoughts on “How To Fix A Storm Door Hinge”