Home>Furniture & Design>Bathroom Accessories>How To Fix Cracked Toilet Seat
Bathroom Accessories
How To Fix Cracked Toilet Seat
Modified: October 20, 2024
Learn how to easily fix a cracked toilet seat with our step-by-step guide. Keep your bathroom looking great with our bathroom accessories expertise.
(Many of the links in this article redirect to a specific reviewed product. Your purchase of these products through affiliate links helps to generate commission for Storables.com, at no extra cost. Learn more)
Introduction
A cracked toilet seat can be a frustrating and unsightly issue in any bathroom. Whether the crack is small or substantial, addressing it promptly is crucial to prevent further damage and maintain the functionality and aesthetics of your toilet. Fortunately, with the right tools, materials, and a bit of know-how, you can tackle this problem effectively and restore your toilet seat to its former condition.
In this comprehensive guide, we will walk you through the step-by-step process of fixing a cracked toilet seat. From gathering the necessary tools and materials to reattaching the seat, we will cover each stage in detail, providing you with the knowledge and confidence to tackle this repair project with ease.
By following the instructions outlined in this guide, you can save time and money by avoiding the need for a costly replacement. Additionally, taking the initiative to repair the crack in your toilet seat demonstrates your resourcefulness and DIY prowess, allowing you to take pride in maintaining your home.
So, roll up your sleeves, gather your tools, and let's dive into the process of fixing that cracked toilet seat. With a little effort and the right approach, you'll have your toilet seat looking as good as new in no time.
Key Takeaways:
- Don’t let a cracked toilet seat stress you out! With the right tools and materials, you can easily fix it yourself, saving time and money while showcasing your DIY skills.
- By following a step-by-step process, you can confidently remove, assess, repair, and reattach a cracked toilet seat, demonstrating your resourcefulness and commitment to maintaining your home.
Read more: How To Fix A Toilet Seat Lid
Step 1: Gather Necessary Tools and Materials
Before embarking on the task of fixing a cracked toilet seat, it's essential to gather the required tools and materials. Having the right items at your disposal will streamline the repair process and ensure that you can address the issue effectively. Here's a comprehensive list of the tools and materials you'll need:
Tools:
- Screwdriver: To remove the screws holding the toilet seat in place.
- Putty Knife: For applying and smoothing out the repair compound.
- Sandpaper: To sand down the repaired area for a smooth finish.
- Disposable Gloves: For hand protection during the repair process.
- Safety Glasses: To protect your eyes from any debris or splinters.
Materials:
- Toilet Seat Repair Kit: This kit typically includes a repair compound and necessary instructions for application.
- Clean Cloth: For wiping down the toilet seat and ensuring a clean surface for the repair.
- Rubbing Alcohol: To clean and disinfect the cracked area before applying the repair compound.
- Protective Masking Tape: For masking off the area around the crack to prevent accidental application of the repair compound on unwanted areas.
- Disposable Container: To mix the repair compound as per the instructions provided in the repair kit.
By ensuring that you have all the tools and materials listed above, you'll be well-prepared to tackle the repair of your cracked toilet seat. This proactive approach will help you avoid interruptions during the repair process and enable you to focus on achieving a successful outcome.
With the necessary tools and materials in hand, you're ready to move on to the next step: removing the toilet seat and assessing the damage. This systematic approach will guide you through the repair process, ensuring that each stage is executed with precision and efficiency.
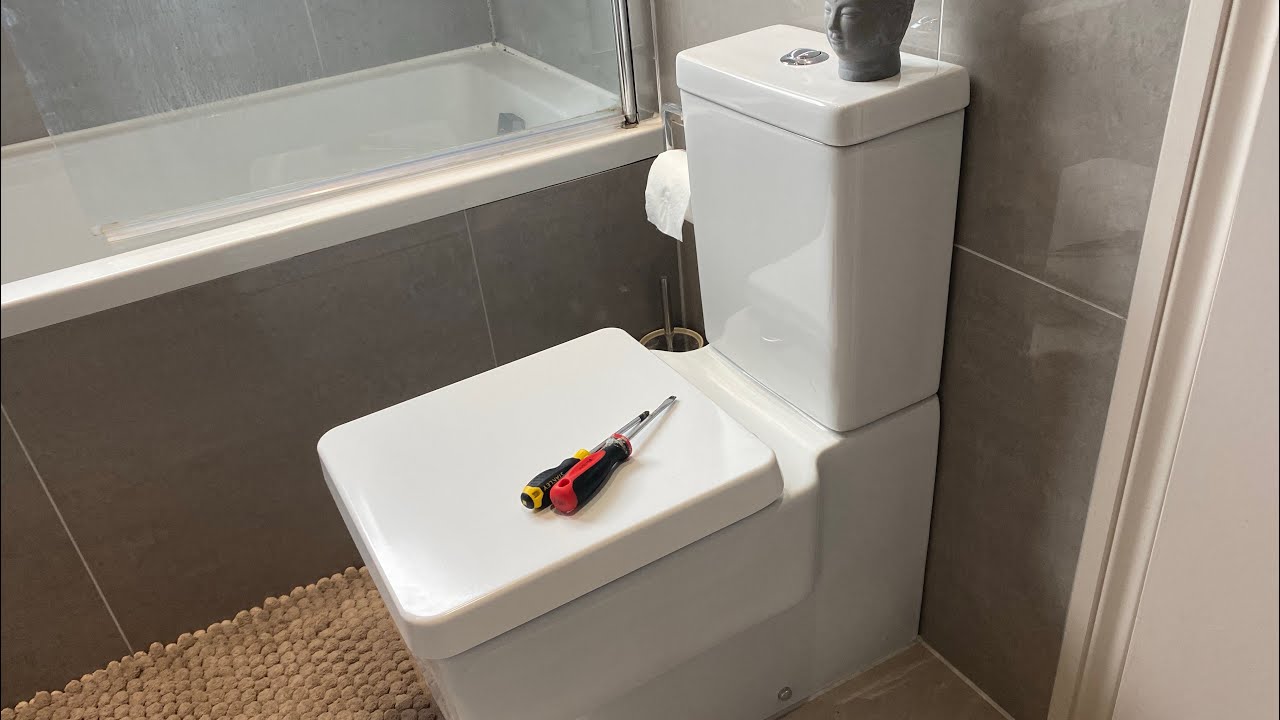
Step 2: Remove the Toilet Seat
Removing the toilet seat is the crucial first step in the process of fixing a cracked toilet seat. This task requires careful attention to detail and the use of the appropriate tools to ensure a smooth and efficient removal. Here's a detailed guide on how to remove the toilet seat:
-
Prepare the Work Area: Before starting, ensure that the area around the toilet is clear and accessible. This will provide you with ample space to maneuver and carry out the removal process without any obstructions.
-
Locate the Mounting Screws: Most toilet seats are secured to the toilet bowl with mounting screws located at the rear underside of the bowl. These screws are typically covered by decorative caps or plastic covers. Gently lift these covers to reveal the screws.
-
Use the Screwdriver: Once the mounting screws are exposed, use a screwdriver that matches the screw head type to loosen and remove the screws. It's important to hold the nut on the underside of the toilet bowl with one hand while unscrewing the screw with the other to prevent the nut from spinning.
-
Lift and Remove the Seat: With the screws removed, carefully lift the toilet seat and separate it from the toilet bowl. Be mindful of any remaining attachments or hinges, ensuring that the seat is detached completely.
-
Clean the Area: After removing the toilet seat, take the opportunity to clean the mounting area and the exposed toilet bowl surface. Use a mild cleaning solution and a clean cloth to wipe away any dirt or residue, preparing the surface for the next steps in the repair process.
By following these steps, you can successfully remove the toilet seat without encountering any complications. It's important to handle the seat with care during removal to avoid any accidental damage. With the seat removed, you can proceed to the next stage of assessing the damage and preparing for the repair process.
With the toilet seat successfully removed, you're now ready to move on to the next phase of fixing the cracked toilet seat. This systematic approach ensures that each step is completed with precision, setting the stage for a successful repair.
Read more: How To Fix A Cracked Toilet Tank
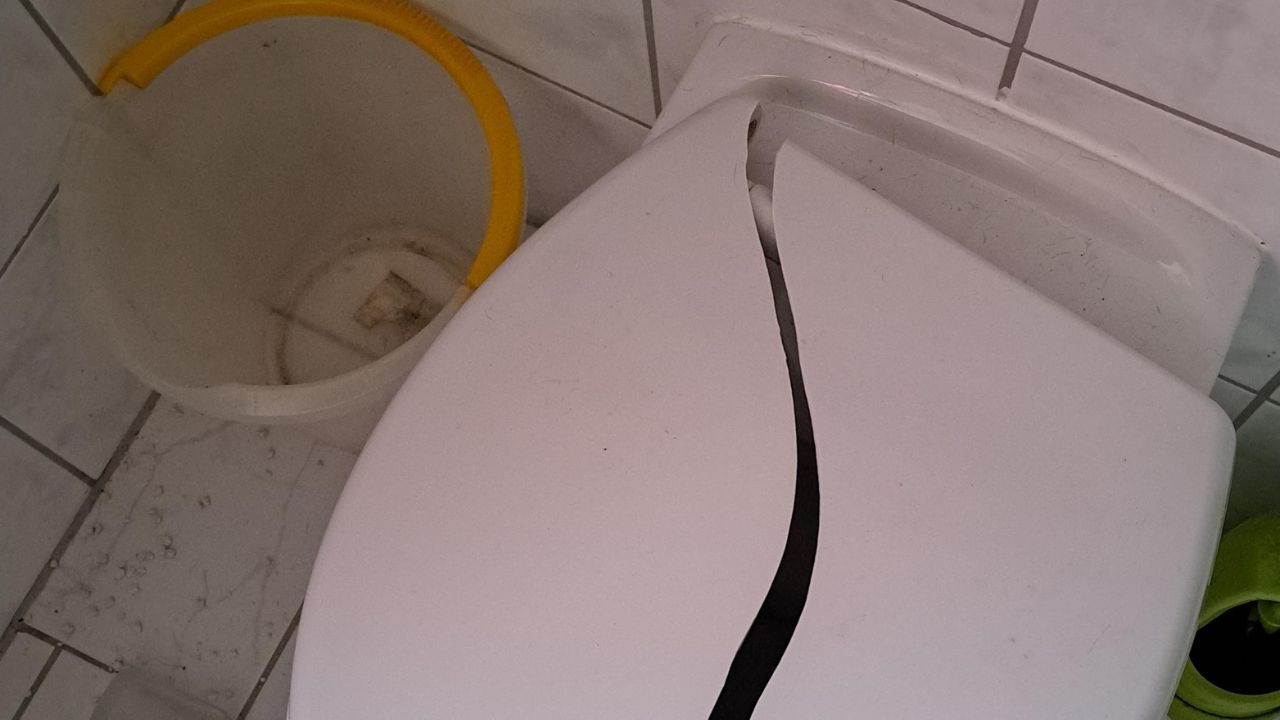
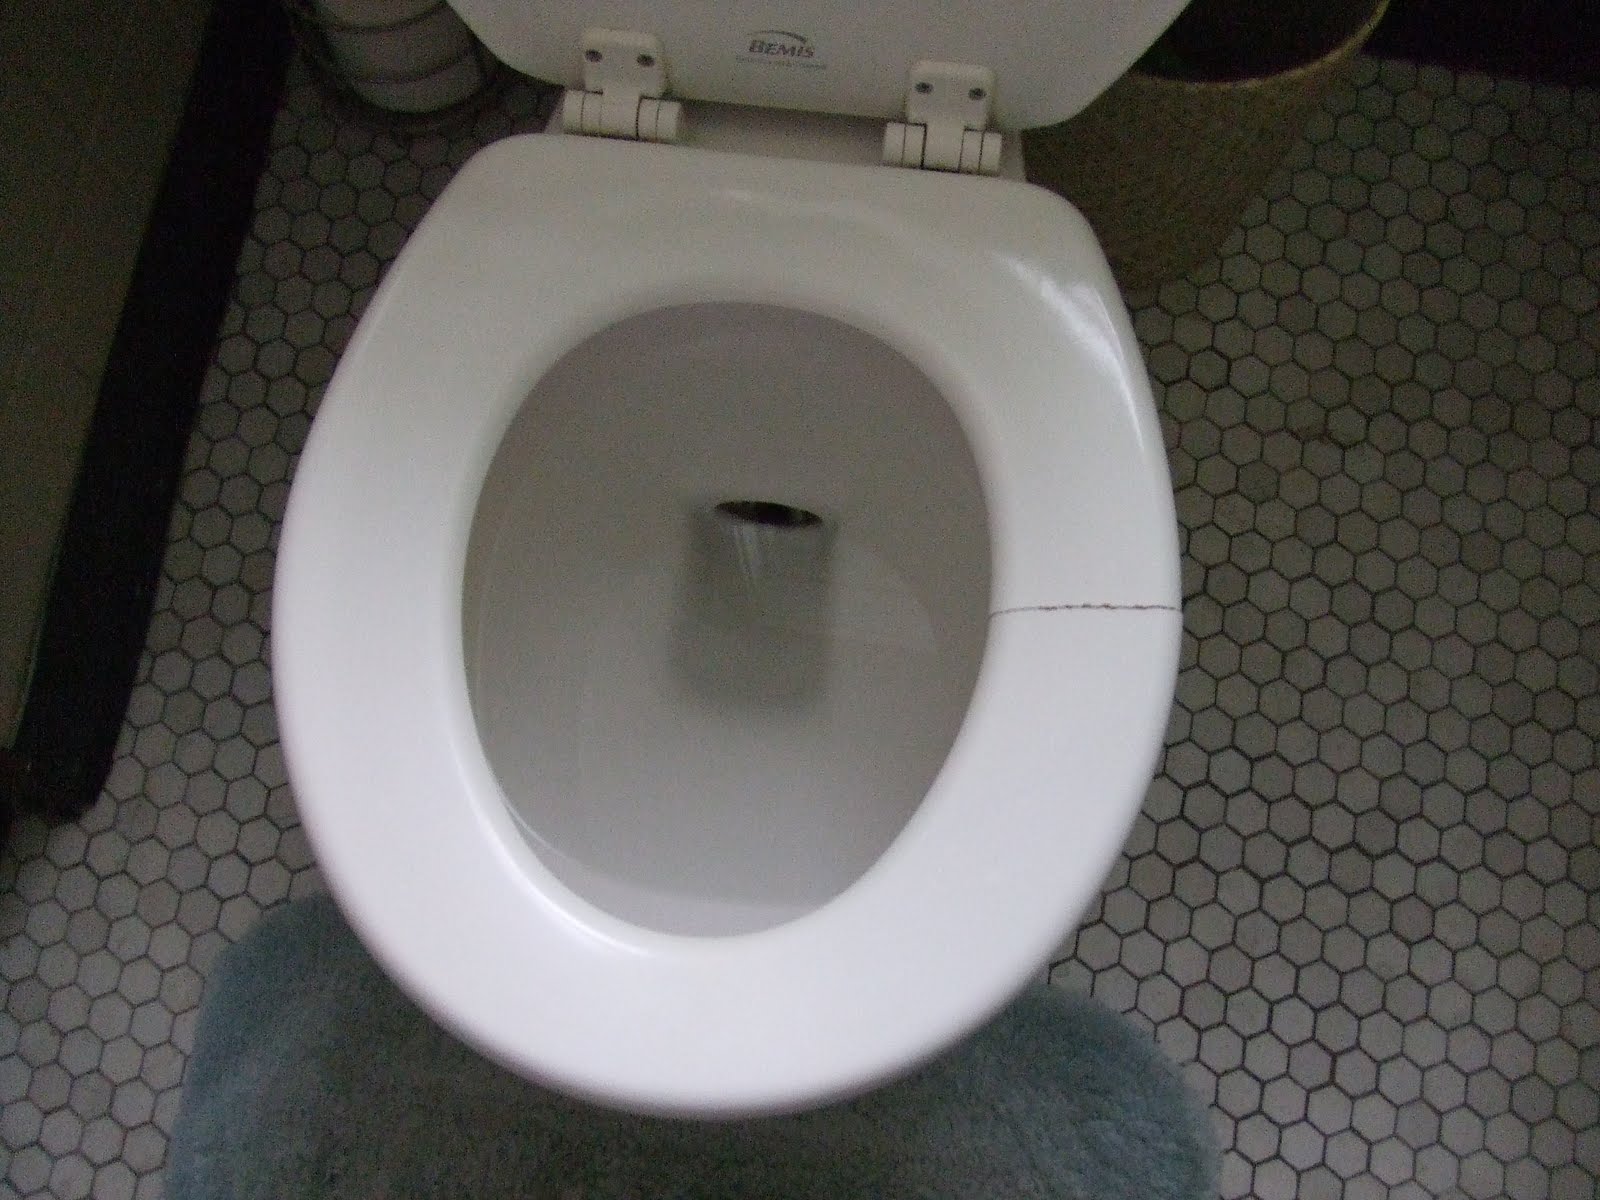
Step 3: Assess the Damage
After successfully removing the toilet seat, the next crucial step in the repair process is to thoroughly assess the extent of the damage. This assessment will provide valuable insights into the nature of the crack and help determine the most effective approach for the repair. Here's a detailed guide on how to assess the damage to your cracked toilet seat:
-
Examine the Crack: Carefully inspect the cracked area of the toilet seat, noting the size, depth, and location of the crack. Determine whether the crack is confined to the surface or if it extends into the structural components of the seat.
-
Check for Additional Damage: While assessing the crack, it's essential to check for any additional damage, such as splintering or weakening of the surrounding material. Thoroughly examine the area around the crack to identify any secondary issues that may need attention during the repair process.
-
Evaluate the Stability: Test the stability of the toilet seat to ensure that it remains structurally sound despite the presence of the crack. Gently press and apply pressure to different areas of the seat to gauge its stability and identify any potential weak points.
-
Consider the Material: Take into account the material of the toilet seat, whether it's made of wood, plastic, or another composite material. Different materials may require specific repair techniques and materials, so understanding the composition of the seat is essential for an effective repair.
-
Assess the Aesthetic Impact: Evaluate the aesthetic impact of the crack on the overall appearance of the toilet seat. Consider how the crack may affect the visual appeal of the seat and the surrounding bathroom environment.
By conducting a thorough assessment of the damage, you'll gain a comprehensive understanding of the condition of your cracked toilet seat. This assessment will serve as a foundation for determining the most suitable repair approach and ensuring that the repair is carried out with precision and effectiveness.
With the damage thoroughly assessed, you're now equipped with the insights needed to proceed to the next stage of the repair process: repairing the crack. This systematic approach ensures that each step is completed with attention to detail, setting the stage for a successful repair of your cracked toilet seat.
Step 4: Repair the Crack
Repairing the crack in your toilet seat is a critical stage in restoring its functionality and visual appeal. With the right approach and materials, you can effectively mend the crack and prevent it from compromising the integrity of the seat. Here's a detailed guide on how to repair the crack in your toilet seat:
-
Prepare the Surface: Begin by cleaning the cracked area with rubbing alcohol to remove any dirt, debris, or residue. This step ensures that the surface is free from contaminants, allowing the repair compound to adhere effectively.
-
Apply the Repair Compound: Using a putty knife, carefully apply the repair compound to the cracked area, ensuring that it fills the entire length of the crack. Smooth out the compound to create a seamless finish, blending it with the surrounding surface of the seat.
-
Follow Manufacturer Instructions: If you're using a toilet seat repair kit, it's essential to follow the manufacturer's instructions for mixing and applying the repair compound. Adhering to the provided guidelines will ensure that the repair is carried out according to the recommended specifications.
-
Allow for Proper Curing: After applying the repair compound, allow sufficient time for it to cure and harden as per the manufacturer's instructions. This curing process is crucial for ensuring the durability and longevity of the repair.
-
Sand and Smooth the Surface: Once the repair compound has cured, use sandpaper to gently sand down the repaired area, creating a smooth and even surface. This step helps blend the repaired section with the rest of the seat, ensuring a seamless finish.
-
Clean and Inspect: Wipe down the repaired area with a clean cloth to remove any residual dust or particles. Inspect the repaired crack to ensure that the surface is smooth and free from imperfections.
By following these steps, you can effectively repair the crack in your toilet seat, restoring its structural integrity and visual appeal. This meticulous approach ensures that the repair is carried out with precision, setting the stage for a successful restoration of your toilet seat.
With the crack successfully repaired, you're now ready to proceed to the final stage of the repair process: reattaching the toilet seat. This systematic approach ensures that each step is executed with care and attention to detail, culminating in a fully restored and functional toilet seat.
You can fix a cracked toilet seat by using a toilet seat repair kit. Clean the area, apply the repair compound, and let it dry. Sand it smooth and reattach the seat.
Step 5: Reattach the Toilet Seat
Reattaching the toilet seat is the final crucial step in the process of fixing a cracked toilet seat. This task requires precision and attention to detail to ensure that the seat is securely and correctly positioned on the toilet bowl. Here's a detailed guide on how to reattach the toilet seat:
-
Position the Seat: Carefully align the mounting holes on the toilet seat with the corresponding holes on the toilet bowl. Ensure that the seat is positioned evenly and symmetrically to maintain a balanced appearance.
-
Insert the Mounting Screws: Once the seat is properly positioned, insert the mounting screws through the underside of the toilet bowl, aligning them with the mounting holes on the seat. Use the appropriate screwdriver to tighten the screws, ensuring a secure and stable attachment.
-
Check for Stability: After securing the mounting screws, test the stability of the reattached seat by gently applying pressure and shifting the seat from side to side. Verify that the seat remains firmly in place and does not wobble or shift under pressure.
-
Cover the Screws: If your toilet seat includes decorative caps or covers for the mounting screws, carefully place them over the screws to conceal and protect the attachment points. These covers contribute to the overall aesthetic appeal of the toilet seat.
-
Inspect the Alignment: Take a moment to visually inspect the alignment and positioning of the reattached seat. Ensure that it sits evenly on the toilet bowl and aligns with the overall design of the bathroom environment.
-
Test the Functionality: Open and close the reattached toilet seat to verify its functionality. Check for smooth movement and secure closure, confirming that the reattachment process has not compromised the seat's operational performance.
By following these steps, you can successfully reattach the toilet seat, completing the repair process and restoring the functionality and appearance of your toilet. This meticulous approach ensures that the seat is securely and correctly positioned, providing you with the confidence that the repair has been carried out with precision.
With the toilet seat securely reattached, you have effectively addressed the issue of the cracked seat, demonstrating your DIY prowess and resourcefulness in maintaining your home. The systematic completion of each step in the repair process has culminated in a fully restored and functional toilet seat, ready to serve its purpose in your bathroom for the long term.
Conclusion
In conclusion, successfully fixing a cracked toilet seat is a rewarding accomplishment that not only restores the functionality of your bathroom fixture but also showcases your DIY skills and resourcefulness. By following the step-by-step guide outlined in this comprehensive article, you have gained the knowledge and confidence to address this common household issue with ease.
The process began with gathering the necessary tools and materials, ensuring that you were well-prepared to undertake the repair project. Removing the toilet seat was the initial crucial step, requiring careful attention to detail and the use of the appropriate tools to ensure a smooth and efficient removal. Assessing the damage provided valuable insights into the nature of the crack, allowing for a thorough understanding of the repair requirements.
Repairing the crack itself involved meticulous application of the repair compound, followed by proper curing and surface finishing. This stage was essential in restoring the structural integrity and visual appeal of the toilet seat. Finally, reattaching the seat completed the repair process, ensuring that it was securely and correctly positioned on the toilet bowl.
By meticulously following each step, you have not only addressed the issue of the cracked toilet seat but also demonstrated your commitment to maintaining your home. The systematic approach employed in this repair process has resulted in a fully restored and functional toilet seat, ready to serve its purpose in your bathroom for the long term.
It's important to recognize that the skills and knowledge gained from this repair project extend beyond this specific task. The ability to tackle household repairs with confidence and precision is a valuable asset that empowers you to take proactive measures in maintaining your living space. Additionally, the cost-effective nature of repairing a cracked toilet seat, as opposed to replacing it, reflects your practical approach to home maintenance.
As you reflect on the successful completion of this repair project, take pride in the fact that you have not only fixed a cracked toilet seat but also enhanced your DIY capabilities. Your proactive approach to addressing household issues sets the stage for continued success in maintaining and improving your living environment. With the knowledge and skills acquired from this experience, you are well-equipped to tackle future repair and maintenance tasks with confidence and proficiency.
Frequently Asked Questions about How To Fix Cracked Toilet Seat
Was this page helpful?
At Storables.com, we guarantee accurate and reliable information. Our content, validated by Expert Board Contributors, is crafted following stringent Editorial Policies. We're committed to providing you with well-researched, expert-backed insights for all your informational needs.


0 thoughts on “How To Fix Cracked Toilet Seat”