Home>Furniture & Design>Bathroom Accessories>How To Install An Exhaust Fan In The Wall
Bathroom Accessories
How To Install An Exhaust Fan In The Wall
Modified: February 17, 2024
Learn how to install an exhaust fan in the wall for improved ventilation in your bathroom. Find step-by-step instructions and tips for bathroom accessories.
(Many of the links in this article redirect to a specific reviewed product. Your purchase of these products through affiliate links helps to generate commission for Storables.com, at no extra cost. Learn more)
Introduction
Installing an exhaust fan in the wall is a practical and beneficial home improvement project that can enhance ventilation and air quality in your bathroom. Proper ventilation is crucial for preventing moisture buildup, which can lead to mold and mildew growth, as well as potential damage to walls and ceilings. Additionally, a well-installed exhaust fan can help eliminate unpleasant odors and improve overall comfort within the bathroom space.
By following the step-by-step guide outlined in this article, you can successfully install an exhaust fan in the wall, promoting a healthier and more pleasant bathroom environment for you and your family. Whether you're a seasoned DIY enthusiast or a novice homeowner eager to take on a new project, this comprehensive guide will equip you with the knowledge and confidence to complete the installation process with ease.
From gathering the necessary tools and materials to testing the functionality of the newly installed exhaust fan, each step is designed to provide clear and actionable instructions. With a focus on safety and efficiency, this guide will empower you to tackle the installation process methodically, ensuring that the end result is a well-functioning exhaust fan that effectively serves its purpose.
As you embark on this home improvement endeavor, keep in mind that proper ventilation is not only essential for maintaining a healthy indoor environment but also contributes to the longevity of your bathroom fixtures and surfaces. With the right approach and attention to detail, you can achieve a successful exhaust fan installation that brings lasting benefits to your home.
Now, let's dive into the step-by-step process of installing an exhaust fan in the wall, starting with gathering the necessary tools and materials.
Key Takeaways:
- Installing an exhaust fan in the wall can improve bathroom air quality, prevent moisture-related issues, and enhance overall comfort. It’s a practical DIY project that promotes a healthier home environment.
- Careful planning, precise installation, and thorough testing are essential for a successful exhaust fan project. Choosing the right location, cutting the wall hole, and ensuring proper functionality lead to long-term benefits.
Read more: How To Install An Exhaust Fan
Step 1: Gather the necessary tools and materials
Before embarking on the installation of an exhaust fan in the wall, it is essential to gather all the required tools and materials. Having the right equipment at hand will streamline the installation process and ensure that you can work efficiently without unnecessary interruptions. Here's a comprehensive list of the necessary tools and materials:
Tools:
- Measuring Tape: Accurately measure the dimensions of the exhaust fan and the designated installation area on the wall.
- Pencil: Use a pencil to mark the precise locations for cutting and mounting the exhaust fan.
- Drywall Saw or Jigsaw: A drywall saw or jigsaw will be essential for cutting the opening in the wall to accommodate the exhaust fan.
- Screwdriver: Both flathead and Phillips screwdrivers may be needed for securing the fan in place and connecting electrical components.
- Drill and Bits: A drill with appropriate bits will be necessary for creating pilot holes and securing the fan in place.
- Utility Knife: Use a utility knife to score and cut through any wall coverings or materials as needed.
- Stud Finder: This tool will help locate the studs within the wall, ensuring secure attachment of the exhaust fan.
Materials:
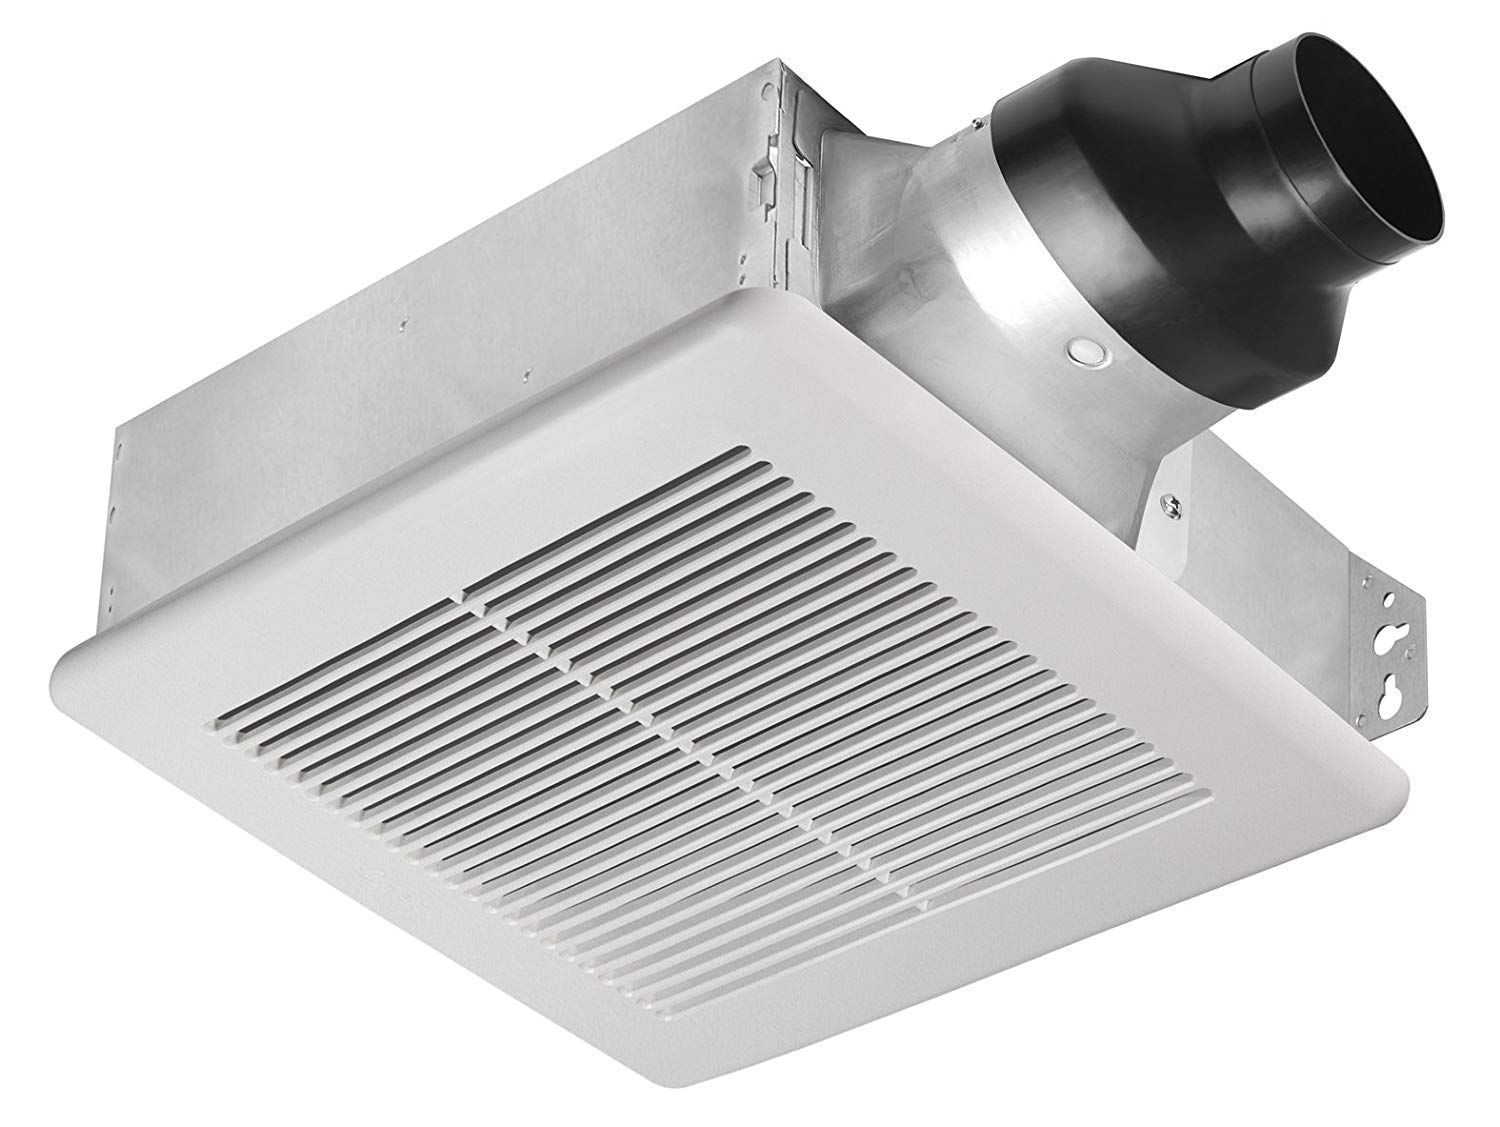
- Exhaust Fan: Select a high-quality exhaust fan that is suitable for wall installation and adequately sized for the intended bathroom space.
- Ventilation Ducting: Depending on the specific requirements of your installation, you may need flexible or rigid ducting to connect the exhaust fan to the exterior vent.
- Exterior Vent Cover: Choose a vent cover that is compatible with the ventilation ducting and suitable for outdoor use.
- Screws and Anchors: Ensure you have the appropriate screws and anchors for securing the exhaust fan to the wall and mounting the vent cover.
- Electrical Cable and Connectors: If electrical wiring is not already in place, you will need the necessary cable and connectors for connecting the exhaust fan to a power source.
- Safety Equipment: Prioritize safety by having protective gear such as gloves and safety glasses on hand.
By gathering these essential tools and materials, you will be well-prepared to proceed with the subsequent steps of choosing the installation location, cutting the wall opening, and ultimately installing the exhaust fan. With careful preparation, you can approach the installation process with confidence, knowing that you have everything you need to complete the project efficiently and effectively.
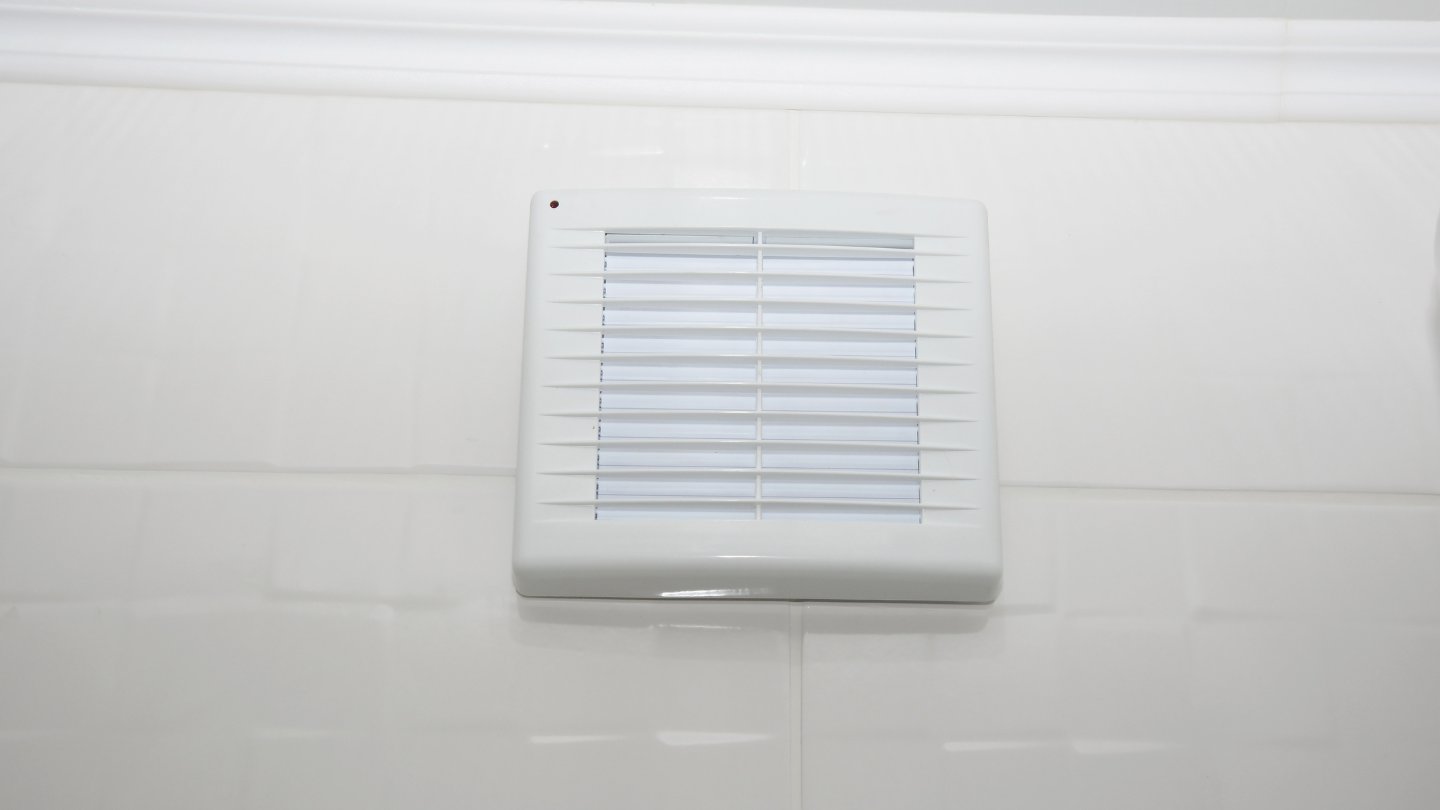
Step 2: Choose the location for the exhaust fan
Selecting the optimal location for the exhaust fan is a critical decision that directly impacts its effectiveness in ventilating the bathroom space. When determining the placement of the exhaust fan, several factors should be taken into consideration to ensure optimal performance and seamless integration with the existing bathroom layout.
Read more: How To Install An Exhaust Fan In The Kitchen
Consider Airflow Efficiency
The primary objective of the exhaust fan is to efficiently remove moisture, odors, and impure air from the bathroom. To achieve this, it is essential to position the fan in an area where it can effectively capture and expel the air. Ideally, the exhaust fan should be installed near the source of moisture and odors, such as the shower or bathtub, to swiftly eliminate these elements from the air.
Evaluate Wall Structure and Stud Placement
Before finalizing the location for the exhaust fan, it is crucial to assess the wall structure and identify the placement of wall studs. Mounting the fan in proximity to a wall stud provides a secure and stable anchoring point, ensuring that the fan is firmly affixed to the wall. Additionally, considering the presence of wall studs is essential for determining the feasibility of the installation and avoiding potential obstructions within the wall.
Account for Exterior Ventilation
Another vital consideration when choosing the location for the exhaust fan is the accessibility to an exterior wall for ventilation. The selected location should allow for the installation of ventilation ducting that can efficiently channel the expelled air to the outdoors. By strategically positioning the exhaust fan in close proximity to an exterior wall, you can streamline the ducting installation process and optimize the ventilation pathway.
Assess Noise and Aesthetic Impact
While functionality is paramount, it is also important to consider the potential noise generated by the exhaust fan and its visual impact on the bathroom space. Selecting a location that minimizes noise transmission to adjacent rooms and living areas is advisable. Additionally, the chosen placement should complement the overall aesthetics of the bathroom, integrating seamlessly with the existing decor and architectural elements.
Seek Professional Guidance if Needed
If you encounter challenges or uncertainties in determining the ideal location for the exhaust fan, seeking professional guidance from a qualified contractor or HVAC specialist can provide valuable insights. Their expertise can help you navigate potential obstacles and ensure that the chosen location aligns with best practices for ventilation and installation.
By carefully evaluating these considerations, you can confidently select the optimal location for the exhaust fan, setting the stage for a successful installation that enhances the functionality and comfort of your bathroom space.
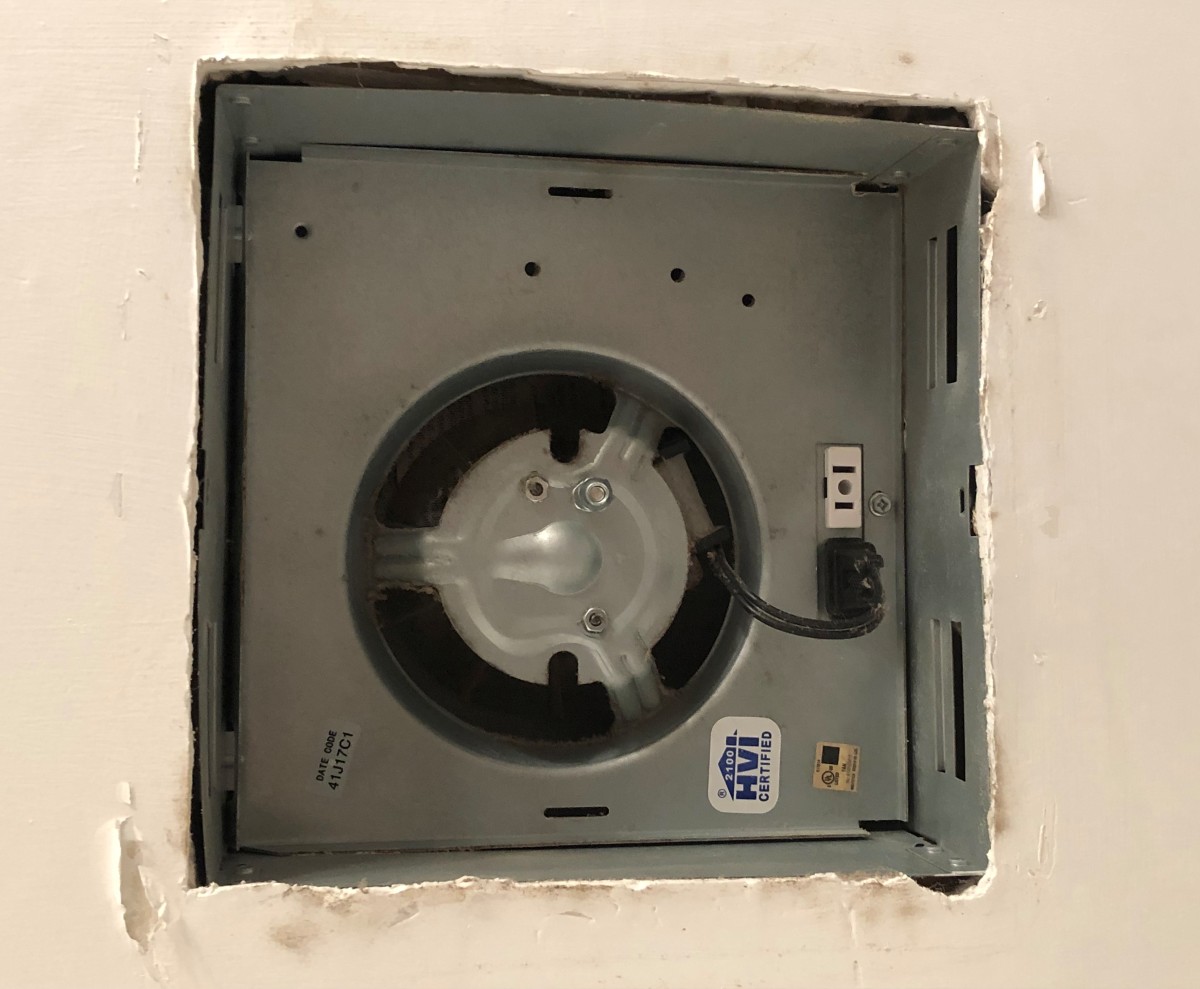
Step 3: Cut the hole in the wall
Cutting the hole in the wall for the exhaust fan installation is a crucial step that demands precision and careful execution. This process involves creating a properly sized opening to accommodate the exhaust fan while ensuring a seamless integration with the surrounding wall structure. By following the detailed steps outlined below, you can effectively cut the hole in the wall, paving the way for the subsequent installation of the exhaust fan.
Measure and Mark the Opening
Begin by using a measuring tape to determine the precise dimensions required for the hole in the wall. Refer to the manufacturer's specifications for the exhaust fan to establish the correct dimensions for the opening. Once the measurements are determined, use a pencil to mark the outline of the opening on the wall. Ensure that the marked area aligns with the chosen location for the exhaust fan and accounts for any necessary clearances from adjacent walls or fixtures.
Prepare for Cutting
Before proceeding with the actual cutting, it is essential to prepare the work area and ensure the safety of the surrounding environment. Clear any obstructions or debris from the area where the hole will be cut. Additionally, consider using protective measures such as drop cloths to contain dust and debris generated during the cutting process. If applicable, turn off the electrical power to any nearby outlets or switches to prevent accidental activation during the cutting phase.
Read more: How To Install An Exhaust Fan In A Window
Use the Appropriate Cutting Tool
Select a suitable cutting tool based on the wall material and the complexity of the installation. For drywall, a drywall saw or jab saw is commonly used to make precise cuts. When dealing with other wall materials such as plaster or wood, a jigsaw equipped with the appropriate blade can facilitate smooth and accurate cutting. Exercise caution and steady control when operating the cutting tool to maintain the integrity of the surrounding wall and prevent unnecessary damage.
Execute the Cutting Process
Carefully follow the marked outline as you begin cutting the hole in the wall. Start with small, controlled incisions to establish the initial opening, gradually expanding the cut to match the designated dimensions. Maintain a steady hand and proceed methodically to achieve clean and accurate edges. Take note of any electrical wiring, plumbing, or structural elements within the wall, ensuring that they are not compromised during the cutting process.
Verify the Fit and Adjust as Needed
Once the initial cut is completed, verify that the dimensions of the opening align with the requirements for the exhaust fan installation. Test-fit the fan housing within the cutout to confirm that it fits securely and aligns properly with the wall surface. If adjustments are necessary to achieve a precise fit, carefully trim the edges of the opening as needed, ensuring that the exhaust fan can be seamlessly integrated into the wall.
By meticulously following these steps, you can successfully cut the hole in the wall with precision and accuracy, laying the groundwork for the subsequent installation of the exhaust fan. This meticulous approach ensures that the wall opening is tailored to accommodate the fan, setting the stage for a seamless and professional installation process.
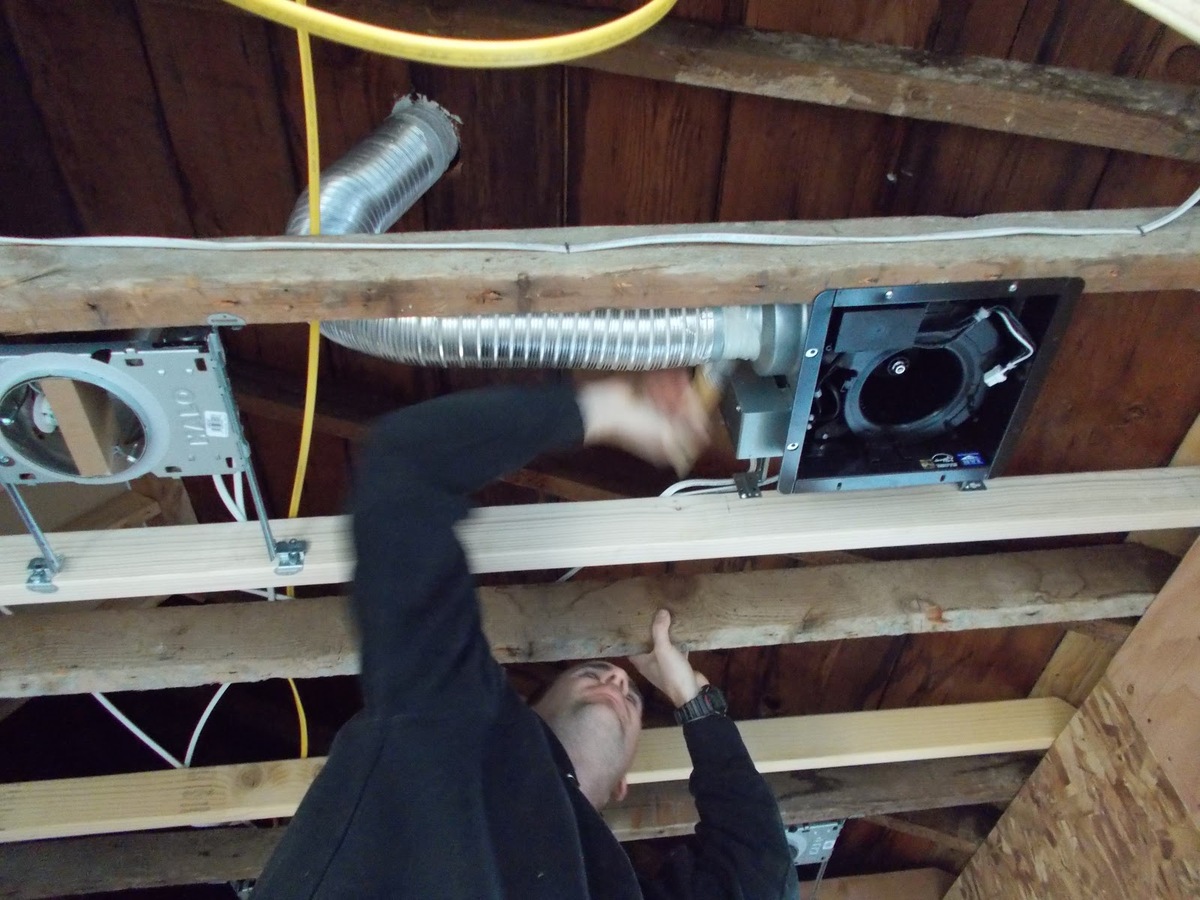
Step 4: Install the exhaust fan
With the wall opening prepared, the next pivotal phase involves the actual installation of the exhaust fan. This process demands attention to detail and adherence to the manufacturer's guidelines to ensure a secure and functional installation. By following the comprehensive steps outlined below, you can effectively install the exhaust fan, bringing you closer to the completion of this home improvement project.
Read more: How To Install An Attic Exhaust Fan
Mounting the Fan Housing
Begin by positioning the exhaust fan housing into the prepared wall opening, ensuring a snug and secure fit. Align the fan housing carefully, verifying that it sits flush against the wall surface. Depending on the specific design of the exhaust fan, secure it in place using the provided mounting brackets or screws. Exercise caution to avoid overtightening, which could potentially damage the fan housing or compromise its stability.
Connecting the Ventilation Ducting
If not already in place, connect the ventilation ducting to the exhaust port of the fan housing. Ensure a tight and secure connection to prevent air leakage. The ducting should extend from the fan housing to the exterior vent location, providing a clear pathway for expelling the moist and impure air from the bathroom. Use appropriate fasteners or clamps to secure the ducting in place, minimizing the risk of dislodgment or detachment.
Securing the Exterior Vent Cover
Once the ventilation ducting is in place, proceed to install the exterior vent cover on the designated exterior wall. Position the vent cover over the vent opening, ensuring that it aligns with the ventilation ducting and sits securely against the exterior wall surface. Secure the vent cover using the provided screws or fasteners, verifying that it is firmly affixed and capable of withstanding external elements such as wind and precipitation.
Electrical Wiring and Connections
If electrical wiring is required for the exhaust fan, carefully follow the manufacturer's instructions for connecting the fan to a power source. Adhere to all electrical codes and safety standards during this process, ensuring that the wiring is properly insulated and protected. If uncertain about electrical work, consider consulting a qualified electrician to handle the wiring and connections, prioritizing safety and compliance with regulations.
Read more: How To Install A Kitchen Exhaust Fan
Testing the Fan Functionality
With the exhaust fan securely installed and all connections verified, proceed to test the functionality of the fan. Turn on the fan and observe its operation, confirming that it effectively expels air through the ventilation ducting. Listen for any unusual noises or vibrations that may indicate installation issues. Additionally, verify that the exterior vent cover opens and closes as intended, facilitating proper airflow while preventing backdrafts.
By meticulously following these steps, you can successfully install the exhaust fan in the wall, culminating in a functional and efficient ventilation solution for your bathroom. This pivotal phase brings you closer to reaping the benefits of improved air quality and moisture control, enhancing the overall comfort and well-being of your home environment.
Step 5: Connect the electrical wiring
Connecting the electrical wiring for the exhaust fan is a critical aspect of the installation process, ensuring that the fan operates safely and effectively. Before proceeding with the electrical connections, it is essential to prioritize safety and adhere to all relevant electrical codes and regulations. If you are not experienced in electrical work, it is advisable to seek the assistance of a qualified electrician to handle this phase of the installation.
Begin by carefully reviewing the manufacturer's instructions and specifications for the electrical requirements of the exhaust fan. Identify the power source for the fan, which may involve connecting to an existing electrical circuit or installing a dedicated electrical line for the fan. If a dedicated line is necessary, consult a professional electrician to ensure compliance with electrical codes and standards.
Once the power source is determined, turn off the electrical circuit that will supply power to the exhaust fan. Use a voltage tester to verify that the power is indeed turned off before proceeding with any electrical work. This precautionary measure is crucial for personal safety and prevents the risk of electrical shock or injury during the wiring process.
Next, carefully strip the insulation from the electrical wires, exposing the conductors for connection. The specific wiring configuration may vary based on the design of the exhaust fan and the electrical setup in your home. Follow the provided wiring diagram and instructions from the manufacturer to make the appropriate connections, ensuring that the wiring is securely fastened and insulated to prevent any exposed conductors.
If the exhaust fan includes a built-in light or heating element, take extra care to connect these components according to the manufacturer's specifications. Ensure that all connections are made with precision and attention to detail, minimizing the risk of electrical faults or malfunctions.
After completing the electrical connections, carefully tuck the wiring into the fan housing, ensuring that it is neatly organized and does not obstruct the fan's operation. Secure any excess wiring to prevent it from interfering with the fan or posing a safety hazard.
Once the electrical wiring is connected and secured, restore power to the circuit and test the functionality of the exhaust fan. Verify that the fan operates smoothly and that all electrical components function as intended. If any issues or irregularities are observed, immediately disconnect the power and reassess the wiring connections to rectify any potential issues.
By meticulously following the manufacturer's guidelines and exercising caution throughout the electrical wiring process, you can ensure a safe and reliable electrical connection for the exhaust fan. This phase brings you closer to the completion of the installation, setting the stage for a fully operational and efficient ventilation solution for your bathroom.
Step 6: Test the exhaust fan
After completing the installation of the exhaust fan, it is crucial to conduct thorough testing to ensure that the fan functions as intended and effectively serves its purpose of ventilating the bathroom space. The testing phase allows you to verify the operational efficiency of the exhaust fan, identify any potential issues, and make necessary adjustments to optimize its performance. By following the detailed steps outlined below, you can systematically test the exhaust fan, providing confidence in its functionality and contributing to a healthier and more comfortable bathroom environment.
Power On and Observation
Begin the testing process by powering on the exhaust fan and observing its operation. Activate the fan using the designated switch or control mechanism, and listen for the sound of the fan motor as it initiates airflow. Observe the movement of the fan blades and ensure that they rotate smoothly without any unusual noises or vibrations. Additionally, confirm that the fan effectively draws air from the bathroom space, indicating proper ventilation.
Read more: How To Install Kitchen Exhaust Fan
Airflow Assessment
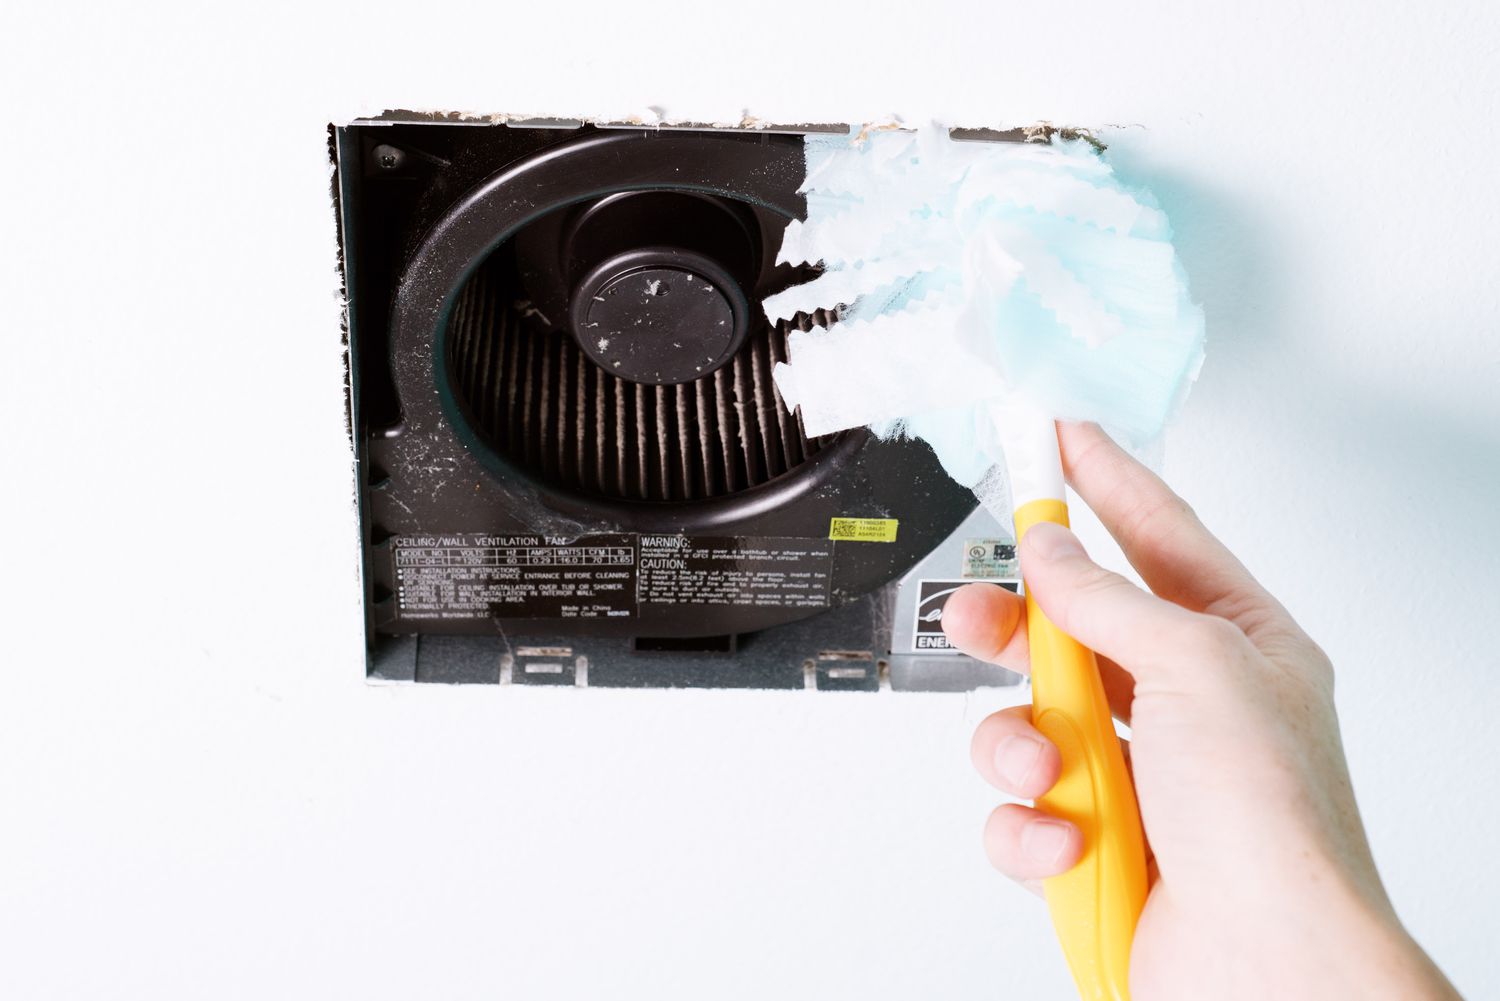
Assess the airflow generated by the exhaust fan to gauge its effectiveness in removing moisture and odors from the bathroom. Place a piece of lightweight material, such as tissue paper, near the fan grille to observe the airflow. The material should be drawn towards the grille, indicating that the fan is effectively expelling air from the bathroom. This test provides a visual confirmation of the fan's airflow capacity and its ability to maintain a well-ventilated environment.
Verification of Exterior Ventilation
Proceed to the exterior vent location and verify that the exhaust air is being expelled outdoors as intended. Feel for airflow at the exterior vent cover, confirming that moist and impure air is being effectively channeled outside. Additionally, visually inspect the vent cover to ensure that it opens and closes properly during fan operation, preventing backdrafts and maintaining efficient ventilation.
Noise and Vibration Assessment
Listen for any excessive noise or vibration emanating from the exhaust fan during operation. While some level of sound is expected, particularly with higher airflow capacity fans, excessive noise or irregular vibrations may indicate installation issues or fan malfunctions. Address any noticeable noise or vibration concerns promptly to maintain a quiet and comfortable bathroom environment.
Functional Controls and Features
Test the functionality of any additional features or controls integrated into the exhaust fan, such as built-in lighting or humidity sensors. Verify that these features operate as intended and enhance the overall functionality of the fan. If the fan includes adjustable speed settings, test each setting to ensure that the fan responds accordingly, providing flexibility in ventilation control.
Read more: Who Can Install Bathroom Exhaust Fan
Final Inspection and Adjustment
Conduct a final visual inspection of the exhaust fan and its surrounding components, verifying that all connections are secure and that the fan housing is properly mounted. Address any visible issues or discrepancies, such as loose fasteners or misaligned components, to ensure the overall integrity of the installation. Make any necessary adjustments to optimize the fan's performance and address any identified concerns.
By meticulously conducting these comprehensive tests and assessments, you can confidently verify the functionality and effectiveness of the exhaust fan. This thorough testing phase ensures that the fan operates optimally, contributing to improved air quality, moisture control, and overall comfort within the bathroom space. Additionally, addressing any potential issues during testing allows for timely adjustments, ensuring that the exhaust fan delivers long-term benefits to your home environment.
Conclusion
In conclusion, the successful installation of an exhaust fan in the wall represents a significant enhancement to the functionality and comfort of the bathroom space. By meticulously following the step-by-step guide outlined in this comprehensive article, homeowners can achieve a well-ventilated environment that effectively mitigates moisture buildup, eliminates odors, and promotes overall air quality. The culmination of this installation process brings forth a range of benefits that contribute to a healthier and more enjoyable bathroom experience.
Through the careful selection of the installation location, homeowners can strategically position the exhaust fan to optimize airflow efficiency and effectively address the source of moisture and odors within the bathroom. By considering factors such as wall structure, exterior ventilation accessibility, and aesthetic impact, the chosen location can seamlessly integrate the exhaust fan into the existing bathroom layout while prioritizing functionality and visual appeal.
The meticulous process of cutting the hole in the wall and installing the exhaust fan ensures a precise and secure fit, laying the foundation for efficient ventilation and long-term performance. Attention to detail during the electrical wiring and connection phase further reinforces the safety and reliability of the exhaust fan, providing homeowners with peace of mind regarding its operational integrity.
The comprehensive testing phase serves as a critical validation of the exhaust fan's functionality, allowing homeowners to confirm its operational efficiency, airflow capacity, and noise levels. By conducting thorough assessments and addressing any identified concerns, homeowners can fine-tune the installation to ensure optimal performance and a seamless integration with the bathroom environment.
Ultimately, the successful installation of an exhaust fan in the wall empowers homeowners to maintain a healthy indoor environment, prevent potential damage from moisture-related issues, and elevate the overall comfort and functionality of the bathroom space. This home improvement endeavor not only contributes to the well-being of occupants but also safeguards the longevity and integrity of the bathroom fixtures and surfaces.
With a well-installed exhaust fan in place, homeowners can enjoy the peace of mind that comes with effective moisture control, improved air quality, and a more pleasant bathroom experience. This culmination of efforts reflects a proactive approach to home maintenance and enhancement, underscoring the value of a well-ventilated and comfortable living environment.
Frequently Asked Questions about How To Install An Exhaust Fan In The Wall
Was this page helpful?
At Storables.com, we guarantee accurate and reliable information. Our content, validated by Expert Board Contributors, is crafted following stringent Editorial Policies. We're committed to providing you with well-researched, expert-backed insights for all your informational needs.


0 thoughts on “How To Install An Exhaust Fan In The Wall”