Home>Furniture & Design>Interior Design Trends>How To Make A Wine Glass Holder
Interior Design Trends
How To Make A Wine Glass Holder
Modified: August 18, 2024
Learn how to make a stylish wine glass holder to elevate your interior design. Explore the latest interior design trends and create a functional and decorative piece for your home.
(Many of the links in this article redirect to a specific reviewed product. Your purchase of these products through affiliate links helps to generate commission for Storables.com, at no extra cost. Learn more)
Introduction
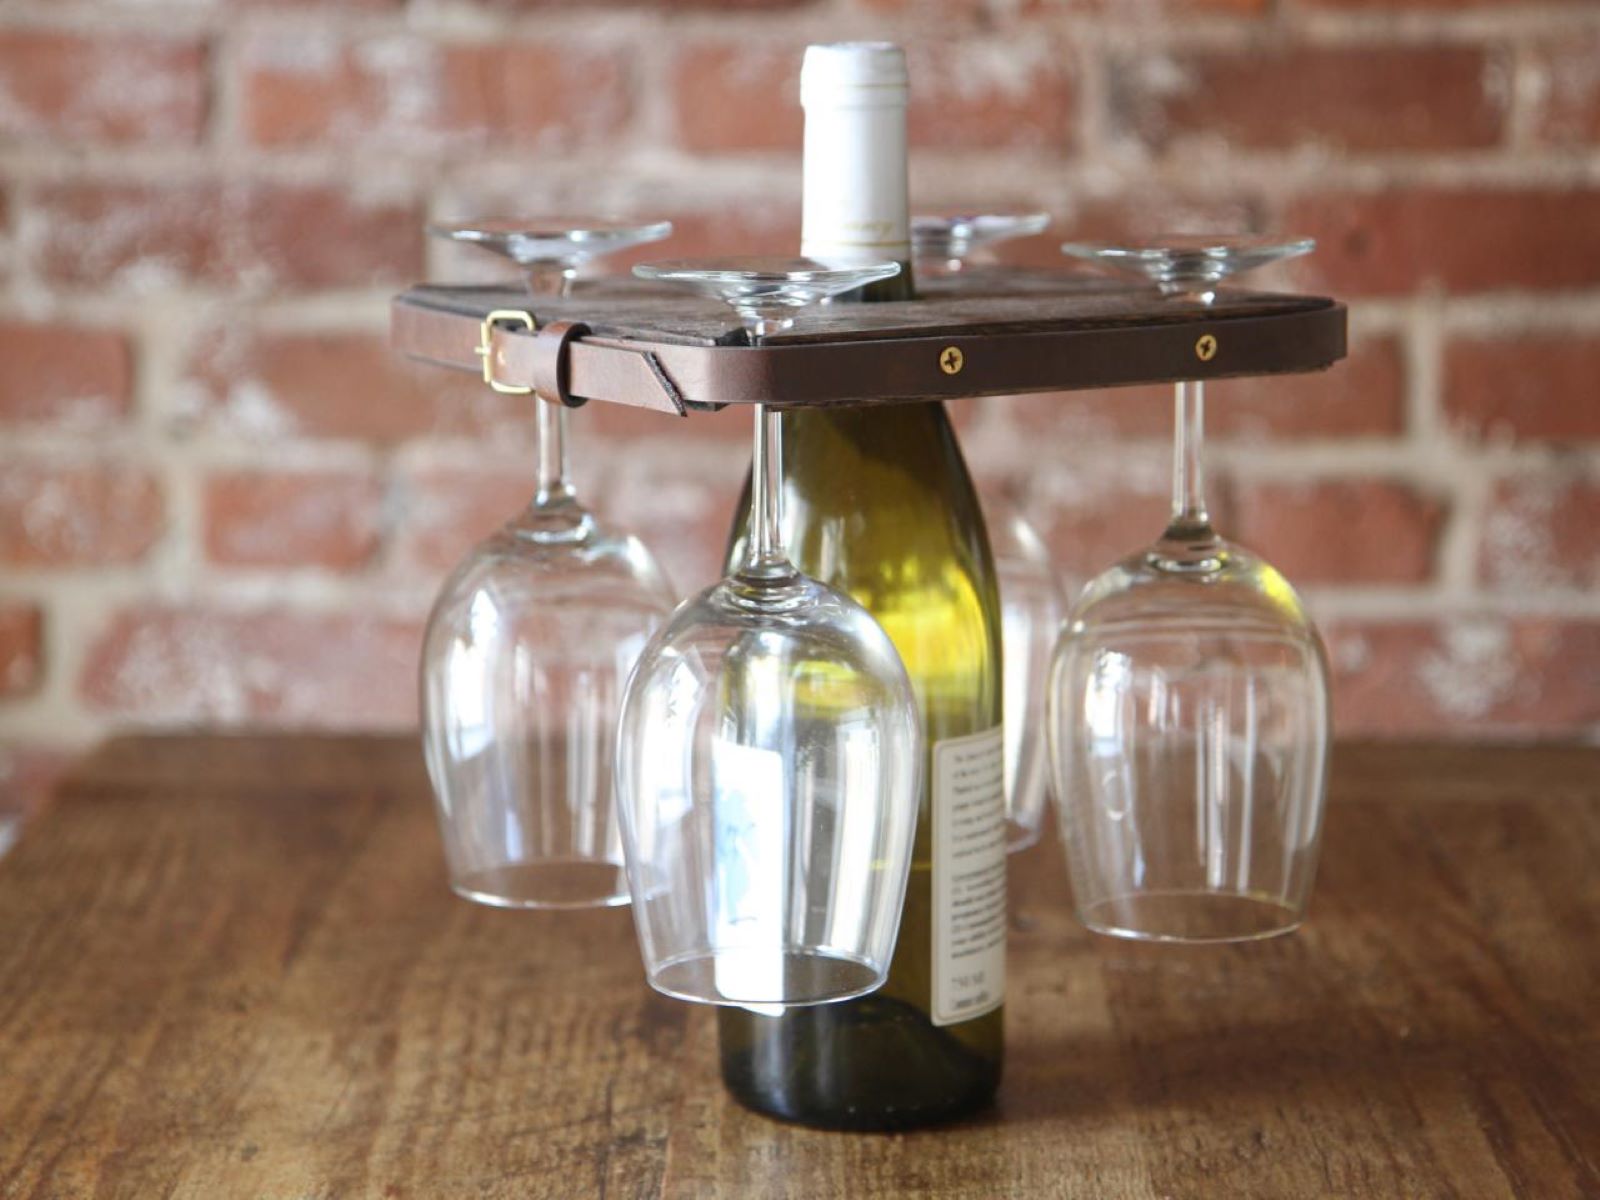
Creating a wine glass holder is a fantastic way to add both functionality and aesthetic appeal to your living space. Whether you're an avid wine enthusiast or simply enjoy entertaining guests, a DIY wine glass holder can be a stylish and practical addition to your home decor. This project offers a wonderful opportunity to showcase your craftsmanship and creativity while also serving a useful purpose.
By crafting your own wine glass holder, you have the freedom to customize it to suit your personal style and the existing decor of your home. Whether you prefer a rustic, farmhouse-inspired look or a sleek, modern design, you can tailor the materials and finishes to align with your vision. Additionally, this project allows you to exercise your woodworking skills and unleash your inner artisan, resulting in a unique and personalized piece that reflects your individuality.
Not only does a wine glass holder serve as a functional storage solution, but it also doubles as a decorative element that can elevate the ambiance of your space. When not in use, the holder can add visual interest to your kitchen, dining area, or home bar, becoming a conversation piece that draws the eye and complements your interior design. Furthermore, by creating a wine glass holder from scratch, you can take pride in knowing that you've contributed a handmade, artisanal touch to your home environment.
In the following sections, we will explore the step-by-step process of crafting a wine glass holder, from selecting the materials to adding the finishing touches. By following these instructions, you can embark on a rewarding DIY journey that culminates in a practical and visually appealing addition to your home. Let's dive into the materials and steps required to bring this project to life.
Key Takeaways:
- Crafting a wine glass holder allows you to showcase your creativity and woodworking skills while adding a stylish and practical touch to your living space. It’s a fun DIY project that can enhance your home decor.
- By carefully measuring, cutting, sanding, drilling, and assembling the wood, you can create a unique and personalized wine glass holder that reflects your individuality and adds a handmade, artisanal touch to your home.
Read more: How To Make Teacup Wine Glasses
Materials Needed
To embark on the creation of a wine glass holder, you will need a selection of materials and tools to bring your vision to fruition. Here's a comprehensive list of the items required for this DIY project:
-
Wood: The foundation of your wine glass holder will be crafted from wood. Opt for a sturdy and visually appealing wood type, such as pine, oak, or walnut, based on your preferences and the existing decor of your space. Ensure that the wood is of sufficient thickness to provide stability and durability to the holder.
-
Sandpaper: A variety of sandpaper grits, including coarse, medium, and fine, will be essential for smoothing the wood surfaces and achieving a polished finish. This will ensure that the holder not only looks refined but also feels smooth to the touch.
-
Drill and Drill Bits: A power drill equipped with drill bits suitable for creating holes in the wood is necessary for accommodating the stems of the wine glasses. The drill bits should be sized to match the diameter of the glass stems for a secure fit.
-
Measuring Tape and Ruler: Accurate measurements are crucial for ensuring that the wine glass holder is proportionate and functional. A measuring tape and ruler will aid in precisely marking and cutting the wood to the required dimensions.
-
Wood Glue: A high-quality wood glue will be used to securely bond the various components of the wine glass holder together. Opt for a reliable wood glue that provides strong adhesion and dries clear for a professional finish.
-
Finishing Materials: Depending on your aesthetic preferences, you may choose to apply a wood finish, such as varnish, stain, or paint, to enhance the visual appeal of the holder. Additionally, a clear protective sealant can be applied to safeguard the wood and prolong the lifespan of the holder.
-
Safety Equipment: Prioritize safety by equipping yourself with protective gear, including safety goggles and work gloves, to shield your eyes and hands during the woodworking process.
By gathering these materials and tools, you will be well-equipped to commence the construction of your wine glass holder. With these essentials in hand, you can proceed to the subsequent steps, where we will delve into the intricacies of crafting this functional and stylish home accessory.
Step 1: Measure and Cut the Wood
The initial step in creating a wine glass holder involves the precise measurement and cutting of the wood components. This pivotal stage sets the foundation for the structural integrity and visual appeal of the holder. To begin, select the wood material of your choice, ensuring that it is of sufficient thickness to provide stability and durability to the holder.
Using a measuring tape and ruler, carefully mark the dimensions for the wine glass holder components on the wood. The measurements should account for the length, width, and depth of the holder, as well as the spacing for the individual glass slots. Accuracy is paramount at this stage, as it directly influences the functionality and aesthetic harmony of the final product.
Once the measurements are marked, proceed to cut the wood along the designated lines using a saw or a suitable cutting tool. Exercise caution and precision during the cutting process to achieve clean and uniform edges. It is advisable to double-check the measurements before cutting to ensure that the components align with the intended design.
In addition to the main body of the holder, consider crafting decorative elements or embellishments from the wood to enhance the visual appeal of the finished piece. These details can add a touch of elegance and personalization to the holder, elevating its overall aesthetic impact.
Upon completing the cutting process, carefully inspect the wood components to ensure that they align with the specified measurements and exhibit smooth, even edges. Any rough or uneven surfaces can be refined using sandpaper to achieve a polished finish.
By meticulously measuring and cutting the wood according to the predetermined dimensions, you lay the groundwork for a well-crafted wine glass holder that seamlessly integrates functionality and style. With the wood components prepared, you are ready to progress to the subsequent steps, where the assembly and refinement of the holder will take shape.
Step 2: Sand the Wood
After cutting the wood components for the wine glass holder, the next crucial step is to sand the surfaces to achieve a smooth and refined texture. Sanding serves as a transformative process that not only enhances the visual appeal of the wood but also ensures a pleasant tactile experience when handling the holder. This meticulous stage contributes to the overall quality and professional finish of the DIY project.
Begin the sanding process by using coarse-grit sandpaper to address any rough or uneven areas on the wood surfaces. This initial sanding stage aims to eliminate imperfections, such as splinters or irregularities resulting from the cutting process. By exerting gentle yet firm pressure, gradually smooth out the surfaces, paying close attention to the edges and corners to achieve a uniform texture.
Following the initial sanding, transition to medium-grit sandpaper to further refine the wood surfaces. This stage focuses on smoothing out the coarser abrasions left by the previous sanding, gradually imparting a more polished appearance to the wood. The goal is to create a consistent and velvety texture that not only looks visually appealing but also feels pleasing to the touch.
As the wood surfaces approach the desired smoothness, proceed to the final sanding phase using fine-grit sandpaper. This fine-grit sanding serves to impart a silky finish to the wood, effectively eliminating any remaining imperfections and achieving a refined, professional quality. Pay particular attention to the edges and corners, ensuring that they are impeccably smooth and free from any roughness.
Throughout the sanding process, it is essential to maintain a steady and even pressure, moving the sandpaper in the direction of the wood grain to prevent any unsightly scratches or inconsistencies. Additionally, periodically inspect the wood surfaces to assess the progress and identify any areas that require further attention.
Upon completing the sanding process, the wood components should exhibit a lustrous and smooth finish, ready to be assembled into the wine glass holder. The meticulous sanding effort not only enhances the visual allure of the holder but also ensures a delightful tactile experience, reflecting the craftsmanship and attention to detail invested in the project.
With the wood surfaces impeccably sanded, you are poised to proceed to the subsequent steps, where the assembly and finishing touches of the wine glass holder will bring the project to fruition.
When making a wine glass holder, make sure to measure the diameter of the wine glass stem accurately to ensure a snug fit. This will prevent the glass from slipping or falling out of the holder.
Step 3: Drill Holes for the Glasses
With the wood components prepared and sanded to perfection, the next pivotal step in crafting a wine glass holder involves drilling precise holes to accommodate the stems of the glasses. This step is instrumental in ensuring that the glasses are securely held in place while adding a touch of sophistication to the holder's design.
Begin by carefully determining the spacing and arrangement of the holes on the wood surface. The layout should allow for adequate clearance between the glasses, preventing any potential collisions and ensuring ease of access. Utilize a measuring tape and pencil to mark the positions of the holes, maintaining uniform spacing and alignment for a visually balanced and functional result.
Select a drill bit that corresponds to the diameter of the wine glass stems, ensuring a snug and secure fit. Prior to drilling, it is advisable to perform a test on a scrap piece of wood to verify that the chosen drill bit size accommodates the glasses effectively. This precautionary measure helps to prevent errors and ensures that the holes are tailored to the specific dimensions of the glass stems.
With the drilling parameters established, carefully position the drill bit at the marked locations on the wood and proceed to create the holes. Exercise precision and a steady hand to maintain vertical alignment, ensuring that the holes are uniform in depth and angle. It is essential to drill to the appropriate depth, allowing the glasses to be inserted securely without compromising the stability of the holder.
As the drill penetrates the wood, maintain a controlled pace and apply gentle pressure to prevent splintering or rough edges around the holes. Periodically retract the drill to clear any wood shavings, facilitating a clean and precise drilling process. Exercise caution and attentiveness throughout this stage to achieve flawless results that complement the overall craftsmanship of the wine glass holder.
Upon completing the drilling process, inspect the holes to ensure that they are smooth, uniform, and free from any imperfections. Any rough edges or irregularities can be addressed using fine-grit sandpaper to refine the interior surfaces of the holes, ensuring a seamless and polished finish.
By meticulously drilling holes that accommodate the wine glasses, you elevate the functionality and elegance of the holder, creating a purposeful and visually captivating storage solution. With this essential step completed, you are ready to progress to the assembly phase, where the individual components of the wine glass holder will be seamlessly integrated to bring the project to fruition.
Read more: How To Make Custom Wine Glasses
Step 4: Assemble the Holder
Assembling the wine glass holder marks a pivotal stage where the individual wood components seamlessly come together to form a cohesive and functional piece. This step requires precision and attention to detail to ensure that the holder not only exhibits structural integrity but also exudes a refined and harmonious aesthetic.
Commence the assembly process by arranging the wood components in the designated configuration, aligning the edges and corners with meticulous care. Prior to applying wood glue, conduct a dry fit to verify that the pieces interlock snugly and that the overall dimensions align with the intended design. This preliminary assessment allows for any necessary adjustments to be made before the adhesive is applied, ensuring a seamless and secure assembly.
Once the components are positioned to satisfaction, apply a generous amount of high-quality wood glue along the adjoining edges, ensuring even coverage to facilitate a strong and durable bond. Exercise caution to prevent excess glue from seeping onto the visible surfaces, as this can mar the final finish of the holder. With the adhesive applied, carefully press the wood components together, exerting gentle pressure to promote optimal adhesion.
To reinforce the structural integrity of the holder, consider utilizing clamps to secure the assembled components in place while the wood glue sets. This precautionary measure helps to maintain alignment and stability, preventing any shifting or misalignment during the curing process. Ensure that the clamps are positioned strategically to exert uniform pressure across the assembly, promoting a seamless and uniform bond.
As the wood glue cures, periodically inspect the assembly to verify that the components remain aligned and that the adhesive is setting effectively. Any excess glue that emerges from the joints can be gently removed using a damp cloth to prevent unsightly residue. Exercise patience during this phase, allowing ample time for the wood glue to fully cure and establish a robust bond between the components.
Upon the completion of the assembly process, the wine glass holder should exhibit a cohesive and sturdy construction, reflecting the meticulous craftsmanship and attention to detail invested in its creation. With the individual wood components seamlessly integrated, the holder is poised to undergo the final stage of refinement, where the addition of finishing touches will elevate its visual allure and functionality.
By methodically assembling the wood components with precision and care, you lay the groundwork for a well-crafted wine glass holder that embodies both practicality and aesthetic appeal. With the assembly phase concluded, the project progresses to the final step, where the addition of finishing touches will bring the holder to its full potential.
Step 5: Add Finishing Touches
With the wood components assembled into a cohesive wine glass holder, the addition of finishing touches serves as the culminating stage that elevates the visual allure and functionality of the piece. This pivotal step involves refining the holder's appearance and safeguarding its longevity through the application of protective finishes and thoughtful embellishments.
Begin by evaluating the aesthetic direction of the wine glass holder and selecting a suitable finish that aligns with your design preferences. Whether opting for a natural wood stain to accentuate the grain patterns or a vibrant paint color to infuse a pop of personality, the finishing touch should harmonize with the existing decor while enhancing the holder's overall appeal. Apply the chosen finish methodically, ensuring even coverage and allowing ample drying time between coats to achieve a professional and enduring result.
In addition to the surface finish, consider incorporating decorative elements that impart a personalized touch to the holder. This may involve the addition of ornamental accents, such as metal hardware, engraved details, or intricate carvings, that infuse character and individuality into the design. These embellishments not only contribute to the visual charm of the holder but also reflect the artisanal craftsmanship invested in its creation.
To safeguard the wood and prolong the lifespan of the holder, apply a clear protective sealant that shields the surfaces from moisture, stains, and wear. The protective sealant serves as a safeguard against environmental factors, ensuring that the holder retains its luster and integrity over time. Prioritize a sealant that is compatible with the chosen finish, applying it meticulously to create a resilient barrier that upholds the holder's pristine appearance.
Upon completing the finishing touches, take a moment to admire the transformation of the wine glass holder, appreciating the meticulous craftsmanship and attention to detail that have culminated in a functional and visually captivating piece. The addition of finishing touches not only enhances the holder's aesthetic appeal but also reinforces its durability, ensuring that it remains a cherished and practical accent in your living space.
With the finishing touches applied, the wine glass holder stands as a testament to your creativity and woodworking prowess, ready to grace your home with its functional elegance and artisanal charm.
Conclusion
In conclusion, the process of creating a wine glass holder is a gratifying endeavor that combines craftsmanship, functionality, and personal expression. From the meticulous measurement and cutting of the wood to the intricate assembly and application of finishing touches, each step contributes to the transformation of raw materials into a refined and purposeful home accessory.
By embarking on this DIY project, you have not only crafted a practical storage solution for your wine glasses but also infused your living space with a touch of artisanal charm. The wine glass holder stands as a testament to your creativity and dedication, reflecting your ability to merge practical utility with aesthetic appeal.
Through the careful selection of materials, precise woodworking techniques, and thoughtful design choices, you have brought to life a piece that not only serves a functional purpose but also adds a distinctive flair to your home decor. The holder's presence enhances the ambiance of your kitchen, dining area, or home bar, becoming a conversation piece that draws the eye and complements your interior design.
Furthermore, the process of creating a wine glass holder fosters a sense of accomplishment and pride in your craftsmanship. As you witness the transformation of raw materials into a refined and functional piece, you gain a deeper appreciation for the artistry and effort invested in handmade creations. This sense of fulfillment and accomplishment adds a layer of personal significance to the holder, making it more than just a practical accessory—it becomes a reflection of your creativity and skill.
As you integrate the wine glass holder into your living space, take pride in knowing that you have contributed a handmade, artisanal touch to your home environment. Whether you opt for a rustic, farmhouse-inspired design or a sleek, modern aesthetic, the holder serves as a testament to your individuality and design sensibilities.
In essence, the creation of a wine glass holder transcends the mere act of crafting a functional accessory; it embodies the spirit of creativity, personalization, and the joy of bringing handmade artistry into your daily life. As you admire the finished piece and witness its seamless integration into your home, take pride in the craftsmanship and creativity that have culminated in a practical and visually captivating addition to your living space.
Frequently Asked Questions about How To Make A Wine Glass Holder
Was this page helpful?
At Storables.com, we guarantee accurate and reliable information. Our content, validated by Expert Board Contributors, is crafted following stringent Editorial Policies. We're committed to providing you with well-researched, expert-backed insights for all your informational needs.


0 thoughts on “How To Make A Wine Glass Holder”