Tableware
How To Make Teacup Wine Glasses
Modified: October 28, 2024
Learn how to repurpose teacups and transform them into unique wine glasses with this easy DIY tutorial! Create stunning tableware with your own personal touch.
(Many of the links in this article redirect to a specific reviewed product. Your purchase of these products through affiliate links helps to generate commission for Storables.com, at no extra cost. Learn more)
Introduction
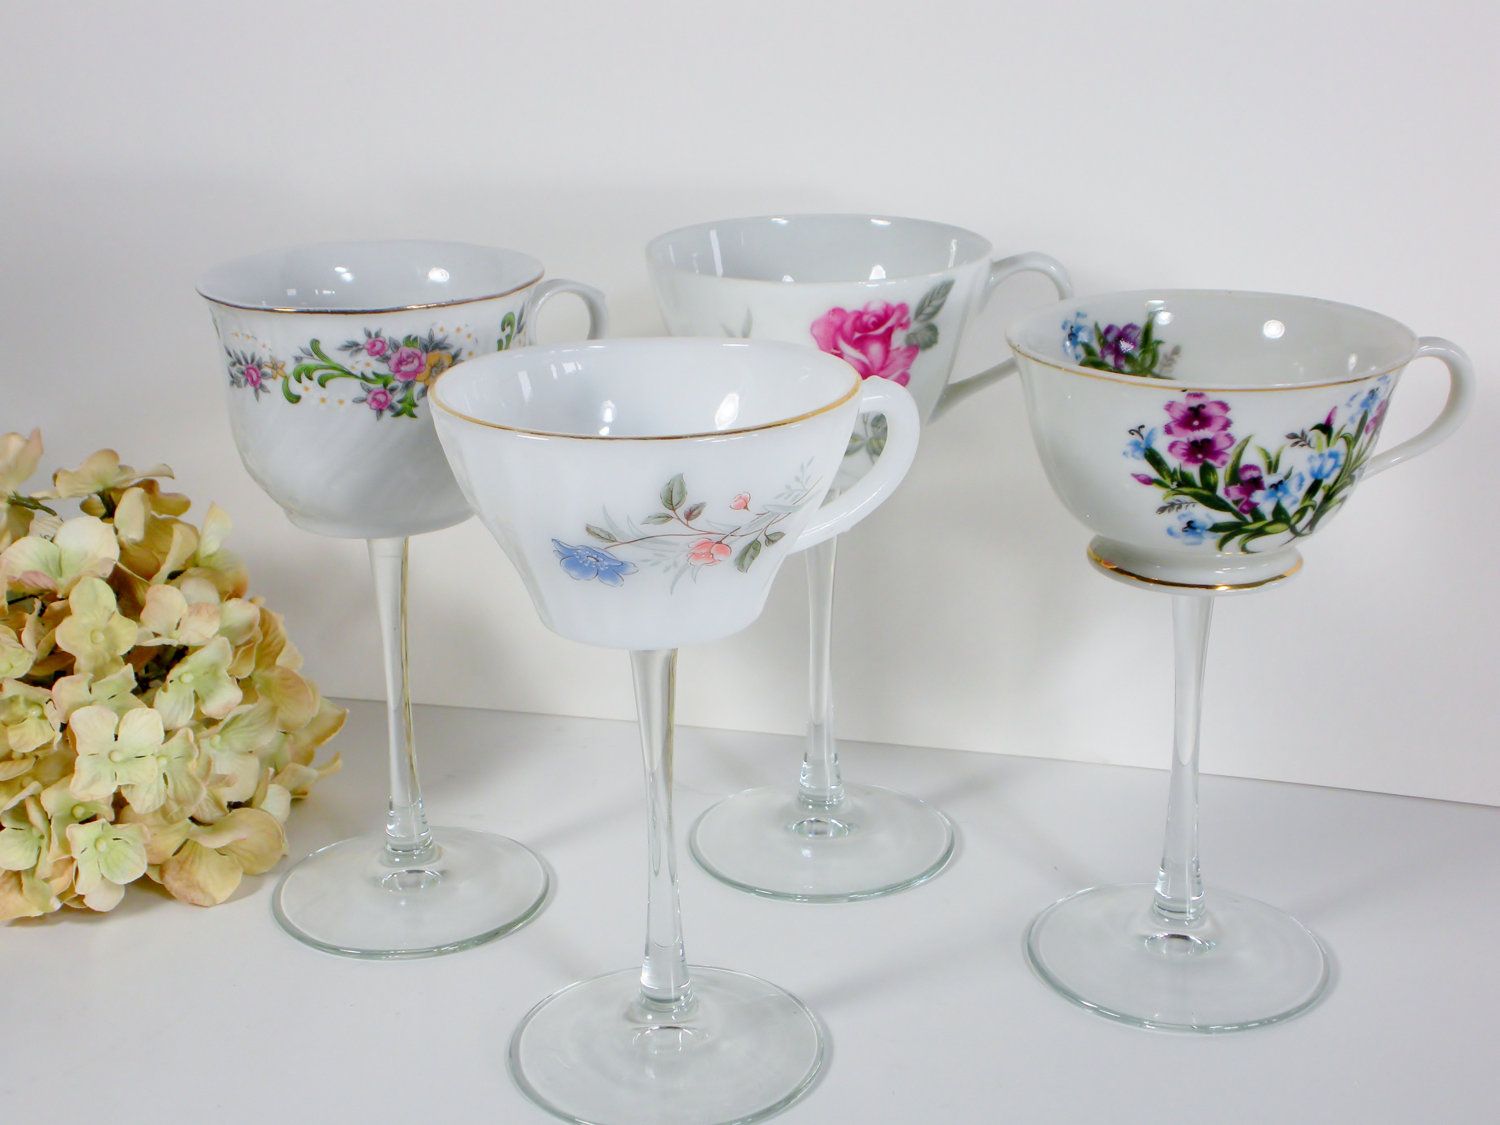
Welcome to the wonderful world of teacup wine glasses! If you’re looking to add a touch of elegance and whimsy to your tableware collection, teacup wine glasses are the perfect choice. These charming creations combine the delicate beauty of vintage teacups with the sophistication of wine glasses, creating a unique and eye-catching piece that is sure to impress your guests.
In this article, we will guide you through the process of making your own teacup wine glasses. Whether you’re a DIY enthusiast looking for a fun project or a tableware enthusiast seeking a new addition to your collection, this step-by-step guide will give you all the information you need to create these delightful glasses.
Before we get started, let’s take a look at the materials you’ll need for this project.
Key Takeaways:
- Transform vintage teacups and wine glasses into charming teacup wine glasses by carefully selecting, cleaning, and attaching them. Add a touch of elegance and whimsy to your tableware collection with this fun and creative DIY project.
- Personalize your teacup wine glasses with decorative accents and protective coatings to reflect your unique style. These one-of-a-kind creations make delightful gifts and conversation starters, adding a special touch to any occasion. Cheers to your artistic and innovative spirit!
Read more: How To Make Custom Wine Glasses
Materials Needed
To make teacup wine glasses, you’ll need the following materials:
- Vintage teacups: Look for teacups with unique designs and sturdy construction. You can often find vintage teacups at antique stores, thrift shops, or online marketplaces.
- Wine glasses: Choose wine glasses that have the stem and base separate from the bowl. This will make it easier to attach them to the teacups.
- Epoxy resin or glass adhesive: This will be used to securely attach the teacups to the wine glasses. Both epoxy resin and glass adhesive are readily available at craft stores or online.
- Protective gloves: It’s important to wear gloves to protect your hands when working with epoxy resin or glass adhesive.
- Protective eyewear: For added safety, wear goggles or protective eyewear to prevent any particles from getting into your eyes during the crafting process.
- Disposable mixing cups and stirring sticks: These will be used to mix the epoxy resin or glass adhesive according to the manufacturer’s instructions.
- Lint-free cloth or paper towels: This will be used to clean and prep the teacups and wine glasses before attaching them together.
- Masking tape or clamps: Depending on the method you choose to attach the teacups and wine glasses, you may need masking tape or clamps to hold them securely in place while they dry.
Now that you have all the materials ready, let’s dive into the step-by-step process of making teacup wine glasses.
Step 1: Choose the Right Teacups
The first step in making teacup wine glasses is to select the perfect teacups. Look for teacups that have a stable base and are in good condition. Vintage teacups are often the most popular choice due to their charming designs and timeless appeal.
When choosing teacups, consider the following:
- Design: Look for teacups with intricate patterns, beautiful colors, or unique motifs. Find teacups that reflect your personal style or complement your existing tableware collection.
- Size: Ensure that the teacup is proportionate to the wine glass. The base of the teacup should fit securely onto the stem of the wine glass. Avoid teacups that are too large or too small for the wine glass as it may affect stability.
- Material: Teacups made from fine bone china or porcelain are ideal as they exude elegance and are durable enough for everyday use.
- Condition: Examine the teacups for any chips, cracks, or imperfections. It’s best to choose teacups in good condition, as any flaws may affect the longevity and aesthetics of the final product.
Remember, the teacups you choose will determine the overall look and feel of your teacup wine glasses. Take your time to find the ones that truly speak to you and match your personal taste.
Once you’ve selected the perfect teacups, it’s time to move on to the next step: cleaning and prepping the teacups.
Step 2: Clean and Prep the Teacups
Before you can begin attaching the teacups to the wine glasses, it’s important to ensure they are clean and properly prepped. Follow these steps to clean and prep the teacups:
- Wash the teacups: Start by washing the teacups with warm, soapy water. Use a gentle dishwashing soap and a soft sponge to remove any dirt or residue from the teacups. Rinse them thoroughly and allow them to air dry or use a lint-free cloth to pat them dry.
- Remove any stickers or labels: If the teacups have any stickers or labels, gently peel them off. Use rubbing alcohol or adhesive remover to remove any sticky residue left behind.
- Inspect for any damage: Carefully examine the teacups for any chips, cracks, or imperfections. If you notice any, assess whether they can be repaired or if it’s best to choose a different teacup.
- Ensure a flat surface: Place the teacups on a flat surface to check if they wobble or have uneven bottoms. If any teacups are unstable, consider using a glass file or sandpaper to even out the surface. This will help with the adhesion process later on.
By cleaning and prepping the teacups thoroughly, you’ll ensure a strong bond when attaching them to the wine glasses. Properly prepping the teacups will also enhance the aesthetic appeal of the finished teacup wine glasses.
Now that your teacups are clean and prepped, it’s time to move on to the next step: preparing the wine glasses.
Step 3: Prepare the Wine Glasses
In this step, you’ll need to prepare the wine glasses that will serve as the base for your teacup wine glasses. Here’s how to do it:
- Inspect the wine glasses: Examine the wine glasses to ensure they are free from any cracks or chips. It’s essential to start with wine glasses that are in good condition to ensure stability and longevity.
- Clean the wine glasses: Wash the wine glasses with warm, soapy water and rinse them thoroughly. Use a lint-free cloth or paper towel to dry them completely.
- Disassemble the glasses: If your wine glasses have removable bases or stems, separate them from the bowl. This will make it easier to attach the teacups later on.
- Prepare the attaching surface: Gently sand the attaching surface of the wine glasses using fine-grit sandpaper. This will create a slightly roughened surface, which will improve the adhesion between the wine glass and the teacup.
- Clean the attaching surface: After sanding, wipe away any dust or debris from the attaching surface of the wine glasses. This will ensure a clean and optimal bonding surface.
By preparing the wine glasses correctly, you’ll create a strong and secure foundation for attaching the teacups. Ensuring that the attaching surface is clean and slightly roughened will help to achieve a durable bond.
Now that the teacups and wine glasses are prepped and ready, it’s time to move on to the exciting part – attaching them together!
Read more: How To Make A Wine Glass Chandelier
Step 4: Apply Epoxy Resin or Glass Adhesive
Now comes the critical step of attaching the teacups to the wine glasses. To achieve a strong and lasting bond, you have two options: epoxy resin or glass adhesive. Here’s how to apply each:
Epoxy Resin:
- Read the instructions: Carefully read and follow the manufacturer’s instructions for the epoxy resin you’re using. Each brand may have slightly different mixing ratios and curing times.
- Mix the epoxy resin: In disposable mixing cups, combine equal parts of the epoxy resin and the hardener. Use a stirring stick to thoroughly mix the components according to the instructions. Ensure that you mix enough epoxy resin to cover the entire attaching surface of the wine glass and teacup.
- Apply the epoxy resin: Using a clean stirring stick or a small brush, apply a thin layer of the epoxy resin onto the attaching surface of the wine glass. Do the same on the bottom of the teacup where it will be attached.
- Align and attach: Carefully align the attaching surfaces of the wine glass and teacup, ensuring that they are centered and level. Gently press them together to make sure they adhere properly.
- Wipe away excess epoxy resin: Use a lint-free cloth moistened with rubbing alcohol to wipe away any excess epoxy resin that may have squeezed out. Be careful not to disturb the alignment of the teacup and wine glass while cleaning.
Glass Adhesive:
- Read the instructions: Read and follow the instructions provided by the manufacturer of the glass adhesive. Different brands may have varying application methods and curing times.
- Apply the glass adhesive: Squeeze a small amount of the glass adhesive onto the attaching surface of the wine glass. Avoid applying too much, as it may cause messy overflow when the teacup is attached.
- Position and attach the teacup: Carefully position the teacup on top of the wine glass, aligning their attaching surfaces. Press them together firmly, ensuring a secure bond.
- Secure with masking tape or clamps: If necessary, use masking tape or clamps to hold the teacup and wine glass in place while the glass adhesive cures. Follow the recommended curing time provided in the manufacturer’s instructions.
Remember, whether you choose epoxy resin or glass adhesive, it’s essential to work in a well-ventilated area and wear protective gloves throughout the process. Additionally, avoid using the teacup wine glasses until the adhesive has fully cured for the recommended time.
Now that the teacups are attached to the wine glasses, it’s time to let them dry and set before adding the finishing touches.
When making teacup wine glasses, be sure to use teacups with thick, sturdy bases to prevent tipping. Additionally, choose a strong adhesive that is safe for glass to attach the stems securely.
Step 5: Let the Glasses Dry
After successfully attaching the teacups to the wine glasses, it’s crucial to allow them sufficient time to dry and set. This will ensure a strong bond and stability. Follow these steps to let the glasses dry:
- Refer to manufacturer’s instructions: Depending on the type of adhesive used, refer to the manufacturer’s instructions for the recommended drying and curing time. It is important to give the glasses enough time to properly set.
- Place the glasses in a safe, dry location: Find a clean and dry area where the glasses can be left undisturbed during the drying process. Make sure the glasses are placed on a flat and level surface to maintain their alignment.
- Avoid unnecessary movement: Try not to move or handle the glasses while they are drying. Any unnecessary movement can disrupt the bonding process and compromise the strength of the bond.
- Keep the glasses away from moisture: Ensure that the drying area is free from any moisture or humidity. Excessive moisture can interfere with the adhesion process and lead to weak bonds.
- Follow the recommended drying time: Patience is key. Allow the glasses to dry for the recommended duration mentioned in the adhesive’s instructions. Rushing the process may result in a weaker bond.
During the drying period, it’s crucial to exercise caution and avoid using the glasses until they are completely dry and set. Once the recommended drying time has elapsed, you can proceed to the final step – adding those finishing touches!
Read more: How To Make Teacup Candles
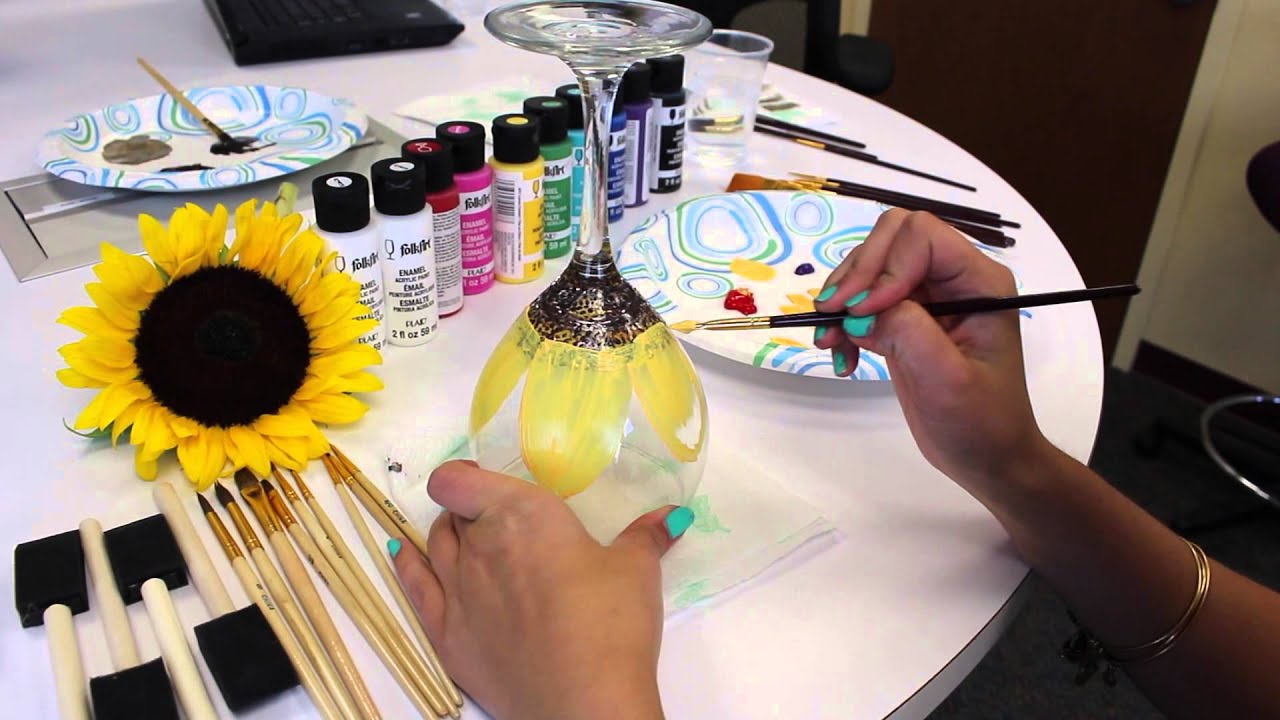
Step 6: Finishing Touches
Now that your teacup wine glasses are dry and the teacups are securely attached to the wine glasses, it’s time to add the final touches to enhance their appearance. Here are some finishing touches you can consider:
- Clean any residue: Carefully inspect the glasses for any residual adhesive or smudges. Use a lint-free cloth or a cotton swab dipped in rubbing alcohol to gently clean off any remaining residue. This will ensure a polished and professional look.
- Decorative accents: If desired, you can further personalize your teacup wine glasses with decorative accents. Consider adding ribbons, bows, or small charms around the stem or base of the wine glass to add a touch of elegance or whimsy.
- Protective coating: To protect the design on the teacups and ensure longevity, you can apply a clear coat of food-safe sealant or varnish. This will help to preserve the beauty of the teacup wine glasses over time and make them easier to clean.
- Display and storage: Find a suitable place to display and store your teacup wine glasses when they are not in use. Consider a glass cabinet or a dedicated shelf where they can be showcased and admired.
Remember, the finishing touches are optional, and you can customize your teacup wine glasses to match your personal style and preferences. Experiment with different ideas and let your creativity shine!
Once you’ve added the finishing touches, your beautiful teacup wine glasses are ready to be enjoyed. Whether you use them for special occasions or as a daily delight, they are sure to be conversation starters and a delightful addition to your tableware collection.
Congratulations on creating your own teacup wine glasses! We hope this step-by-step guide has been helpful and inspiring. Enjoy your elegant, one-of-a-kind creations!
Conclusion
Congratulations on completing your journey of making teacup wine glasses! Through careful selection, cleaning, and attaching, you’ve transformed vintage teacups and wine glasses into stunning and unique pieces of tableware. These teacup wine glasses are not only functional but also add a touch of elegance and charm to any occasion.
Now that you have learned the process, feel free to experiment with different teacup and wine glass combinations to create a collection that reflects your personal style and taste. These teacup wine glasses also make thoughtful and memorable gifts for friends and family who appreciate both vintage aesthetics and fine wine.
Remember to handle your newly created teacup wine glasses with care and store them in a safe place when not in use. Cleaning them gently and applying a protective coating will help maintain their beauty and allow you to enjoy them for years to come.
Thank you for joining us on this journey to create teacup wine glasses. We hope this step-by-step guide has inspired you to unleash your creativity and explore new ways to repurpose and reimagine tableware. Cheers to your artistic and innovative spirit!
Frequently Asked Questions about How To Make Teacup Wine Glasses
Was this page helpful?
At Storables.com, we guarantee accurate and reliable information. Our content, validated by Expert Board Contributors, is crafted following stringent Editorial Policies. We're committed to providing you with well-researched, expert-backed insights for all your informational needs.


0 thoughts on “How To Make Teacup Wine Glasses”