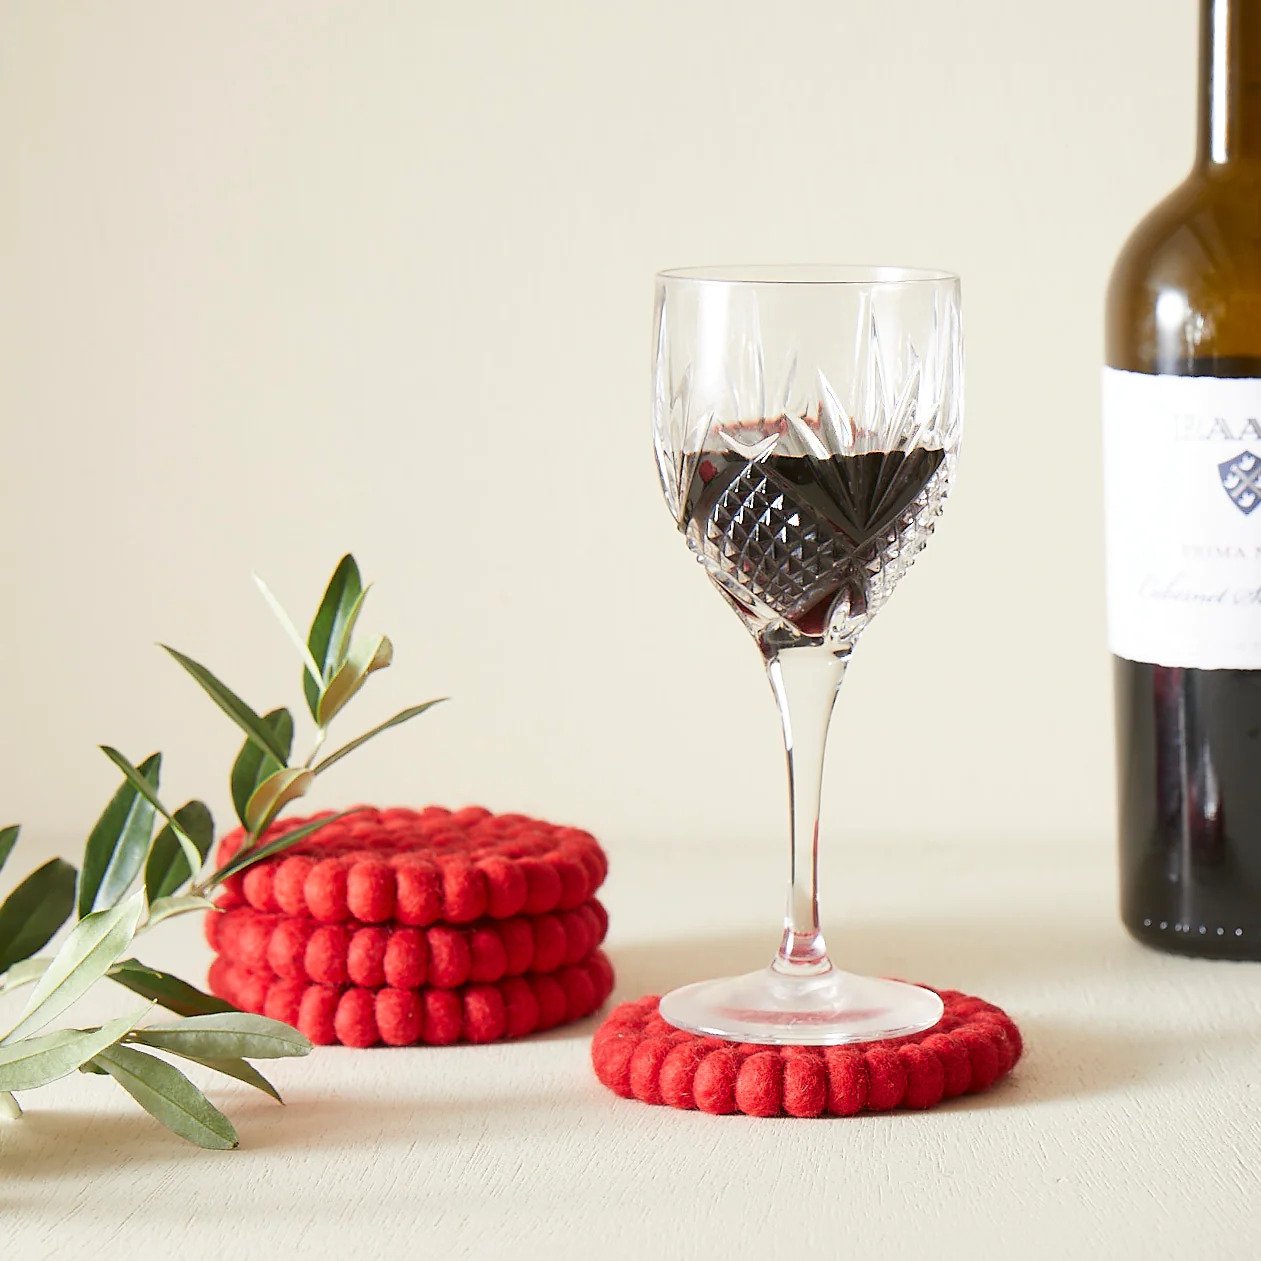

Tableware
How To Make Felt Wine Glass Coasters
Modified: February 24, 2024
Create stylish and practical tableware with our step-by-step guide on how to make felt wine glass coasters. Protect your surfaces in style with these DIY coasters.
(Many of the links in this article redirect to a specific reviewed product. Your purchase of these products through affiliate links helps to generate commission for Storables.com, at no extra cost. Learn more)
Introduction
When it comes to tableware, one often thinks of plates, bowls, and cutlery, but there is one item that deserves special attention – wine glasses. Whether you are hosting a dinner party or enjoying a quiet evening at home, wine glasses are an essential part of the dining experience. To protect your furniture and add a touch of elegance to your tabletop, why not make your own felt wine glass coasters?
Felt wine glass coasters are not only practical but also offer endless possibilities for customization. They can be tailored to match your décor or reflect your personal style. Making your own felt wine glass coasters is a fun and creative project that allows you to put your tableware expertise to good use.
In this article, we will guide you through the step-by-step process of creating these charming and functional coasters. From cutting the felt to assembling the coasters, we’ve got you covered. So, gather your materials and let’s get started!
Key Takeaways:
- Elevate your dining experience with personalized felt wine glass coasters, adding both practicality and elegance to your tableware collection. Get creative and impress your guests with these charming DIY creations.
- Embrace your creativity and showcase your tableware expertise by crafting unique felt wine glass coasters. Protect your furniture with style and add a touch of sophistication to every dining occasion.
Read more: How To Make Felted Coasters
Materials Needed
Before diving into the crafting process, it’s important to gather all the necessary materials. Here’s a list of what you’ll need to make your felt wine glass coasters:
- Felt sheets: Choose a variety of colors to match your desired aesthetic. Make sure the felt is thick enough to provide ample protection for your tabletop.
- Scissors: Ensure you have a sharp pair of scissors to precisely cut the felt.
- Chalk or fabric marker: Use this to draw the shape of your wine glass coaster on the felt.
- Embroidery floss or thread: Opt for colors that complement the felt and add decorative stitching.
- Embroidery needle: A thin needle will allow you to sew through the felt easily.
- Embroidery hoop (optional): This can help keep the felt taut while stitching.
- Hot glue gun (optional): If you want to add additional elements like beads or sequins, a hot glue gun will come in handy.
These materials can be easily found at your local craft store or online. Once you have everything ready, you can proceed to the next step – cutting the felt!
Step 1: Cutting the Felt
The first step in making your felt wine glass coasters is cutting the felt into the desired shape and size. Here’s how you can do it:
- Place the felt sheet on a flat surface and ensure it is smooth and wrinkle-free.
- Using the chalk or fabric marker, draw the outline of a wine glass shape onto the felt. You can create a template by tracing the bottom of a wine glass or use your artistic skills to freehand the shape.
- Take your scissors and carefully cut along the drawn outline. Make sure to cut smoothly and follow the shape precisely for a neat finish.
- Repeat this step for each coaster you plan to make, using different colors of felt if desired.
Remember to take your time and be patient while cutting the felt. Clean, precise cuts will give your coasters a professional and polished look.
Once you have cut out the wine glass shapes, you are ready to move on to the next step – creating the wine glass shape!
Step 2: Creating the Wine Glass Shape
Now that you have cut out the wine glass shapes from the felt, it’s time to give them a three-dimensional appearance. By creating a wine glass shape, your coasters will not only look visually appealing but will also provide a secure spot for your wine glasses. Follow these steps to create the wine glass shape:
- Hold the felt wine glass shape firmly in one hand.
- Using your other hand, fold the bottom part of the cutout upwards, about one-third of the way from the bottom.
- Carefully pinch the folded part together, creating a crease in the felt.
- Hold the pinched part and fold it inward slightly, creating a concave shape that resembles the bowl of a wine glass.
- Press down on the folds to make sure they stay in place. You can also use a small dab of hot glue to secure the folds if needed.
- Repeat these steps for each felt wine glass shape.
By creating this wine glass shape, your coasters will not only mimic the appearance of a real wine glass but will also provide stability for your glassware.
Now that you have created the wine glass shape, it’s time to add some decorative elements to your coasters in the next step!
When cutting out the felt for your wine glass coasters, use sharp fabric scissors to ensure clean and precise edges. This will give your coasters a professional and polished look.
Step 3: Adding Decorative Elements
Now that you have the wine glass shape for your coasters, it’s time to let your creativity shine by adding decorative elements. Embellishing your felt wine glass coasters will not only make them visually appealing but also add a personal touch. Here’s how you can add decorative elements:
- Choose the embroidery floss or thread in colors that complement the felt.
- Thread your embroidery needle with the chosen floss or thread.
- Decide on the type of decorative stitch you want to use. Options include blanket stitch, whip stitch, or even simple straight stitches.
- Select a starting point on the edge of the coaster and begin stitching, following the perimeter of the wine glass shape.
- You can use a contrasting or coordinating color of thread to accentuate the edges or create intricate patterns within the coaster.
- Experiment with different stitches, patterns, and colors to bring out your personal style.
- If desired, you can also add additional decorative elements like beads, sequins, or fabric patches using a hot glue gun.
Remember, this step is where you can let your imagination run wild. Get creative and have fun with the design process, as your felt wine glass coasters will be unique and reflect your personal style.
Once you have added your desired decorative elements, it’s time to move on to the next step – assembling the coaster!
Read more: How To Make Felt Baskets
Step 4: Assembling the Coaster
Now that you have added decorative elements to your felt wine glass coasters, it’s time to assemble them. By following these steps, you will ensure that your coasters are durable and functional:
- Take two similarly colored wine glass shapes with their decorative elements facing up.
- Apply a thin line of fabric glue or use a hot glue gun along the edges of one of the felt shapes. Leave a small opening for inserting the wine glass stem.
- Carefully align the edges of the second felt shape with the first and press firmly to create a bond.
- Continue pressing and smoothing along the entire edge to secure the two pieces together.
- Allow the glue to dry completely before moving on to the next step.
- Once the glue is dry, carefully turn the assembled coaster right-side up.
By assembling the coasters with glue, you ensure that they stay in place and provide a sturdy base for your wine glasses. Remember to align the coasters evenly to maintain a neat and professional appearance.
Now that you have successfully assembled your wine glass coasters, it’s time for the final step – adding the finishing touches.
Step 5: Final Touches and Finishing
You’re almost done with creating your felt wine glass coasters! Now it’s time to add the final touches to make them truly remarkable. Follow these steps to complete your coasters:
- Inspect each coaster for any loose threads or excess glue. Trim any stray threads or glue carefully with scissors to achieve a clean finish.
- Check the stability and flatness of the base. If needed, add a small dot of fabric glue or use a hot glue gun to reinforce any areas that may be lifting or not lying flat.
- Double-check that the coasters are fully dry and secure.
- If desired, you can add an extra layer of protection to the coaster base by attaching a small piece of felt or cork to the bottom using fabric glue or a hot glue gun. This will prevent any scratches or damage to your tabletop.
- Once you are satisfied with the final result, let the coasters dry completely before using them.
After these finishing touches, your felt wine glass coasters are ready to use! Place them on your tabletop with pride, knowing that you’ve created an elegant and functional addition to your tableware collection.
Remember to care for your coasters by spot cleaning them as needed and storing them in a clean, dry place when not in use.
Congratulations on completing your felt wine glass coasters! Enjoy using them to protect your furniture and add a touch of sophistication to your dining experience.
Now that you’ve mastered the art of making felt wine glass coasters, don’t be afraid to experiment with different colors, designs, and shapes. Let your imagination soar and create coasters that are uniquely yours.
Thank you for joining us on this crafting journey. Cheers to your creativity and the joy it brings to your table!
Conclusion
Crafting your own felt wine glass coasters is a delightful way to showcase your tableware expertise while adding a touch of elegance to your dining experience. By following the step-by-step process outlined in this article, you have learned how to create personalized coasters that are both practical and visually appealing.
From cutting the felt to assembling the coasters and adding decorative elements, each step has allowed you to apply your creativity and make the coasters uniquely yours. The materials required are easily accessible, and the process itself is enjoyable and rewarding.
Felt wine glass coasters not only serve a functional purpose by protecting your tabletop from spills and condensation but also add a touch of sophistication and style to your dining arrangements. By customizing the shape, color, and decorative elements, you can create coasters that perfectly complement your home decor.
Whether you are hosting a dinner party or enjoying a quiet evening at home, the effort and care put into making your own felt wine glass coasters will surely impress your guests and elevate your dining experience. Plus, they make wonderful gifts that show your thoughtfulness and creativity.
So, why settle for ordinary coasters when you can create your own? Embrace your tableware expertise and let your creativity shine by crafting these lovely felt wine glass coasters. We hope this article has provided you with the inspiration and guidance needed to embark on this enjoyable and fulfilling DIY project.
Now, gather your materials, follow the steps outlined, and let your creativity flow. Enjoy the process and the enchantment it brings to your tabletop.
Cheers to your creativity and the beauty you bring to your dining experience. Happy crafting!
Frequently Asked Questions about How To Make Felt Wine Glass Coasters
Was this page helpful?
At Storables.com, we guarantee accurate and reliable information. Our content, validated by Expert Board Contributors, is crafted following stringent Editorial Policies. We're committed to providing you with well-researched, expert-backed insights for all your informational needs.

0 thoughts on “How To Make Felt Wine Glass Coasters”