Home>Furniture & Design>Outdoor Furniture>How To Make An Outdoor Nativity Scene

Outdoor Furniture
How To Make An Outdoor Nativity Scene
Published: January 13, 2024
Learn how to create a stunning outdoor nativity scene with our expert tips and ideas. Discover the best outdoor furniture and design for your nativity display.
(Many of the links in this article redirect to a specific reviewed product. Your purchase of these products through affiliate links helps to generate commission for Storables.com, at no extra cost. Learn more)
Introduction
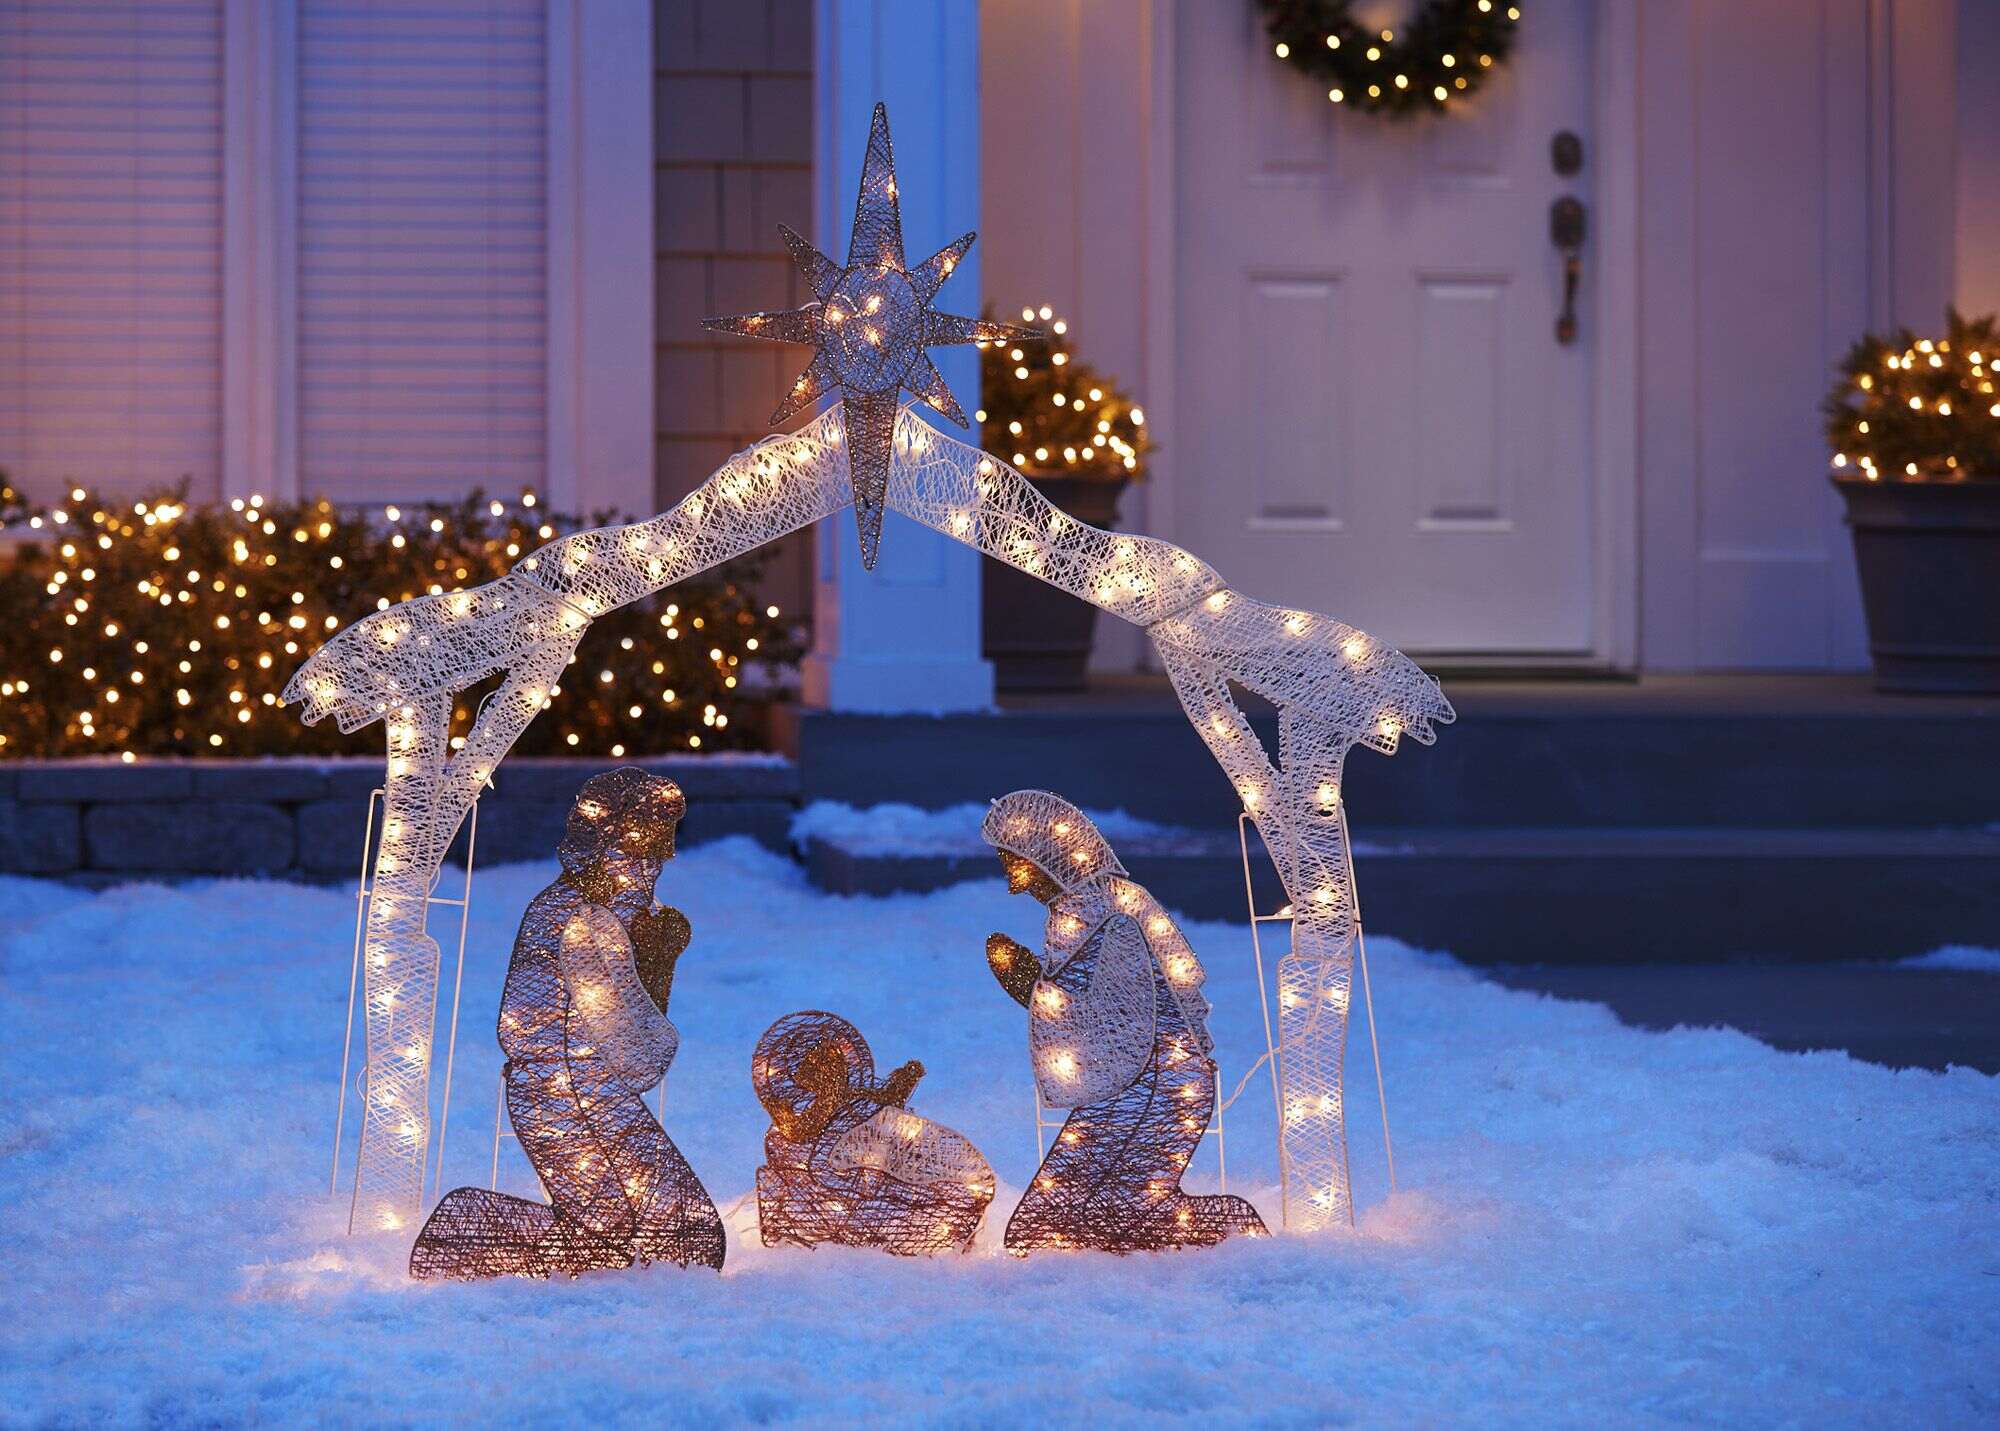
Creating an outdoor nativity scene is a beautiful way to share the joy of the holiday season with your community. Whether you're setting up a nativity scene in your churchyard, front yard, or a public space, the process can be a rewarding and meaningful experience. In this guide, we'll walk you through the steps to create a stunning outdoor nativity scene that will captivate and inspire all who see it.
An outdoor nativity scene typically features life-sized or larger-than-life figures depicting the birth of Jesus Christ, including Mary, Joseph, the baby Jesus, the shepherds, the wise men, and various animals. The scene serves as a visual representation of the biblical story of the birth of Jesus and is often a focal point of Christmas celebrations.
By crafting your own outdoor nativity scene, you can personalize the display to reflect your faith and creativity. Whether you're a skilled woodworker or a novice crafter, there are various approaches to creating a nativity scene that will suit your abilities and resources. From planning and design to construction, painting, and setting up the scene, this guide will provide you with the essential steps to bring your outdoor nativity scene to life.
Not only does an outdoor nativity scene add a touch of spiritual significance to your outdoor space, but it also serves as a beautiful way to engage with your community and spread the message of hope and goodwill. As we delve into the materials needed, planning and design, construction, painting and decorating, setting up the nativity scene, and maintenance and storage, you'll gain the knowledge and inspiration to embark on this fulfilling project. Let's embark on this creative journey together and craft a stunning outdoor nativity scene that will uplift and inspire all who behold it.
Key Takeaways:
- Create a stunning outdoor nativity scene by planning, constructing, and painting with care and creativity. Share the joy of the holiday season with your community through this meaningful and inspiring project.
- Preserve the beauty and integrity of your outdoor nativity scene by maintaining and storing it properly. Keep the timeless message of faith and love alive for years to come, inspiring and delighting all who encounter it.
Read more: How To Create Scenes In Alexa
Materials Needed
Before embarking on the creation of your outdoor nativity scene, it’s essential to gather the necessary materials. The specific materials required will depend on the design and size of your nativity scene. Here’s a general list of materials that you might need:
- Wood or Metal: Depending on your preference and skills, you’ll need material for constructing the stable and the figures. Common choices include plywood, solid wood, or metal sheets.
- Saw and Cutting Tools: If you’re crafting the figures and stable from wood, a saw and cutting tools will be essential for shaping the materials.
- Nails, Screws, or Adhesive: To assemble the stable and secure the figures, you’ll need fasteners such as nails, screws, or strong adhesive.
- Paint and Brushes: High-quality, weather-resistant paint and brushes are essential for adding color and detail to the nativity scene.
- Outdoor Sealant: To protect the finished pieces from the elements, an outdoor sealant or varnish is crucial.
- Lighting: Consider adding outdoor lighting to illuminate the nativity scene during the evening hours, creating a stunning visual impact.
- Decorative Fabric: Fabric can be used to dress the figures and add texture to the scene.
- Decorative Accessories: Depending on your design, you might want to incorporate decorative elements such as faux hay, moss, or other natural materials to enhance the setting.
- Ground Anchors: To secure the stable and figures in place, especially in areas with inclement weather, ground anchors or stakes are essential.
- Tools: Basic tools such as a hammer, drill, measuring tape, and sandpaper will be necessary for construction and assembly.
It’s important to ensure that the materials you choose are durable and suitable for outdoor display. Additionally, consider the local weather conditions and choose materials that will withstand exposure to sun, wind, and moisture. By gathering these materials, you’ll be well-prepared to proceed with the planning and design phase of your outdoor nativity scene project.
Planning and Design
Creating a captivating outdoor nativity scene begins with thoughtful planning and a well-conceived design. Before diving into the construction phase, take the time to envision the overall look and feel you want to achieve. Here are essential steps to consider during the planning and design stage:
- Choose a Location: Select a prominent and visible spot for your nativity scene. Consider the available space, accessibility, and the backdrop against which the scene will be displayed.
- Sketch the Layout: Create a rough sketch or use design software to plan the arrangement of the stable, figures, and any additional elements you wish to include. This will help you visualize the scale and positioning of the components.
- Select the Figures: Decide on the specific figures you want to include in your nativity scene. This may include Mary, Joseph, the baby Jesus, shepherds, wise men, angels, and animals. Consider the scale and proportion of the figures in relation to the overall scene.
- Design the Stable: If your nativity scene will feature a stable, determine the size, style, and construction details. Consider whether you want a simple silhouette or a more intricate structure with architectural details.
- Consider Lighting: Think about how you will illuminate the nativity scene. Whether using spotlights, string lights, or other lighting elements, planning for illumination is crucial for creating a captivating display, especially during the evening hours.
- Incorporate Natural Elements: If desired, plan to integrate natural elements such as hay, moss, or rocks to enhance the authenticity and visual appeal of the scene.
- Ensure Safety and Stability: As you plan the layout and design, prioritize safety and stability. Ensure that the figures and stable are securely positioned and won’t pose any hazards to viewers.
During the planning and design phase, allow your creativity to flourish while keeping practical considerations in mind. By carefully mapping out the layout and visualizing the finished display, you’ll be well-prepared to move on to the construction phase and bring your outdoor nativity scene to life.
Construction
With the planning and design phase complete, it’s time to bring your outdoor nativity scene to life through construction. Whether you’re crafting the figures and stable from scratch or assembling pre-made components, attention to detail and craftsmanship will be key. Here are the essential steps for the construction phase:
- Prepare the Materials: Gather all the materials and tools needed for construction, ensuring that everything is readily accessible.
- Construct the Stable: If your nativity scene includes a stable, begin by constructing this central element. Cut the wood or metal to the appropriate dimensions and assemble the pieces according to your design.
- Create the Figures: Whether carving, sculpting, or assembling, focus on creating the figures with precision and attention to detail. Ensure that the scale and proportions align with your initial design.
- Assemble Additional Elements: If your design includes additional elements such as a manger, angels, or decorative features, assemble these components as well.
- Secure and Reinforce: As you construct each piece, prioritize stability and durability. Use sturdy fasteners and reinforcement techniques to ensure that the figures and stable will withstand outdoor conditions.
- Weatherproofing: If your materials are susceptible to the elements, consider applying a weatherproof sealant or paint to protect the nativity scene from moisture and sun exposure.
- Test the Layout: As you complete the construction, periodically test the layout of the figures and stable to ensure that everything fits together as intended.
Throughout the construction phase, take your time to execute each step with care and precision. Whether you’re a seasoned craftsman or a first-time creator, the construction of your outdoor nativity scene is an opportunity to infuse your artistry and devotion into the project. With the figures and stable taking shape, the next phase will involve adding color and detail to bring the scene to life.
When making an outdoor nativity scene, consider using weather-resistant materials like plastic, wood, or metal to ensure it can withstand outdoor conditions. This will help your nativity scene last longer and stay looking nice.
Painting and Decorating
Once the construction phase is complete, it’s time to infuse your outdoor nativity scene with color, texture, and detail through painting and decorating. This stage allows you to add personality and visual appeal to the figures and stable, bringing them to life with vibrant hues and decorative touches. Here are the essential steps for painting and decorating your nativity scene:
- Choose High-Quality Paint: Select weather-resistant paint that is suitable for outdoor use. Consider acrylic or enamel paints designed to withstand exposure to the elements.
- Prime the Surfaces: If necessary, apply a primer to the wood or metal surfaces before painting to ensure better adhesion and longevity of the paint.
- Add Base Colors: Begin by applying base coats of paint to the figures and stable. Use a brush or spray paint to cover the surfaces evenly, allowing the base colors to dry thoroughly.
- Add Detail and Texture: Use smaller brushes to add intricate details to the figures, such as facial features, clothing textures, and decorative elements. Consider using different paint finishes to create visual interest, such as matte, satin, or metallic paints.
- Decorate the Stable: If your stable includes architectural details or decorative elements, use paint to enhance these features and add character to the structure.
- Consider Natural Finishes: For a rustic and authentic look, consider using natural finishes such as staining wood or incorporating natural materials into the design.
- Add Decorative Accents: Once the base painting is complete, consider adding decorative accents such as faux fur, fabric, or other embellishments to the figures to enhance their visual appeal.
- Weatherproofing: After the paint has dried, apply a weatherproof sealant or varnish to protect the painted surfaces from the elements.
As you embark on the painting and decorating phase, let your creativity guide you in adding depth and character to the nativity scene. Each brushstroke and decorative touch contributes to the overall impact of the display, creating a visually stunning and emotionally resonant outdoor nativity scene.
Read more: How To Create Scenes In Google Home
Setting Up the Nativity Scene
With the construction, painting, and decorating phases complete, it’s time to bring your outdoor nativity scene to its designated location and set it up for all to admire. The process of setting up the nativity scene requires careful placement, attention to detail, and a touch of artistry to create a captivating display. Here are the essential steps for setting up your nativity scene:
- Prepare the Display Area: Clear the designated area of any debris, ensuring a clean and level surface for the nativity scene.
- Position the Stable: Begin by placing the stable in the desired location, ensuring that it is securely anchored and level. Consider using ground anchors or stakes to stabilize the structure.
- Arrange the Figures: Carefully position the figures within the stable, creating a balanced and visually engaging composition. Pay attention to the scale and spacing of the figures to achieve a harmonious arrangement.
- Consider Lighting: If you’ve incorporated lighting elements, ensure that they are strategically placed to illuminate the scene effectively, highlighting key features and creating a warm ambiance.
- Add Natural Elements: If desired, embellish the display with natural elements such as hay, moss, or rocks to enhance the setting and create a sense of authenticity.
- Final Adjustments: Step back and assess the overall display, making any necessary adjustments to the positioning of the figures and decorative elements to achieve the desired visual impact.
- Capture the Moment: Once the nativity scene is set up, consider capturing photographs to document and share the beauty of your creation with others.
As you set up your outdoor nativity scene, envision the impact it will have on those who encounter it. Whether displayed in a public space or your own front yard, the nativity scene serves as a powerful symbol of faith, hope, and the spirit of the holiday season. By taking the time to arrange the scene thoughtfully and with attention to detail, you’ll create a captivating and meaningful display that resonates with all who behold it.
Maintenance and Storage
After the joyous holiday season has passed, it’s essential to consider the maintenance and storage of your outdoor nativity scene. Proper care and storage practices will ensure that the display remains in excellent condition for years to come, ready to be unveiled and enjoyed during the next Christmas season. Here are the key steps for maintaining and storing your nativity scene:
- Clean and Inspect: As the holiday season draws to a close, carefully clean each figure and the stable, removing any dirt or debris that may have accumulated during display. Inspect the components for any signs of wear or damage that may require repair.
- Weatherproofing Maintenance: If your nativity scene is exposed to the elements, consider reapplying a weatherproof sealant or varnish to protect the surfaces from moisture and sun damage.
- Secure Storage: Choose a dedicated storage area that is dry, climate-controlled, and free from pests to safeguard the nativity scene during the off-season. If space is limited, consider disassembling the components for more compact storage.
- Protective Packaging: If disassembling the nativity scene, carefully wrap each figure and the stable in protective materials such as bubble wrap or soft fabric to prevent scratches and damage during storage.
- Labeling and Organization: Clearly label each component and consider creating an inventory list to streamline the assembly process when the nativity scene is brought out for display in the following year.
- Regular Inspection: Throughout the year, periodically inspect the stored components to ensure that they remain in good condition and address any maintenance or repair needs promptly.
- Reflect and Plan: Take the opportunity to reflect on the previous display and consider any enhancements or modifications you may want to make for the next holiday season. This may include adding new figures, refreshing the paint, or reimagining the layout.
By prioritizing maintenance and proper storage, you’ll preserve the beauty and integrity of your outdoor nativity scene, allowing it to continue inspiring and delighting all who experience its timeless message of faith and love.
Conclusion
Creating an outdoor nativity scene is a labor of love that allows you to share the timeless story of the birth of Jesus Christ in a visually compelling and meaningful way. From the initial planning and design stages to the construction, painting, setting up, and maintenance of the display, each phase reflects your dedication to crafting a display that resonates with the spirit of the holiday season. As you embark on this creative journey, remember that the beauty of the nativity scene lies not only in its visual appeal but also in the profound message it conveys.
Through your artistry and devotion, you have the power to inspire and uplift those who encounter your outdoor nativity scene. Whether displayed in a community gathering space, a place of worship, or your own front yard, the nativity scene serves as a poignant reminder of the hope and joy that Christmas brings. It is a testament to faith, love, and the enduring traditions that unite us during this special time of year.
As you carefully craft each figure, adorn the stable, and set the scene for all to admire, you are contributing to a tradition that has touched hearts for generations. Your outdoor nativity scene has the potential to spark wonder, contemplation, and a sense of togetherness among those who pause to take it in. It is a visual expression of the cherished story that has been celebrated and revered for centuries.
As you bid farewell to the holiday season and carefully store your nativity scene for the year ahead, know that your efforts have left an indelible mark on those who have experienced the beauty and grace of your creation. Your dedication to preserving this timeless tradition ensures that the spirit of Christmas will continue to shine brightly in your community and beyond.
May the joy and peace of the Christmas season remain with you as you look forward to unveiling your outdoor nativity scene once again, bringing warmth and inspiration to all who behold its enduring beauty.
Frequently Asked Questions about How To Make An Outdoor Nativity Scene
Was this page helpful?
At Storables.com, we guarantee accurate and reliable information. Our content, validated by Expert Board Contributors, is crafted following stringent Editorial Policies. We're committed to providing you with well-researched, expert-backed insights for all your informational needs.









0 thoughts on “How To Make An Outdoor Nativity Scene”