Home>Furniture & Design>Outdoor Furniture>How To Make An Outdoor Stove
Outdoor Furniture
How To Make An Outdoor Stove
Published: January 15, 2024
Learn how to make an outdoor stove with our expert tips and step-by-step guide. Create the perfect addition to your outdoor furniture and design.
(Many of the links in this article redirect to a specific reviewed product. Your purchase of these products through affiliate links helps to generate commission for Storables.com, at no extra cost. Learn more)
Introduction
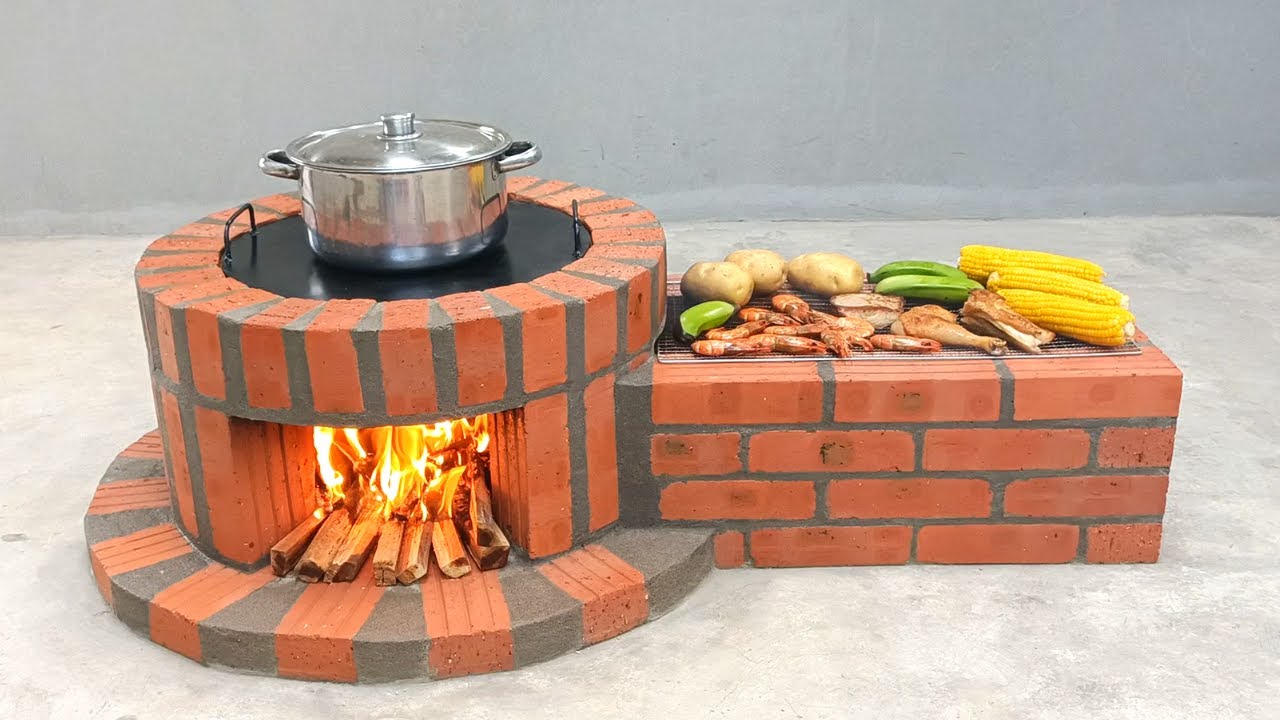
Creating an outdoor stove is an exciting and rewarding project for anyone who enjoys spending time in the great outdoors. Whether you're an avid camper, a backyard enthusiast, or simply someone who loves to cook al fresco, having a reliable outdoor stove can enhance your outdoor experience. In this comprehensive guide, we will walk you through the process of constructing your own outdoor stove using readily available materials and simple techniques. With just a few basic tools and a little bit of creativity, you can craft a functional and efficient outdoor stove that will serve you well during camping trips, backyard barbecues, or any outdoor adventure.
Not only is building an outdoor stove a practical endeavor, but it also provides a sense of accomplishment and empowerment. By constructing your own stove, you'll gain a deeper understanding of its mechanics and functionality, allowing you to customize it to suit your specific needs. Additionally, creating a DIY outdoor stove is a sustainable choice, as it promotes resourcefulness and reduces reliance on traditional fuel sources.
Throughout this guide, we will outline the materials you'll need, the step-by-step process of assembling the stove, and how to test its functionality. Whether you're a seasoned DIY enthusiast or a newcomer to outdoor projects, this guide is designed to be accessible and informative, empowering you to embark on this fulfilling endeavor with confidence. So, roll up your sleeves, gather your materials, and let's dive into the exciting world of crafting your very own outdoor stove.
Key Takeaways:
- Building your own outdoor stove is a fun and rewarding DIY project that enhances outdoor cooking experiences. It promotes resourcefulness, sustainability, and a deeper understanding of stove mechanics.
- Crafting an outdoor stove empowers you to customize a functional cooking appliance using simple materials. It’s a symbol of creativity, self-sufficiency, and the joy of outdoor culinary adventures.
Read more: How To Make Popcorn On An Induction Cooktop
Materials Needed
Before diving into the construction process, it’s essential to gather all the necessary materials and tools. The beauty of building an outdoor stove lies in its simplicity and the minimal requirements for construction. Here’s a list of the basic materials you’ll need to get started:
- Large Metal Can: Look for a sturdy metal can, such as a large coffee can or a paint can. The size of the can will depend on your specific needs, but a 1-gallon can is a good starting point.
- Tin Snips: These will be used to cut the metal can to create the necessary openings for the stove.
- Marker or Pen: To mark the cutting lines on the metal can.
- Insulating Material: Vermiculite, perlite, or a similar insulating material will be used to create a barrier between the inner and outer walls of the stove.
- Grate or Wire Mesh: This will serve as the stove’s cooking surface, allowing air to flow underneath and support your cooking vessel.
- Drill with Bits: A drill will be necessary for creating ventilation holes in the can.
- High-temperature Paint: To coat the exterior of the stove for added durability and heat resistance.
- Stove Fuel: Depending on your preference, you can use wood, charcoal, or other suitable stove fuel.
- Heat-Resistant Gloves: To ensure safety when handling the stove during and after use.
These materials can be easily sourced from hardware stores, home improvement centers, or even repurposed from items you may already have at home. Once you’ve gathered these materials, you’re well on your way to creating your own outdoor stove.
Step 1: Preparing the Base
The first step in constructing your outdoor stove is to prepare the base, which forms the foundation for the stove’s functionality and stability. This process involves creating the necessary openings and ventilation to facilitate airflow and ensure efficient combustion. Let’s dive into the detailed steps for preparing the base of your outdoor stove:
- Marking and Cutting: Using a marker or pen, mark the areas on the metal can where you’ll need to make cuts. These will include the opening for the fuel chamber, the air intake holes, and the opening for the cooking surface. Carefully measure and mark these areas to ensure precision.
- Cutting the Openings: With the help of tin snips, carefully cut along the marked lines to create the necessary openings. Exercise caution while cutting to prevent sharp edges and ensure a clean, precise finish.
- Creating Ventilation Holes: Using a drill with the appropriate bits, create small ventilation holes around the lower portion of the can. These holes will allow air to enter the stove, promoting combustion and facilitating the flow of heat.
- Adding Insulating Material: Once the openings and ventilation holes are in place, add a layer of insulating material, such as vermiculite or perlite, between the inner and outer walls of the stove. This insulation helps retain heat and improves the stove’s overall efficiency.
- Installing the Cooking Surface: Place a grate or wire mesh across the top of the can to serve as the cooking surface. This surface provides support for your cooking vessel and allows airflow to reach the fuel source from underneath.
By meticulously following these steps, you’ll establish a solid foundation for your outdoor stove, setting the stage for the subsequent assembly and completion of the stove. With the base prepared, you’re now ready to move on to the exciting process of assembling the various components that will bring your outdoor stove to life.
Step 2: Assembling the Stove
Assembling the components of your outdoor stove is where the project truly takes shape, transforming a simple metal can into a functional and efficient cooking appliance. This step involves bringing together the various elements that will contribute to the stove’s performance and usability. Here’s a detailed guide to assembling your outdoor stove:
- Positioning the Fuel Chamber: Place the fuel source, such as wood or charcoal, into the designated chamber within the stove. Ensure that there is sufficient clearance between the fuel and the surrounding walls to allow for proper airflow and combustion.
- Securing the Cooking Vessel: If you’re using a pot or pan for cooking, position it securely on the cooking surface, ensuring stability and balance. The cooking vessel should sit atop the grate or wire mesh, allowing heat to reach the underside for efficient cooking.
- Aligning the Air Intake: Verify that the air intake holes are unobstructed and properly aligned to facilitate the inflow of air. Adequate airflow is crucial for sustaining combustion and maintaining a consistent cooking temperature.
- Checking the Insulation: Confirm that the insulating material between the inner and outer walls of the stove is intact and evenly distributed. The insulation helps contain heat within the stove, improving its overall efficiency and heat retention.
- Inspecting the Exterior: Prior to use, examine the exterior of the stove, ensuring that all components are securely in place and that there are no sharp edges or protruding elements that could pose a safety risk.
By carefully assembling the stove and ensuring that each component is positioned and functioning as intended, you’ll create a reliable outdoor cooking appliance that is ready to deliver exceptional performance. With the stove now assembled, the next crucial step involves adding the fuel source to initiate the combustion process and bring your outdoor stove to life.
When making an outdoor stove, make sure to use a sturdy and heat-resistant material, such as metal or ceramic, to ensure safety and durability.
Step 3: Adding the Fuel Source
Adding the fuel source is a pivotal step in the process of activating your outdoor stove and harnessing its cooking capabilities. Whether you opt for traditional wood, convenient charcoal, or another suitable fuel, this step sets the stage for igniting the stove and initiating the combustion process. Here’s a comprehensive guide to adding the fuel source to your outdoor stove:
- Choosing the Fuel: Select the appropriate fuel for your outdoor cooking needs. Wood, for instance, provides a natural and aromatic option, while charcoal offers convenience and consistent heat. Consider factors such as burn time, heat intensity, and availability when choosing your fuel source.
- Placing the Fuel: Carefully position the chosen fuel within the designated chamber of the stove. Arrange the wood or charcoal to allow for adequate airflow and combustion, ensuring that it is positioned securely and does not impede the airflow or cooking surface.
- Igniting the Fuel: Using a suitable ignition method, such as matches or a lighter, carefully ignite the fuel source within the stove. Exercise caution and follow appropriate safety measures to prevent accidents and ensure a controlled ignition process.
- Observing the Combustion: As the fuel ignites and combustion begins, observe the stove to ensure that the flame is sustained and that the airflow is promoting efficient burning. The combustion process should establish a consistent heat source for cooking while minimizing smoke and emissions.
- Adjusting the Airflow: Monitor the airflow and make any necessary adjustments to the air intake to regulate the combustion process and maintain the desired cooking temperature. Proper airflow management is essential for achieving optimal cooking conditions.
By adding the fuel source and initiating the combustion process, you’ll activate your outdoor stove and unlock its potential for preparing delicious meals in an outdoor setting. With the stove now fueled and operational, the final step involves testing its functionality to ensure that it meets your cooking requirements and expectations.
Read more: How To Make A Stove Top Distiller
Step 4: Testing the Stove
Testing the functionality of your newly constructed outdoor stove is an exciting and essential phase of the project, allowing you to gauge its performance, heat distribution, and overall usability. This step involves putting the stove through its paces to ensure that it meets your cooking needs and delivers the expected results. Here’s a comprehensive guide to testing the functionality of your outdoor stove:
- Preheating the Stove: Allow the stove to preheat for a few minutes after igniting the fuel source. This preheating period ensures that the stove reaches an optimal cooking temperature, allowing for efficient heat distribution.
- Conducting Heat Distribution Test: Place a cooking vessel, such as a pot or pan, on the stove’s cooking surface and observe the distribution of heat. Ensure that the heat is evenly dispersed across the bottom of the vessel, promoting uniform cooking and minimizing hot spots.
- Testing Cooking Performance: Prepare a simple dish or boil water on the stove to assess its cooking performance. Observe the flame intensity, heat retention, and overall cooking experience to determine the stove’s suitability for various outdoor culinary tasks.
- Monitoring Combustion Efficiency: Throughout the testing phase, monitor the combustion process and airflow to ensure that the stove maintains a consistent flame and efficient burning of the fuel source. Minimal smoke and efficient fuel consumption are indicators of a well-designed and functional outdoor stove.
- Ensuring Safety and Stability: Verify that the stove remains stable during use and that all components are secure. Additionally, prioritize safety by keeping flammable materials at a safe distance and using heat-resistant gloves when handling the stove.
By thoroughly testing the stove and evaluating its performance across various cooking scenarios, you’ll gain valuable insights into its capabilities and potential areas for improvement. This testing phase allows you to fine-tune the stove’s operation and make any necessary adjustments to optimize its functionality for future outdoor cooking endeavors.
With the stove successfully tested and proven to meet your cooking requirements, you can now confidently incorporate it into your outdoor adventures, whether it’s camping, backyard gatherings, or simply enjoying the pleasures of outdoor cooking.
Conclusion
Congratulations on successfully crafting your own outdoor stove! By embarking on this DIY project, you’ve not only created a practical cooking appliance but also gained valuable insights into the mechanics of outdoor stoves and the art of harnessing fire for culinary pursuits. As you reflect on the journey from gathering materials to testing the stove’s functionality, it’s evident that the process has been both rewarding and educational.
Building an outdoor stove is a testament to resourcefulness and creativity, as you’ve transformed simple materials into a functional and efficient cooking tool. The satisfaction of constructing a stove tailored to your specific needs is a testament to the empowerment that DIY projects can bring. Additionally, the sustainable nature of repurposing materials and utilizing natural fuel sources aligns with a conscious and environmentally friendly approach to outdoor cooking.
As you prepare to integrate your outdoor stove into your outdoor escapades, whether it’s camping under the stars, hosting a backyard barbecue, or simply enjoying the serenity of nature, remember the versatility and reliability of the stove you’ve created. Its ability to provide a consistent heat source, facilitate culinary creativity, and foster communal cooking experiences makes it a valuable addition to your outdoor gear.
Furthermore, the knowledge and skills you’ve gained from this endeavor can be shared with fellow outdoor enthusiasts, sparking inspiration and fostering a sense of self-sufficiency in crafting essential tools for outdoor living. The journey from a simple metal can to a fully functional outdoor stove serves as a reminder of the ingenuity and fulfillment that DIY projects offer.
As you embark on future outdoor adventures with your newly constructed stove, may it serve as a symbol of your ability to innovate, adapt, and savor the joys of outdoor cooking. Embrace the warmth of the flame, the aromas of outdoor cuisine, and the camaraderie that comes with sharing meals around a crackling fire. Your outdoor stove stands as a testament to your resourcefulness and your commitment to enhancing outdoor experiences through craftsmanship and creativity.
So, with your outdoor stove at the ready, it’s time to savor the flavors of the great outdoors and revel in the satisfaction of a DIY project well executed. Here’s to many memorable meals and heartwarming moments around the flickering flames of your handmade outdoor stove.
Frequently Asked Questions about How To Make An Outdoor Stove
Was this page helpful?
At Storables.com, we guarantee accurate and reliable information. Our content, validated by Expert Board Contributors, is crafted following stringent Editorial Policies. We're committed to providing you with well-researched, expert-backed insights for all your informational needs.


0 thoughts on “How To Make An Outdoor Stove”