Home>Furniture>Bedroom Furniture>How To Disassemble An Ikea Bed Frame

Bedroom Furniture
How To Disassemble An Ikea Bed Frame
Modified: August 22, 2024
Learn how to disassemble your Ikea bed frame with our easy step-by-step guide. Save time and hassle when moving or upgrading your bedroom furniture.
(Many of the links in this article redirect to a specific reviewed product. Your purchase of these products through affiliate links helps to generate commission for Storables.com, at no extra cost. Learn more)
Introduction
Welcome to the ultimate guide on how to disassemble an Ikea bed frame. Whether you’re moving, upgrading your bedroom furniture, or simply want to rearrange your space, knowing how to properly disassemble your bed frame is essential. By following the step-by-step instructions in this article, you’ll be able to dismantle your Ikea bed frame safely and efficiently.
Ikea bed frames are known for their durability and functionality, making them a popular choice in many households. However, their unique assembly design may seem daunting when it comes time to take them apart. But fear not! With the right tools and a little bit of patience, disassembling your Ikea bed frame can be a breeze.
In this comprehensive guide, we will walk you through each step of the process, from clearing the area to organizing and storing the disassembled parts. We’ll also provide a list of tools and materials you’ll need to have on hand to ensure a smooth disassembly process.
So, before you grab your toolbox and start dismantling your Ikea bed frame, let’s take a look at the tools and materials you’ll need.
Key Takeaways:
- Master the art of disassembling your Ikea bed frame with ease using the right tools and step-by-step instructions, ensuring a smooth and efficient process.
- Safely dismantle your Ikea bed frame by following the comprehensive guide, from clearing the area to organizing and storing the disassembled parts, empowering you to confidently tackle the task.
Read more: How To Disassemble A Bed Frame
Tools and Materials Required
Before you begin disassembling your Ikea bed frame, it’s important to gather all the necessary tools and materials. This will help you work efficiently and minimize any potential damage to the frame or surrounding furniture. Here’s a list of items you’ll need:
- Allen wrench: Most Ikea bed frames come with their own Allen wrench for assembly. Make sure you have it handy for disassembly.
- Flathead screwdriver: This tool will come in handy for removing any screws or hardware.
- Phillips screwdriver: Depending on the specific Ikea bed frame model, you may need a Phillips screwdriver to remove certain screws.
- Mallet or rubber mallet: A soft mallet is ideal for gently tapping and loosening any stubborn joints or connections.
- Protective gloves: It’s always a good idea to wear gloves to protect your hands while disassembling the bed frame.
- Blankets or sheets: Use blankets or sheets to protect the floor and surrounding furniture from any scratches or damage.
- Plastic bags or small containers: These are useful for organizing and storing small hardware pieces, such as screws and bolts.
- Marker or labels: Use a marker or labels to mark and identify each disassembled part for easier reassembly later on.
By gathering these tools and materials before you start disassembling your Ikea bed frame, you’ll be well-prepared and ensure a smoother disassembly process. Now that you have everything you need, let’s move on to step one: clearing the area.
Step 1: Clearing the Area
Before you begin disassembling your Ikea bed frame, it’s important to create a clear and spacious work area. This will prevent any obstacles or accidents as you navigate through the disassembly process. Follow these steps to ensure a clutter-free space:
- Remove any bedding or linens from the bed. This includes pillows, sheets, comforters, and mattress covers. Set them aside in a safe place.
- Clear the immediate area around the bed. Move any furniture, lamps, or decorations that may be obstructing your workspace. This will give you ample room to maneuver as you dismantle the bed frame.
- If there are any items stored underneath the bed, such as storage boxes or bins, remove them and set them aside. You may need to disassemble or empty these containers separately.
- Ensure there is enough overhead clearance for you to work comfortably. If you have a low ceiling, you may need to adjust your posture or consider moving the disassembly process to a more spacious area.
- If you anticipate encountering any tight spaces or narrow hallways while moving the disassembled bed frame, it may be helpful to measure those areas beforehand to ensure a smooth transition.
By clearing the area and creating an unobstructed workspace, you’ll have more freedom to maneuver around the bed frame as you disassemble it. This will help prevent any accidents or damage to surrounding furniture. With the area prepared, you’re now ready to move on to step two: removing the mattress.
Step 2: Removing the Mattress
Now that you’ve cleared the area, it’s time to remove the mattress from your Ikea bed frame. Follow these steps to safely and effectively remove the mattress:
- Start by removing any pillows or bedding that may be on top of the mattress.
- With a friend or partner, hold both ends of the mattress and lift it slightly. This will allow you to assess how securely the mattress is attached to the bed frame.
- If your Ikea bed frame has straps or fasteners holding the mattress in place, unbuckle or unfasten them. This will release the mattress from the bed frame.
- If your bed frame uses slats to support the mattress, lift the mattress slightly and carefully remove the slats one by one. Set them aside in a safe place.
- You may need to rotate or angle the mattress as you remove it, especially if it’s a larger size or if the frame has any obstructions.
- Once the mattress is completely free from the bed frame, carefully lower it to the ground. Ensure you have a clear pathway to set it aside or move it to a different location.
By following these steps, you’ll be able to safely remove the mattress from your Ikea bed frame without causing any damage or strain. With the mattress out of the way, you can now move on to the next step: detaching the headboard and footboard.
Step 3: Detaching the Headboard and Footboard
With the mattress removed, it’s time to detach the headboard and footboard from your Ikea bed frame. The exact method of detachment may vary depending on the model, but here are some general steps to guide you:
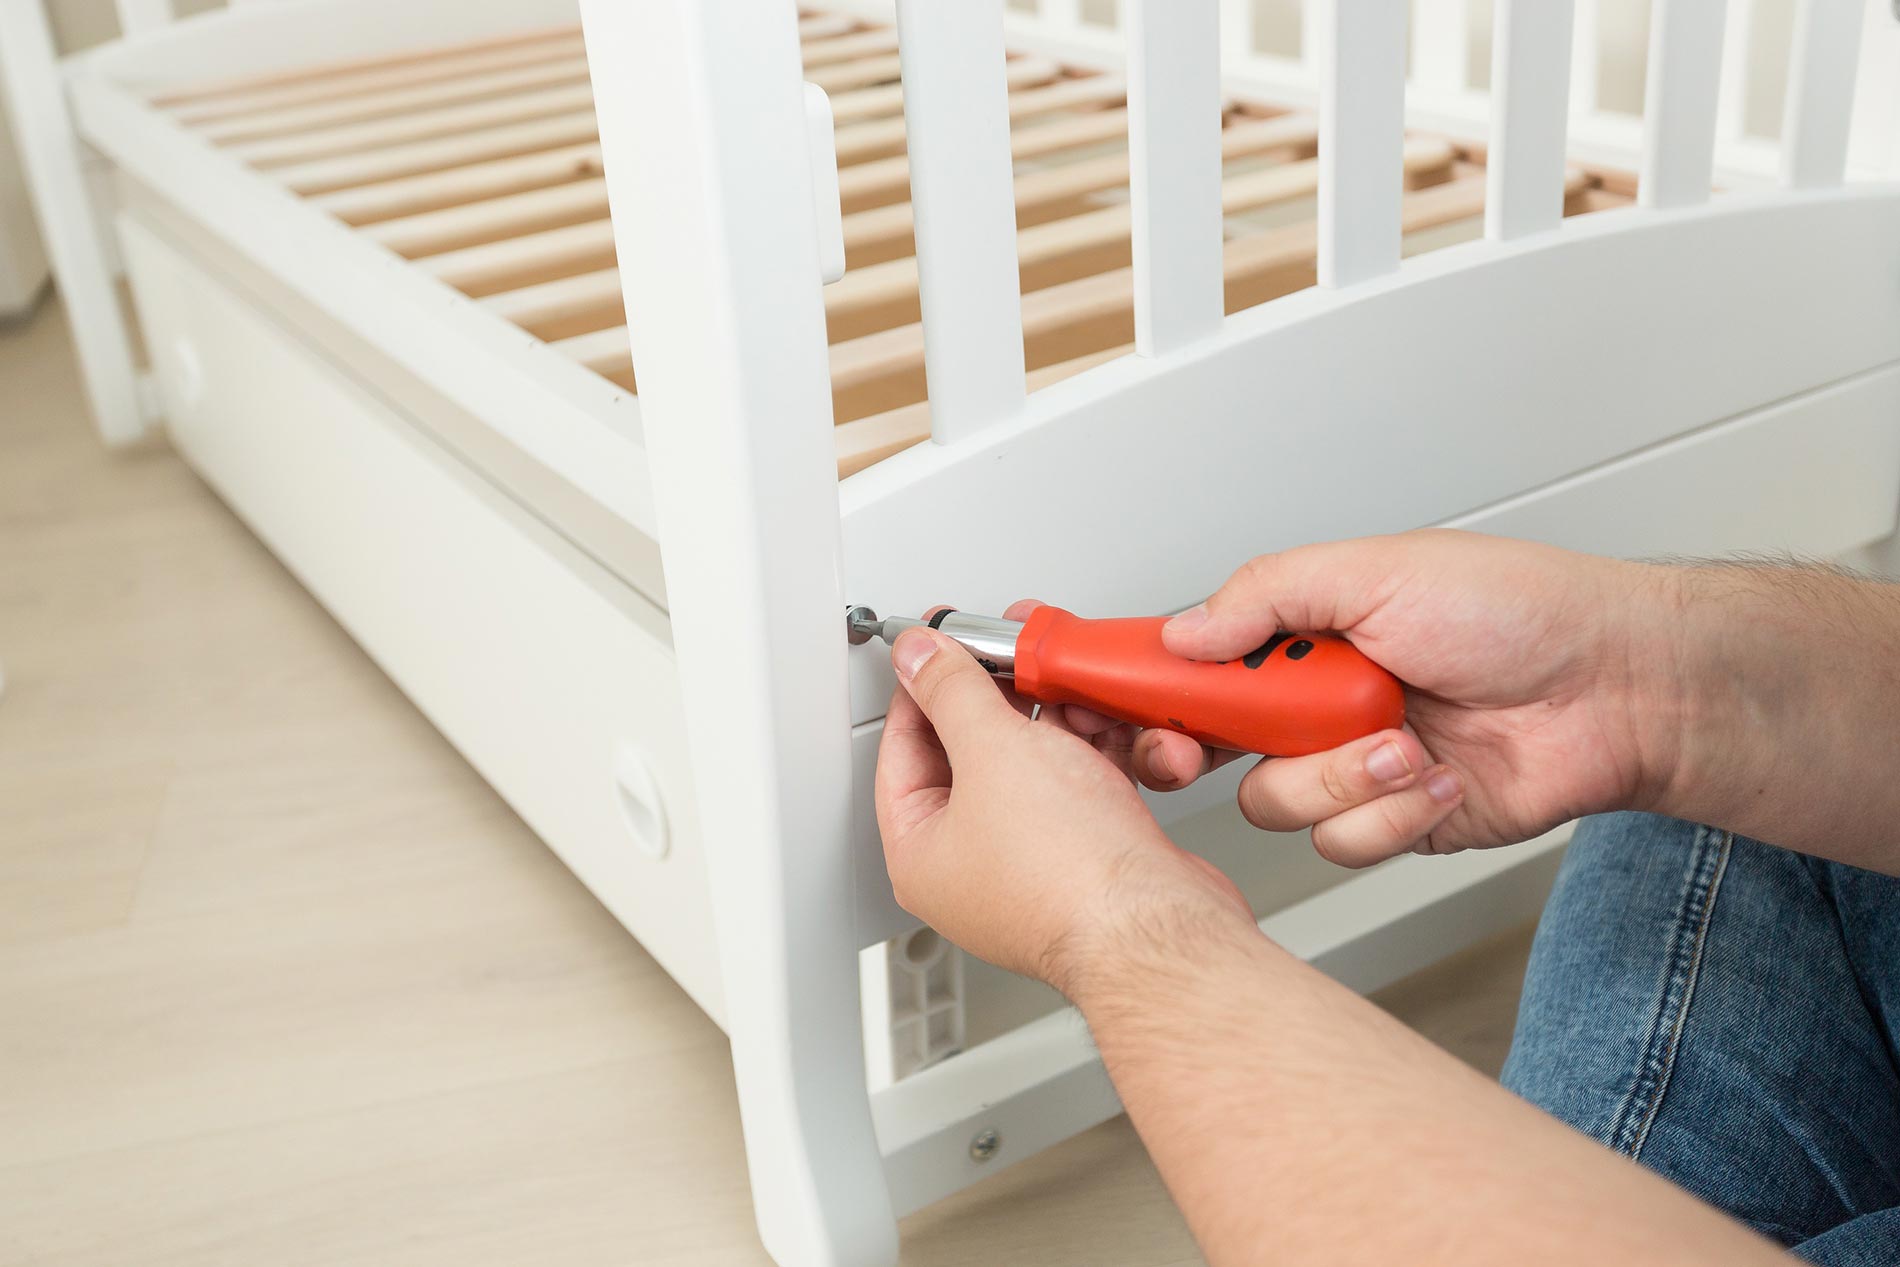
- If your bed frame has any visible screws or bolts attaching the headboard or footboard to the frame, locate them and begin unscrewing or unbolting them using the appropriate screwdriver or wrench.
- Some Ikea bed frames may use a slot and hook system to attach the headboard and footboard. In this case, gently lift the headboard or footboard upwards to disengage it from the slots and hooks.
- For bed frames with a built-in fastening mechanism, such as sliding latches or interlocking clips, locate and release these mechanisms to detach the headboard and footboard from the frame.
- If your bed frame has a wooden or metal frame connecting the headboard and footboard, check for any screws or bolts holding these components together. Remove them using the appropriate tools.
- Once the headboard and footboard are detached, carefully lift them away from the frame and set them aside in a safe location. If they are cumbersome or heavy, it’s advisable to have someone assist you during this step.
It’s important to exercise caution and patience when detaching the headboard and footboard to avoid any damage to the frame or injury to yourself. With the headboard and footboard safely removed, you can now move on to step four: detaching the side rails.
When disassembling an Ikea bed frame, be sure to keep track of all the screws and hardware in a labeled bag or container to make reassembly easier.
Read more: How To Disassemble An Adjustable Bed Frame
Step 4: Detaching the Side Rails
With the headboard and footboard removed, it’s now time to detach the side rails of your Ikea bed frame. Follow these steps to safely and effectively remove the side rails:
- Start by locating the connection points where the side rails are attached to the bed frame. Look for screws, bolts, or other fasteners that are securing the rails in place.
- Using the appropriate tools, such as a screwdriver or wrench, carefully remove the screws or bolts from the connection points. Keep these hardware pieces in a safe place to avoid misplacing them.
- Once the screws or bolts are removed, gently lift and pull the side rails away from the bed frame. This may require some wiggling or maneuvering, depending on the design of your Ikea bed frame.
- If your bed frame has a slat system, make sure to also detach the slats from the side rails. Remove any screws or other fasteners that are holding the slats in place, and set them aside.
- If your bed frame has any additional support beams or crossbars, check for any screws or bolts securing them to the side rails. Remove these fasteners to completely detach the side rails.
By following these steps, you’ll be able to safely detach the side rails from your Ikea bed frame. Remember to keep the hardware pieces and slats organized and set them aside for easier reassembly later. With the side rails removed, you can now move on to step five: disassembling the slats or bed base.
Step 5: Disassembling the Slats or Bed Base
Once the side rails are detached, it’s time to disassemble the slats or bed base of your Ikea bed frame. The method of disassembly may vary depending on the specific design of your bed frame, so follow these general steps:
- If your bed frame has slats, start by removing them one by one. Carefully lift each slat out of its designated slot or attachment point and set them aside.
- Some Ikea bed frames have a bed base instead of slats. In this case, check for any screws, bolts, or other fasteners that are holding the bed base in place.
- Using the appropriate tools, carefully remove the screws, bolts, or fasteners from the bed base. Keep them in a safe place to prevent misplacement.
- Once the fasteners are removed, lift and remove the bed base from the bed frame. If it’s large or heavy, you may need assistance to ensure safe handling.
- If your Ikea bed frame has any additional support beams or center bars, check if they can be detached. Follow the same process of removing screws or bolts to disassemble them.
Take care to keep all the slats, bed base pieces, and hardware organized and grouped together. This will make reassembly easier in the future. With the slats or bed base disassembled, you can now move on to step six: removing any remaining hardware.
Step 6: Removing any Remaining Hardware
As you near the end of the disassembly process, it’s important to check for and remove any remaining hardware from your Ikea bed frame. Follow these steps to ensure all screws, bolts, and other fasteners are properly removed:
- Inspect the bed frame thoroughly and look for any hidden or overlooked hardware. This can include screws, bolts, nuts, or any other fasteners that were not removed in previous steps.
- Using the appropriate tools, carefully remove any remaining hardware from the bed frame. Keep them in a safe place to prevent misplacement.
- Check any attached components, such as brackets or connectors, to ensure they are free from any remaining hardware. Detach them if necessary.
- If your bed frame has any decorative or functional elements, such as knobs or handles, remove them as well. This will help prevent any damage during storage or transportation.
By thoroughly checking for and removing any remaining hardware, you’ll ensure that your Ikea bed frame is fully disassembled. Keep all the hardware organized and labeled to make reassembly easier in the future. With the remaining hardware removed, you can now move on to the final step: organizing and storing the disassembled parts.
Step 7: Organizing and Storing the Disassembled Parts
Now that your Ikea bed frame is completely disassembled, it’s important to properly organize and store the parts to ensure a smooth reassembly process or safe transportation. Follow these steps to effectively manage the disassembled components:
- Gather all the disassembled parts, including the headboard, footboard, side rails, slats or bed base, and any hardware.
- Group similar parts together and label them accordingly. This can be done using plastic bags or small containers for hardware, and labels or markers for larger components.
- Make sure to securely tape or attach any screws, bolts, or other hardware to the corresponding parts they belong to. This will prevent them from getting lost or misplaced.
- Arrange the disassembled parts in a designated storage area. This can be a specific section in your garage, a storage room, or even a labeled box if you’re planning to transport the parts.
- If possible, keep the disassembled parts in an upright position to avoid any unnecessary pressure or damage. Use blankets, sheets, or foam padding to protect them from scratches during storage or transportation.
- Keep the instruction manual or assembly guide for your Ikea bed frame in a safe place. This will be helpful when it’s time to reassemble the bed frame in the future.
By organizing and storing the disassembled parts properly, you’ll eliminate the risk of misplacing or damaging any components. When you’re ready to reassemble the bed frame or move it to a new location, you’ll have everything easily accessible and well-preserved.
With step seven complete, congratulations! You have successfully disassembled your Ikea bed frame and prepared it for storage or transportation. Whether you’re moving, rearranging your space, or simply upgrading your bedroom furniture, knowing how to disassemble and reassemble your bed frame is an invaluable skill. Take your time and follow each step carefully to ensure a smooth and hassle-free process. Happy organizing and reassembling!
Read more: How To Disassemble A Zinus Bed Frame
Conclusion
Disassembling an Ikea bed frame may seem like a daunting task, but with the right tools and step-by-step instructions, it can be a straightforward process. By following the comprehensive guide outlined in this article, you now have the knowledge and confidence to dismantle your Ikea bed frame safely and efficiently.
Remember to start by clearing the area and removing the mattress. From there, carefully detach the headboard and footboard, followed by the side rails. Disassembling the slats or bed base comes next, and be sure to remove any remaining hardware. Finally, organize and store the disassembled parts for easy reassembly or transportation in the future.
Throughout the disassembly process, keep in mind the importance of protecting the frame and surrounding furniture from damage. Use blankets or sheets to cover the floor and surrounding areas, and wear protective gloves to safeguard your hands.
Once your Ikea bed frame is successfully disassembled, take the time to label and organize the parts. This will make the reassembly process much smoother when the time comes. Keep the instruction manual or assembly guide in a safe place for easy reference.
Disassembling your Ikea bed frame allows for greater convenience when moving or rearranging your bedroom layout. It also ensures that your bed frame remains in good condition during transport. With a little patience and attention to detail, you can successfully disassemble and reassemble your Ikea bed frame multiple times throughout its lifetime.
Remember, always refer to the specific assembly instructions provided by Ikea for your specific bed frame model. These instructions may vary slightly from the general steps outlined here.
We hope you found this guide helpful and that it has empowered you to confidently disassemble your Ikea bed frame. Enjoy the flexibility and convenience that comes with knowing how to break down and rebuild your furniture as needed.
Frequently Asked Questions about How To Disassemble An Ikea Bed Frame
Was this page helpful?
At Storables.com, we guarantee accurate and reliable information. Our content, validated by Expert Board Contributors, is crafted following stringent Editorial Policies. We're committed to providing you with well-researched, expert-backed insights for all your informational needs.


0 thoughts on “How To Disassemble An Ikea Bed Frame”