Home>Furniture>Bedroom Furniture>How To Install A Murphy Bed

Bedroom Furniture
How To Install A Murphy Bed
Modified: January 6, 2024
Looking for bedroom furniture? Learn how to install a Murphy bed and maximize your space with this step-by-step guide.
(Many of the links in this article redirect to a specific reviewed product. Your purchase of these products through affiliate links helps to generate commission for Storables.com, at no extra cost. Learn more)
Introduction
Welcome to the ultimate guide on how to install a Murphy bed! If you’re looking to maximize the space in your bedroom or create a multifunctional room, a Murphy bed is a fantastic solution. Also known as a wall bed or pull-down bed, a Murphy bed is designed to fold up vertically against a wall when not in use, allowing you to reclaim valuable floor space.
Installing a Murphy bed may sound like a daunting task, but with the right tools, materials, and a step-by-step approach, it can be a rewarding DIY project. This guide will provide you with detailed instructions to help you successfully install a Murphy bed in your home.
Before diving into the installation process, let’s briefly go over the benefits of having a Murphy bed. Firstly, Murphy beds are incredibly space-saving. They are perfect for small apartments, guest rooms, or home offices that need to serve multiple purposes. By folding up the bed when not in use, you can transform the room into a functional living space or workspace.
Secondly, Murphy beds are a stylish and practical choice for any modern home. With a wide range of designs and finishes available, you can find a Murphy bed that complements your existing bedroom furniture and matches your personal style.
Lastly, Murphy beds are versatile and convenient. Whether you need an extra bed for guests or a comfortable place to sleep every night, a Murphy bed can fulfill both requirements. It offers the comfort and support of a traditional bed without occupying valuable space permanently.
Now that we’ve established the benefits of a Murphy bed, let’s move on to the step-by-step installation process. By following these instructions carefully, you’ll soon have a functional and stylish Murphy bed in your home.
Key Takeaways:
- Installing a Murphy bed is a rewarding DIY project that maximizes space and adds style to any room. Follow the step-by-step guide for a secure and professional installation, creating a versatile and convenient sleeping solution.
- By carefully measuring, selecting the right kit, and making final adjustments, you can enjoy a functional and stylish Murphy bed that enhances your living space. Maximize comfort and convenience while reclaiming valuable floor space.
Read more: What Is A Murphy Bed
Step 1: Gather Materials
Before you can begin the installation process, it’s essential to gather all the necessary materials. By having everything on hand, you can ensure a smooth and efficient installation. Here are the materials you’ll need:
- Murphy bed kit: This includes the bed frame, bed mechanism, and any additional hardware required for installation. Make sure to check the kit’s specifications and ensure it fits your desired bed size.
- Power drill: A drill will be necessary for drilling holes and attaching hardware.
- Level: A level is crucial to ensure proper alignment and ensure the bed functions smoothly.
- Tape measure: Accurate measurements are essential for proper installation. Use a tape measure to measure the wall space and determine the correct bed dimensions.
- Screwdriver: A screwdriver will be needed for attaching screws and fastening hardware.
- Stud finder: This tool will help you locate wall studs, which are essential for securely mounting the bed frame.
- Pencil: Use a pencil to mark measurements and guide the installation process.
- Wall anchors: Depending on the type of wall you have, you may need wall anchors to provide additional support when mounting the bed.
- Safety goggles and gloves: It’s always a good idea to protect your eyes and hands during the installation process.
Make sure to double-check the instructions included with your Murphy bed kit, as it may have specific requirements or additional materials that are not listed here.
Once you have gathered all the necessary materials, you can proceed to the next step: measuring the space where the Murphy bed will be installed.
Step 2: Measure the Space
Accurate measurements are crucial when installing a Murphy bed to ensure it fits properly in your designated space. Before making any purchases or starting the installation process, take the time to measure the area where the bed will be installed. Here’s how to do it:
- Clear the area: Remove any furniture or obstacles from the wall where the Murphy bed will be placed. This will make it easier to take accurate measurements.
- Identify the location: Determine the exact spot where you want to install the Murphy bed. Consider factors such as access to power outlets, ceiling height, and any other space requirements you may have.
- Measure the width: Using a tape measure, measure the width of the wall from side to side. This will give you an idea of how much space you have available for the bed.
- Measure the height: Measure the height of the wall from the floor to the ceiling. This measurement is essential to ensure that there is enough clearance for the bed to fold up and down without obstruction.
- Measure the depth: Measure the distance from the wall to the farthest point where the bed will extend when fully opened. This measurement is important to ensure that there is enough space for the bed to fully extend and provide a comfortable sleeping area.
- Take note of any irregularities: Pay attention to any irregularities in the wall, such as electrical outlets, switches, or window sills. These will need to be taken into account during the installation process.
Once you have taken accurate measurements of the space, it’s time to move on to the next step: selecting and purchasing a Murphy bed kit that fits your requirements.
Step 3: Select and Purchase a Murphy Bed Kit
Now that you have measured the space, it’s time to choose and purchase a Murphy bed kit that suits your needs and preferences. Here’s what you should consider during the selection process:
- Bed Size: Determine the size of bed you require based on your needs and available space. Murphy beds come in various sizes, such as twin, full, queen, or king. Choose a size that fits comfortably in your room without overwhelming the space.
- Design and Style: Consider the design and style of the Murphy bed. Look for a kit that matches your existing bedroom decor or choose a neutral design that can blend well with different interior styles. Some kits even offer customization options, allowing you to choose the type of finish, hardware, and additional features.
- Quality and Durability: Ensure that the Murphy bed kit is made of high-quality materials that can withstand daily use. Read customer reviews and product descriptions to assess the durability and reliability of the kit.
- Functional Features: Take note of any additional features that might enhance the functionality of the Murphy bed. This can include built-in storage shelves, integrated lighting, or a desk attachment. Consider your specific needs and preferences when evaluating these features.
- Price Range: Set a budget for your Murphy bed kit. Take into account the quality, features, and customization options when determining the price range you’re comfortable with.
Once you have narrowed down your options, make your purchase from a reputable retailer or manufacturer. Ensure that the kit includes all the necessary components for installation, such as the bed frame, bed mechanism, and any additional hardware.
With your Murphy bed kit in hand, you’re one step closer to transforming your space. In the next step, we’ll cover how to prepare the wall for the installation process.
Step 4: Prepare the Wall
Before installing your Murphy bed, it’s important to prepare the wall to ensure a secure and stable setup. Here are the steps to follow:
- Clean the wall: Start by cleaning the wall where the Murphy bed will be mounted. Remove any dust, dirt, or debris to create a clean surface.
- Locate wall studs: Use a stud finder to locate the wall studs where you’ll be attaching the bed frame. Wall studs provide the necessary support and stability for the bed.
- Mark stud locations: Mark the locations of the wall studs with a pencil. Make sure to have the marks clearly visible for reference during the installation process.
- Calculate bed height: Measure the height of the bed frame from the bottom to the top mounting bracket. Use this measurement to mark a level line across the wall, ensuring that the bed will be mounted at the desired height.
- Mark other hardware placements: Refer to the instructions provided with your Murphy bed kit and mark the locations for any additional hardware, such as wall anchors or support brackets.
- Double-check measurements: Take a moment to double-check all the measurements and markings on the wall. Ensuring accuracy at this stage will save you time and effort during the actual installation.
By preparing the wall properly, you’ll ensure a solid foundation for your Murphy bed. With the wall ready, you can now move on to the next step: installing the bed frame.
Read more: How To Build A Murphy Bed
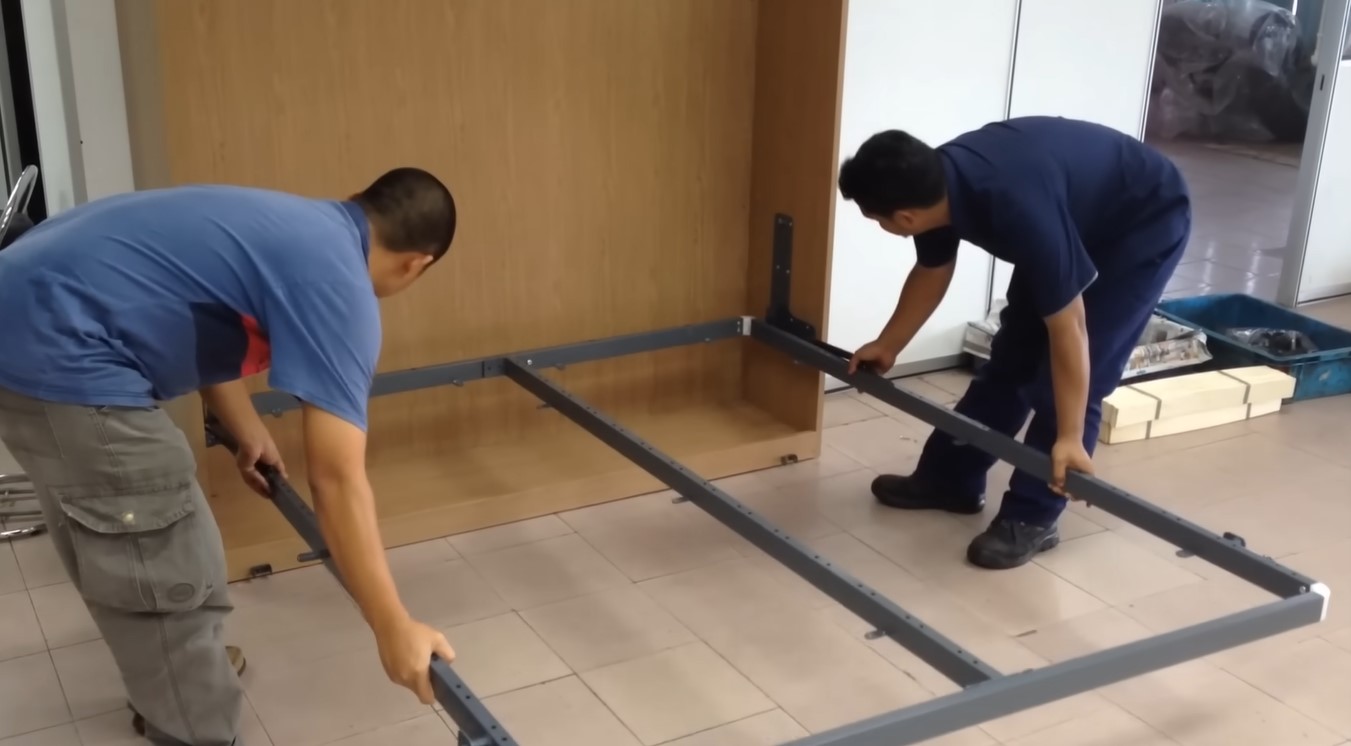
Step 5: Install the Bed Frame
With the wall properly prepared, it’s time to install the bed frame of your Murphy bed. The bed frame provides the structure and support for the mattress, allowing the bed to fold up and down smoothly. Follow these steps to install the bed frame:
- Position the bed frame: Position the bed frame against the wall at the desired height. Make sure it aligns with the marks you made earlier for the stud locations.
- Level the frame: Use a level to ensure that the bed frame is perfectly level. Adjust as necessary to achieve a balanced and even installation.
- Attach the bed frame to the wall studs: Using a power drill and appropriate screws or bolts, secure the bed frame to the wall studs. Be sure to drill through the marked stud locations to ensure maximum stability.
- Check for stability: Once the bed frame is attached, give it a gentle shake to check for any wobbling or instability. If necessary, reinforce the frame by adding additional screws or brackets.
- Double-check alignment and level: Take a step back and double-check the alignment and levelness of the bed frame. Make any adjustments if needed.
It’s important to follow the manufacturer’s instructions provided with your Murphy bed kit, as the installation process may vary depending on the specific design and features of the bed frame.
Once the bed frame is securely installed, you’re ready for the next step: attaching the bed mechanism. This mechanism allows the bed to smoothly fold up and down, making it easy to use and store.
When installing a Murphy bed, make sure to carefully follow the manufacturer’s instructions and use the recommended tools to ensure proper installation and safety.
Step 6: Attach the Bed Mechanism
Now that the bed frame is securely installed, it’s time to attach the bed mechanism, which allows the Murphy bed to fold up and down effortlessly. The bed mechanism consists of hinges, springs, and other components that enable smooth operation. Follow these steps to attach the bed mechanism:
- Refer to the manufacturer’s instructions: Read and familiarize yourself with the specific instructions provided by the manufacturer for your Murphy bed kit. Each kit may have slight variations in the attachment process.
- Position the bed mechanism: Carefully position the bed mechanism on the bed frame, aligning it with the designated mounting points.
- Attach the bed mechanism to the frame: Using the screws or bolts provided with the kit, secure the bed mechanism to the bed frame according to the instructions. Ensure that the mechanism is attached firmly and securely.
- Test the folding function: Once the bed mechanism is attached, test the folding function of the bed by gently pulling it down and allowing it to fold up. Ensure that it moves smoothly and without any obstructions.
- Make adjustments if necessary: If you encounter any issues during the test, such as stiffness or misalignment, refer to the instructions and make necessary adjustments to rectify the problem. This may involve tightening or loosening screws or adjusting the position of the mechanism.
It’s crucial to follow the manufacturer’s instructions for attaching the bed mechanism to ensure proper functionality and safety. If you have any doubts or difficulties during this step, consult the manufacturer or seek professional assistance.
With the bed mechanism securely attached, you’re now prepared for the next step: securing the wall mounting hardware. This hardware provides additional stability and support for the Murphy bed when it’s in the upright position.
Step 7: Secure the Wall Mounting Hardware
Securing the wall mounting hardware is an important step in ensuring that your Murphy bed remains stable and secure when it’s folded up against the wall. The wall mounting hardware provides additional support and prevents the bed from accidentally unfolding. Follow these steps to secure the wall mounting hardware:
- Refer to the manufacturer’s instructions: Carefully read the manufacturer’s instructions provided with your Murphy bed kit for specific guidance on attaching the wall mounting hardware. Different kits may have slightly different hardware and attachment methods.
- Position the hardware: Determine the location for the wall mounting hardware based on the instructions. Generally, the hardware will be positioned on the wall above the bed frame, allowing it to secure the folded up bed.
- Mark the screw hole locations: Use a pencil to mark the screw hole locations on the wall based on the instructions. Ensure that the marks are level and align with the designated holes on the hardware.
- Attach the wall mounting hardware: Using a power drill and appropriate screws or bolts, attach the wall mounting hardware securely to the wall. Make sure to drill into studs whenever possible for maximum stability. If studs are not available, use wall anchors to provide additional support.
- Double-check the alignment: After attaching the wall mounting hardware, double-check its alignment with the bed frame and the rest of the installation. Make any necessary adjustments to ensure proper alignment.
- Test the stability: Once the wall mounting hardware is secured, give the folded-up Murphy bed a gentle shake to test its stability. The bed should remain securely in place without wobbling or coming loose.
It’s important to follow the manufacturer’s instructions and guidelines for attaching the wall mounting hardware to ensure the bed’s safety and stability. If you have any concerns or questions, it’s advisable to seek assistance from the manufacturer or a professional.
Now that the wall mounting hardware is in place, you’re ready for the next step: testing and adjusting the Murphy bed.
Step 8: Test and Adjust the Murphy Bed
After completing the installation of your Murphy bed, it’s important to thoroughly test and adjust it to ensure smooth and safe operation. This step allows you to identify any issues and make necessary adjustments for optimal functionality. Follow these steps for testing and adjusting your Murphy bed:
- Perform a comprehensive test: Carefully pull down the bed from its folded position and ensure that it lowers smoothly and without any resistance. Check that all hinges and springs are working correctly, and there are no unusual noises or obstructions.
- Test the locking mechanism: Once the bed is fully extended, engage the locking mechanism (if applicable) to hold it securely in place. Verify that the bed is locked securely and does not wobble or move when pressure is applied.
- Check for proper alignment: Examine the bed to ensure that it is aligned correctly with the surrounding furniture and walls. Adjust the bed frame and mounting hardware as needed to achieve proper alignment.
- Test the folding mechanism: Gently fold up the bed, making sure that it folds smoothly and without any struggle. Test the bed at different angles to assess its folding capabilities and make any necessary adjustments for smooth operation.
- Ensure clearance and safety: Confirm that there is sufficient clearance above and around the bed when it’s in the upright position. Ensure that no objects obstruct the folding and unfolding process, and the bed can be stored securely.
- Make necessary adjustments: If you encounter any issues during the testing phase, refer to the manufacturer’s instructions and make any necessary adjustments or repairs. This may involve tightening screws, lubricating hinges, or addressing any other specific issues that arise.
By thoroughly testing and adjusting your Murphy bed, you can ensure that it functions correctly and provides a safe and comfortable sleeping space. Don’t rush this step, as it plays a vital role in the overall satisfaction and longevity of your Murphy bed installation.
With the Murphy bed successfully tested and adjusted, you’re now ready for the final step: making the finishing touches and final adjustments to complete the installation process.
Read more: How To Build A Murphy Bed Frame
Step 9: Make Final Adjustments and Finishing Touches
Congratulations! You’re in the final stage of installing your Murphy bed. This step involves making any necessary final adjustments and adding those finishing touches to ensure your installation is picture-perfect. Follow these steps to complete the process:
- Inspect the installation: Take a close look at the entire installation to identify any areas that need adjustment or fine-tuning. Check for any loose screws, misalignments, or cosmetic imperfections.
- Tighten all hardware: Use a screwdriver or power drill to tighten all the screws and bolts throughout the installation. This will ensure that everything remains secure and steady during use.
- Adjust the levelness: Use a level to double-check that the bed frame is perfectly level both vertically and horizontally. Make any necessary adjustments to maintain a balanced and aesthetically pleasing installation.
- Secure loose ends: Trim or secure any loose cords or cables that may be visible after the installation. This will help maintain a neat and tidy appearance.
- Add decorative elements: Enhance the overall look of your Murphy bed by adding decorative elements such as wall art, shelves, or lighting that complement the style and theme of your room.
- Apply touch-up paint (if needed): If any scratches or blemishes are visible on the bed frame or wall, touch them up with paint that matches the existing color scheme.
- Final cleaning: Take a few moments to clean up any debris or dust that may have accumulated during the installation process. Wipe down the bed frame and surrounding area to give it a polished finish.
By making these final adjustments and adding those finishing touches, you’ll have a beautifully installed Murphy bed that not only adds functionality to your space but also enhances its overall aesthetic appeal.
With the installation process complete, take a moment to step back and admire your newly installed Murphy bed. Enjoy the extra space it provides and the convenience it offers. Now, you can confidently and comfortably enjoy a versatile and stylish sleeping space whenever you need it.
Thank you for following this comprehensive guide on how to install a Murphy bed. We hope you found it helpful, and may your new Murphy bed bring you years of comfort and convenience!
Conclusion
Congratulations on successfully completing the installation of your Murphy bed! You’ve transformed your space into a more functional and versatile area, maximizing the use of available space by adding a convenient sleeping solution. By following the steps outlined in this guide, you’ve achieved a secure and professional installation that will offer you years of comfort and satisfaction.
A Murphy bed is not only a practical solution for small spaces but also a stylish addition to any room. Its ability to fold up against the wall when not in use allows you to reclaim valuable floor space and create a multi-purpose area that can be used as a living room, home office, or guest room. The versatility and convenience of a Murphy bed make it an excellent investment for any homeowner.
Remember to always refer to the manufacturer’s instructions for your specific Murphy bed kit, as different kits may have slightly varying installation processes. Safety should be a top priority throughout the installation, so take the time to ensure that all components are securely attached, and the bed operates smoothly without any obstructions or issues.
Now that you’ve completed the installation, it’s time to enjoy your newly installed Murphy bed. Take pride in your accomplishment and revel in the additional space and flexibility it provides. Personalize your space with decorative elements and make it truly your own.
If you have any further questions or need assistance, always reach out to the manufacturer or consult with a professional to ensure the longevity and proper maintenance of your Murphy bed.
Thank you for choosing this comprehensive guide on how to install a Murphy bed. We hope it has been helpful, and we wish you many peaceful and restful nights in your new Murphy bed!
Frequently Asked Questions about How To Install A Murphy Bed
Was this page helpful?
At Storables.com, we guarantee accurate and reliable information. Our content, validated by Expert Board Contributors, is crafted following stringent Editorial Policies. We're committed to providing you with well-researched, expert-backed insights for all your informational needs.














0 thoughts on “How To Install A Murphy Bed”