Home>Furniture>Kitchen Furniture>How To Replace Fuse In GE Microwave Oven
Kitchen Furniture
How To Replace Fuse In GE Microwave Oven
Modified: August 24, 2024
Learn how to replace the fuse in your GE microwave oven with this step-by-step guide. Read our informative articles for detailed instructions and troubleshooting tips.
(Many of the links in this article redirect to a specific reviewed product. Your purchase of these products through affiliate links helps to generate commission for Storables.com, at no extra cost. Learn more)
Introduction
Having a microwave oven is a convenient and essential appliance in many households. It allows us to quickly heat up food and beverages, saving us precious time and effort. However, like any electronic device, a microwave oven can experience issues over time, one of which is a blown fuse.
A blown fuse in a microwave oven can cause it to stop functioning altogether. This could be due to a power surge, a faulty component, or other electrical issues. Fortunately, replacing a blown fuse is a relatively simple and cost-effective solution that can get your microwave oven up and running again.
In this article, we will guide you through the step-by-step process of replacing a fuse in a GE microwave oven. However, it’s important to note that microwaves can vary in design and specific components, so it’s crucial to consult your appliance’s manual or contact the manufacturer for any model-specific instructions or safety precautions.
Before starting the fuse replacement process, it’s crucial to prioritize safety and follow certain precautions to avoid electrical hazards. Let’s dive into the safety measures you should follow before attempting any repairs on your GE microwave oven.
Key Takeaways:
- Prioritize safety by unplugging the microwave, wearing protective gear, and consulting the manual. Follow the step-by-step guide to replace the blown fuse and restore your GE microwave oven’s functionality.
- Ensure a smooth repair process by identifying the blown fuse, securely installing the new fuse, and testing the microwave oven’s functionality. Prioritize safety, and seek professional assistance if needed.
Read more: How To Replace Fuse In Extension Cord
Safety Precautions
When working with any electrical appliance, including a microwave oven, safety should always be the top priority. Here are some important safety precautions to keep in mind:
- Unplug the microwave oven: Before beginning any repairs or maintenance, make sure to disconnect the appliance from the power supply. This will minimize the risk of electric shock and ensure your safety throughout the process.
- Allow the microwave oven to cool down: Microwaves generate heat while in use, so it’s important to let the oven cool down completely before attempting to replace the fuse. This will reduce the risk of burns or other injuries.
- Wear protective gear: Protect yourself by wearing gloves and safety goggles while working on your microwave oven. This will shield you from any potential hazards such as broken glass or sharp edges.
- Consult the manufacturer’s manual: Each microwave oven model is unique, so it’s crucial to refer to the manufacturer’s manual for specific instructions regarding fuse replacement. This will ensure that you follow the correct procedures and avoid any mistakes.
- Avoid tampering with internal components: Unless you are a trained professional or have experience working with electronics, it’s best to refrain from attempting any repairs beyond the fuse replacement. Tampering with other internal components can cause further damage or even pose a safety risk.
- Perform the repair in a well-lit and spacious area: Make sure you have enough room to maneuver and work comfortably. Good lighting will allow you to clearly see the fuse panel and handle the components safely.
- Keep children and pets away: To prevent accidents or interruptions, ensure that children and pets are kept at a safe distance while you are working on the microwave oven. This will minimize the risk of them accidentally touching electrical components or getting in the way.
- If in doubt, seek professional help: If you feel unsure or uncomfortable about replacing the fuse yourself, it’s always best to seek professional assistance. They have the expertise and experience to handle the repair safely and effectively.
By following these safety precautions, you can ensure a safe and smooth fuse replacement process for your GE microwave oven. Now that we have covered the necessary safety measures, let’s move on to the step-by-step guide for replacing the fuse.
Step 1: Unplug the Microwave Oven
Before you begin replacing the fuse in your GE microwave oven, it is crucial to unplug the appliance from the power source. This step is vital to ensure your safety throughout the entire process and minimize the risk of electrical shock.
To unplug the microwave oven, locate the power cord at the back of the appliance. Firmly grasp the plug and pull it out of the electrical outlet. It is important to hold the plug itself rather than yanking on the cord, as this can damage the cord or the outlet.
Once the microwave oven is unplugged, double-check that there is no power flowing to the appliance. You can do this by attempting to turn on the microwave and verifying that it remains inactive. Additionally, be sure to keep the oven unplugged until the fuse replacement is complete.
Unplugging the microwave oven is crucial to ensure your safety while working on the appliance. It prevents any accidental power surges or electrical shocks that might occur during the fuse replacement process.
Now that you have disconnected the microwave oven from the power supply, you are ready to move on to the next step, which involves locating the fuse panel.
Step 2: Locate the Fuse Panel
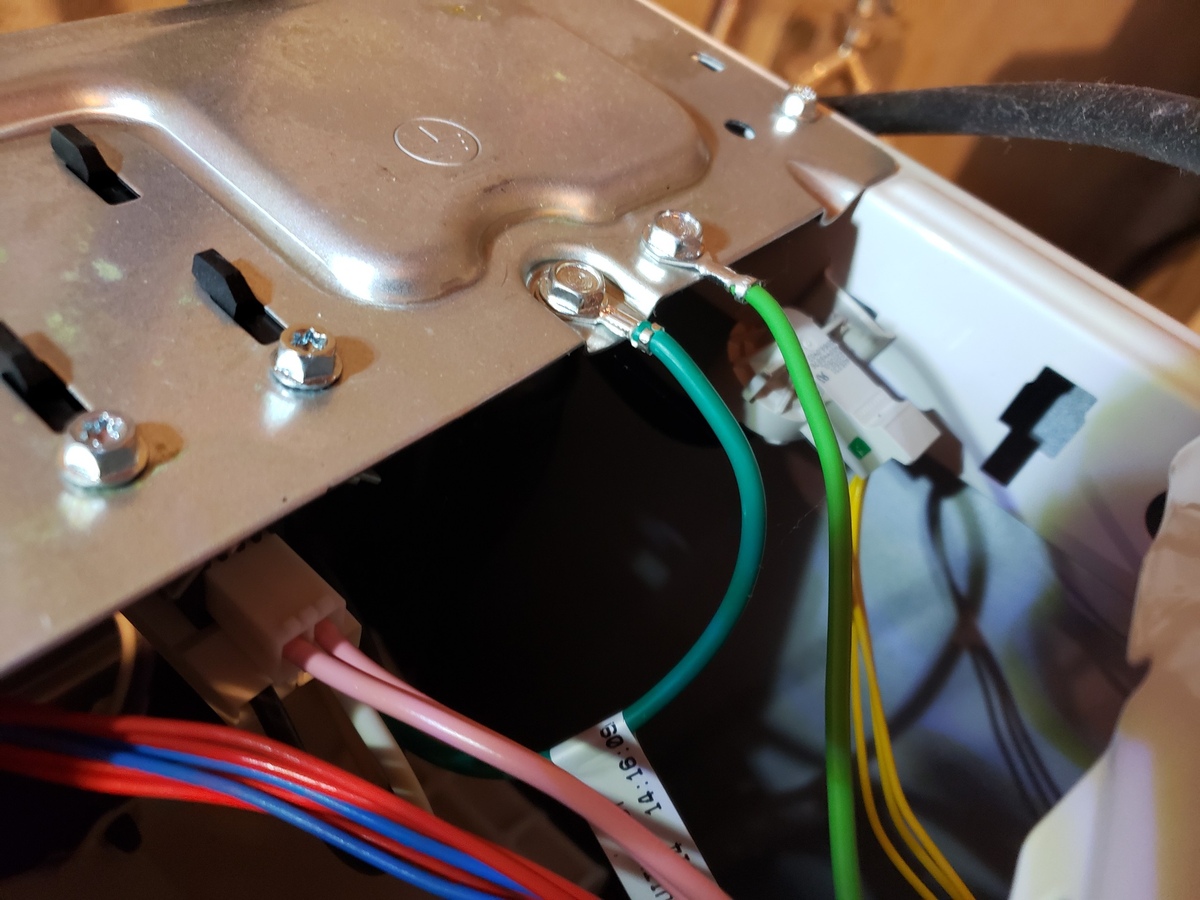
After unplugging the microwave oven, the next step in replacing the fuse is to locate the fuse panel. The fuse panel is typically located on the back or side of the appliance, but it may vary depending on the specific model of your GE microwave oven.
To locate the fuse panel, carefully inspect the exterior of the microwave oven. Look for any removable panels, covers, or access points on the back or side of the appliance. These panels are designed to grant access to the internal components, including the fuse panel.
Consult the manufacturer’s manual or documentation for specific instructions on locating the fuse panel for your particular model of GE microwave oven. The manual will provide a detailed diagram or description of the fuse panel’s location, ensuring that you identify it correctly.
Once you have located the fuse panel, take note of its position and how it is secured in place. This will help you in the following steps when you will need to remove the panel to access the fuse.
It is important to note that some microwave ovens may have multiple fuse panels, while others might have a single central panel. However, the process of replacing the fuse remains the same regardless of the number of panels.
Now that you have successfully located the fuse panel, proceed to the next step, which involves removing the fuse panel cover.
Step 3: Remove the Fuse Panel Cover
With the fuse panel located, the next step in replacing the fuse in your GE microwave oven is to remove the fuse panel cover. The cover is designed to protect the components inside and ensure their integrity.
Before you proceed with removing the fuse panel cover, make sure that the microwave oven is still unplugged to prevent any potential electrical hazards or accidently triggering the microwave.
To remove the fuse panel cover, carefully examine the panel for any screws, clips, or latches that are securing it in place. Use the appropriate tools, such as a screwdriver or pliers, to loosen or remove these fasteners.
If the cover is secured with screws, simply unscrew them in a counterclockwise direction until they are completely removed. Set the screws aside in a safe place to avoid misplacing them.
If the cover is attached with clips or latches, gently press or release them to disengage the cover from the panel. Take care not to exert too much force to prevent any damage to the clips or latches.
Once the fasteners are removed or loosened, carefully lift or slide the fuse panel cover off the microwave oven. Pay attention to any cables or wires that may be connected to the cover, and disconnect them if necessary. Take note of the position and orientation of the cover for easy reinstallation later.
With the fuse panel cover removed, you now have access to the internal components, including the fuse itself. Handle the cover with care, as it may have sharp edges. Set it aside in a safe and clean area to avoid any damage or contamination.
Now that you have successfully removed the fuse panel cover, you are ready to move on to the next step: identifying the blown fuse.
Step 4: Identify the Blown Fuse
After removing the fuse panel cover, the next step in replacing the fuse in your GE microwave oven is to identify the blown fuse. A blown fuse will typically have visible signs of damage or disconnection, signaling that it needs to be replaced.
Inspect the fuse and look for any signs of damage, such as a broken filament, blackened marks, or a visibly melted appearance. These are indications that the fuse is blown and needs to be replaced with a new one.
Alternatively, you can use a multimeter or continuity tester to check the fuse for continuity. Set the multimeter to the continuity or resistance mode, touch the fuse ends with the multimeter probes, and observe the reading. If the multimeter shows no continuity or infinite resistance, this confirms that the fuse is blown.
It is important to note that not all fuses have a visible indicator of being blown. In some cases, the fuse may appear intact, but it could still be faulty. If you suspect that the fuse is the cause of the microwave oven malfunction, it’s best to replace it regardless of its visual appearance.
If you are unsure about how to identify a blown fuse or believe that there may be other underlying issues causing the problem, it is recommended to consult a professional technician or contact the manufacturer for assistance.
Once you have identified the blown fuse, proceed to the next step, which involves removing the blown fuse from the fuse panel.
Before replacing the fuse in your GE microwave oven, make sure to unplug the appliance and discharge the capacitor to avoid any risk of electric shock. Always use the correct type and rating of fuse as specified in the appliance manual.
Step 5: Remove the Blown Fuse
After identifying the blown fuse in your GE microwave oven, the next step is to remove it from the fuse panel. Removing the blown fuse will allow you to replace it with a new one and restore the functionality of your microwave oven.
Before removing the blown fuse, ensure that the microwave oven is still unplugged to guarantee your safety throughout the process.
To remove the blown fuse, firmly grasp it between your fingers or use a pair of needle-nose pliers if it is difficult to reach. Gently and steadily pull the fuse straight out from its socket in the fuse panel. Do not apply excessive force or twist the fuse, as this can cause damage to the fuse or the socket.
Take note of the fuse’s size, rating, and other specifications, as these details will be important when selecting a replacement fuse. You can usually find this information labeled on the blown fuse itself or in the microwave oven’s manual.
Inspect the fuse socket for any signs of damage or debris. Clean the socket if necessary, ensuring that it is free from any dirt or corrosion before installing the new fuse.
Set the blown fuse aside in a safe place and avoid touching the metal contacts. Discard the blown fuse properly according to local regulations and guidelines for electronic waste disposal. It is important to handle and dispose of blown fuses responsibly.
Now that you have successfully removed the blown fuse from the fuse panel, proceed to the next step: replacing it with a new fuse.
Step 6: Replace with a New Fuse
With the blown fuse removed from the fuse panel, it’s time to replace it with a new fuse. A new fuse will restore the electrical circuit and allow your GE microwave oven to function properly again.
Before proceeding, ensure that you have the correct replacement fuse that matches the specifications of the blown fuse. Refer to the microwave oven’s manual or consult the manufacturer to identify the appropriate type, size, and rating for the new fuse.
Take the new fuse and align the metal contacts with the corresponding slots in the fuse socket. Gently push the new fuse straight into the socket until it is fully seated and secured in place. Avoid using excessive force or twisting the fuse during installation.
It’s important to note that if your microwave oven has multiple fuses, ensure that you replace the blown fuse with the correct new fuse. Each fuse may have different specifications, so pay attention to the labeling or markings on both the new and old fuses.
Once the new fuse is installed, double-check that it is firmly seated in the fuse socket and securely connected. This will ensure a proper electrical connection and prevent any issues or malfunctions in the future.
Now that you have successfully replaced the blown fuse with a new one, proceed to the next step, which involves securing the fuse panel cover back onto the microwave oven.
Step 7: Secure the Fuse Panel Cover
After replacing the fuse in your GE microwave oven, the next step is to secure the fuse panel cover back onto the appliance. The cover protects the internal components and ensures their integrity, so it’s important to properly secure it in place.
Before securing the fuse panel cover, ensure that the new fuse is correctly installed and the microwave oven is still unplugged for safety.
Align the fuse panel cover with the corresponding slots or hooks on the microwave oven. Take note of any cables or wires that were connected to the cover before its removal and ensure they are reconnected properly.
Carefully position the fuse panel cover over the fuse panel and gently slide or press it back into place. If the cover is secured with screws, insert the screws into their respective holes and tighten them in a clockwise direction using a screwdriver. Be careful not to overtighten.
If the cover is secured with clips or latches, make sure they engage correctly with the microwave oven’s body. Gently press or snap the clips or latches back into place until they securely hold the fuse panel cover.
Double-check that the fuse panel cover is properly aligned and flush with the rest of the microwave oven’s exterior. This will ensure a seamless appearance and proper functionality of the appliance.
With the fuse panel cover securely in place, your GE microwave oven is now ready for the next step: plugging it back into the power source.
Read more: What Is A Microwave Oven
Step 8: Plug in the Microwave Oven
The final step in replacing the fuse in your GE microwave oven is to plug it back into the power source. This will allow the microwave oven to receive electrical power and resume its normal functioning.
Before plugging in the microwave oven, ensure that the fuse panel cover is securely in place and all connections are properly set. Confirm that the new fuse is installed correctly and matches the specifications recommended by the manufacturer.
Position the microwave oven close to the electrical outlet, making sure that the power cord is easily accessible. Firmly insert the plug into the outlet, ensuring a snug fit.
Once you have plugged in the microwave oven, double-check that the power cord is not tangled or pinched, and there are no obstructions around the appliance.
With the microwave oven plugged in, turn on the power supply to the outlet. You should see the control panel light up or display the current time, indicating that the appliance is receiving electricity.
To ensure the proper functioning of the microwave oven, perform a quick test by setting a short cooking time and running it. Verify that the appliance heats up, the turntable rotates (if applicable), and all other functions are working as expected.
If the microwave oven does not turn on or experiences any issues after plugging it back in, double-check the fuse installation, connections, and power supply. If the problem persists, consult the appliance’s manual or contact the manufacturer for further assistance.
Congratulations! You have successfully replaced the fuse in your GE microwave oven. By following these steps, you have resolved a common issue and restored your microwave oven’s functionality.
Remember to exercise caution and prioritize safety whenever you are working with electrical appliances. If you are uncertain about any aspect of the repair process or have concerns about your abilities, it is always best to seek professional assistance.
Now that your microwave oven is back in working order, you can enjoy the convenience of quick and efficient cooking once again.
Conclusion
Replacing a blown fuse in your GE microwave oven is a relatively simple and cost-effective solution to restore its functionality. By following the step-by-step guide outlined in this article and prioritizing safety precautions, you can successfully replace the fuse and get your microwave oven up and running again.
Remember to always prioritize safety when working with electrical appliances. Unplug the microwave oven before starting any repairs, allow it to cool down, wear protective gear, consult the manufacturer’s manual, and avoid tampering with internal components if you are not experienced.
Throughout the process, it is crucial to exercise caution and handle the fuse and internal components with care. Ensure that you have the correct replacement fuse and properly install it in the fuse panel. Securely fasten the fuse panel cover back onto the microwave oven and double-check all connections before plugging it back in.
If you encounter any difficulties or are uncertain about any aspect of the repair process, it is recommended to seek professional assistance or contact the manufacturer for guidance.
By successfully replacing the blown fuse, you have resolved a common issue and saved yourself from the inconvenience of a malfunctioning microwave oven. With your microwave oven back in operation, you can once again enjoy the convenience of quick and efficient cooking.
Remember to always practice proper maintenance and care for your microwave oven to ensure its longevity and continued performance. Regularly clean the interior and exterior, avoid using metal utensils or containers, and follow the manufacturer’s guidelines for safe operation.
Thank you for following this comprehensive guide on how to replace a fuse in your GE microwave oven. We hope this article has been helpful, and we wish you success in repairing your appliance.
Now that you've mastered replacing a fuse in your GE microwave oven, why not delve deeper into maintaining your appliance? If you're facing more complex issues or just want to ensure optimal performance, our detailed guide on GE microwave repair will walk you through necessary fixes and maintenance tips. Keep your microwave in top shape and extend its lifespan without always calling in the pros. Ready to tackle more? Check out our comprehensive repair guide next!
Frequently Asked Questions about How To Replace Fuse In GE Microwave Oven
Was this page helpful?
At Storables.com, we guarantee accurate and reliable information. Our content, validated by Expert Board Contributors, is crafted following stringent Editorial Policies. We're committed to providing you with well-researched, expert-backed insights for all your informational needs.


0 thoughts on “How To Replace Fuse In GE Microwave Oven”