Home>Furniture>Living Room Furniture>How To Install LED Lights On TV Stand
Living Room Furniture
How To Install LED Lights On TV Stand
Modified: May 6, 2024
Enhance your living room furniture with LED lights! Learn how to easily install LED lights on your TV stand for a stylish and modern touch. Get step-by-step instructions now!
(Many of the links in this article redirect to a specific reviewed product. Your purchase of these products through affiliate links helps to generate commission for Storables.com, at no extra cost. Learn more)
Introduction
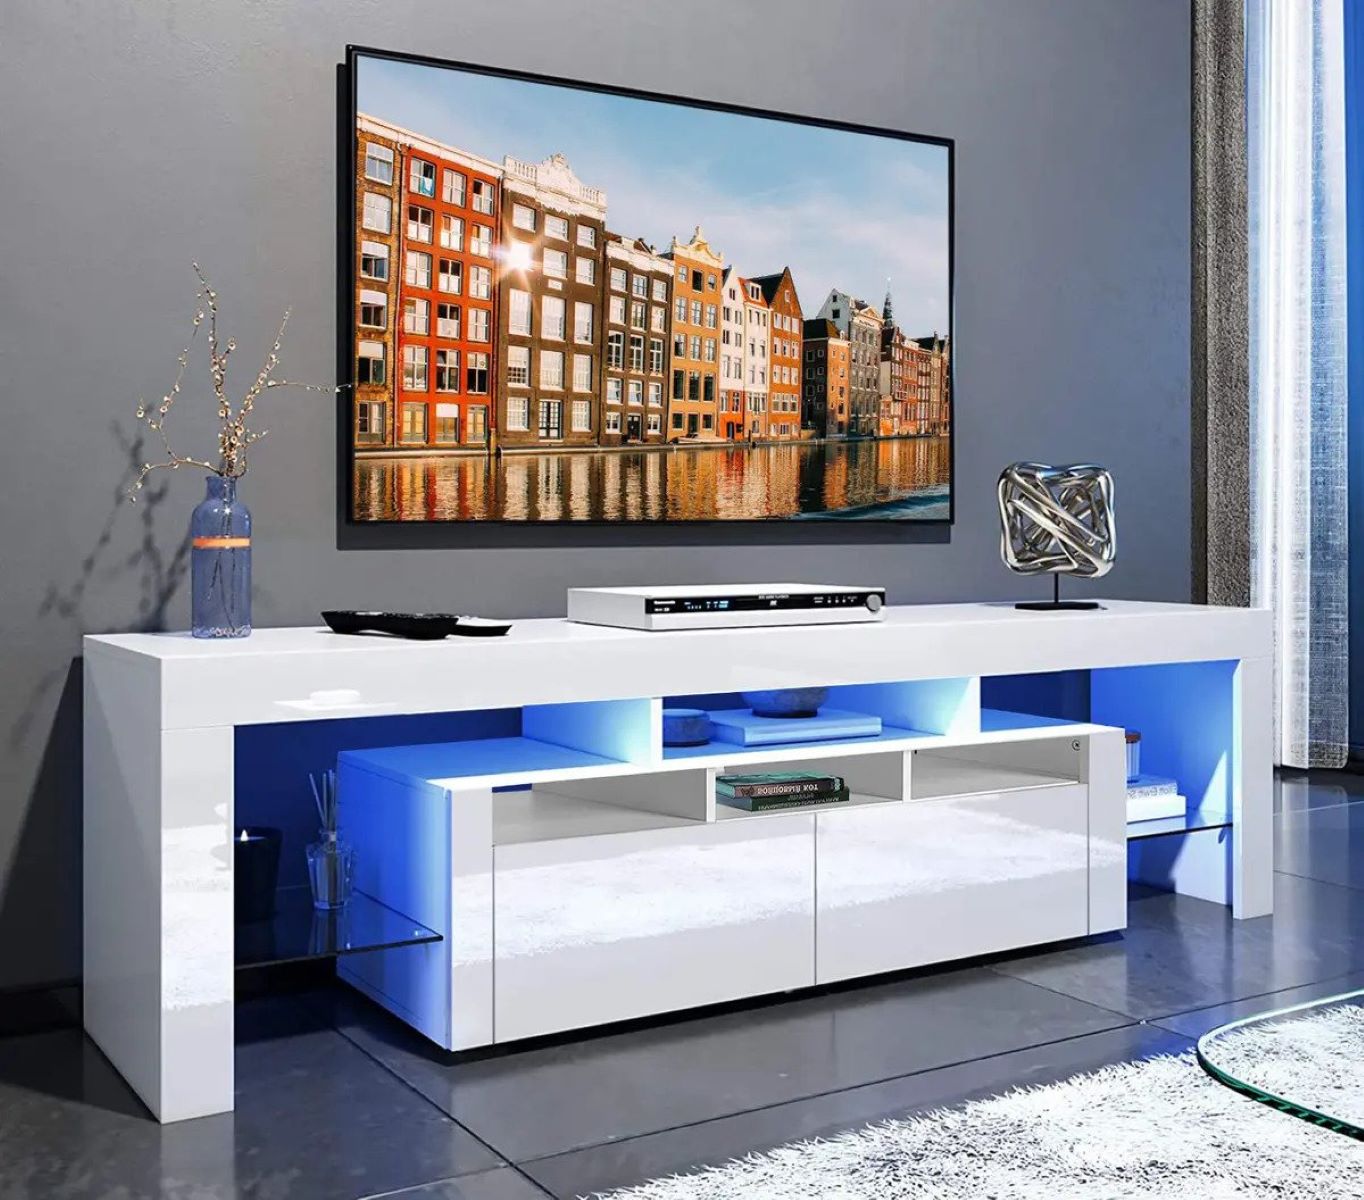
Adding LED lights to your TV stand can not only enhance the ambiance of your living room but also create a stunning visual display for your entertainment area. LED lights are energy-efficient, versatile, and easy to install, making them the perfect choice for illuminating your TV stand.
In this article, we will guide you through the step-by-step process of installing LED lights on your TV stand. Whether you’re a DIY enthusiast or a beginner, you’ll find this guide helpful in transforming your living room into a more vibrant and inviting space.
Before we dive in, let’s quickly run through the materials you’ll need for this project:
- LED light strips
- Power adapter
- Scissors
- Clean cloth
- Double-sided tape
- Zip ties
Once you have gathered these materials, you’re ready to embark on this exciting journey. So, let’s get started with Step 1: Gather the necessary materials.
Key Takeaways:
- Transform your living room with captivating LED lights on your TV stand. Follow the step-by-step guide for a seamless installation and enjoy the mesmerizing ambiance they bring to your entertainment area.
- Elevate your viewing experience by experimenting with different lighting effects, syncing with your entertainment system, and maintaining your LED lights for long-lasting visual appeal.
Read more: How To Install Vizio TV Stand
Step 1: Gather the necessary materials
Before you start installing LED lights on your TV stand, it’s essential to gather all the necessary materials. Having everything prepared in advance will make the installation process more efficient and ensure that you have everything you need on hand. Here’s a list of the materials you’ll need:
- LED light strips: Look for LED light strips that are long enough to cover the perimeter of your TV stand. Consider the color and brightness options available to find the right match for your desired ambiance.
- Power adapter: LED light strips require a power source to operate. Make sure to choose a power adapter that is compatible with the voltage and specifications of your LED lights.
- Scissors: You’ll need a pair of scissors to cut the LED light strips to the desired length and to trim any excess wires.
- Clean cloth: Before installing the LED lights, it’s important to clean the surface of your TV stand. A clean cloth will help remove any dust or debris.
- Double-sided tape: To secure the LED light strips to your TV stand, you’ll need double-sided tape. This will ensure that the lights stay in place and adhere properly to the surface.
- Zip ties: Zip ties can be used to neatly organize and manage the wires of your LED lights, keeping them hidden and preventing any tangling or clutter.
Once you have gathered these materials, you’re ready to move on to the next step: measuring and planning the LED light placement. Having everything prepared will make the installation process smooth and hassle-free, so take your time to ensure you have everything you need before proceeding.
Step 2: Measure and plan the LED light placement
Before you start installing the LED lights on your TV stand, it’s important to measure and plan the placement to ensure a precise and visually appealing result. Follow these steps to measure and plan the LED light placement:
- Measure the length of your TV stand: Use a measuring tape to determine the length of your TV stand. This will help you determine how many LED light strips you will need and where to place them.
- Decide on the desired lighting effect: Consider the ambiance you want to create in your living room. Do you want a subtle and cozy glow, or a vibrant and colorful display? This will help you determine the brightness and color options for your LED lights.
- Choose the placement of the LED light strips: Based on the measurements of your TV stand, decide where you want to place the LED light strips. Common options include along the edges of the TV stand, behind the TV, or inside any shelves or compartments.
- Cut the LED light strips: Using scissors, cut the LED light strips to the appropriate length according to your measurements. Most LED light strips have markings indicating where they can be cut, so you can easily customize them to fit your TV stand.
- Test the LED light strips: Before securing the LED light strips, it’s a good idea to test them. Connect the strips to the power adapter and check if the lights are working properly. This way, you can easily make any adjustments before permanently installing them.
By measuring and planning the LED light placement, you’ll ensure that the lights are evenly distributed and create the desired effect. This step is crucial in achieving a professional-looking installation. Once you have planned the placement, you can move on to the next step: preparing the TV stand surface.
Step 3: Prepare the TV stand surface
Before you can install the LED lights on your TV stand, it’s important to prepare the surface to ensure proper adhesion. Follow these steps to prepare the TV stand surface:
- Clean the surface: Use a clean cloth to wipe down the surface of your TV stand. Remove any dust, dirt, or debris that may affect the adhesion of the LED light strips.
- Dry the surface: Ensure that the surface is completely dry before applying the LED light strips. Any moisture or dampness can compromise the adhesive and cause the lights to come loose.
- Apply double-sided tape (optional): For an extra secure hold, you can apply double-sided tape to the areas where you will be placing the LED light strips. This will help ensure that the lights stay in place, especially if your TV stand has a textured or uneven surface.
By cleaning and preparing the TV stand surface, you’ll create an optimal environment for the LED lights to adhere to. This step is crucial to prevent the lights from falling or peeling off over time. Once the surface is ready, you can proceed to the next step: installing the LED light strips.
Step 4: Install the LED light strips
Now that you have prepared the TV stand surface, it’s time to install the LED light strips. Follow these steps to ensure a secure and aesthetically pleasing installation:
- Peel off the adhesive backing: Carefully peel off the adhesive backing from the LED light strips, exposing the sticky side.
- Align and stick the LED light strips: Starting from one end of the TV stand, align the LED light strip with the edge and press it firmly onto the surface. Slowly work your way around, adhering the strip evenly.
- Smooth out any air bubbles or wrinkles: Use your fingers or a soft cloth to smooth out any air bubbles or wrinkles that may have formed during the installation process. This will ensure a seamless and professional finish.
- Connect multiple LED light strips (if necessary): If your TV stand requires multiple LED light strips, connect them using the connectors provided. Make sure the connections are secure to ensure proper functionality.
Take your time during the installation process to ensure that the LED light strips are placed accurately and securely. This step is crucial to achieving a polished and visually striking result. Once the LED light strips are installed, it’s time to move on to the next step: connecting the LED lights to a power source.
When installing LED lights on a TV stand, make sure to measure the length of the stand and choose LED strips that are long enough to cover the entire bottom edge. Clean the surface before applying the adhesive and use cable clips to keep the wires tidy.
Read more: How To Install A Samsung TV Stand
Step 5: Connect the LED lights to a power source
With the LED light strips installed on your TV stand, it’s time to connect them to a power source. Follow these steps to safely and effectively connect the LED lights:
- Locate the power adapter: The power adapter is typically included with your LED light kit. Find the power adapter and ensure that it is compatible with the voltage requirements of your LED light strips.
- Connect the power adapter to the LED light strips: Plug the power adapter into a nearby power outlet. Then, connect the other end of the adapter to the input connector on the LED light strips.
- Ensure a secure connection: Make sure the connections are secure and properly aligned. A loose connection can cause the LED lights to flicker or not work at all.
- Test the LED lights: Switch on the power supply and test the LED lights to ensure they are functioning properly. If any of the lights are not working, double-check the connections and troubleshoot accordingly.
It’s important to note that some LED light strips come with additional features, such as remote controls or smartphone apps. These allow you to customize the brightness, color, and additional lighting effects of your LED lights. Familiarize yourself with the instructions provided by the manufacturer to take full advantage of these features.
Once you have successfully connected the LED lights to a power source and verified their functionality, you can proceed to the next step: testing the LED lights.
Step 6: Test the LED lights
After connecting the LED lights to a power source, it’s important to test them to ensure they are working properly. Here are the steps to test the LED lights on your TV stand:
- Switch on the power supply: Turn on the power supply to provide electricity to the LED light strips.
- Observe the lighting effect: Take a moment to observe the lighting effect produced by the LED lights. Ensure that the brightness and color match your desired ambiance.
- Adjust the settings (if applicable): If your LED lights come with adjustable settings, such as brightness or color options, use the remote control or smartphone app to make any necessary adjustments.
- Verify all lights are working: Check each individual LED light on the strip to ensure that all of them are functioning properly. If you notice any faulty lights, double-check the connections and replace any defective bulbs.
Testing the LED lights is crucial to catch any issues upfront and make any necessary adjustments. It allows you to ensure that the lights are illuminating your TV stand in the way you envisioned. Once you are satisfied with the lighting effect and functionality of the LED lights, you can proceed to the next step: properly securing and hiding the wires.
Step 7: Properly secure and hide the wires
Now that you have installed and tested the LED lights on your TV stand, it’s time to focus on securely and neatly organizing the wires. Properly securing and hiding the wires will not only improve the overall appearance but also eliminate any potential tripping hazards. Follow these steps to achieve a clean and organized look:
- Use zip ties to bundle the wires: Gather all the wires from the LED light strips and use zip ties to bundle them together. This will help keep the wires organized and prevent them from tangling or getting in the way.
- Route the wires behind the TV stand: Carefully route the bundled wires behind the TV stand, away from the visible areas. Use clips or adhesive hooks to secure the wires to the back of the TV stand for a tidy look.
- Hide the wires using cable management solutions: If your TV stand has dedicated cable management holes or compartments, use them to conceal the wires. Alternatively, you can use cable sleeves or raceways to hide the wires along the edges of the TV stand.
- Avoid tight bends or pinching the wires: Ensure that the wires are not tightly bent or pinched, as this can damage the insulation and affect the functionality of the LED lights. Allow for some slack to prevent any strain on the wires.
Taking the time to properly secure and hide the wires will result in a visually appealing and clutter-free setup. It will create a seamless integration of the LED lights into your TV stand and contribute to an overall polished look. With the wires neatly organized, you can now enjoy your new LED lights on your TV stand without any distractions.
Congratulations! You have successfully completed the installation of LED lights on your TV stand. It’s now time to step back and appreciate the captivating ambiance and modern flair they have brought to your living room.
Step 8: Enjoy your new LED lights on TV stand
Congratulations, you have completed the installation of LED lights on your TV stand! It’s time to sit back, relax, and enjoy the mesmerizing glow and ambiance that the LED lights bring to your living room. Here are some tips to fully enjoy your new LED lights on your TV stand:
- Experiment with different lighting effects: Take advantage of the adjustable settings on your LED lights to create various lighting effects. Play with different colors, brightness levels, and even dynamic lighting modes to set the perfect mood for any occasion.
- Sync the lights with your entertainment system: If your LED lights are compatible with smart home platforms or have integration capabilities, consider syncing them with your entertainment system. This will allow the lights to react and change color according to the content on your TV, creating an immersive viewing experience.
- Showcase your TV stand: The addition of LED lights can enhance the visual appeal of your TV stand. Consider rearranging or organizing your TV stand to showcase it as a focal point in your living room. Display your favorite decorative items or arrange your media devices in an aesthetically pleasing manner.
- Adjust the lighting to suit different activities: LED lights can be versatile and adapt to different scenarios. Dim the lights and create a cozy atmosphere for movie nights or increase the brightness for playing games or hosting gatherings. Find the perfect lighting balance for every activity.
- Maintain and clean the LED lights: Regularly clean the LED light strips with a soft cloth to remove any dust or dirt buildup. This will help maintain the brightness and clarity of the lights over time. Additionally, check the connections and wiring occasionally to ensure everything is secure and functioning correctly.
With your LED lights installed, you now have a stunning and captivating feature in your living room. Whether you’re watching your favorite TV shows, hosting movie nights, or simply enjoying some downtime, the LED lights on your TV stand will create an ambiance that enhances your viewing experience. So sit back, relax, and indulge in the captivating glow of your new LED lights on your TV stand.
Thank you for following this step-by-step guide. We hope it has been helpful in transforming your TV stand into a visual masterpiece. Enjoy the vibrant and immersive experience that LED lights bring to your living room!
Read more: How To Install An LED Ceiling Light
Conclusion
Adding LED lights to your TV stand can truly elevate the ambiance and visual appeal of your living room. Not only do they bring a modern and captivating glow, but they also create a mesmerizing atmosphere for your entertainment area. By following the step-by-step guide provided in this article, you have successfully installed LED lights on your TV stand and created a stunning visual display.
From gathering the necessary materials to properly securing and hiding the wires, each step was carefully explained to ensure a seamless and professional installation. Through measuring and planning, preparing the TV stand surface, and connecting the LED lights to a power source, you were able to achieve a visually pleasing and functional setup.
The enjoyment doesn’t stop there. With your new LED lights on your TV stand, you can now explore different lighting effects, sync them with your entertainment system, and adjust the brightness to suit various activities. These lights provide versatility and enhance your overall viewing experience.
Remember to maintain and clean your LED lights regularly to ensure their longevity and optimal performance. By keeping them in good condition, you can continue to enjoy the captivating ambiance they bring to your living room.
Thank you for following this comprehensive guide on installing LED lights on your TV stand. We hope that this article has provided you with the knowledge and confidence to create a visually stunning and inviting space in your home. Enjoy the mesmerizing glow and ambiance that your new LED lights on your TV stand bring to your living room!
Now that you've mastered installing LED lights on your TV stand, why not tackle more projects to spruce up your home? Our guide on DIY home projects offers practical tips and creative ideas to transform your space. Whether you're looking to craft custom furniture or add unique touches to your décor, this guide provides all the know-how you need. Get ready to turn those home improvement dreams into reality with our hands-on guide.
Frequently Asked Questions about How To Install LED Lights On TV Stand
Was this page helpful?
At Storables.com, we guarantee accurate and reliable information. Our content, validated by Expert Board Contributors, is crafted following stringent Editorial Policies. We're committed to providing you with well-researched, expert-backed insights for all your informational needs.

0 thoughts on “How To Install LED Lights On TV Stand”