Home>diy>Building & Construction>How To Install LED Recessed Lighting In New Construction
Building & Construction
How To Install LED Recessed Lighting In New Construction
Modified: October 20, 2024
Looking to install energy-efficient LED recessed lighting in your new construction project? Our step-by-step guide will help you navigate the building construction process seamlessly.
(Many of the links in this article redirect to a specific reviewed product. Your purchase of these products through affiliate links helps to generate commission for Storables.com, at no extra cost. Learn more)
Introduction
Welcome to the world of LED recessed lighting in new construction! If you’re renovating your home or building a new one, adding LED recessed lights can elevate the overall aesthetic and functionality of your space. LED recessed lights not only provide ample illumination but also offer energy efficiency and a sleek, modern look.
In this comprehensive guide, we will walk you through the step-by-step process of installing LED recessed lighting in new construction. We’ll cover everything from planning and layout to wiring and installation, ensuring that you have all the information you need to successfully complete this project.
Before we dive into the details, let’s take a moment to discuss the tools and materials you will need for the installation:
Tools:
- Measuring tape
- Pencil
- Stud finder
- Wire cutters/strippers
- Screwdriver
- Drill
- Hole saw
Materials:
- LED recessed light kit
- Recessed light housings
- Electrical wire
- Wire nuts
- Mounting brackets
- LED light trims
With these tools and materials at hand, you’re ready to embark on your LED recessed lighting installation journey. Let’s get started!
Key Takeaways:
- Proper planning, layout, and selection of LED recessed lighting are essential for a successful new construction installation. Consider factors such as room dimensions, lighting purpose, and trim styles to achieve optimal illumination and aesthetic appeal.
- Thorough preparation, precise wiring, and meticulous installation of LED recessed light housings and trims are crucial for a seamless and professional lighting outcome. Testing the lights ensures functionality and enjoyment of the energy-efficient, modern lighting solution.
Read more: How To Install Outdoor Recessed Lighting
Tools and Materials Needed
Before you begin the installation process, it’s essential to gather all the necessary tools and materials. Having everything prepared ahead of time will streamline the process and ensure a smooth installation. Here’s a list of the tools and materials you’ll need:
Tools:
- Measuring Tape: This will help you accurately measure the placement of the recessed lights.
- Pencil: Marking the location of the lights on the ceiling will aid in precise installation.
- Stud Finder: The stud finder will help locate the studs in the ceiling, ensuring secure mounting of the light fixtures.
- Wire Cutters/Strippers: These tools will be necessary for cutting and stripping the electrical wires.
- Screwdriver: A screwdriver will be needed for various aspects of the installation, such as securing the light fixtures.
- Drill: You’ll need a drill to create holes for the recessed light housings.
- Hole Saw: This tool is necessary for cutting out the openings for the recessed light fixtures.
Materials:
- LED Recessed Light Kit: Opt for a kit that includes the necessary components, such as housing, trim, and bulbs.
- Recessed Light Housings: These housings hold the LED lights in place and provide insulation.
- Electrical Wire: Ensure you have the correct gauge wire for the installation, usually 14 or 12 gauge.
- Wire Nuts: These connectors will be used to secure the electrical wires together.
- Mounting Brackets: These brackets are needed to secure the recessed light housings to the ceiling.
- LED Light Trims: The trims will surround the LED lights, providing a finished look and directing the light.
Having these tools and materials prepared will make the installation process more efficient and successful. Take the time to gather everything you need before starting the project to avoid interruptions or delays. Once you have everything ready, you can move on to the next step of planning and layout.
Step 1: Planning and Layout
Before you start installing LED recessed lighting in new construction, it’s crucial to plan and create a layout for your lights. Proper planning will ensure that the lights are evenly spaced and positioned correctly for optimal illumination. Here’s how you can go about it:
1. Measure the Room: Use a measuring tape to determine the dimensions of the room. This will help you determine the number of recessed lights needed and their placement.
2. Consider the Purpose: Think about the function of each area in the room. For task-oriented areas like kitchen counters or bathroom vanities, you’ll need brighter and more focused lighting. For ambient lighting, such as in living rooms or bedrooms, you can opt for softer, diffused lights.
3. Create a Lighting Plan: Based on the room’s dimensions and purpose, create a plan for where you want the recessed lights to be installed. Typically, lights should be spaced around 4 to 6 feet apart to ensure even illumination.
4. Mark the Locations: Use a pencil and a stud finder to mark the locations of the lights on the ceiling. Keep in mind any obstructions like ceiling joists, HVAC vents, or electrical wiring that may affect the placement.
5. Determine the Light’s Aperture Size: Decide on the size of the aperture for the recessed lights. Aperture sizes typically range from 3 to 8 inches, with larger sizes providing more light output. Consider the ceiling height and the overall aesthetic of the room when making this decision.
6. Check for Electrical Requirements: Ensure that your new construction area has proper electrical connections and sufficient power supply to support the additional lights. If needed, consult an electrician to make any necessary upgrades or adjustments.
7. Make a Shopping List: Based on your lighting plan, make a list of the LED recessed lights, housings, trims, and other materials required for the installation.
By thoroughly planning and creating a layout for your LED recessed lights, you’ll have a clear vision of how the final result will look. This will help you streamline the installation process and ensure that your lighting goals are met. Once you have completed the planning and layout, you can move on to selecting the right type of LED recessed lighting for your new construction project.
Step 2: Choose the Right Type of LED Recessed Lighting
Choosing the right type of LED recessed lighting is essential to achieve the desired aesthetic and functionality in your new construction project. Here are some factors to consider when selecting the lights:
1. Light Color Temperature: LED lights come in different color temperatures, including warm white, cool white, and daylight. Consider the ambiance you want to create in each space and choose the color temperature accordingly. Warm white (2700K-3000K) offers a cozy and intimate feel, while cool white (3500K-4000K) provides a neutral, inviting light. Daylight (5000K-6500K) mimics natural daylight and is best for areas where you need bright, focused lighting.
2. Dimmable or Non-Dimmable: Decide if you want your LED recessed lights to be dimmable. Dimmable lights offer flexibility, allowing you to adjust the brightness according to your preference and the needs of the space.
3. Efficiency and Energy Consumption: Look for LED recessed lights that are energy-efficient and have a high lumen output. LEDs consume less energy compared to traditional lighting options, making them more environmentally friendly and cost-effective in the long run.
4. Trim Styles: Consider the design and trim options available for the LED recessed lights. There are various trims available, such as baffle, reflector, and adjustable trims, each offering a different look and light distribution. Choose a trim style that complements the overall design of the room.
5. IC-Rated or Non-IC Rated: If you are installing recessed lights in areas where insulation will be in direct contact with the fixture, such as in ceilings, make sure to choose IC-rated fixtures. These fixtures are designed for insulated ceilings and ensure safe and code-compliant installation.
6. Wet or Damp Location Rated: If you plan to install recessed lights in areas exposed to moisture, such as bathrooms or outdoor spaces, ensure that you choose lights that are wet or damp location rated. These lights are specifically designed to withstand moisture and humidity.
Consider your specific lighting needs and the requirements of each space in your new construction project when selecting the LED recessed lights. Consult with lighting experts or research reputable brands to ensure you choose high-quality, reliable fixtures. Once you have chosen the right LED recessed lighting, you’re ready to proceed with the installation process.
Step 3: Prepare the New Construction Area
Before you start installing the LED recessed lights in your new construction project, it’s important to properly prepare the area. This involves ensuring the ceiling is clear and ready for the installation process. Follow these steps to prepare the new construction area:
1. Clear the Workspace: Remove any furniture, fixtures, or decorations from the room to create a clear and unobstructed workspace. This will allow you to move freely and safely during the installation process.
2. Cover the Floors and Furniture: Protect the floors and any remaining furniture by covering them with drop cloths or plastic sheets. This will prevent any damage or debris from falling onto the surfaces.
3. Turn Off the Power: Locate the circuit breaker that controls the power to the area where you’ll be installing the LED recessed lights. Turn off the power to that circuit to ensure safety during the installation process. Use a non-contact voltage tester to verify that the power is indeed turned off before proceeding.
4. Remove the Existing Ceiling Fixtures: If there are any existing fixtures or lights in the new construction area, remove them carefully. Disconnect any wiring and remove the fixtures from the ceiling. Patch and repair any holes or damaged areas in the ceiling if necessary.
5. Inspect the Ceiling: Take a closer look at the ceiling to ensure it is in good condition and suitable for installation. Address any structural issues or damages before proceeding. It’s important to have a stable and secure ceiling for proper installation of the LED recessed lights.
6. Locate and Mark the Studs: Use a stud finder to locate the ceiling joists or studs where you’ll be mounting the recessed light housings. Mark the locations with a pencil for reference during the installation process. This step is important to ensure secure and stable attachment of the light fixtures.
By properly preparing the new construction area before the installation, you’ll create a safe and organized space for the LED recessed lights. Taking the time to clear the area, protect surfaces, turn off the power, and assess the ceiling will set a solid foundation for a successful installation. With the area prepared, you’re now ready to move on to the next step of running the wiring for the LED recessed lights.
Read more: DIY Guide To Installing Recessed Lighting
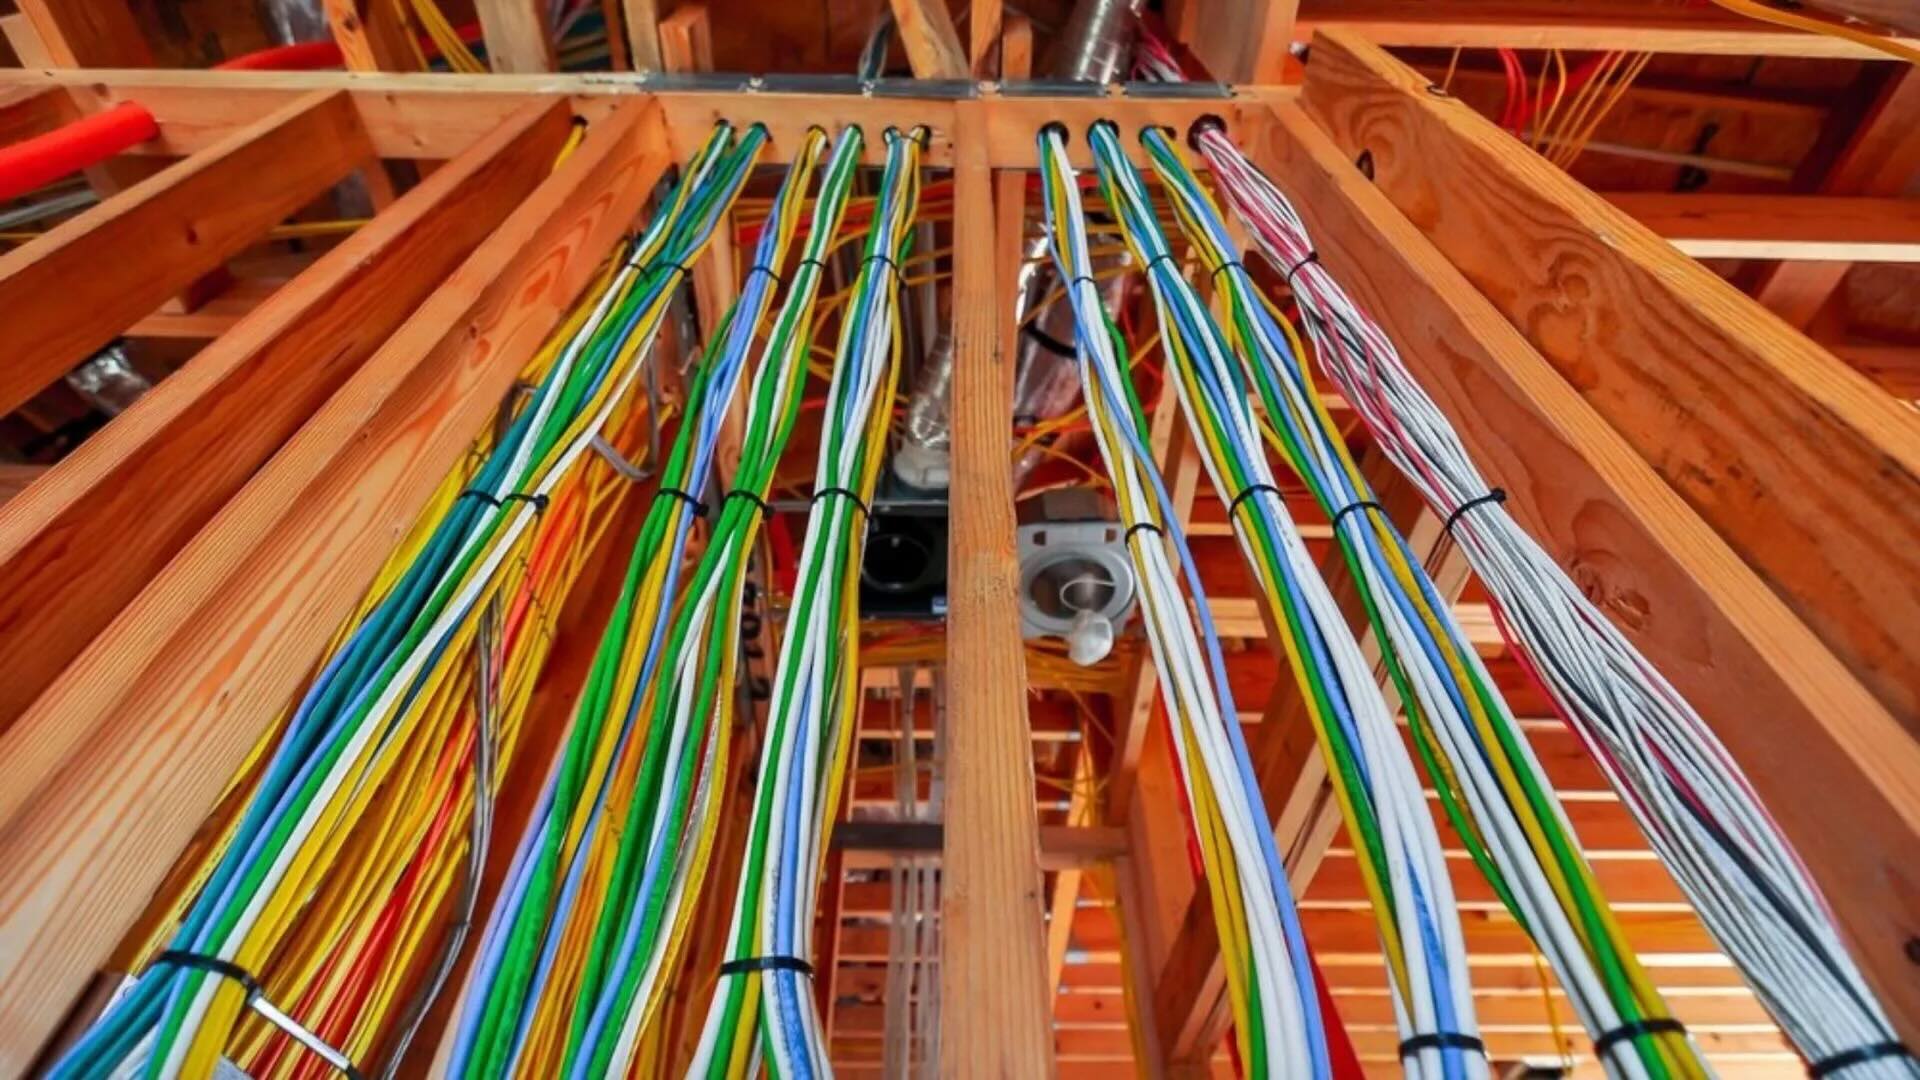
Step 4: Run Wiring for the LED Recessed Lights
Now that you’ve prepared the new construction area, it’s time to run the wiring for the LED recessed lights. Properly wiring the lights is crucial for their functionality and safety. Follow these steps to run the wiring:
1. Plan the Wiring Layout: Determine the most efficient path to run the wiring from the main electrical panel to the locations where the LED recessed lights will be installed. Consider the shortest and most direct route while avoiding any obstacles or obstructions in the ceiling.
2. Turn Off the Power: Before starting any electrical work, switch off the power to the circuit you’ll be working on. This will prevent any accidents or electrical shocks. Use a non-contact voltage tester to ensure that the power is indeed turned off.
3. Install Junction Boxes: Install junction boxes in the ceiling at each location where a recessed light will be installed. These boxes will serve as connection points for the wiring. Follow electrical codes and safety guidelines for properly mounting and securing the boxes.
4. Measure and Cut the Electrical Wire: Measure and cut the electrical wire to the appropriate lengths for each light location. Leave a bit of extra wire for ease of installation. Use wire cutters/strippers to strip the insulation from the ends of the wires.
5. Connect Wiring: Connect the wires from the main electrical panel to the junction boxes. Use wire nuts to secure the connections, ensuring that the black (hot) wire is connected to the black wire, the white (neutral) wire is connected to the white wire, and the green or bare (ground) wire is connected to the ground wire.
6. Route the Wiring: Run the wiring through the ceiling, following the planned layout. Use cable staples or wire clips to secure the wiring along the joists or studs to prevent it from sagging or coming in contact with other objects. Ensure that the wiring is not pinched or damaged during the installation.
7. Leave Slack in the Wiring: Leave enough slack in the wiring at each junction box to make it easier to make the connections later on. This will give you some flexibility during the installation of the recessed lights.
8. Test the Wiring: After running the wiring, but before installing the recessed lights, test the connections using a voltage tester to ensure that the wiring is properly installed and the connections are secure. This additional step will help prevent any issues or rework later on.
By carefully running the wiring for the LED recessed lights, you’ll ensure a safe and efficient electrical connection. Take your time to secure and organize the wiring, and double-check all connections before moving on to the next step. In the next step, we’ll cover the installation of the LED recessed light housings.
When installing LED recessed lighting in new construction, make sure to carefully measure and mark the placement of the lights before cutting any holes in the ceiling. This will ensure that the lights are evenly spaced and properly aligned.
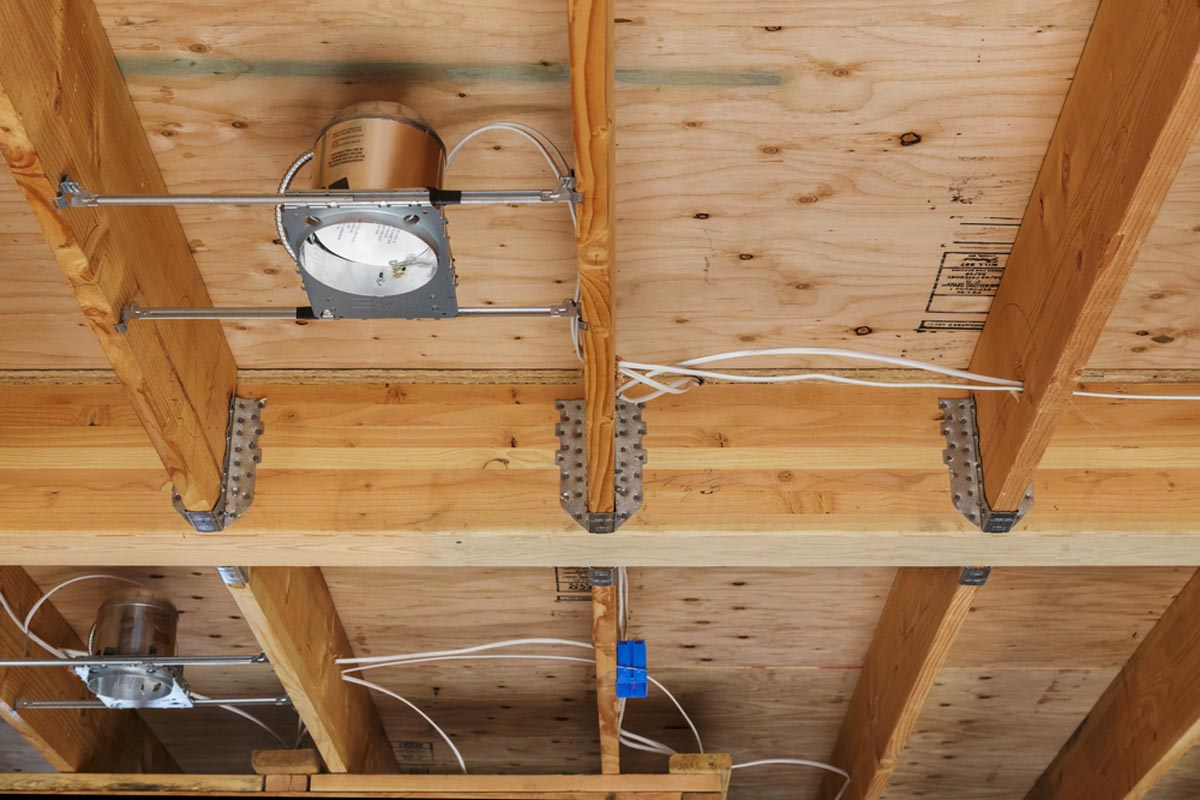
Step 5: Install the LED Recessed Light Housings
With the wiring in place, it’s time to move on to installing the LED recessed light housings in your new construction area. The housing serves as the foundation for the lights and provides insulation. Follow these steps to properly install the housings:
1. Choose the Correct Housing: Select the appropriate housing type based on the design and layout of your LED recessed lights. Common options include remodel housings and new construction housings. New construction housings are typically used when installing lights in new buildings or areas with open ceilings.
2. Position the Housings: Take one LED recessed light housing and position it in the first marked location on the ceiling. Ensure that it is aligned with the markings and centered properly. Use a pencil to trace around the housing’s outer edge, creating an outline for reference.
3. Cut the Openings: Use a hole saw or a suitable cutting tool to create the openings for the recessed light housings. Follow the traced outlines and carefully cut through the ceiling material, such as drywall or plaster. Remove any debris from the openings.
4. Secure the Housings: Insert the LED recessed light housings into the openings, ensuring a snug fit. Most housings have mounting brackets or clips that can be secured to the ceiling joists or studs. Follow the manufacturer’s instructions to properly attach and secure the housings in place.
5. Check for Proper Alignment: Once the housing is secured, double-check that it is properly aligned and level. Adjust if necessary. The housings should be flush with the ceiling, creating a seamless and clean look.
6. Repeat the process: Repeat steps 2 to 5 for the remaining LED recessed light locations, carefully positioning, cutting, and securing the housings one by one. Make sure to maintain consistent spacing and alignment between the housings.
7. Insulate Around the Housings: If required by local building codes, use insulation to fill any gaps between the housing and the ceiling. Proper insulation helps improve energy efficiency and reduces the potential for air leaks.
By properly installing the LED recessed light housings, you’ll ensure a stable foundation for the lights and create a professionally finished look. Take your time to align and secure each housing correctly, paying attention to the details. Once the housings are in place, you’re ready to move on to the next step, which is connecting the wires to the LED recessed lights.
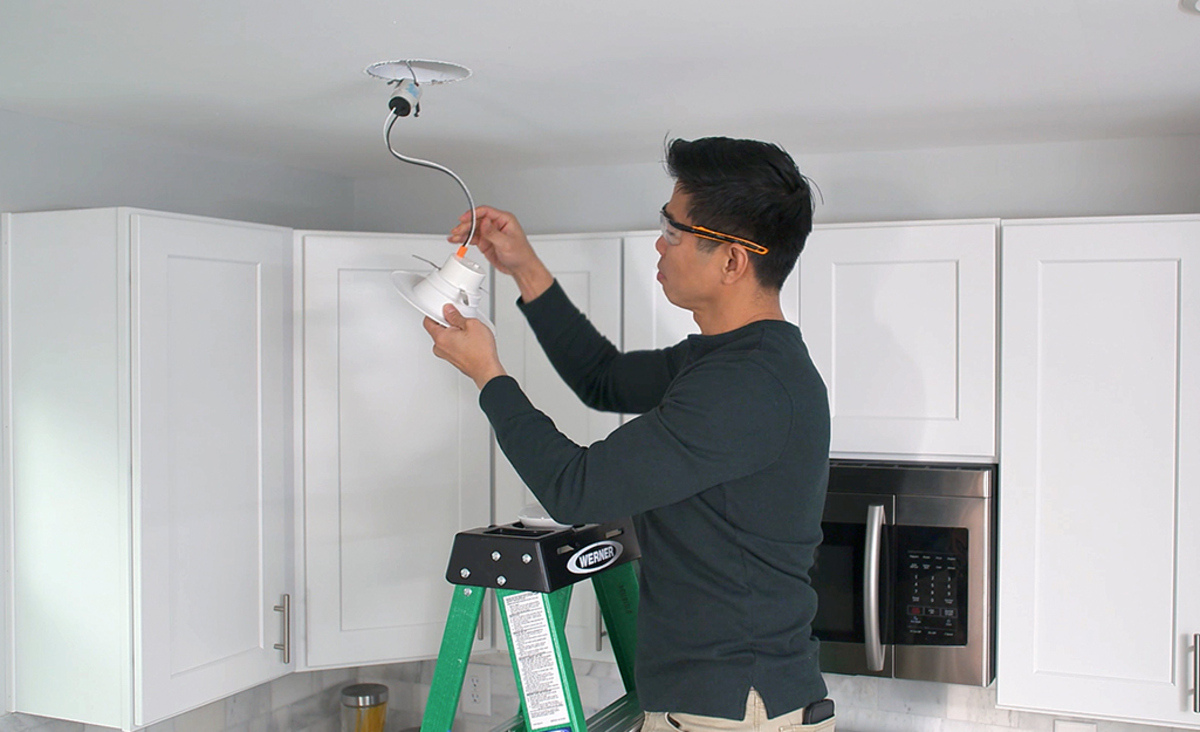
Step 6: Connect the Wires to the LED Recessed Lights
With the LED recessed light housings installed, it’s time to connect the wiring and make the necessary electrical connections. Follow these steps to properly connect the wires to the LED recessed lights:
1. Prepare the Wiring: Strip the insulation from the ends of the wires connected to the junction boxes. Use wire cutters/strippers to carefully remove about 3/4 inch of insulation from the ends of the wires.
2. Make the Connections: Each LED recessed light will have color-coded wires, usually a black wire (hot), a white wire (neutral), and a green or bare wire (ground). Match the corresponding wires from the junction box to the wires on the LED recessed light.
3. Secure the Connections: Join the ends of the wires together by twisting them clockwise. Use wire nuts to secure the connections. Ensure that the wire nuts are properly tightened to create a secure and reliable connection.
4. Tuck the Connections: Carefully tuck the connected wires into the junction box, making sure they are not obstructing the movement of the LED recessed light or interfering with the housing. This will ensure a clean and organized installation.
5. Repeat the process: Repeat steps 2 to 4 for each LED recessed light, connecting the corresponding wires from the junction boxes to their respective wires on the lights. Pay attention to proper color-coding and secure connections for each light.
6. Insulate the Connections: Once all the wires are properly connected and tucked into the junction boxes, use electrical tape or wire nuts with built-in insulation to cover the wire connections. This provides insulation and protects against any accidental contact.
7. Double-Check the Connections: Before proceeding to the next step, double-check that all the wire connections are secure, properly insulated, and aligned. Verify that there are no loose or exposed wires that could pose a safety hazard.
By carefully connecting the wires to the LED recessed lights, you’ll ensure a reliable and safe electrical connection. Take your time to match the correct wires and secure the connections properly. Once the wires are connected, you can proceed to the next step, which is attaching the LED light trims.
Step 7: Attach the LED Light Trims
Now that the wiring is complete, it’s time to add the finishing touch to your LED recessed lights by attaching the LED light trims. The trims not only enhance the aesthetic appeal of the lights but also help direct the light output. Follow these steps to attach the LED light trims:
1. Select the Trims: Choose the LED light trims that best complement the overall design and style of your space. There are various trims available, including baffle, reflector, and adjustable trims. Ensure that the trims you select are compatible with the recessed light housings you installed.
2. Align the Trim: Take one LED light trim and align it with the corresponding recessed light housing. Ensure that it fits securely and aligns properly with the housing. Some trims may require twisting or pushing to lock into place, while others may have clips or springs for attachment. Refer to the manufacturer’s instructions for specific details.
3. Install the Trim: Once aligned, gently push or twist the trim into place. You should feel or hear a click or a secure connection. Ensure that the trim is snugly fitted without gaps or wobbling.
4. Check for Proper Placement: Step back and inspect the installed trim. Ensure that it is centered and level with the ceiling. Confirm that the trim is sitting flush with the housing and creating a seamless look.
5. Repeat the Process: Repeat steps 2 to 4 for each LED recessed light, installing the corresponding trims. Maintain consistent spacing and alignment between the trims for a cohesive and professional appearance.
6. Trim Adjustment (if applicable): If you have selected adjustable trims, follow the manufacturer’s instructions to adjust the direction of the light. Some trims allow you to tilt or swivel the light head to focus the beam in a specific direction.
7. Test the Lights: After attaching all the LED light trims, turn on the power to the circuit and test the lights. Ensure that each light is functioning properly and emitting the desired level of brightness. Make any necessary adjustments or troubleshooting if any issues arise.
By attaching the LED light trims, you’ll add the final touch to your recessed lights, enhancing both the appearance and functionality of the lighting installation. Take your time to align and install each trim properly, ensuring a seamless and polished result. With the trims attached, you’re nearing the completion of your LED recessed lighting installation. The final step is to test the LED recessed lights to ensure proper functionality.
Read more: How To Change Recessed Light Bulb
Step 8: Test the LED Recessed Lights
After completing the installation of the LED recessed lights and attaching the trims, the final step is to test the lights to ensure proper functionality. Testing is crucial to verify that the lights are working correctly and providing the desired illumination. Follow these steps to test your LED recessed lights:
1. Turn on the Power: Ensure that the circuit breaker for the LED recessed lights is turned on. If you had turned off the power during the installation process, switch it back on now.
2. Check Each Light: Go to each LED recessed light and observe if it turns on when the switch is flipped. Verify that the light emits the desired level of brightness and that the color temperature aligns with your preferences.
3. Inspect for Even Illumination: Observe the overall illumination in the room and check if the lights are evenly distributed. Ensure that there are no dark spots or areas with insufficient lighting. Adjust the positioning of the trims if necessary to achieve a more balanced distribution of light.
4. Test Dimmable Lights (if applicable): If you’ve installed dimmable LED recessed lights, test the dimming functionality. Gradually adjust the dimmer switch to vary the brightness levels and ensure that the lights respond smoothly and consistently.
5. Look for Any Issues: While the lights are turned on, inspect for any flickering, buzzing, or other signs of electrical or performance issues. These can indicate poor connections or problems with the LED recessed lights themselves.
6. Make Adjustments if Needed: If you notice any issues or areas that need improvement, consider making necessary adjustments. This may involve repositioning the trims, checking the wiring connections or consulting with an electrician for further inspection.
7. Enjoy Your Newly Installed LED Recessed Lights: Once you’ve tested and confirmed that the LED recessed lights are functioning properly, sit back and enjoy the enhanced lighting in your new construction. Appreciate the energy efficiency and aesthetic appeal that these lights bring to your space.
By thoroughly testing your LED recessed lights, you will ensure their proper functionality and identify any issues that may need to be addressed. Pay attention to even illumination, dimmable functionality, and any potential irregularities. With the lights successfully tested, you have now completed the installation of LED recessed lights in your new construction project. Congratulations on a job well done!
Remember to refer to the manufacturer’s instructions and consult with a professional if you encounter any difficulties or have specific requirements.
Conclusion
Congratulations on successfully completing the installation of LED recessed lighting in your new construction! By following the steps outlined in this comprehensive guide, you have transformed your space with energy-efficient, stylish, and functional lighting.
Throughout this process, you learned the importance of planning and layout, selecting the right type of LED recessed lighting, preparing the new construction area, running the wiring, installing the light housings, connecting the wires, attaching the trims, and finally, testing the lights. Each step plays a crucial role in achieving a professional and seamless lighting installation.
LED recessed lighting offers numerous benefits, including energy efficiency, longevity, and versatile design options. They provide bright, focused illumination while adding a modern and sleek touch to any space. Additionally, LED lights require less maintenance and generate less heat compared to traditional lighting options, making them a preferred choice for both residential and commercial applications.
As you enjoy the newfound ambiance and functionality of your space, remember to regularly maintain your LED recessed lights by dusting the trims, cleaning the lenses, and checking for any signs of damage or wear. This will help ensure their optimal performance and longevity.
Whether you installed LED recessed lights in your kitchen, living room, bathroom, or any other area, their presence will enhance the overall atmosphere and bring your new construction to life. Enjoy the energy savings, adjust the dimming capabilities to suit your needs, and revel in the beautiful lighting that perfectly complements your space’s design and purpose.
Thank you for trusting this guide to assist you in installing LED recessed lighting in your new construction project. We hope this comprehensive article has provided you with the knowledge and guidance needed for a successful installation. Should you have any further questions or need assistance in the future, don’t hesitate to consult with lighting experts or seek professional help.
Happy illuminating!
Frequently Asked Questions about How To Install LED Recessed Lighting In New Construction
Was this page helpful?
At Storables.com, we guarantee accurate and reliable information. Our content, validated by Expert Board Contributors, is crafted following stringent Editorial Policies. We're committed to providing you with well-researched, expert-backed insights for all your informational needs.


0 thoughts on “How To Install LED Recessed Lighting In New Construction”