Home>Furniture>Outdoor Furniture>How To Hang Lights On An Aluminum Patio Cover
Outdoor Furniture
How To Hang Lights On An Aluminum Patio Cover
Modified: May 6, 2024
Learn the best technique to hang outdoor lights on your aluminum patio cover for a stunning ambiance. Upgrade your outdoor-furniture with our step-by-step guide.
(Many of the links in this article redirect to a specific reviewed product. Your purchase of these products through affiliate links helps to generate commission for Storables.com, at no extra cost. Learn more)
Introduction
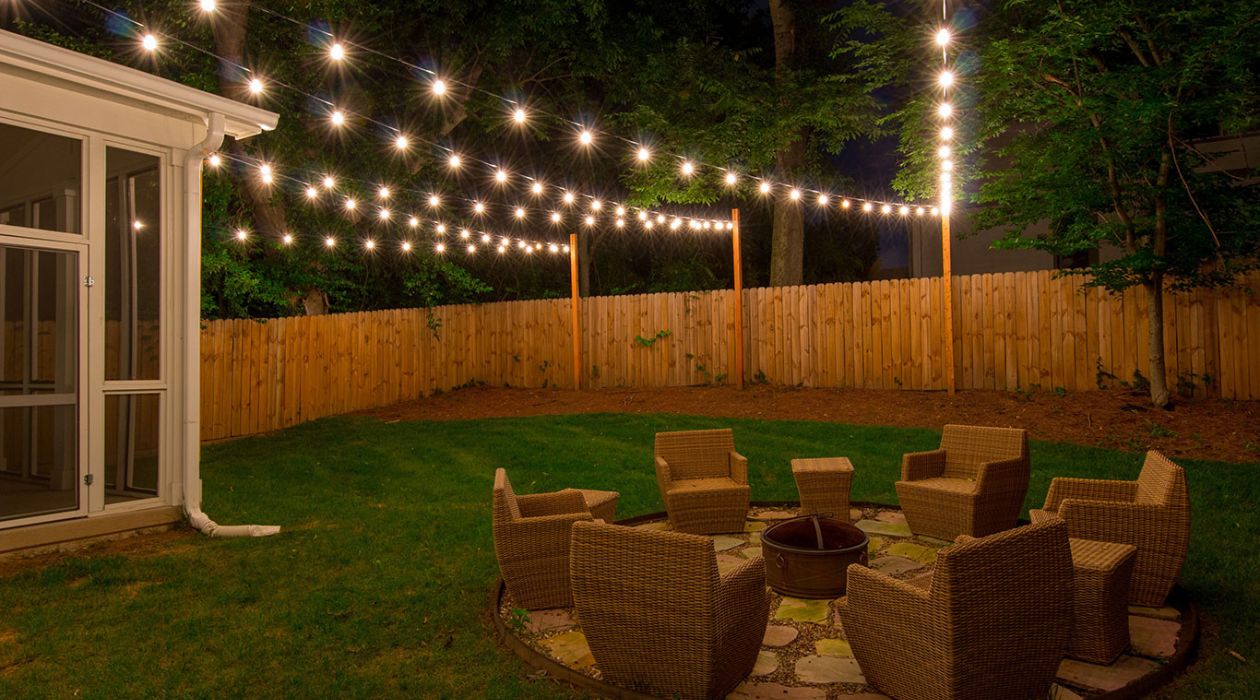
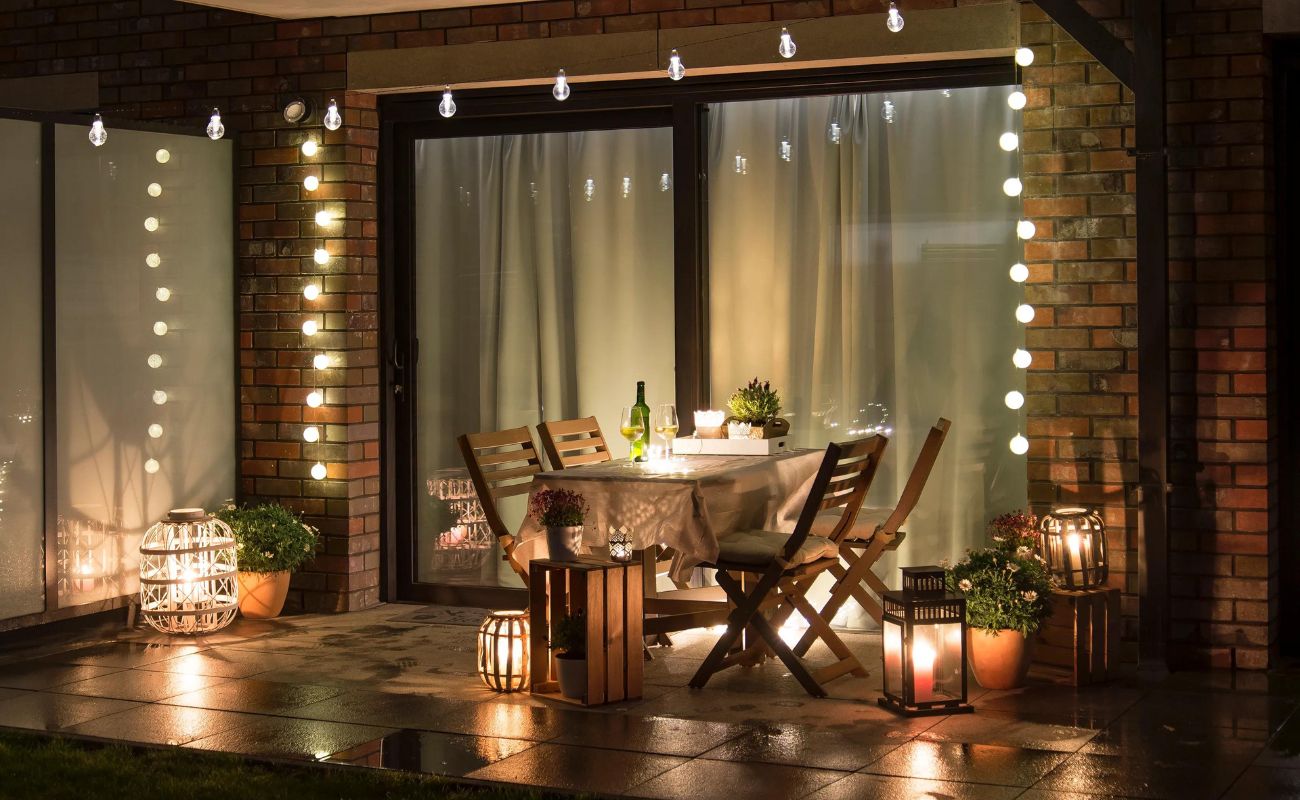
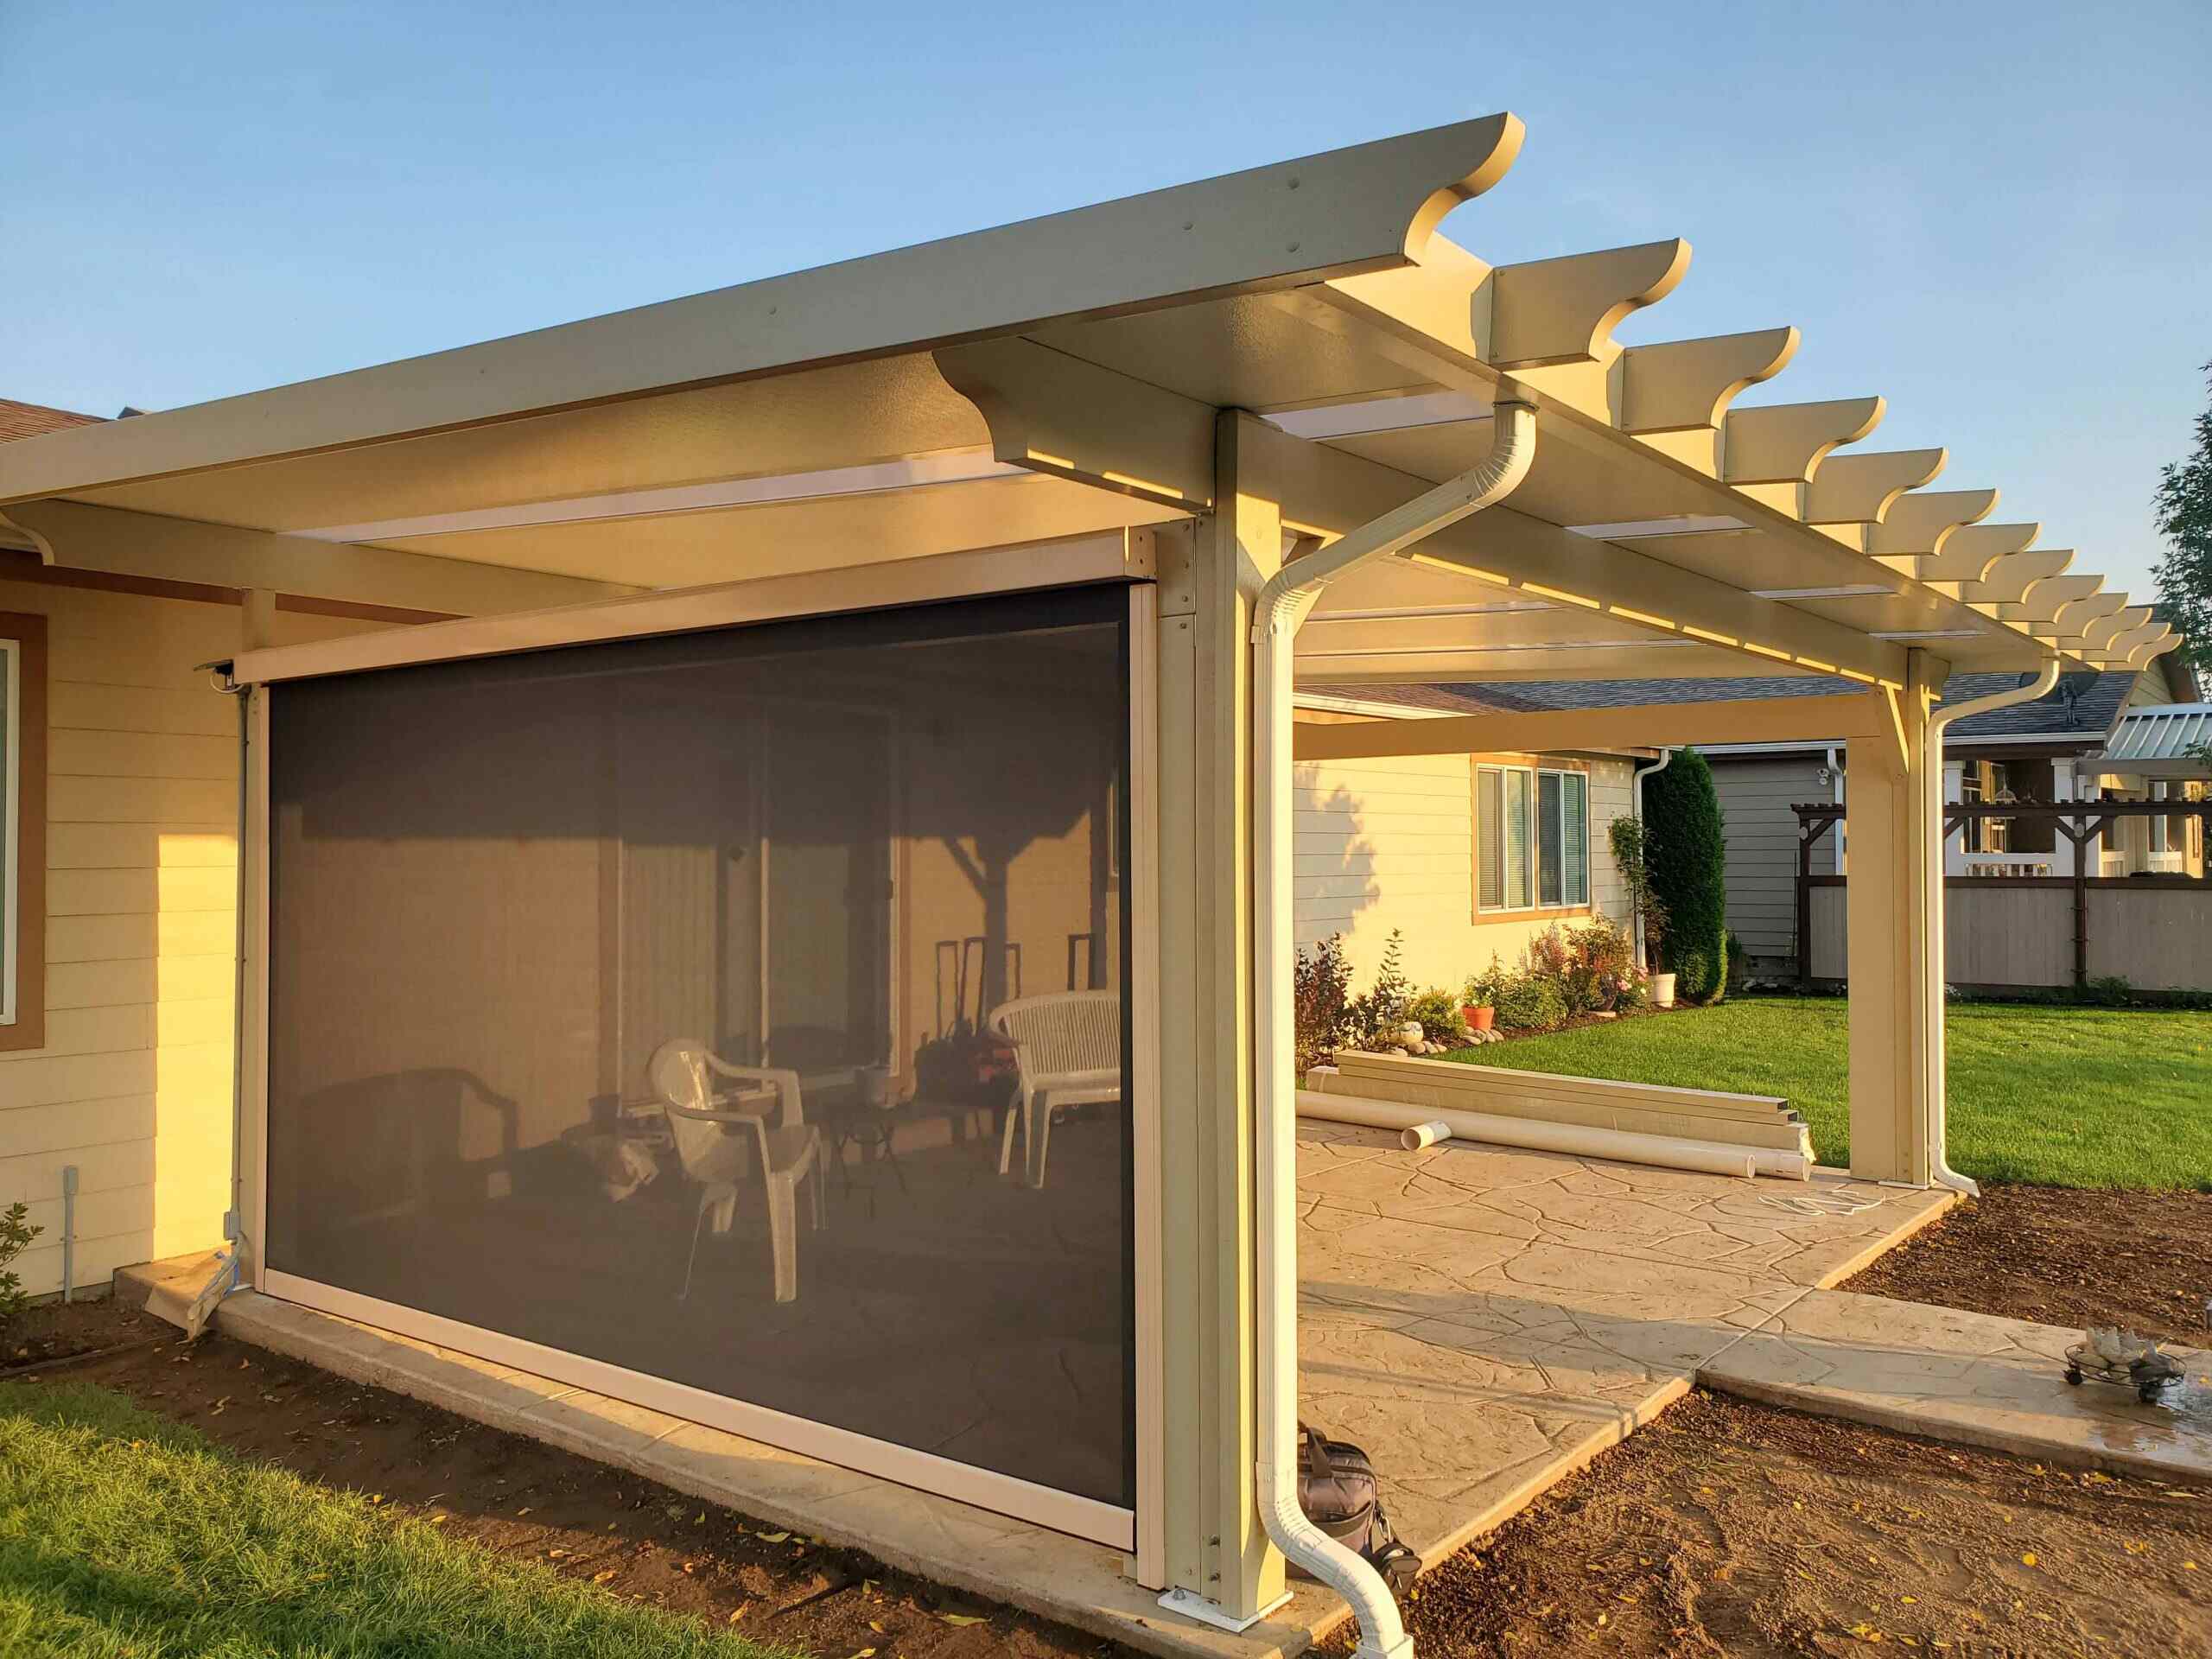
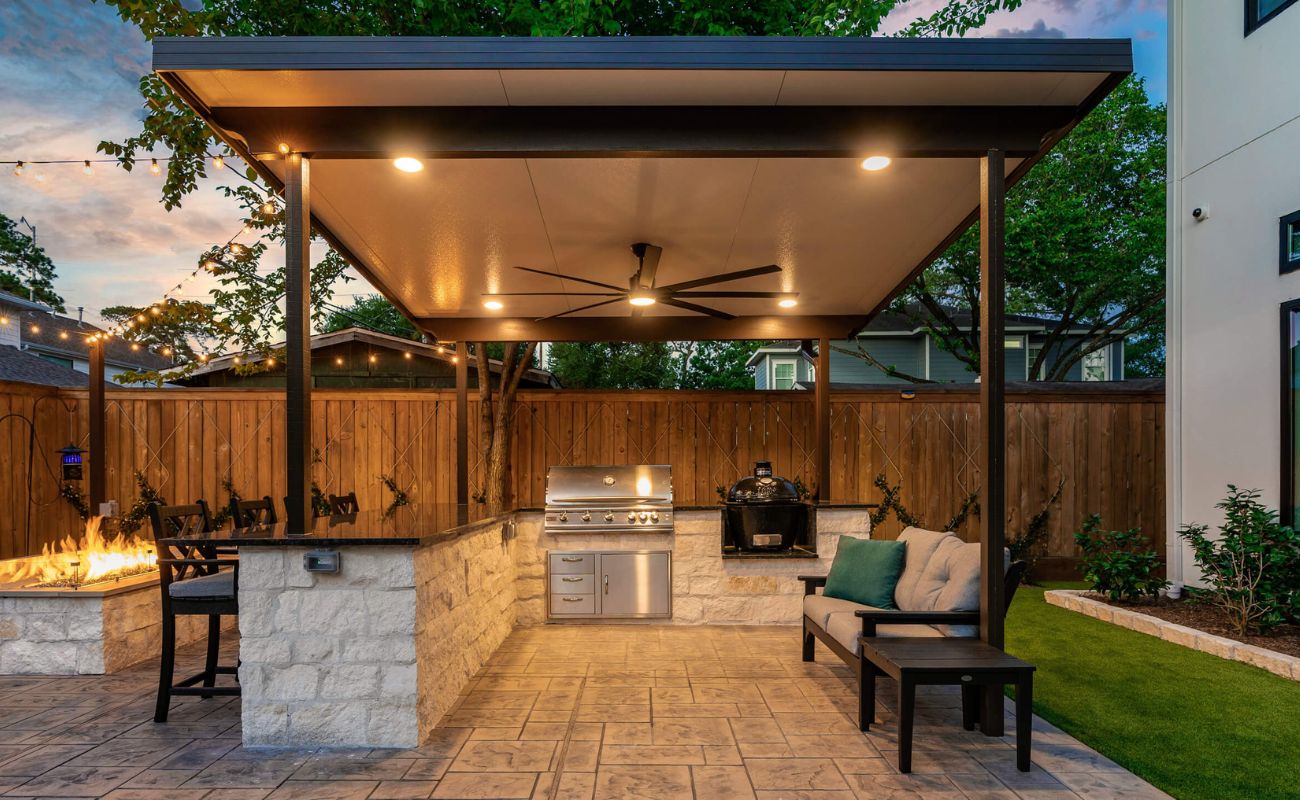
Welcome to our comprehensive guide on how to hang lights on an aluminum patio cover. Adding lights to your outdoor living space not only enhances the overall ambiance but also extends the usability of your patio during evening hours. Aluminum patio covers are a popular choice for their durability, weather resistance, and aesthetic appeal. By following the step-by-step instructions in this article, you’ll be able to beautifully illuminate your patio cover and create a warm and inviting atmosphere.
Before we delve into the technical aspects of hanging lights on an aluminum patio cover, it’s important to assess the condition of the cover and understand its load-bearing capabilities. Aluminum patio covers are designed to support the weight of the structure itself, but additional weight from lights and other accessories must be taken into consideration. It’s crucial to ensure that the cover is structurally sound and can handle the weight of the lights without compromising its integrity.
Once you’ve assessed the patio cover and determined that it can safely accommodate lights, it’s time to prepare the area. Remove any dirt, debris, or obstacles that may hinder the installation process. Clean the surface of the patio cover to provide a smooth and even base for mounting the lights. Additionally, check if there are any electrical outlets nearby or if you’ll need to install extension cords or a power source specifically for the lights.
Next, you’ll need to select the right type of lights for your patio cover. There are various options available, including string lights, rope lights, LED strip lights, and even patio cover-specific lighting fixtures. Consider the desired level of brightness, the style of your outdoor space, and whether you want the lights to be permanent or temporary. LED lights are a popular choice for their energy efficiency and long lifespan.
Gathering the necessary tools and materials is the next step. Depending on the type of lights you choose, you may need a ladder, screws or mounting clips, electrical tape, an extension cord, and a power drill. Make sure you have all the required items before proceeding with the installation process.
Key Takeaways:
- Illuminate your aluminum patio cover with the perfect lights to create a warm and inviting outdoor atmosphere, enhancing the usability of your space during evening hours.
- Prioritize safety and thorough planning when installing lights on your patio cover, ensuring a visually pleasing and functional result that transforms your outdoor space.
Read more: How To Hang Patio Lights On A Covered Patio
Assessing the Patio Cover
Before proceeding with the installation of lights on your aluminum patio cover, it’s important to assess the condition of the structure. This will ensure that the patio cover is capable of supporting the additional weight of the lights without compromising its integrity.
Begin by visually inspecting the patio cover for any signs of wear and tear. Look for cracks, dents, or other damage that may affect its load-bearing capacity. If you notice any significant damage, it’s advisable to consult a professional before proceeding with the installation.
Next, check the stability of the patio cover. Give it a gentle shake to see if it feels sturdy. If there’s any noticeable wobbling or movement, it may indicate a structural issue that needs to be addressed. In such cases, it’s crucial to seek professional guidance to ensure safety.
Consider the weight capacity of the patio cover. Aluminum is known for its lightweight yet durable nature, but it still has limitations. Check the manufacturer’s specifications or consult with an expert to determine the maximum weight the patio cover can safely support. It’s important not to exceed this limit to avoid structural damage or collapse.
If you’re unsure about the load-bearing capabilities of your patio cover, it’s always best to err on the side of caution. Consider hiring a professional contractor or engineer to evaluate the structure and provide guidance on the installation of lights. They’ll be able to assess the strength of the patio cover and make recommendations based on its current condition.
Remember, safety should always be a top priority when installing lights on your patio cover. By properly assessing the structure beforehand, you can ensure that it’s capable of supporting the weight of the lights and provide a safe and enjoyable outdoor space for years to come.
Preparing the Area
Once you’ve assessed the patio cover and confirmed its capability to support the weight of the lights, it’s time to prepare the area for the installation process. Proper preparation is crucial for a smooth and successful installation.
Begin by removing any furniture or decorations from the patio area. Clearing the space will provide you with a clutter-free area to work in and minimize any potential accidents or damage to your belongings. Store the items in a safe location until the installation is complete.
Next, thoroughly clean the surface of the patio cover. Remove any dust, dirt, or debris using a broom and a mild detergent solution if necessary. Ensure that the surface is dry before proceeding with the installation. A clean surface will provide better adhesion and ensure a secure attachment for the lights.
Check for any obstacles that may hinder the installation process. Look out for overhanging branches, wires, or any other objects that could interfere with the path of the lights. Trim any branches or relocate any obstructions to ensure a clear and unobstructed installation area.
If you’re planning to install lights that require an electrical power source, check for nearby electrical outlets. Determine whether you’ll be able to connect the lights to an existing outlet or if you’ll need to install extension cords or a dedicated power source specifically for the lights. Plan the positioning of the lights accordingly to ensure easy access to the power source.
Consider the layout and design of your outdoor space when preparing the area. Visualize where you want the lights to be installed and how they will enhance the aesthetic appeal of your patio cover. Take into account any architectural features or decorative elements that you want to highlight with the lights. Planning the layout beforehand will make the installation process more efficient and ensure a visually pleasing result.
By taking the time to prepare the area properly, you’ll create an optimal environment for the installation of lights on your aluminum patio cover. A clean, clear, and well-planned space will not only make the installation process easier but also contribute to the overall success and aesthetics of the project.
Selecting the Right Type of Lights
When it comes to hanging lights on your aluminum patio cover, selecting the right type of lights is essential for achieving the desired ambiance and functionality. There are various types of lights available, each with its own unique features and benefits. Consider the following factors when choosing the perfect lights for your patio cover.
1. String Lights: String lights, also known as fairy lights, are a popular and versatile option. They consist of a string of small bulbs attached to a wire or cable. String lights come in various lengths and can be easily draped or hung across the patio cover, creating a warm and whimsical atmosphere.
2. Rope Lights: Rope lights are flexible tubes with built-in LED lights. They offer a decorative and practical lighting solution for patio covers. The flexibility of rope lights allows for easy installation and versatility in how they are placed. They can be wrapped around poles or strung along the edges of the patio cover for a mesmerizing effect.
3. LED Strip Lights: LED strip lights are thin strips of LEDs that provide a bright and energy-efficient lighting option. They come with an adhesive backing, making them easy to attach to the underside of the patio cover. LED strip lights offer a contemporary and sleek look that can be customized to fit your desired lighting design.
4. Patio Cover-Specific Lighting Fixtures: Some manufacturers offer lighting fixtures specifically designed for patio covers. These fixtures are often integrated into the structure itself and provide a seamless and cohesive lighting solution. They can be recessed into the patio cover or mounted on the surface, creating a polished and sophisticated look.
Consider the ambiance you want to create with your lights. Warm white lights emit a cozy and inviting glow, while cool white lights give a more modern and crisp feel. Additionally, you may want to opt for lights with dimming capabilities to adjust the brightness according to your preference.
Another crucial factor to consider is the longevity and energy efficiency of the lights. LED lights are a popular choice as they consume less energy and have a longer lifespan compared to traditional incandescent bulbs. LED lights also emit minimal heat, making them safer for outdoor use.
Ultimately, the right type of lights for your patio cover will depend on your personal preference, the atmosphere you want to create, and the overall style of your outdoor space. Take the time to explore different options, read reviews, and consider consulting with a professional lighting specialist, if needed, to make an informed decision.
By selecting the right type of lights, you’ll be able to transform your aluminum patio cover into a captivating and inviting outdoor retreat.
Gathering the Necessary Tools and Materials
Before you begin the installation of lights on your aluminum patio cover, it’s important to gather all the necessary tools and materials to ensure a smooth and efficient process. Having everything you need on hand will save you time and frustration during the installation. Here’s a list of essential items you’ll need for the project:
1. Ladder: Depending on the height of your patio cover, you may need a ladder to reach the installation area safely. Choose a sturdy ladder that can support your weight and has the appropriate height to access the desired installation points.
2. Screws or Mounting Clips: The method of securing the lights will depend on the type of lights you choose. If using string lights or rope lights, you may need screws or mounting clips to attach them to the patio cover. Make sure to select screws or clips that are suitable for outdoor use and are compatible with the material of your patio cover.
3. Electrical Tape: Electrical tape is useful for securing any loose wires or connections and providing an added layer of protection against the elements. It helps to keep the electrical components of the lights safe and secure.
4. Extension Cord: If your power source is not located near the patio cover, you may need to use an extension cord to connect the lights to the nearest electrical outlet. Ensure that the extension cord is outdoor-rated and long enough to reach the desired location.
5. Power Drill: A power drill will come in handy if you need to make holes for mounting screws or clips. Ensure that you have the appropriate drill bits for the material of your patio cover and that the drill is fully charged or has a nearby power source.
6. Additional Accessories: Depending on the type of lights you choose, you may need additional accessories such as connectors, splitters, or timers. These accessories can help customize the installation and control the lighting effects according to your preferences.
7. Safety Gear: Safety should always be a priority when working with electrical equipment. Consider wearing safety goggles, gloves, and non-slip shoes to protect yourself from any potential hazards.
Make a checklist of all the tools and materials you’ll need before starting the installation process. This will ensure that you have everything required and prevent any unnecessary delays or interruptions during the project.
If you’re unsure about the specific tools or materials needed for your chosen type of lights, consult the manufacturer’s guidelines or seek advice from a professional electrician or lighting specialist. They can provide valuable insights and recommendations based on your specific requirements.
By gathering the necessary tools and materials beforehand, you’ll be well-prepared to tackle the installation of lights on your aluminum patio cover and create a stunning and well-illuminated outdoor space.
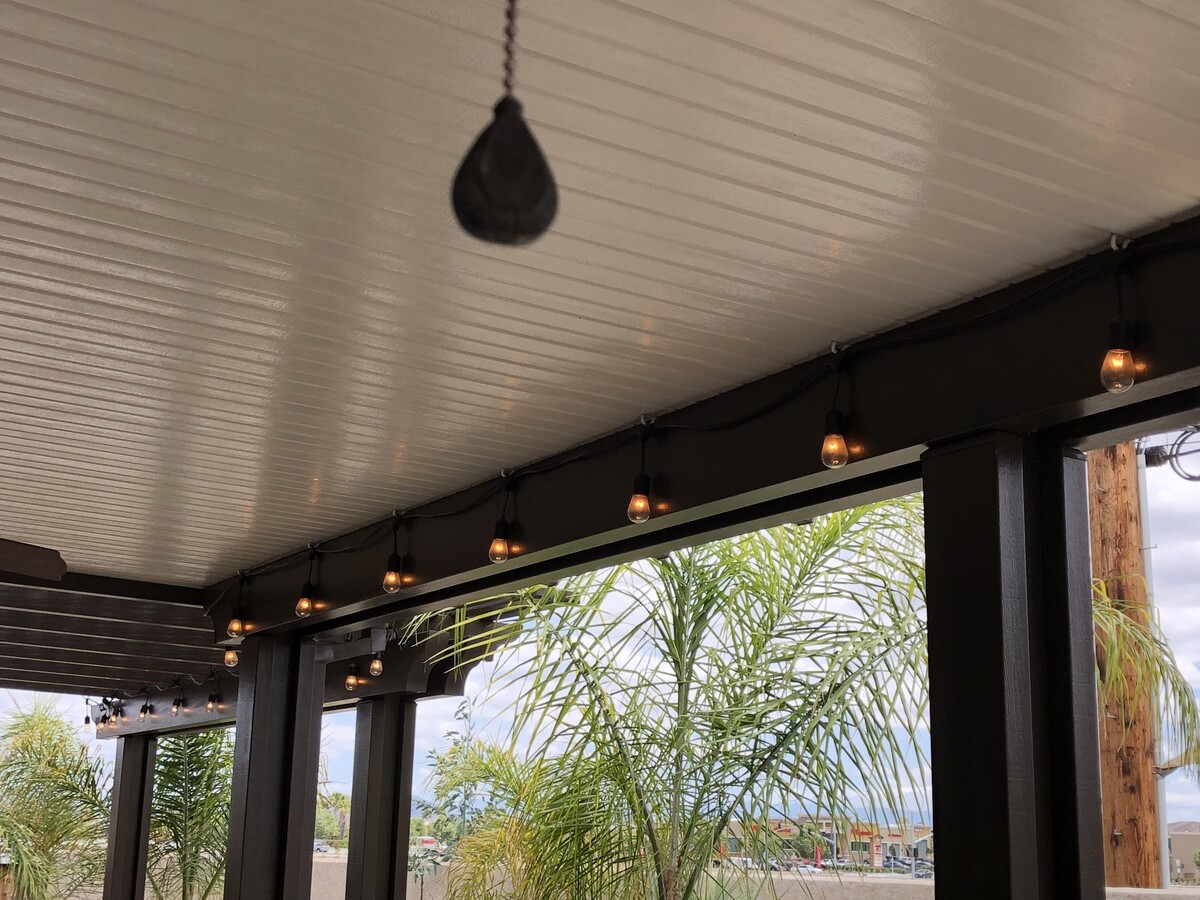
Use outdoor-rated clips or hooks to hang lights on an aluminum patio cover. Make sure to secure the clips or hooks to the support beams of the cover to ensure they can hold the weight of the lights.
Read more: How To Hang Curtains On Aluminum Patio
Measuring and Planning the Layout
Before you start attaching lights to your aluminum patio cover, it’s important to measure the area and plan out the layout. Taking accurate measurements and carefully planning the placement of the lights will ensure a visually pleasing and functional result. Here are the steps to follow:
1. Measure the Patio Cover: Start by measuring the dimensions of your patio cover. Consider the length and width of the area you want to cover with lights. This will help you determine the amount of lighting you’ll need and guide you in selecting the appropriate length of string lights or the number of rope lights or LED strips required.
2. Determine the Hanging Points: Identify the attachment points on the patio cover where you’ll hang the lights. This can be on the edges, along the supports, or any other suitable locations. Take into account the structural integrity of the patio cover and choose spots that can safely support the weight of the lights. Use a pencil to mark the hanging points for reference.
3. Plan the Wiring Route: If you’re using string lights or LED strips that require wiring, plan the route for the wires to reach the nearest electrical outlet. Consider the proximity of the power source and the path that will be least visible or obstructive. It may be necessary to use extension cords or hide the wires along the patio cover for a clean and neat appearance.
4. Consider Lighting Patterns: Depending on the type of lights you’re using, you may want to create specific lighting patterns or effects. For example, you could hang string lights in a zigzag or crisscross pattern for a festive look, or arrange rope lights along the edges of the patio cover for a more subtle and elegant glow. Visualize the desired lighting effect and plan the layout accordingly.
5. Account for Power Source: Ensure that the power source for the lights is accessible and conveniently located. If necessary, install an outdoor-rated electrical outlet or use an extension cord to reach the nearest outlet. Make sure the electrical setup is safe and meets all local electrical codes and regulations.
6. Test the Layout: Before permanently securing the lights, it’s a good idea to test the layout to ensure you’re satisfied with the placement and appearance. This allows you to make any necessary adjustments before attaching the lights more permanently.
Take your time during the measuring and planning stage to ensure accurate measurements and a well-thought-out layout. This preparation will save you from potential rework or disappointment after installation.
If you’re unsure about the best layout or need guidance, consider consulting an expert who can provide advice based on your specific patio cover and lighting preferences. They can offer valuable insights and suggestions to create a stunning and harmonious lighting design.
By carefully measuring and planning the layout, you’ll be able to install lights on your aluminum patio cover in a way that enhances the aesthetic appeal and creates a welcoming and cozy atmosphere for your outdoor space.
Anchoring the Lights
Once you’ve measured and planned the layout for your lights on the aluminum patio cover, it’s time to anchor and secure them in place. Proper anchoring is crucial to ensure that the lights are stable, safe, and will withstand outdoor elements. Follow these steps to anchor your lights effectively:
1. Determine Anchoring Method: Depending on the type of lights you’re using and the design of your patio cover, you’ll need to select the appropriate anchoring method. For string lights or rope lights, you can use screws or mounting clips to attach them securely to the patio cover’s surface or supports. LED strip lights often come with adhesive backing, allowing for easy attachment. Choose the method that works best for your specific lights and patio cover.
2. Mark the Anchoring Points: Referencing the layout you planned earlier, mark the exact points where you’ll be attaching the lights. Use a pencil or marker to make small dots or lines on the patio cover at these locations. This will serve as a guide during the installation process.
3. Pre-drill Holes (if necessary): If you’re using screws to anchor the lights, pre-drill small holes at the marked points. This will help prevent the aluminum from cracking or splitting when inserting the screws. Ensure that the drill bit size matches the diameter of the screws you’ll be using.
4. Attach the Lights: Begin attaching the lights to the patio cover, following the marked anchoring points. For string lights or rope lights, use screws or mounting clips to secure them in place. If you’re using LED strip lights, peel off the backing from the adhesive side and carefully press the strip onto the patio cover’s surface or supports. Press firmly to ensure a strong bond.
5. Space the Lights Evenly: As you attach the lights, ensure that they are evenly spaced and follow the layout you planned. This will help create a balanced and visually appealing lighting effect across the patio cover.
6. Secure Loose Wires: If your lights have loose wires, use electrical tape to secure them to the patio cover. This will help keep the wires neatly organized and prevent them from dangling or becoming a tripping hazard.
7. Test Stability: Once all the lights are anchored, gently tug on them to check their stability. Ensure that they’re securely attached and won’t come loose easily. Make any necessary adjustments or add additional anchoring points as needed.
It’s important to carefully follow the manufacturer’s instructions when anchoring the lights to your aluminum patio cover. This will ensure that you’re correctly using the recommended methods and materials for securing the lights.
If you’re uncertain about the proper anchoring technique or need assistance, consider consulting a professional installer or a knowledgeable hardware store representative. They can provide guidance and help ensure that your lights are safely anchored and will withstand outdoor conditions.
By properly anchoring your lights, you can enjoy a beautifully illuminated aluminum patio cover that adds charm and functionality to your outdoor living space.
Installing the Lights on the Patio Cover
With the lights anchored securely to your aluminum patio cover, it’s time to proceed with the installation process. Follow these steps to ensure a successful installation of the lights:
1. Start With the Power Source: Connect the lights to the power source. If using string lights or rope lights, plug them into an outdoor-rated extension cord or directly into a nearby electrical outlet. For LED strip lights, follow the manufacturer’s instructions for connecting them to the power source. Test the lights to ensure they are working properly before proceeding.
2. Stringing the Lights: If you’re installing string lights, start by attaching one end of the string to a designated anchoring point and work your way along the patio cover, securing the lights at regular intervals. Ensure that the string is taut but not overly stretched. Use additional screws or mounting clips to keep the lights in place and maintain a neat appearance.
3. Hanging Rope Lights: For rope lights, carefully loop or drape them along the edges or supports of the patio cover as planned. Use zip ties or mounting clips to secure the lights, ensuring they are evenly spaced and hang straight. Take care not to bend or crimp the rope lights excessively, as this could impact their performance.
4. Attaching LED Strip Lights: If using LED strip lights, peel off the backing and apply them to the designated areas on the patio cover as per your layout plan. Press them firmly for optimal adhesion. Take care not to pull or stretch the strips excessively, as this can damage the electrical components. Use additional adhesive if needed to ensure the strips stay in place.
5. Organizing the Wires: As you install the lights, take the time to organize and hide any loose wires. Secure them to the patio cover using electrical tape or clips. Position the wires in a way that minimizes their visibility and reduces the risk of them getting tangled or damaged.
6. Concealing Extension Cords: If you’re using extension cords to connect the lights to the power source, take extra care to conceal the cords and ensure they are not a tripping hazard. Tuck them neatly along the patio cover’s edges or secure them with clips or cable management solutions. Avoid placing them in high traffic areas or where they could be exposed to water or other elements.
7. Re-test the Lights: Once the installation is complete, test the lights again to ensure they are functioning as intended. Check that all bulbs or LEDs are lit and that there are no loose connections or flickering lights. Make any necessary adjustments or repairs before finalizing the installation.
Throughout the installation process, prioritize safety by turning off the lights and unplugging them whenever you need to make adjustments or handle electrical components. Follow all recommended safety guidelines and consult a professional if you are uncertain about any electrical aspects of the installation.
By following these steps, you can confidently install lights on your aluminum patio cover, creating a captivating and enchanting ambiance in your outdoor space.
Testing and Adjusting the Lights
Once you’ve completed the installation of lights on your aluminum patio cover, it’s important to perform thorough testing and make any necessary adjustments to ensure optimal performance and aesthetics. Testing the lights will help identify any issues or areas that may require fine-tuning. Follow these steps to effectively test and adjust your patio cover lights:
1. Turn on the Lights: Begin by turning on the lights and observing their overall functionality. Check if all the bulbs or LEDs are properly illuminated and if the desired intensity of light is achieved. Evaluate the overall brightness and color temperature to ensure it matches your intended ambiance.
2. Assess Lighting Distribution: Take a step back and observe the distribution of light across the patio cover. Pay attention to any areas that may be excessively bright or dim. Ensure that the lights are evenly spaced and that there are no gaps or sections with poor lighting intensity.
3. Make Adjustments: If you notice any irregularities in lighting distribution, make the necessary adjustments. This could involve moving lights to different locations, tightening or loosening mounting clips, or adjusting the direction or angle of the lights. Experiment with different configurations until you achieve the desired lighting effect.
4. Address Wiring Concerns: Check the wiring and connections for any signs of loose or exposed wires. Ensure that all connections are secure and properly insulated using electrical tape or connectors. Address any wiring concerns promptly to prevent potential hazards or malfunctions.
5. Evaluate Dimming or Color Options: If your lights offer dimming or color options, test out the different settings to find the perfect balance for your patio cover. Adjust the brightness or change the colors to create various moods or atmospheres. Experiment with different combinations until you find the ideal settings that complement your outdoor space.
6. Test Durability: Consider the durability of your lights by conducting durability tests. Expose the lights to different weather conditions, such as rain or wind, to ensure they can withstand outdoor elements. If any issues arise, address them promptly to prevent potential damage or safety risks.
7. Seek Feedback: Invite friends or family members to view the patio cover lights and provide their feedback. They may offer a fresh perspective and point out any areas that could use improvement. Take their suggestions into consideration and make any necessary adjustments based on their feedback.
Remember, the testing and adjusting phase is essential for fine-tuning the installation and ensuring that the lights meet your expectations. It may take some trial and error to achieve the desired lighting effect, but the effort will be worth it for a stunning and functional patio cover.
If you encounter any difficulties during the testing and adjusting process or require professional assistance, don’t hesitate to consult an expert electrician or lighting specialist. They can provide guidance and solutions tailored to your specific needs.
By thoroughly testing and adjusting your patio cover lights, you’ll create an inviting and enchanting outdoor space that can be enjoyed for years to come.
Read more: How To Build An Aluminum Patio Cover
Conclusion
Congratulations! You have successfully learned how to hang lights on an aluminum patio cover. By following the steps outlined in this comprehensive guide, you now have the knowledge and confidence to enhance the ambiance of your outdoor living space and extend its usability into the evening hours.
Throughout this article, you learned how to assess the condition of your patio cover to ensure its structural integrity and weight-bearing capabilities. Preparing the area involved clearing any obstacles, cleaning the surface, and considering the power source for the lights. Selecting the right type of lights allowed you to create the desired atmosphere and style, while gathering the necessary tools and materials ensured a smooth installation process.
You then measured and planned the layout for the lights, taking into account the dimensions of your patio cover and the desired lighting patterns. Anchoring the lights securely was crucial for stability, and the installation process involved attaching the lights according to the planned layout. Finally, you learned how to effectively test and adjust the lights to achieve optimal performance and lighting distribution.
Remember, safety should always be a priority when working with electrical equipment. Ensure that you follow all safety guidelines, turn off the lights when making adjustments, and consult a professional if you’re unsure about any electrical aspects of the installation.
By adding lights to your aluminum patio cover, you have transformed it into a captivating, inviting, and functional outdoor space. Whether you choose string lights, rope lights, LED strip lights, or patio cover-specific lighting fixtures, the right lighting can create a warm and cozy atmosphere for gatherings, parties, or simply relaxing under the stars.
As you enjoy your beautifully illuminated patio cover, don’t forget to maintain and regularly inspect the lights for any issues. With proper care, your patio cover lights will continue to enhance your outdoor experience for years to come.
Thank you for joining us on this journey to learn how to hang lights on an aluminum patio cover. We hope this guide has been helpful in achieving your desired outdoor lighting goals. May your patio cover become a place of joy, relaxation, and endless memories illuminated by the gentle glow of lights.
Ready to brighten up your outdoor space even more? After mastering how to set up lights on your aluminum patio cover, you might be looking for additional creative ideas. Our next guide offers six unique patio lighting ideas that enhance any outdoor setting. From romantic string lights to dramatic spotlights, find out how simple changes can transform your patio into an enchanting evening retreat.
Frequently Asked Questions about How To Hang Lights On An Aluminum Patio Cover
Was this page helpful?
At Storables.com, we guarantee accurate and reliable information. Our content, validated by Expert Board Contributors, is crafted following stringent Editorial Policies. We're committed to providing you with well-researched, expert-backed insights for all your informational needs.
0 thoughts on “How To Hang Lights On An Aluminum Patio Cover”