Home>Garden Essentials>How To Infill Existing Opening Of CMU With New CMU
Garden Essentials
How To Infill Existing Opening Of CMU With New CMU
Modified: October 20, 2024
Learn how to infill an existing opening of CMU with new CMU for your garden. Step-by-step guide to enhance your garden's durability and aesthetics.
(Many of the links in this article redirect to a specific reviewed product. Your purchase of these products through affiliate links helps to generate commission for Storables.com, at no extra cost. Learn more)
Introduction
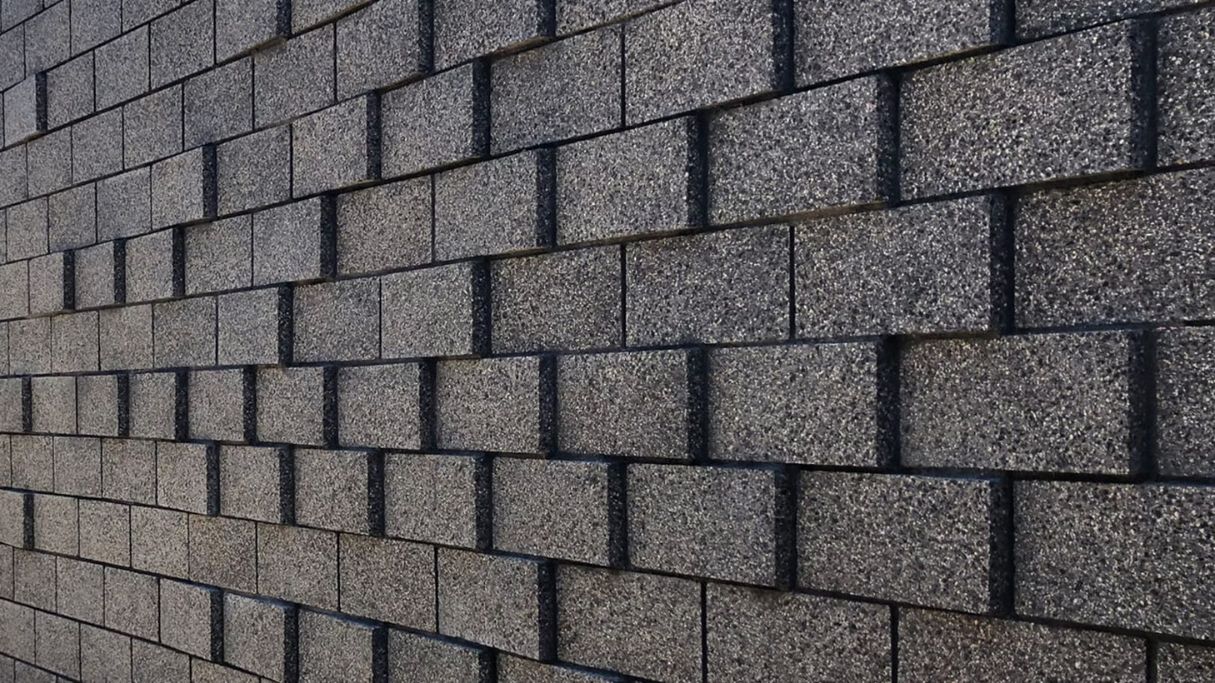
Welcome to our comprehensive guide on how to infill an existing opening of a CMU (Concrete Masonry Unit) wall with new CMU. If you’re looking to enhance or repair a CMU wall, infilling an existing opening can be a necessary step to ensure structural integrity and aesthetic cohesion. Whether you’re a seasoned DIY enthusiast or a professional contractor, this step-by-step guide will walk you through the process of infilling an existing opening with new CMU, providing you with the knowledge and skills needed to successfully complete the project.
CMU walls are widely used for their durability and strength, making them a common choice for both residential and commercial applications. However, over time, openings may need to be filled due to various reasons, such as the removal of a window or the creation of a new doorway. By infilling these openings with new CMU, you can restore the wall’s integrity and improve its overall appearance.
Before getting started, it’s important to note that infilling an existing opening with new CMU requires careful planning, precise measurements, and proper execution. It is recommended to familiarize yourself with basic masonry techniques and safety precautions before undertaking this project. Now, let’s dive into the step-by-step process of infilling an existing opening of a CMU wall with new CMU.
Key Takeaways:
- Assess the existing opening and surrounding wall for damage and structural issues before infilling with new CMU. Proper planning and preparation are crucial for a successful project.
- Carefully measure, cut, and install the new CMU blocks, ensuring precise alignment and secure placement. Attention to detail and safety measures are essential for a professional finish.
Step 1: Assessing the Existing Opening
The first step in infilling an existing opening of a CMU wall with new CMU is to thoroughly assess the condition of the opening. This step is essential to determine the scope of the project and identify any potential challenges that may arise.
Start by examining the size and shape of the existing opening. Measure the width, height, and depth of the opening, as these measurements will guide you in selecting the appropriate size of new CMU blocks. Additionally, take note of any obstructions or irregularities within the opening that may need to be addressed before installing the new CMU blocks.
Next, inspect the surrounding CMU wall for any signs of damage or deterioration. Look for cracks, chips, or loose mortar joints that may indicate structural issues. If you notice any significant damage, it is crucial to address it before proceeding with the infilling process to ensure a solid foundation for the new CMU blocks.
Consider the function and purpose of the infilled wall. If the wall is load-bearing or provides structural support, you might need to consult with a structural engineer to ensure that the new CMU blocks are installed correctly and can bear the intended load.
Lastly, evaluate the overall aesthetic of the existing CMU wall and determine if any additional design elements, such as decorative blocks or specific mortar techniques, need to be incorporated to maintain or enhance the visual continuity of the wall.
Taking the time to carefully assess the existing opening and surrounding CMU wall will help you plan and prepare for the infilling process more effectively. It will also ensure that you have all the necessary materials and tools required to complete the project successfully.
Step 2: Preparing the Work Area
Once you have assessed the existing opening and have a clear understanding of the project requirements, it’s time to prepare the work area for infilling the CMU wall. This step involves creating a clean and safe environment to ensure a seamless installation process.
Start by removing any debris, loose mortar, or obstructions from the existing opening. Use a brush or vacuum to sweep away dust and dirt. It’s important to have a clean and level surface to work on, as it will promote better adhesion and alignment of the new CMU blocks.
If there are any protrusions on the existing CMU wall that may interfere with the installation of the new CMU blocks, you may need to chisel or grind them down to create a smooth and even surface. This will ensure a snug fit and proper alignment of the infilled section.
Next, prepare the mortar mix according to the manufacturer’s instructions. Mortar acts as the adhesive that holds the CMU blocks together, so it’s essential to mix it accurately. Typically, you’ll need to combine dry mortar mix with water in a clean bucket, using a drill with a paddle attachment to achieve a smooth consistency.
Before starting the infilling process, make sure you have all the necessary tools and materials within reach. This includes trowels, a mason’s hammer, a level, a rubber mallet, a tape measure, safety goggles, and gloves. Having these items readily available will save you time and ensure a streamlined workflow.
Lastly, consider using temporary bracing or support structures to hold the new CMU blocks in place while the mortar cures. This can be especially useful if you are infilling a larger opening or dealing with vertically stacked CMU blocks.
By adequately preparing the work area, you’ll create a smooth and efficient installation process. This will minimize errors and ensure a sturdy and visually pleasing infilled CMU wall.
Step 3: Measuring and Cutting New CMU
Once the work area is prepared, it’s time to measure and cut the new CMU blocks that will be used to fill the existing opening. Accurate measurements and precise cutting are crucial to ensure a seamless integration of the new CMU within the wall.
Start by measuring the width, height, and depth of the existing opening. These measurements will guide you in determining the size of the new CMU blocks needed. It is important to choose CMU blocks that match the dimensions of the opening as closely as possible to achieve a proper fit.
If the opening is not a standard size, you may need to cut the CMU blocks to the required dimensions. To cut CMU, you’ll need a masonry saw or a masonry chisel and hammer. Use caution and follow proper safety protocols when using these tools.
Measure and mark the CMU block according to the required dimensions. Using a masonry saw, carefully cut along the marked lines to achieve the desired size. Alternatively, if you’re using a masonry chisel and hammer, place the chisel on the marked line and strike it firmly with the hammer to create a clean break.
After cutting the CMU blocks, inspect the edges for any rough or uneven areas. Use a rubbing stone or a file to smooth out any imperfections. This will ensure a snug fit and a professional finish.
Remember to check the vertical and horizontal alignment of the cut CMU blocks with a level as you go. This will help maintain a consistent and uniform appearance of the infilled section.
Throughout the cutting process, it’s essential to wear safety goggles, a dust mask, and gloves to protect yourself from flying debris and dust. Follow all safety guidelines provided by the tool manufacturer and take frequent breaks to avoid fatigue.
By measuring and cutting the new CMU blocks accurately, you’ll achieve a precise fit and ensure a visually pleasing result. This step sets the foundation for a successful infilling of the existing CMU wall opening.
When infilling an existing opening of CMU with new CMU, make sure to clean the existing CMU surface, apply mortar, and then place the new CMU blocks, ensuring they are level and plumb. Fill the joints with mortar and finish the surface as desired.
Step 4: Applying Mortar and Installing New CMU
With the new CMU blocks measured and cut, it’s time to begin the process of applying mortar and installing them into the existing opening. This step requires careful attention to detail and proper technique to ensure a secure and stable infilled section.
Start by applying a layer of mortar to the bottom of the opening using a trowel. This base layer will act as the foundation for the first row of CMU blocks. Spread the mortar evenly, ensuring full coverage and a thickness of about 3/8 to 1/2 inch.
Place the first CMU block gently onto the mortar bed, making sure it is aligned with the surrounding CMU wall and level both vertically and horizontally. Use a rubber mallet to tap the block firmly into place, ensuring a tight fit and proper adhesion with the mortar.
Continue applying mortar and installing the subsequent CMU blocks, working from the bottom up. As you stack the blocks, use a level to ensure they remain plumb and level. Adjust as necessary, tapping with the rubber mallet to achieve a snug fit and proper alignment.
Leave a small gap (about 3/8 inch) between the new CMU blocks and the existing surrounding CMU wall. This gap will be filled with mortar later to create a seamless transition.
As you progress, periodically check the alignment of the infilled section with the surrounding CMU wall for consistency and uniformity. Make any necessary adjustments to maintain a professional finish.
After installing each row of CMU blocks, apply mortar to the top surface before adding the next row. This will ensure a strong bond between the layers.
Continue this process until the opening is completely filled with the new CMU blocks. Remember to periodically check the vertical and horizontal alignment as you go.
Allow the mortar to cure as per the manufacturer’s instructions before proceeding to the next step.
By following proper mortar application techniques and ensuring precise installation of the new CMU blocks, you’ll achieve a solid and secure infilled section of the CMU wall. This step is integral to the overall stability and longevity of the structure.
Read more: What Are Infill Openings For Decks
Step 5: Finishing and Securing New CMU
After installing the new CMU blocks into the existing opening, it’s time to focus on finishing touches and securing the infilled section. This step involves applying mortar, addressing any visible gaps or spaces, and ensuring the integrity of the newly installed CMU.
Start by filling the gaps between the new CMU blocks and the existing surrounding CMU wall. Use a trowel to apply mortar to the gaps, making sure to fill them completely. Smooth out the mortar with the trowel to create a seamless transition between the infilled section and the existing wall.
If you notice any voids or spaces within the new CMU blocks, use additional mortar to fill them in. Use the trowel to pack the mortar into the voids, ensuring a solid and continuous surface.
When applying mortar, make sure to clean off any excess from the surface of the CMU blocks before it dries. This will help create a clean and professional finish.
Once the mortar is applied and the gaps are filled, inspect the infilled section for any loose or unstable CMU blocks. If you find any, remove them, clean off the mortar, and reinstall them, ensuring a tight fit and proper alignment.
Consider using reinforcing materials, such as steel bars or grout, to enhance the structural integrity of the infilled section. This can be particularly beneficial for larger openings or areas with significant load-bearing requirements. Consult with a structural engineer to determine the best reinforcement method for your specific project.
Allow the mortar to fully cure as per the manufacturer’s instructions before proceeding to the next step. This will ensure that the newly installed CMU blocks are securely held in place and ready for any additional finishing treatments.
By meticulously finishing the infilled section and securing the new CMU blocks, you’ll achieve a visually appealing and structurally sound result. Take your time to ensure that all gaps are filled, the mortar is applied correctly, and the CMU blocks are stable.
Step 6: Cleaning up and Inspecting the Work
As you near the completion of the infilling process, it’s time to focus on cleaning up the work area and conducting a thorough inspection of the newly infilled section. This final step ensures that the project is finished to a high standard and that all elements are in place for a successful result.
Start by cleaning off any excess mortar from the surface of the CMU blocks. Use a stiff brush or a trowel to gently scrape away any dried mortar. Be careful not to damage the newly installed CMU blocks while cleaning.
Next, conduct a visual inspection of the infilled section. Look for any signs of unevenness, gaps, or mortar inconsistencies. If you notice any issues, use a trowel to address them, filling in any gaps or correcting any imperfections.
Inspect the alignment of the newly infilled section with the surrounding CMU wall. Ensure that it remains level and plumb throughout. This will contribute to the overall aesthetic and integrity of the wall.
Check for any loose CMU blocks or areas where the mortar may have shifted during the installation process. If you detect any, reapply mortar and secure the blocks, ensuring that they are firmly in place.
Take the time to clean up the surrounding area. Sweep away any debris, dust, or excess mortar that may have accumulated during the infilling process.
Lastly, step back and visually assess the completed work. Admire the seamless integration of the new CMU blocks into the existing wall, appreciating the transformation and the accomplishment of a successful infilling project.
By thoroughly cleaning up the work area and conducting a detailed inspection, you’ll ensure that the infilled section is visually pleasing and structurally sound. This step emphasizes the importance of attention to detail and sets the stage for a long-lasting and visually appealing CMU wall.
Now that you've mastered infilling CMU openings, why not delve deeper into the world of construction? Our next read offers a thorough breakdown of infill construction, a technique central to modern building projects. This guide provides insights that could dramatically reshape your approach to renovation and new construction alike. Ideal for those curious about maximizing space and resources in urban settings, this article is a must-read!
Frequently Asked Questions about How To Infill Existing Opening Of CMU With New CMU
Was this page helpful?
At Storables.com, we guarantee accurate and reliable information. Our content, validated by Expert Board Contributors, is crafted following stringent Editorial Policies. We're committed to providing you with well-researched, expert-backed insights for all your informational needs.


0 thoughts on “How To Infill Existing Opening Of CMU With New CMU”