Home>Renovation & DIY>Home Renovation Guides>How To Add A Dormer To An Existing Roof
Home Renovation Guides
How To Add A Dormer To An Existing Roof
Modified: October 18, 2024
Learn how to add a dormer to your existing roof with our comprehensive home renovation guide. Get expert tips and advice for a successful project.
(Many of the links in this article redirect to a specific reviewed product. Your purchase of these products through affiliate links helps to generate commission for Storables.com, at no extra cost. Learn more)
Introduction
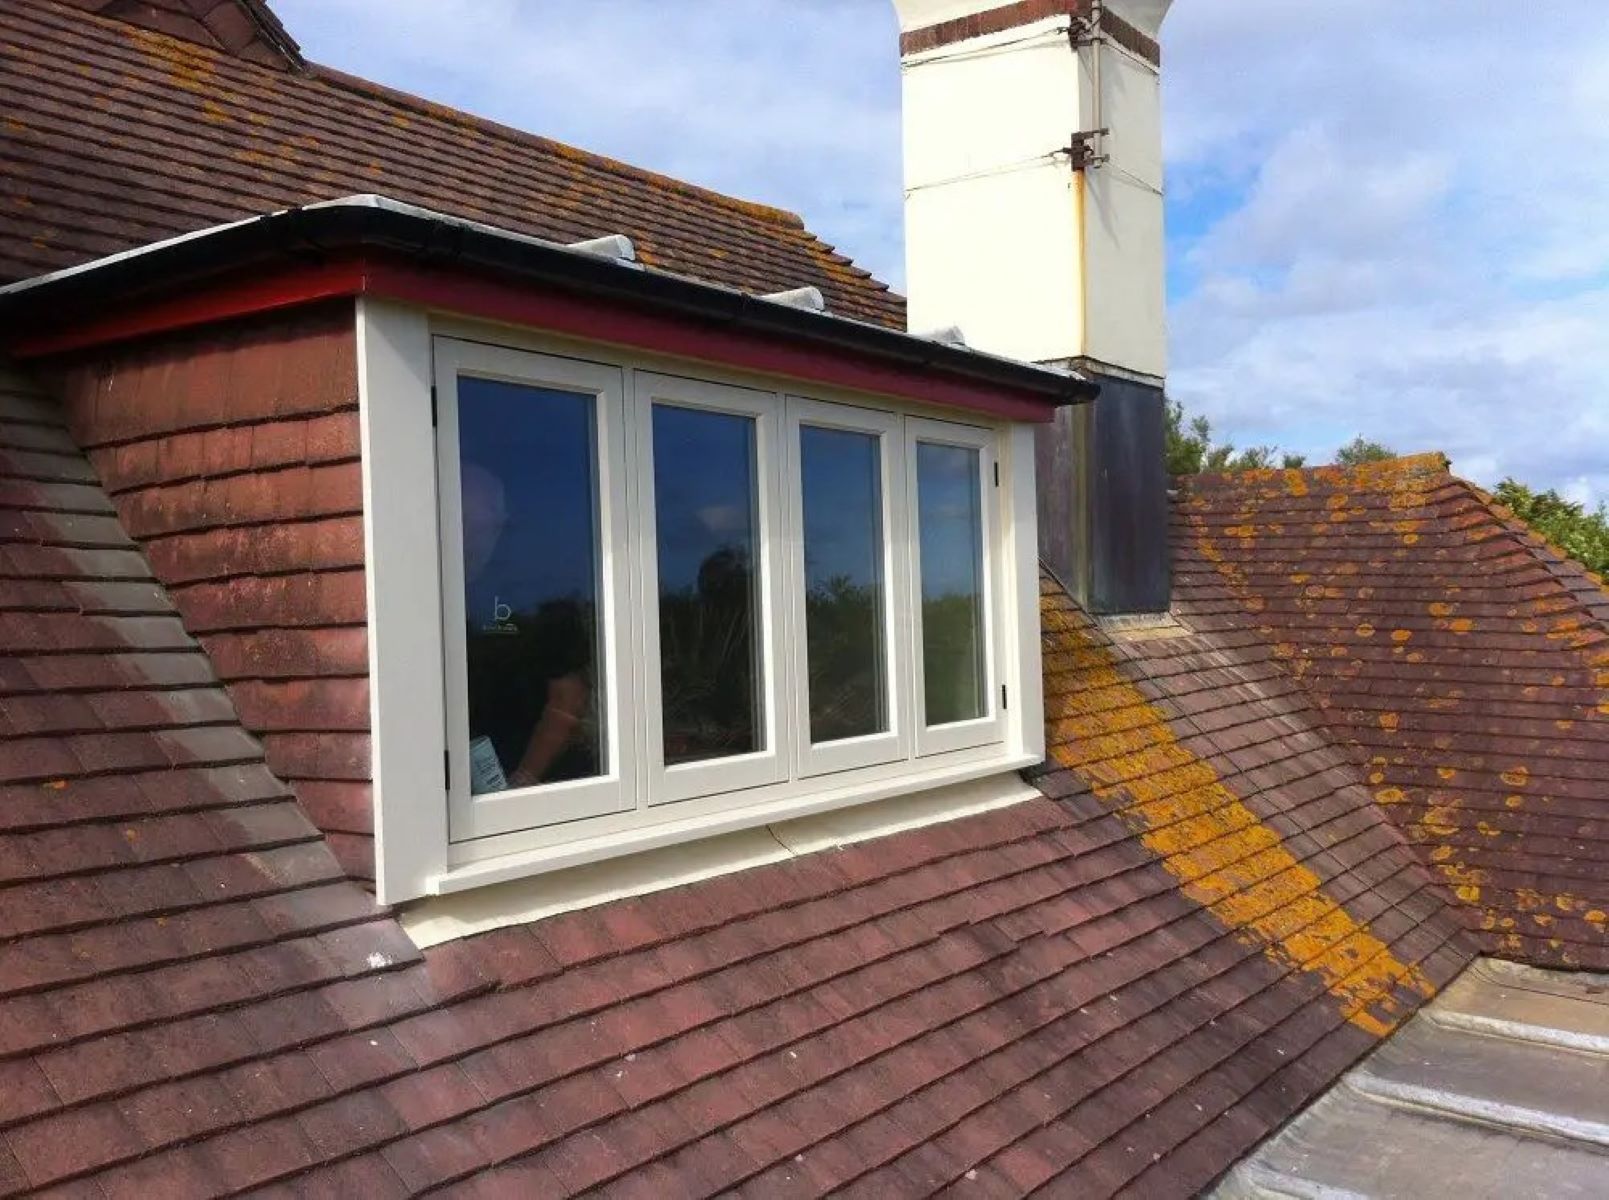
Adding a dormer to an existing roof is an excellent way to increase the usable space in your home while enhancing its aesthetic appeal. A dormer not only adds character to the exterior of the house but also floods the interior with natural light, creating a warm and inviting atmosphere. Whether you're looking to create a cozy reading nook, a spacious master suite, or a bright home office, a well-designed dormer can transform your living space.
The process of adding a dormer to an existing roof involves several crucial steps, from assessing the current roof structure to obtaining permits and executing the construction. Each stage requires careful planning, precise execution, and adherence to building codes and regulations. By understanding the intricacies of this undertaking, homeowners can ensure a successful and seamless integration of the dormer into their existing roof.
Throughout this guide, we will delve into the detailed process of adding a dormer to an existing roof, providing valuable insights and practical tips to help you navigate each phase with confidence. From evaluating the feasibility of a dormer addition to the final finishing touches, this comprehensive guide will equip you with the knowledge and understanding needed to undertake this home renovation project effectively.
As we embark on this journey, it's essential to approach the project with a clear vision and a thorough understanding of the structural and design considerations involved. By doing so, you can embark on this transformative endeavor with confidence, knowing that you are well-prepared to enhance your home with a beautifully crafted dormer addition.
Key Takeaways:
- Adding a dormer to your roof can increase space and natural light, but it requires careful planning, structural assessment, and adherence to building codes. Consult professionals and obtain permits for a successful integration.
- Designing, permitting, and constructing a dormer involves assessing the existing roof, creating a functional and visually appealing design, obtaining permits, and executing precise construction. Attention to detail and compliance are key for a successful dormer addition.
Read more: How To Add A Gable Roof To An Existing Roof
Assessing the Existing Roof
Before embarking on the process of adding a dormer to your existing roof, it is crucial to conduct a thorough assessment of the current roof structure. This initial step is essential for determining the feasibility of integrating a dormer and ensuring that the existing roof can support the additional weight and structural modifications.
Evaluating Roof Pitch and Style
Begin by assessing the pitch and style of your existing roof. The pitch, or slope, of the roof will influence the design and placement of the dormer. Additionally, consider the architectural style of your home, as the dormer should complement the overall aesthetic while seamlessly integrating into the existing roofline.
Identifying Roof Framing and Support
Examine the roof framing to identify the type of support structure in place. Understanding the existing framing, including the size and spacing of rafters or trusses, is crucial for determining how the dormer will be integrated and supported. It is essential to ensure that the roof can accommodate the additional weight of the dormer without compromising its structural integrity.
Assessing Attic Space and Accessibility
Evaluate the attic space to determine how the dormer will impact the interior layout. Consider the location of existing obstacles such as ductwork, wiring, or plumbing that may need to be repositioned to accommodate the dormer. Additionally, assess the accessibility of the attic for construction purposes, as creating the dormer will require interior access for framing and installation.
Examining Roofing Materials and Condition
Inspect the current roofing materials and assess their condition. Understanding the type of roofing material and its condition will inform decisions regarding the integration of the dormer, including matching or replacing roofing materials to ensure a seamless transition and weatherproofing.
Consulting with a Structural Engineer or Architect
Given the complexity of assessing the existing roof for a dormer addition, consulting with a structural engineer or architect is highly recommended. These professionals can provide valuable insights into the structural capacity of the existing roof, potential design options, and necessary modifications to ensure a successful dormer integration.
By thoroughly assessing the existing roof, homeowners can gain a comprehensive understanding of the structural, design, and logistical considerations involved in adding a dormer. This foundational knowledge will guide the subsequent stages of designing, permitting, and constructing the dormer, setting the stage for a well-informed and successful home renovation project.
Designing the Dormer
Designing the dormer is a pivotal stage in the process of adding this architectural feature to an existing roof. It involves meticulous planning and creative vision to ensure that the dormer not only enhances the exterior aesthetics of the home but also integrates seamlessly with the existing roof structure. Here's a detailed look at the essential aspects of designing a dormer:
Determining Dormer Style and Size
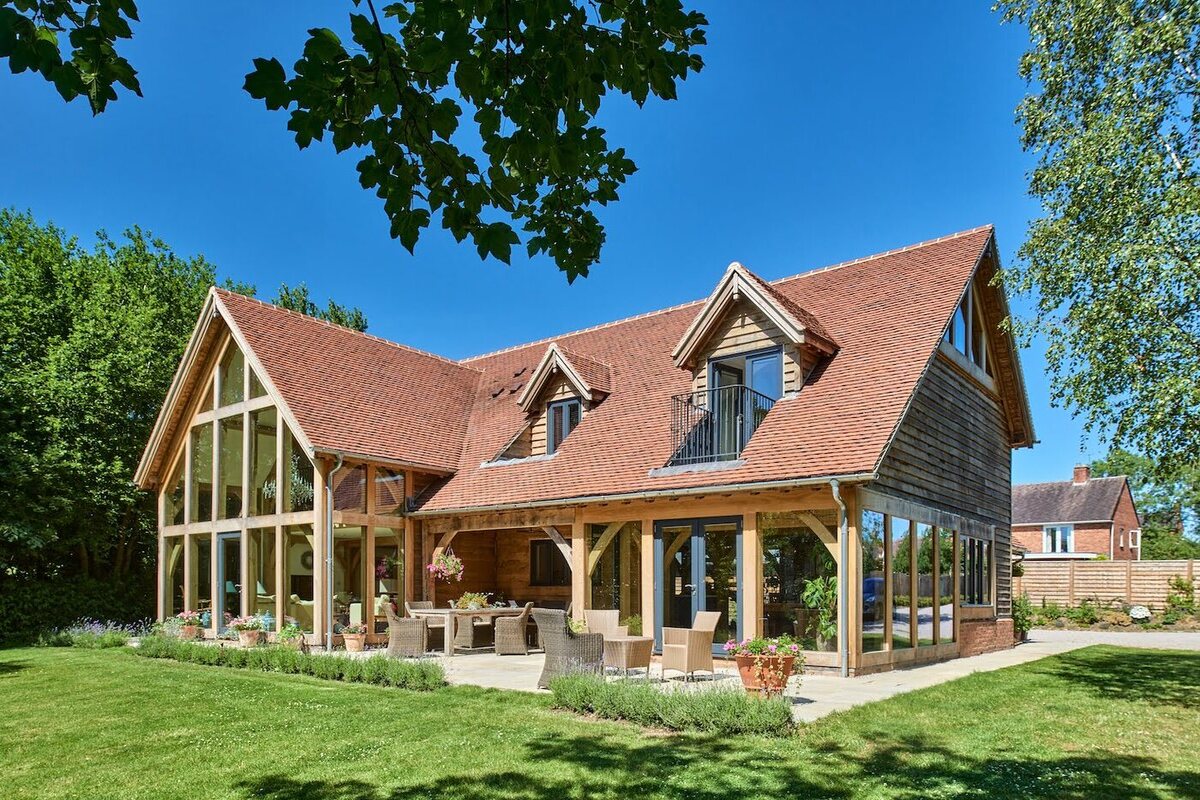
The first step in designing a dormer is to determine the style and size that best suits the overall architecture of the home. Whether opting for a shed, gable, hipped, or eyebrow dormer, it's crucial to consider how each style will harmonize with the existing roofline and contribute to the desired interior space. Additionally, the size of the dormer should be carefully calculated to maximize natural light and interior functionality while maintaining a proportional and balanced exterior appearance.
Read more: How To Tie A Shed Roof Into An Existing Roof
Assessing Interior Functionality
Consider the intended use of the space within the dormer when designing its layout. Whether creating a cozy window seat, a spacious reading nook, or an additional bedroom, the interior functionality should drive the design decisions. Factors such as headroom, window placement, and storage options must be carefully considered to optimize the usability and comfort of the space.
Integrating Architectural Details
Incorporating architectural details that complement the existing home is essential for a cohesive and visually appealing dormer design. This includes matching trim, siding, and roofing materials to seamlessly blend the dormer with the rest of the house. Attention to architectural details ensures that the dormer appears as a natural extension of the home rather than an abrupt addition.
Maximizing Natural Light
Strategic placement of windows within the dormer is crucial for maximizing natural light and ventilation. Designing the dormer to capture optimal sunlight throughout the day can significantly enhance the ambiance of the interior space. Additionally, selecting energy-efficient windows and considering the orientation of the dormer in relation to the sun's path can contribute to a comfortable and well-lit environment.
Considering Structural Support
The design of the dormer must account for the necessary structural support to ensure its stability and longevity. This involves integrating the dormer with the existing roof framing and implementing proper flashing and weatherproofing details to prevent water infiltration. Collaboration with a structural engineer or architect is advisable to ensure that the design aligns with structural requirements and building codes.
By carefully considering these aspects during the design phase, homeowners can create a dormer that not only enhances the architectural character of their home but also provides a functional and inviting space within. The design stage sets the foundation for a successful dormer addition, guiding the subsequent steps of obtaining permits, preparing the roof, and executing the construction with clarity and purpose.
Read more: How To Attach Shed Roof To Existing Roof
Obtaining Permits
Obtaining permits for adding a dormer to an existing roof is a critical step in the renovation process, ensuring compliance with local building codes and regulations. The specific requirements for permits may vary depending on the location and the scope of the project. Here's a detailed overview of the essential considerations when obtaining permits for a dormer addition:
Researching Local Regulations
Begin by researching the building codes and zoning regulations specific to your location. Municipalities often have specific guidelines governing the construction of dormers, including requirements related to setback distances, height restrictions, and architectural compatibility. Understanding these regulations is crucial for preparing the permit application and ensuring that the proposed dormer complies with local standards.
Preparing Permit Documentation
The permit application typically requires detailed documentation, including architectural drawings, structural plans, and specifications for the dormer addition. These documents should accurately depict the proposed design, structural modifications, and compliance with building codes. Working with a qualified architect or designer can facilitate the preparation of comprehensive permit documentation that aligns with regulatory requirements.
Engaging with Building Authorities
Engage with the local building authorities to discuss the permit application process and seek clarification on any specific requirements. Building officials can provide valuable guidance on the documentation needed for the permit application and may offer insights into potential challenges or considerations related to the dormer addition. Establishing open communication with the building authorities can streamline the permit acquisition process.
Read more: How To Add Onto An Existing Shed
Addressing Structural and Safety Standards
The permit application will undergo a thorough review to ensure that the proposed dormer meets structural and safety standards. This includes assessing the impact of the dormer addition on the existing roof structure, verifying compliance with load-bearing requirements, and confirming the integration of proper weatherproofing measures. Adhering to these standards is essential for obtaining approval and ensuring the long-term stability of the dormer.
Navigating Historic District Requirements
If the home is located within a designated historic district, additional considerations may apply when obtaining permits for a dormer addition. Preservation guidelines and architectural review boards within historic districts often have stringent requirements to preserve the character and integrity of the neighborhood. It is essential to navigate these regulations and seek approval for the dormer design that aligns with historic preservation standards.
Securing Permit Approval
Once the permit application is submitted, it will undergo a review process by the building authorities. This may involve inspections, plan revisions, or additional documentation requests to ensure compliance with all regulatory requirements. Upon successful review, the permit will be issued, granting authorization to proceed with the dormer addition in accordance with the approved plans.
By diligently navigating the permit acquisition process and ensuring compliance with building regulations, homeowners can embark on the dormer addition with confidence, knowing that the project aligns with legal and safety standards. Obtaining permits sets the stage for a well-executed and compliant construction phase, laying the groundwork for a successful integration of the dormer into the existing roof structure.
Preparing the Roof
Preparing the existing roof for the addition of a dormer is a crucial phase that sets the foundation for a seamless integration of the new architectural feature. This stage involves strategic planning, meticulous structural modifications, and precise execution to ensure that the roof is primed to accommodate the dormer with stability and weather resistance.
Read more: How To Frame A Shed Dormer Roof
Evaluating Roof Integrity
Before initiating any modifications, a comprehensive evaluation of the existing roof's integrity is essential. This includes assessing the condition of the roofing materials, identifying any areas of water damage or deterioration, and ensuring that the underlying structure is sound. Addressing any pre-existing issues with the roof is imperative to prevent future complications once the dormer is integrated.
Reinforcing Roof Structure
Depending on the design and size of the dormer, reinforcing the roof structure may be necessary to support the additional weight and modifications. This may involve adding new rafters, strengthening existing framing, or installing support beams to accommodate the dormer's load. Collaboration with a structural engineer is advisable to ensure that the roof reinforcement aligns with safety and structural requirements.
Creating Openings and Pathways
Preparing the roof for a dormer involves creating openings and pathways for the dormer's integration. This includes cutting through the existing roof to establish the footprint of the dormer, allowing for seamless connectivity between the new structure and the existing roof. Precise measurements and careful execution are essential to maintain the structural integrity and weatherproofing of the roof during this process.
Implementing Weatherproofing Measures
Weatherproofing the areas where the dormer will be integrated is a critical aspect of preparing the roof. This involves installing flashing, underlayment, and waterproof membranes to create a watertight seal between the dormer and the existing roof. Proper weatherproofing measures are essential to prevent water infiltration and ensure the long-term durability of the dormer addition.
Read more: How To Extend An Existing Patio Roof
Addressing Ventilation and Insulation
As the roof is prepared for the dormer addition, considerations for ventilation and insulation should be integrated into the planning. Ensuring adequate ventilation within the dormer space and optimizing insulation to maintain energy efficiency are essential for creating a comfortable and well-regulated interior environment. Proper ventilation and insulation contribute to the overall functionality and livability of the dormer space.
Securing Worksite Safety
Throughout the process of preparing the roof for the dormer addition, prioritizing worksite safety is paramount. This includes implementing fall protection measures, securing the work area to prevent debris from falling into the interior of the home, and adhering to safety protocols for working at heights. By maintaining a safe and organized worksite, the preparation phase can be executed with precision and care.
By meticulously preparing the roof for the dormer addition, homeowners can lay the groundwork for a successful and structurally sound integration of this architectural feature. This phase sets the stage for the subsequent framing, window installation, and roofing of the dormer, ensuring that the overall construction process unfolds with efficiency and precision.
Framing the Dormer
Framing the dormer is a pivotal phase in the process of adding this architectural feature to an existing roof. This stage involves the construction of the dormer's framework, which not only provides structural support but also defines the shape and character of the dormer. Here's a detailed look at the essential steps involved in framing the dormer:
Establishing the Dormer Layout
The first step in framing the dormer is to establish the layout on the existing roof. This involves transferring the precise dimensions and angles from the architectural plans to the roof surface, outlining the footprint of the dormer. Careful measurements and alignment are crucial to ensure the accurate positioning of the dormer within the existing roof structure.
Read more: How To Add Showerhead To An Existing Tub
Installing Dormer Framing Members
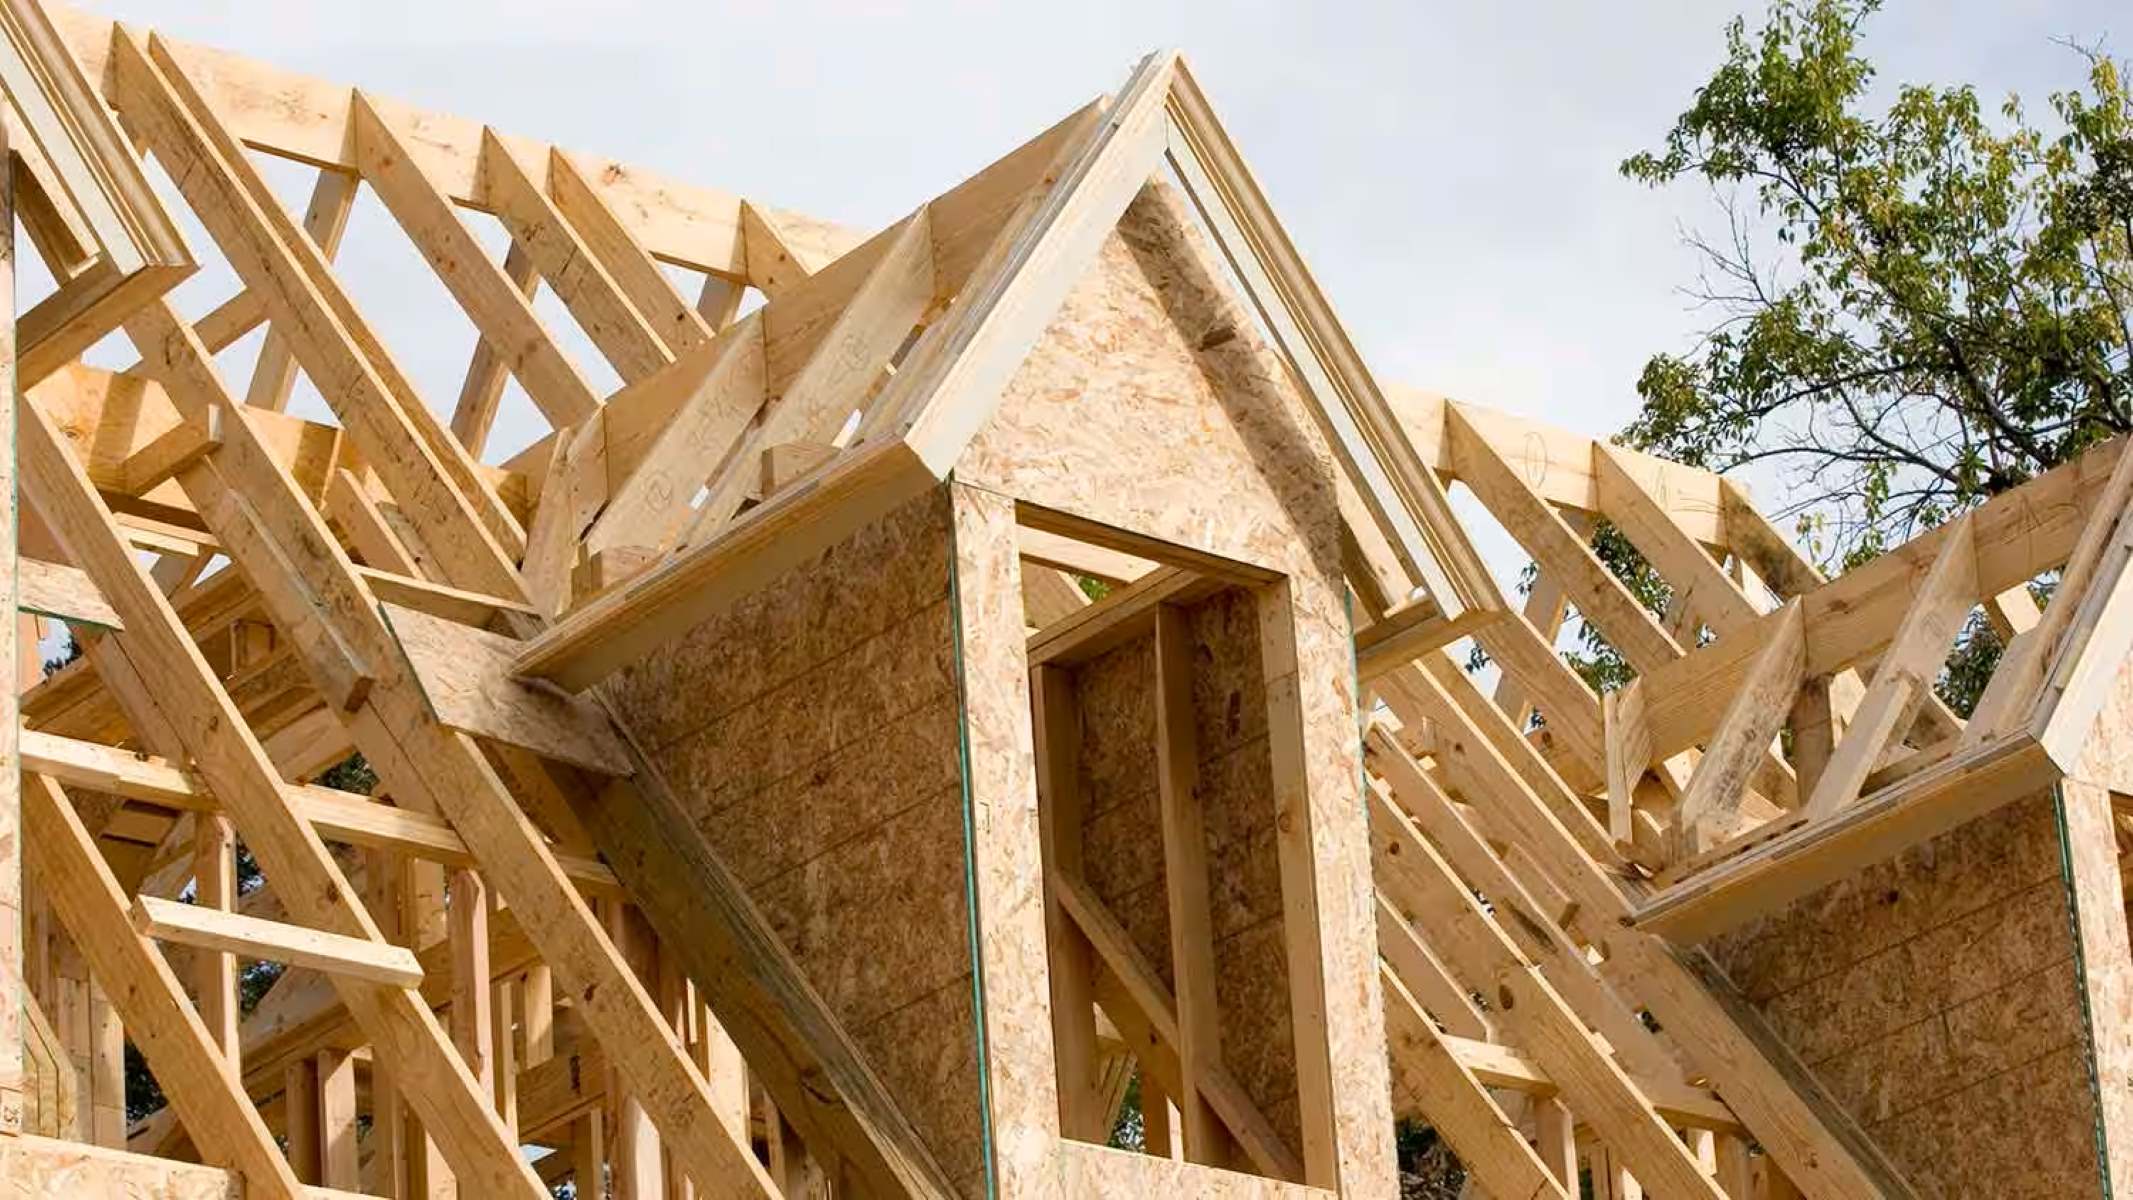
With the layout established, the next step is to install the framing members that will form the skeleton of the dormer. This includes constructing the walls, roof rafters, and floor joists, adhering to the specified dimensions and structural requirements. The framing members are meticulously positioned and secured to create a sturdy framework for the dormer.
Integrating Structural Support
Integrating structural support into the dormer framing is essential to ensure its stability and longevity. This may involve adding additional framing members, such as collar ties or ridge beams, to reinforce the dormer's structure and distribute the weight effectively. Collaboration with a structural engineer is advisable to verify that the framing aligns with safety and load-bearing standards.
Incorporating Window Openings
As part of the framing process, openings for windows are carefully integrated into the dormer walls. Precision is paramount in creating these openings to accommodate the specified window sizes and configurations. Proper framing around the window openings ensures a secure and weather-resistant installation of the windows within the dormer.
Addressing Roof Connection
The connection between the dormer roof and the existing roof is a critical aspect of the framing process. This junction must be meticulously framed and sealed to prevent water infiltration and ensure a seamless integration. Proper flashing and weatherproofing measures are implemented to create a watertight transition between the dormer roof and the existing roofing materials.
Read more: How To Add Wall Insulation To Existing Walls
Ensuring Code Compliance
Throughout the framing process, adherence to building codes and regulations is paramount. The framing must align with structural and safety standards, including load-bearing requirements, fire resistance, and overall structural integrity. Regular inspections and collaboration with building authorities can ensure that the dormer framing meets all necessary code specifications.
By meticulously executing the framing of the dormer, homeowners can lay the foundation for a structurally sound and visually appealing architectural addition. The framing phase sets the stage for the subsequent installation of windows, siding, and roofing, guiding the dormer construction toward its completion with precision and structural integrity.
Installing Windows and Siding
Installing windows and siding is a pivotal phase in the construction of a dormer, as it brings the architectural feature to life while enhancing its functionality and weather resistance. This stage involves the precise installation of windows to maximize natural light and ventilation within the dormer space, as well as the application of siding to seamlessly integrate the dormer with the existing exterior of the home.
Window Installation
The installation of windows within the dormer plays a crucial role in creating a well-lit and inviting interior space. Careful attention is given to the positioning and alignment of the windows to optimize views and natural light exposure. Energy-efficient windows are selected to enhance the thermal performance of the dormer, contributing to overall energy savings and interior comfort. Proper sealing and weatherproofing around the window openings are meticulously executed to prevent air and water infiltration, ensuring the durability and longevity of the dormer structure.
Siding Application
The application of siding to the exterior of the dormer is essential for achieving a cohesive and visually appealing integration with the existing home. Matching the siding materials, color, and texture to those of the original structure is paramount to create a seamless transition. Whether utilizing vinyl, wood, fiber cement, or other siding materials, precise installation techniques are employed to achieve a flawless exterior finish. Attention to detail is given to corner trims, soffits, and fascia to ensure a unified appearance that harmonizes with the overall architectural style of the home.
Weatherproofing and Finishing Touches
Throughout the window and siding installation process, a focus on weatherproofing measures is maintained to safeguard the dormer against the elements. Proper flashing, caulking, and sealing techniques are employed to create a watertight envelope around the windows and along the siding seams, preventing moisture intrusion and maintaining the structural integrity of the dormer. Additionally, finishing touches such as trim details, shutters, and decorative elements are added to enhance the aesthetic appeal of the dormer, contributing to its seamless integration with the existing exterior.
By meticulously executing the installation of windows and siding, homeowners can bring the dormer to its final stages of completion, creating a visually striking and functional addition to their home. The careful attention to detail and precision in this phase ensures that the dormer not only enhances the architectural character of the home but also provides a well-protected and inviting interior space for years to come.
Roofing the Dormer
Roofing the dormer is a critical phase in the construction process, marking the final stage of integrating this architectural feature into the existing roof structure. This phase involves the meticulous installation of roofing materials to ensure a seamless and weather-resistant transition between the dormer and the original roof. Here's a detailed look at the essential steps involved in roofing the dormer:
Selecting Roofing Materials
The first step in roofing the dormer is to select the appropriate roofing materials that align with the overall aesthetic of the home while providing durability and weather resistance. Whether opting for asphalt shingles, wood shakes, metal roofing, or other materials, careful consideration is given to color, texture, and compatibility with the existing roof. The selected roofing materials should seamlessly blend with the original roof while enhancing the visual appeal of the dormer.
Preparing the Roof Surface
Before installing the roofing materials, the roof surface of the dormer is meticulously prepared to ensure a secure and long-lasting application. This involves the installation of underlayment to provide an additional layer of protection against moisture and wind-driven rain. Proper underlayment installation is essential for safeguarding the dormer against water infiltration and optimizing the overall weatherproofing of the roof.
Read more: How To Add Grass Seed To Existing Lawn
Executing Roofing Installation
The installation of roofing materials onto the dormer roof is carried out with precision and attention to detail. Each shingle, shake, or metal panel is methodically positioned and secured to create a uniform and watertight roofing surface. Proper fastening techniques and alignment are crucial to achieve a seamless integration with the existing roof while maintaining the structural integrity of the dormer.
Implementing Flashing and Edging
The incorporation of flashing and edging details is essential to create a secure and weather-resistant junction between the dormer roof and the existing roof. Flashing is meticulously installed around roof penetrations, such as vents and chimneys, to prevent water intrusion. Additionally, edging materials are applied to the perimeter of the dormer roof to ensure a clean and finished appearance while enhancing the weatherproofing of the roof edges.
Ensuring Quality and Longevity
Throughout the roofing process, a focus on quality craftsmanship and attention to detail is maintained to ensure the longevity and performance of the dormer roof. Proper installation techniques, adherence to manufacturer specifications, and thorough inspections contribute to the overall durability and weather resistance of the roofing system. By prioritizing quality, homeowners can be confident in the reliability and longevity of their dormer roof.
By meticulously executing the roofing of the dormer, homeowners can bring this transformative architectural addition to its final stages of completion. The carefully selected and expertly installed roofing materials not only enhance the visual appeal of the home but also provide long-term protection and durability for the dormer structure. The roofing phase represents the culmination of the construction process, marking the successful integration of the dormer into the existing roof with precision and quality craftsmanship.
Finishing Touches
The phase of finishing touches represents the culmination of the dormer addition, marking the transition from construction to the realization of a fully integrated architectural feature. This stage encompasses a range of meticulous details and enhancements that elevate the visual appeal, functionality, and overall cohesiveness of the dormer within the existing home.
Read more: How To Add A Roof To A Deck
Exterior Trim and Molding
The addition of exterior trim and molding serves as a defining element that accentuates the architectural character of the dormer. Carefully selected trim profiles and molding designs are expertly installed to create a polished and refined exterior appearance. These details not only contribute to the aesthetic continuity with the original structure but also add a touch of elegance and sophistication to the dormer's exterior.
Decorative Accents
Incorporating decorative accents such as corbels, brackets, or ornamental details further enriches the visual impact of the dormer. These embellishments are strategically positioned to enhance the charm and individuality of the architectural feature, creating a focal point that captures attention and admiration. The thoughtful integration of decorative accents adds a layer of craftsmanship and artistry to the dormer's exterior, elevating its overall appeal.
Paint and Finishing
The application of paint and finishing touches to the exterior surfaces of the dormer ensures a seamless blend with the existing home while adding a layer of protection and durability. The selection of complementary colors and finishes harmonizes the dormer with the original exterior, creating a unified and harmonious visual composition. The meticulous application of paint and finishing materials reflects a commitment to quality and attention to detail, resulting in a polished and cohesive exterior presentation.
Interior Detailing
Attention to interior detailing within the dormer space contributes to its functionality and aesthetic allure. From the installation of baseboards and trim to the refinement of window casings and sills, every interior detail is meticulously executed to create a welcoming and well-finished interior environment. The integration of interior detailing reflects a dedication to creating a comfortable and visually appealing space within the dormer.
Read more: How Much Space Does A Shed Dormer Add
Landscaping Integration
The seamless integration of landscaping elements around the dormer further enhances its visual impact and connection to the surrounding environment. Thoughtful placement of plantings, hardscape features, and outdoor lighting complements the dormer's presence, creating a harmonious relationship between the architectural addition and the outdoor surroundings. The integration of landscaping elements adds depth and character to the overall presentation of the dormer, enriching its visual appeal.
By meticulously attending to these finishing touches, homeowners can elevate the dormer addition to its fullest potential, creating a seamless and captivating integration within the existing home. The culmination of these details reflects a commitment to craftsmanship, aesthetics, and overall excellence, resulting in a dormer that not only enhances the architectural character of the home but also stands as a testament to meticulous attention to detail and quality.
Ready to take your home's look to the next level after adding that stunning dormer? Dive into our guide on selecting the finest hardwood floors for home transformations. Whether you're refining a room's ambiance or boosting overall property value, the right flooring can make all the difference. Don't miss out on these expert insights for your renovation journey!
Frequently Asked Questions about How To Add A Dormer To An Existing Roof
Was this page helpful?
At Storables.com, we guarantee accurate and reliable information. Our content, validated by Expert Board Contributors, is crafted following stringent Editorial Policies. We're committed to providing you with well-researched, expert-backed insights for all your informational needs.
0 thoughts on “How To Add A Dormer To An Existing Roof”