Home>Gardening & Outdoor>Landscaping Ideas>How To Build A Shed Base On Grass
Landscaping Ideas
How To Build A Shed Base On Grass
Modified: October 18, 2024
Learn how to build a shed base on grass with our expert landscaping ideas. Create a sturdy foundation for your shed with our step-by-step guide.
(Many of the links in this article redirect to a specific reviewed product. Your purchase of these products through affiliate links helps to generate commission for Storables.com, at no extra cost. Learn more)
Introduction
Building a shed base on grass can be a rewarding and practical project for homeowners looking to create additional storage space or a functional outdoor workspace. Whether you plan to use the shed for gardening tools, outdoor equipment, or as a workshop, a sturdy and level base is essential for the structure's stability and longevity.
Constructing a shed base on grass requires careful planning, precise measurements, and the right materials and tools. By following a systematic approach, you can ensure that the shed base is solid, durable, and capable of withstanding the elements.
In this comprehensive guide, we will walk you through the step-by-step process of building a shed base on grass, from gathering the necessary materials and tools to securing the base in place. Whether you're a seasoned DIY enthusiast or a novice looking to take on a new project, this guide will provide you with the knowledge and confidence to create a reliable foundation for your shed.
By the end of this article, you will have a clear understanding of the essential steps involved in building a shed base on grass, empowering you to tackle this project with precision and skill. So, roll up your sleeves, gather your tools, and let's dive into the process of creating a solid and stable foundation for your outdoor shed.
Key Takeaways:
- Building a shed base on grass requires careful planning, precise measurements, and the right materials and tools. By following a systematic approach, homeowners can create a reliable foundation for their shed, ensuring stability and longevity.
- Meticulous steps, from gathering materials to securing the base, culminate in a stable and durable foundation for a shed. This DIY project offers a sense of accomplishment and satisfaction, providing a reliable and enduring structure for years to come.
Read more: How To Build A Base For A Shed
Step 1: Gather the necessary materials and tools
Before embarking on the journey of building a shed base on grass, it's crucial to gather all the essential materials and tools to ensure a smooth and efficient construction process. Here's a comprehensive list of what you'll need:
Materials:
- Pressure-Treated Lumber: This will serve as the primary material for constructing the base frame. Opt for high-quality, pressure-treated lumber to withstand moisture and prevent rot over time.
- Gravel or Crushed Stone: A layer of gravel or crushed stone will provide drainage and stability for the shed base, preventing water accumulation and potential damage to the structure.
- Plywood or Concrete Slabs: Depending on your preference, you can choose either plywood or concrete slabs to create the shed floor. Both options offer durability and support for the shed's contents.
- Landscape Fabric: This will act as a barrier to prevent weed growth and maintain a tidy appearance around the shed base.
- Galvanized Nails or Screws: These corrosion-resistant fasteners will securely join the lumber components, ensuring the structural integrity of the shed base.
- Wood Treatment or Sealant: Applying a wood treatment or sealant to the lumber will enhance its resistance to moisture, prolonging its lifespan and preserving its structural strength.
Tools:
- Tape Measure: Accurate measurements are essential for ensuring the shed base's dimensions align with the shed's requirements.
- Level: A level will help you confirm that the shed base is even and properly aligned, preventing potential structural issues.
- Hammer or Screwdriver: Depending on the fasteners you choose, a hammer or screwdriver will be necessary for securing the lumber and other components.
- Shovel or Spade: These tools are essential for excavating the grass and soil to prepare the ground for the shed base.
- Wheelbarrow: A wheelbarrow will be useful for transporting gravel or crushed stone to the construction site, streamlining the process.
- Work Gloves and Safety Goggles: Prioritize safety by wearing work gloves and safety goggles to protect your hands and eyes during construction.
By ensuring you have all the necessary materials and tools at your disposal, you'll be well-prepared to proceed with the subsequent steps of measuring, preparing, and constructing the shed base on grass. With careful planning and attention to detail, you can set the stage for a successful and enduring shed base that meets your storage and functional needs.
Step 2: Measure and mark the area
Before commencing the construction of a shed base on grass, it is imperative to accurately measure and mark the designated area where the shed will be situated. This crucial step lays the foundation for a well-fitted and structurally sound base. Here's a detailed breakdown of the process:
Read more: How To Build A Wood Base For A Shed
Measuring the Area:
Begin by using a tape measure to determine the precise dimensions of the shed's base area. Ensure that the measurements align with the shed's size requirements, allowing for a slight buffer to accommodate the base's frame and any potential adjustments. Accuracy at this stage is paramount, as it sets the stage for the subsequent construction phases.
Marking the Boundaries:
Once the measurements are confirmed, use wooden stakes or marking spray to outline the boundaries of the shed base on the grass. Placing stakes at each corner of the designated area provides a clear visual guide for the construction process. It's essential to double-check the alignment and squareness of the marked boundaries to avoid any discrepancies during the subsequent stages.
Verifying the Alignment:
After marking the boundaries, use a tape measure to verify that the diagonals of the marked area are equal in length. This step ensures that the shed base will be square and properly aligned, preventing potential issues with the shed's structure and stability. Adjust the position of the stakes if necessary to achieve perfect alignment.
Assessing the Ground:
While measuring and marking the area, take note of the ground's natural slope and any potential unevenness. This observation will inform the subsequent steps of ground preparation and base construction, allowing for adjustments to ensure a level and stable foundation for the shed.
By meticulously measuring and marking the area, you establish a solid framework for the subsequent stages of preparing the ground and constructing the shed base. This attention to detail sets the stage for a successful and durable foundation, ensuring that the shed will stand securely on the grass for years to come.
Read more: How To Build A Shed Base With Paving Slabs
Step 3: Prepare the ground
Preparing the ground is a critical phase in the construction of a shed base on grass, as it sets the stage for a stable and long-lasting foundation. This step involves clearing the grass and soil, addressing any unevenness, and creating a suitable base for the shed. Here's a detailed breakdown of the ground preparation process:
Clearing the Vegetation:
Begin by clearing the grass and vegetation from the marked area using a shovel or spade. Remove any debris, rocks, or roots that could obstruct the construction of the shed base. It's essential to create a clean and level surface to ensure the stability and integrity of the base.
Addressing the Soil:
Assess the quality of the soil within the designated area. If the soil is compacted or uneven, consider using a garden tiller or a soil cultivator to loosen the soil and improve its consistency. This step promotes better drainage and prevents potential issues with ground settlement over time.
Leveling the Ground:
Using a long piece of lumber or a straight board, carefully assess the levelness of the ground. Identify any areas that require additional attention and use a shovel to redistribute the soil as needed. The goal is to achieve a uniformly level surface to support the shed base effectively.
Read more: How To Level A Shed Base
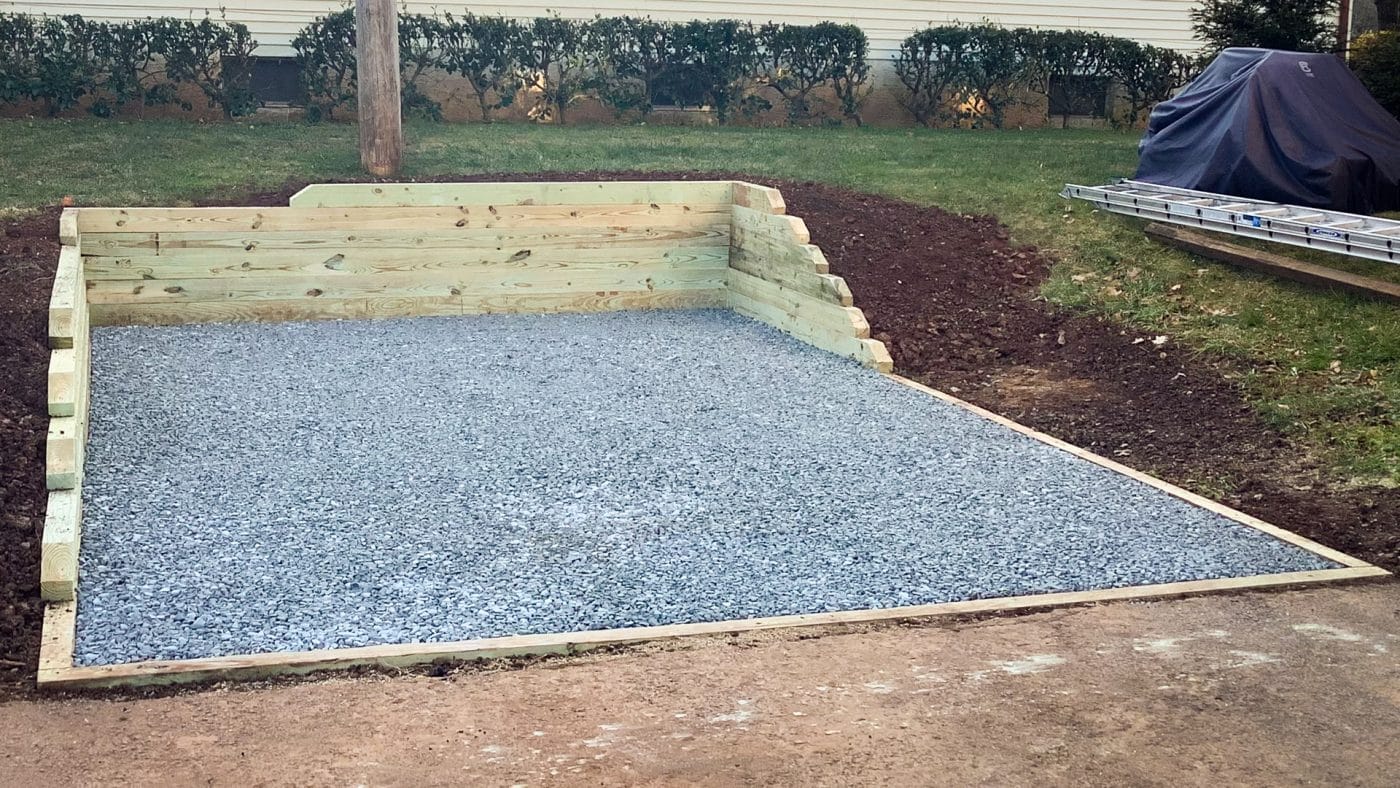
Adding a Layer of Gravel:
To enhance drainage and provide a stable base for the shed, spread a layer of gravel or crushed stone over the prepared ground. The gravel layer should be leveled and compacted to create a solid and even surface. This step is crucial for preventing water accumulation and ensuring the longevity of the shed base.
Installing Landscape Fabric:
Lay landscape fabric over the layer of gravel to inhibit weed growth and maintain a tidy appearance around the shed base. The fabric acts as a barrier, preventing unwanted vegetation from encroaching on the base and simplifying maintenance in the long run.
By meticulously preparing the ground, you establish a solid foundation for the subsequent construction of the shed base. This thorough groundwork ensures that the shed will have a stable and durable footing, capable of withstanding the elements and providing reliable support for the structure.
Step 4: Lay the foundation
With the ground meticulously prepared, the next pivotal step in building a shed base on grass is laying the foundation. This phase involves constructing the base frame using pressure-treated lumber, ensuring structural integrity and stability for the shed. Here's a detailed exploration of the foundation laying process:
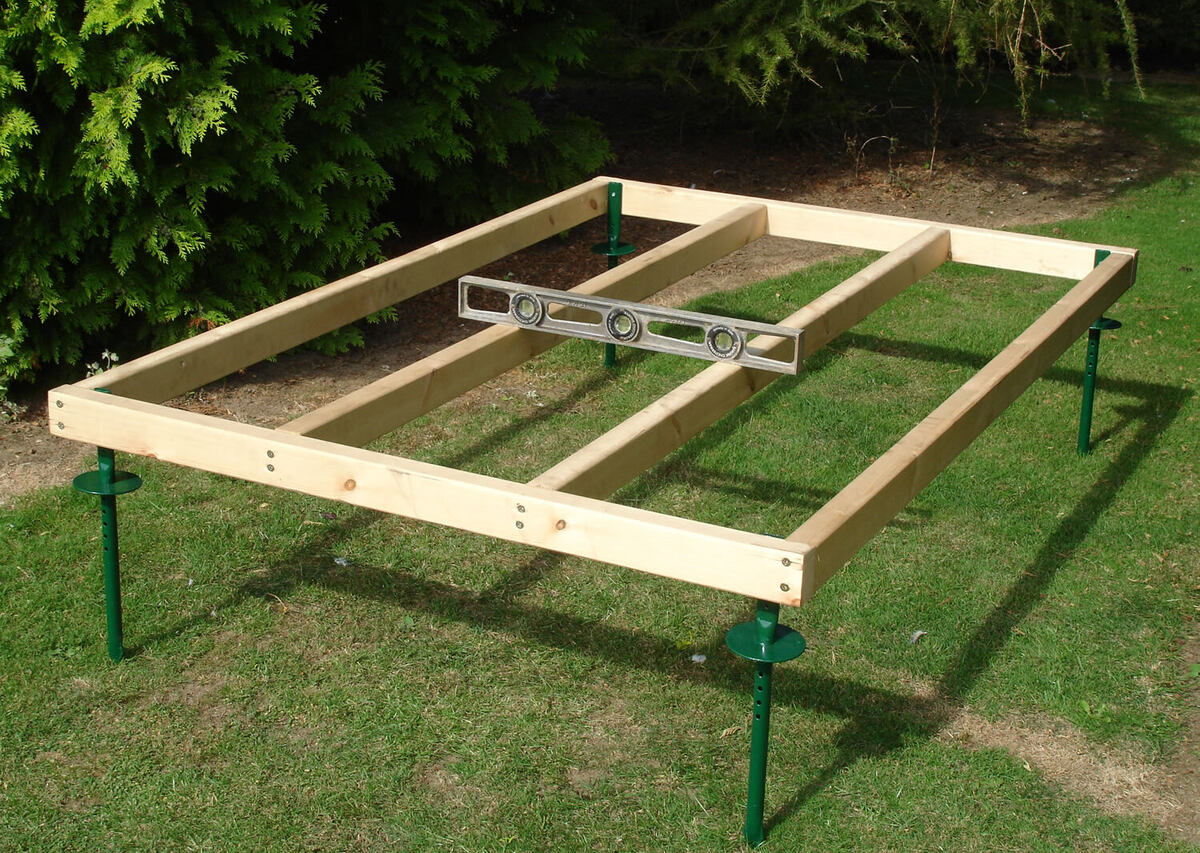
Constructing the Base Frame:
Begin by assembling the base frame using pressure-treated lumber cut to the precise dimensions of the shed base. The frame should align with the marked boundaries, providing a solid perimeter for the shed's floor. Utilize galvanized nails or screws to securely join the lumber components, reinforcing the frame's strength and durability.
Read more: How To Build Cabinet Base
Positioning the Floor Support:
Within the base frame, position additional lumber pieces horizontally to serve as floor supports. These supports will uphold the shed's flooring material, whether it's plywood or concrete slabs. Ensure the supports are evenly spaced to distribute the weight of the shed's contents and promote structural stability.
Installing the Flooring Material:
Depending on your preference, install either plywood or concrete slabs atop the floor supports to create the shed's floor. Secure the flooring material to the supports using appropriate fasteners, guaranteeing a solid and level surface for the shed's interior. The choice between plywood and concrete slabs depends on factors such as personal preference, budget, and intended use of the shed.
Applying Wood Treatment or Sealant:
Prior to proceeding further, apply a wood treatment or sealant to the pressure-treated lumber components. This crucial step enhances the lumber's resistance to moisture, decay, and insect damage, prolonging its lifespan and fortifying the shed base against environmental elements.
Verifying Alignment and Levelness:
Throughout the foundation laying process, consistently verify the alignment and levelness of the base frame and flooring material. Utilize a level to confirm that the base is even and properly aligned, rectifying any discrepancies promptly. A precisely constructed foundation is essential for the shed's structural integrity and long-term stability.
By meticulously laying the foundation, you establish a robust and reliable base for the shed, ensuring that it will withstand the test of time and provide a secure space for storage or work. This phase sets the stage for the subsequent steps of leveling the base and securing it in place, bringing the vision of a functional and durable shed closer to reality.
Read more: What Type Of Gravel For A Shed Base
Step 5: Level the base
Achieving a level base is a critical aspect of building a shed foundation on grass. A level base not only ensures the structural integrity of the shed but also facilitates the proper functioning of doors, windows, and other components. Here's a detailed exploration of the process of leveling the base:
Assessing the Base
Begin by thoroughly assessing the base to identify any areas that require leveling. Utilize a long piece of lumber or a straight board to gauge the evenness of the base. Pay close attention to any discrepancies or uneven spots that may impact the shed's stability and functionality.
Adjusting the Base
If uneven areas are detected, use additional gravel or crushed stone to fill in low spots and create a uniform surface. A shovel or rake can be employed to distribute the material evenly and achieve the desired levelness. It's essential to take a meticulous approach, ensuring that the entire base is consistently level from all vantage points.
Verifying the Levelness
After making adjustments, verify the levelness of the base using a reliable spirit level. Place the level at various points across the base, including the corners and the center, to confirm that the surface is uniformly level. Address any remaining unevenness promptly to guarantee a solid and stable foundation for the shed.
Read more: How Build A Shed
Fine-Tuning the Base
In some instances, fine adjustments may be necessary to achieve precise levelness. This may involve redistributing gravel, compacting the base, or adding small increments of material to achieve the desired level. Patience and attention to detail are crucial during this phase to ensure a flawless base for the shed.
Ensuring Long-Term Stability
A level base not only provides immediate benefits but also contributes to the long-term stability and durability of the shed. By investing time and effort in leveling the base, you lay the groundwork for a reliable structure that can withstand the rigors of time and environmental factors.
By meticulously leveling the base, you ensure that the shed will stand on a solid and stable foundation, ready to fulfill its intended purpose for years to come. This meticulous attention to detail sets the stage for the final step of securing the base in place, bringing the vision of a functional and enduring shed closer to realization.
Step 6: Secure the base
Securing the shed base is the final crucial step in the process of building a shed foundation on grass. This phase involves anchoring the base to the ground, ensuring its stability and resistance to shifting or displacement. Here's a detailed exploration of the process of securing the base:
Anchoring the Base to the Ground
Begin by securing the base to the ground using ground anchors or stakes. These anchors are driven into the soil at strategic points along the perimeter of the base, effectively tethering it to the ground. The use of galvanized or stainless-steel ground anchors provides enhanced resistance to corrosion, ensuring long-term durability.
Read more: How To Build A Base For A Hot Tub
Ensuring Structural Stability
The anchoring process significantly enhances the shed base's structural stability, especially in regions prone to strong winds or inclement weather. By firmly securing the base to the ground, you mitigate the risk of displacement and ensure that the shed remains steadfast in its position, providing reliable protection for its contents.
Verifying the Anchoring Points
Carefully verify the placement and alignment of the ground anchors to guarantee uniform support and stability. The anchors should be positioned at consistent intervals along the base perimeter, creating a balanced and robust anchoring system. This meticulous approach ensures that the entire base is effectively secured, leaving no area vulnerable to potential movement.
Tensioning the Anchors
After positioning the ground anchors, tension them securely to establish a taut connection between the base and the ground. This tensioning process reinforces the anchoring system, fortifying the shed base against lateral forces and ensuring its resilience in the face of external pressures. Proper tensioning is essential for maximizing the effectiveness of the anchoring system.
Final Inspection
Conduct a comprehensive inspection of the secured base, verifying the integrity of the anchoring system and confirming the base's resistance to movement. This final assessment provides assurance that the shed base is firmly anchored and prepared to withstand various environmental conditions, providing a secure and reliable foundation for the shed.
By meticulously securing the base, you ensure that the shed will stand on a solid and stable foundation, ready to fulfill its intended purpose for years to come. This meticulous attention to detail sets the stage for the realization of a functional and enduring shed, capable of withstanding the test of time.
Read more: How To Build A Shed
Conclusion
In conclusion, the process of building a shed base on grass encompasses a series of meticulous steps that culminate in the creation of a stable, durable, and reliable foundation for a shed. From the initial gathering of materials and tools to the final step of securing the base, each phase plays a pivotal role in ensuring the structural integrity and longevity of the shed. By adhering to a systematic approach and paying close attention to detail, homeowners can embark on this DIY project with confidence, knowing that they are creating a solid and functional space for storage, work, or leisure activities.
The careful measurement and marking of the area set the stage for precise construction, ensuring that the shed base aligns with the intended dimensions and provides ample space for the shed's contents. Ground preparation, including clearing vegetation, leveling the ground, and adding a layer of gravel, creates a stable and well-drained surface, essential for the shed's longevity. The meticulous process of laying the foundation, including constructing the base frame, positioning floor supports, and installing the flooring material, establishes a robust and reliable base for the shed.
Leveling the base is a critical step that ensures the shed will stand on a solid and even foundation, facilitating proper functionality and structural stability. Finally, securing the base to the ground through the use of ground anchors or stakes fortifies the entire structure, providing resistance to displacement and ensuring the shed remains steadfast in various environmental conditions.
By following these comprehensive steps, homeowners can create a shed base on grass that not only meets their immediate storage or workspace needs but also stands the test of time, providing a reliable and enduring structure for years to come. This DIY project offers a sense of accomplishment and the satisfaction of knowing that a functional and practical space has been created through careful planning, precise execution, and attention to detail.
Whether the shed serves as a storage solution for gardening tools, outdoor equipment, or a dedicated workspace for DIY projects, the solid foundation laid on the grass sets the stage for a versatile and valuable addition to the outdoor space. With the shed base in place, homeowners can look forward to enjoying the benefits of a well-organized and functional outdoor area, tailored to their specific needs and preferences.
Frequently Asked Questions about How To Build A Shed Base On Grass
Was this page helpful?
At Storables.com, we guarantee accurate and reliable information. Our content, validated by Expert Board Contributors, is crafted following stringent Editorial Policies. We're committed to providing you with well-researched, expert-backed insights for all your informational needs.


0 thoughts on “How To Build A Shed Base On Grass”