Home>Gardening & Outdoor>Outdoor Entertaining>How To Build A Wooden Picnic Table
Outdoor Entertaining
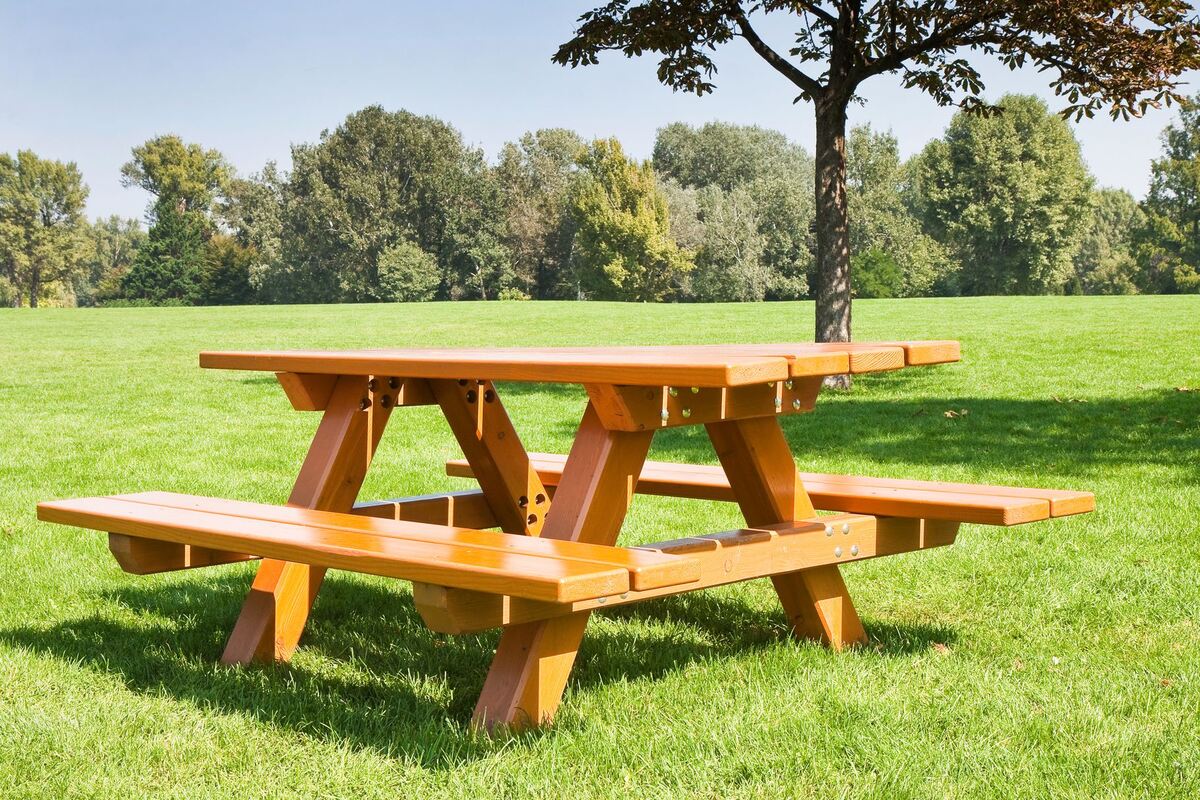
How To Build A Wooden Picnic Table
Modified: February 18, 2024
Learn how to build a sturdy and stylish wooden picnic table for your outdoor entertaining needs. Follow our step-by-step guide for a perfect addition to your outdoor space.
(Many of the links in this article redirect to a specific reviewed product. Your purchase of these products through affiliate links helps to generate commission for Storables.com, at no extra cost. Learn more)
Introduction
When the warm weather arrives, there's nothing quite like dining al fresco with family and friends. And what better way to enjoy a meal outdoors than around a classic wooden picnic table? Building your own wooden picnic table is not only a rewarding DIY project, but it also adds a charming and functional centerpiece to your outdoor entertaining space.
Whether you're hosting a summer barbecue, a casual gathering, or simply seeking a peaceful spot to enjoy a cup of coffee in the morning sunshine, a well-crafted picnic table provides the perfect setting. In this comprehensive guide, we'll walk you through the step-by-step process of building a sturdy and stylish wooden picnic table that will become a beloved fixture in your outdoor oasis.
From selecting the right materials and tools to cutting and assembling the wood with precision, we'll cover everything you need to know to create a beautiful and durable picnic table. With a little creativity, patience, and the willingness to get your hands dirty, you can craft a custom picnic table that suits your space and reflects your personal style.
So, roll up your sleeves, gather your tools, and let's embark on this woodworking adventure together. By the end of this guide, you'll not only have a stunning picnic table to show for your efforts but also the satisfaction of having built it with your own two hands. Let's get started!
Key Takeaways:
- Building a wooden picnic table is a fun and rewarding DIY project that adds charm and functionality to your outdoor space. With the right materials and tools, precise cutting, and careful assembly, you can create a durable and inviting centerpiece for outdoor entertaining.
- Sanding and finishing your picnic table not only enhances its appearance but also protects the wood from outdoor elements. By applying a weather-resistant finish, you can ensure that your handcrafted table remains beautiful and functional for years to come, ready to host countless memorable gatherings.
Read more: How To Build A Picnic Style Dining Table
Materials and Tools
Before diving into the construction process, it’s crucial to gather all the necessary materials and tools. Here’s what you’ll need to build a wooden picnic table:
Materials:
- Pressure-treated lumber (typically 2x4s and 2x6s) for the tabletop, seats, and frame
- Galvanized or stainless steel screws
- Wood glue
- Wood stain or outdoor-grade paint for finishing
- Weather-resistant sealer or varnish
- Sandpaper (medium and fine grit)
Tools:
- Tape measure
- Circular saw or miter saw for cutting the lumber
- Cordless drill with screwdriver bits
- Clamps to hold the wood in place during assembly
- Square for ensuring precise angles
- Sandpaper or electric sander for smoothing the wood
- Paintbrushes or a paint sprayer for applying finish
- Safety goggles and ear protection
It’s important to use pressure-treated lumber to withstand outdoor conditions and resist decay. Additionally, opting for galvanized or stainless steel screws helps prevent rust, ensuring the table’s longevity. When selecting wood stain or paint, choose products specifically designed for exterior use to shield the picnic table from the elements.
Before starting the project, double-check that you have all the materials and tools on hand. This preparation will streamline the construction process and minimize interruptions, allowing you to focus on bringing your vision of a beautiful picnic table to life.
Cutting the Wood
Once you’ve gathered the necessary materials and tools, it’s time to embark on the initial phase of constructing your wooden picnic table: cutting the wood to the required dimensions. Precise measurements and accurate cuts are essential to ensure a sturdy and visually appealing finished product.
Begin by carefully measuring and marking the lumber according to the dimensions of the tabletop, seats, and frame. A tape measure and square will be invaluable in achieving accurate measurements and angles. Whether using a circular saw or miter saw, prioritize safety by wearing goggles and ear protection while cutting the wood.
For the tabletop and seats, 2×6 boards are commonly used to provide ample surface area and structural support. The frame and legs are typically crafted from 2×4 lumber, chosen for its strength and stability. When cutting the wood, pay close attention to the angles and lengths specified in your chosen picnic table plans or design.
It’s important to approach the cutting process methodically, ensuring that each piece of lumber is precisely sized and shaped. Take your time and double-check measurements before making any cuts. Remember, the old adage “measure twice, cut once” rings especially true in woodworking.
As you work through the cutting phase, organize the cut pieces by section and label them accordingly. This organization will streamline the assembly process and prevent confusion later on. Additionally, keep track of any offcuts or scrap pieces that may come in handy for bracing, reinforcement, or future projects.
By the time the cutting stage is complete, you should have a stack of precisely cut lumber ready for the next phase: assembling the tabletop and crafting the table’s legs and frame. With careful attention to detail during the cutting process, you’ll set the stage for a smooth and satisfying construction journey as your wooden picnic table begins to take shape.
Read more: How To Clean A Wooden Picnic Table
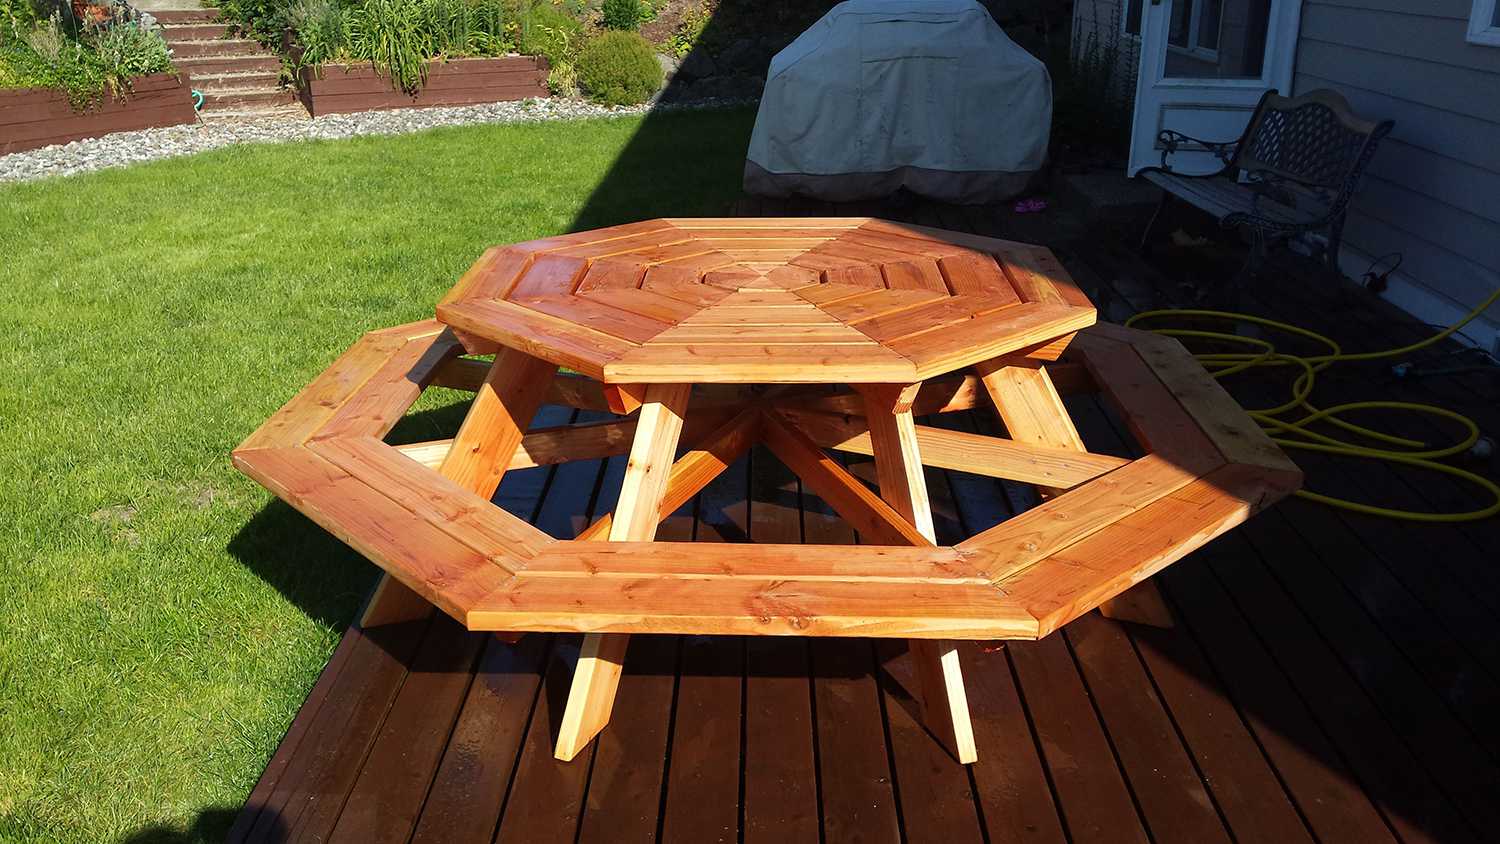
Assembling the Tabletop
With the wood cut to the required dimensions, it’s time to move on to assembling the tabletop, a critical element of your wooden picnic table. The tabletop serves as the focal point for dining and socializing, so precision and sturdy construction are paramount.
Begin by laying out the 2×6 boards that will form the tabletop, arranging them side by side on a flat, level surface. Ensure that the boards are aligned evenly with no gaps between them. Next, use clamps to hold the boards together securely, maintaining their alignment during assembly.
Once the boards are clamped in place, apply wood glue along the edges where the boards meet. This adhesive will enhance the tabletop’s strength and stability by bonding the individual boards together. After applying the glue, use a drill and screws to secure the boards, driving the screws through the tabletop’s underside at regular intervals to create a strong bond.
When attaching the boards, it’s essential to space the screws evenly and maintain consistent alignment to achieve a uniform and visually appealing tabletop. Additionally, be mindful of the screw length to avoid protruding through the tabletop’s surface, which could detract from its aesthetic and pose a safety hazard.
Once the boards are securely fastened, remove the clamps and flip the tabletop over to inspect the finished surface. Use a straight edge or level to ensure the tabletop is flat and even. Any minor irregularities can be addressed by sanding the surface lightly to achieve a smooth and uniform finish.
With the tabletop assembled and inspected, you’ve reached a significant milestone in the construction of your wooden picnic table. The well-crafted tabletop sets the stage for enjoyable outdoor gatherings and dining experiences. Next, you’ll transition to building the legs and frame, bringing your vision of a sturdy and inviting picnic table one step closer to reality.
Building the Legs and Frame
As you progress in constructing your wooden picnic table, the next crucial step is crafting the legs and frame. These components provide essential support and stability, ensuring that the table can accommodate gatherings and withstand the rigors of outdoor use.
Begin by cutting the 2×4 lumber to the specified lengths for the table’s legs and frame components. Using a square to ensure precise angles, assemble the legs by affixing the shorter crosspieces between the longer vertical pieces. This creates sturdy, box-like structures that will form the foundation of the table.
Once the legs are assembled, turn your attention to constructing the frame that will support the tabletop. This typically involves connecting the longer 2×4 pieces to form a rectangular outline that mirrors the dimensions of the tabletop. The frame serves as a crucial structural element, providing stability and distributing the weight of the tabletop and seated guests.
When assembling the frame, take care to align the corners squarely and securely fasten the joints using screws and wood glue. This ensures that the frame maintains its shape and structural integrity over time. Additionally, reinforce the frame with diagonal braces to enhance its stability and resistance to lateral forces.
As you work through the process of building the legs and frame, periodically check the components for squareness and alignment to guarantee that the table will sit level and stable on uneven outdoor surfaces. This attention to detail during assembly will contribute to the table’s overall durability and functionality.
By the time the legs and frame are fully assembled, you’ll have created the foundational structure for your wooden picnic table. The sturdy legs and well-constructed frame set the stage for the final phase of assembly, bringing the tabletop and base together to form a cohesive and inviting outdoor dining centerpiece.
With the legs and frame completed, you’re ready to proceed to the next step: attaching the legs to the tabletop, uniting the various components into a cohesive and functional picnic table.
When building a wooden picnic table, make sure to use weather-resistant wood such as cedar or pressure-treated lumber to ensure durability and longevity of the table, especially if it will be used outdoors.
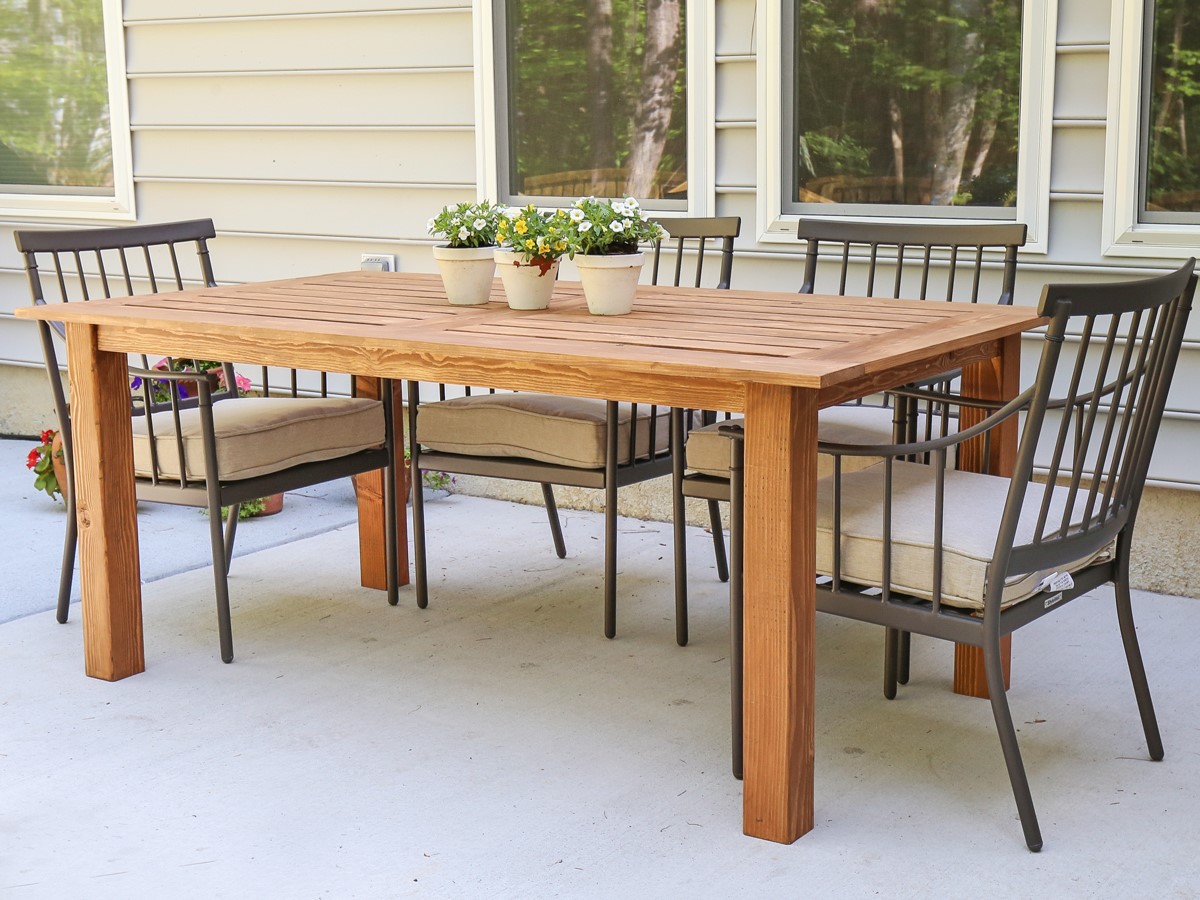
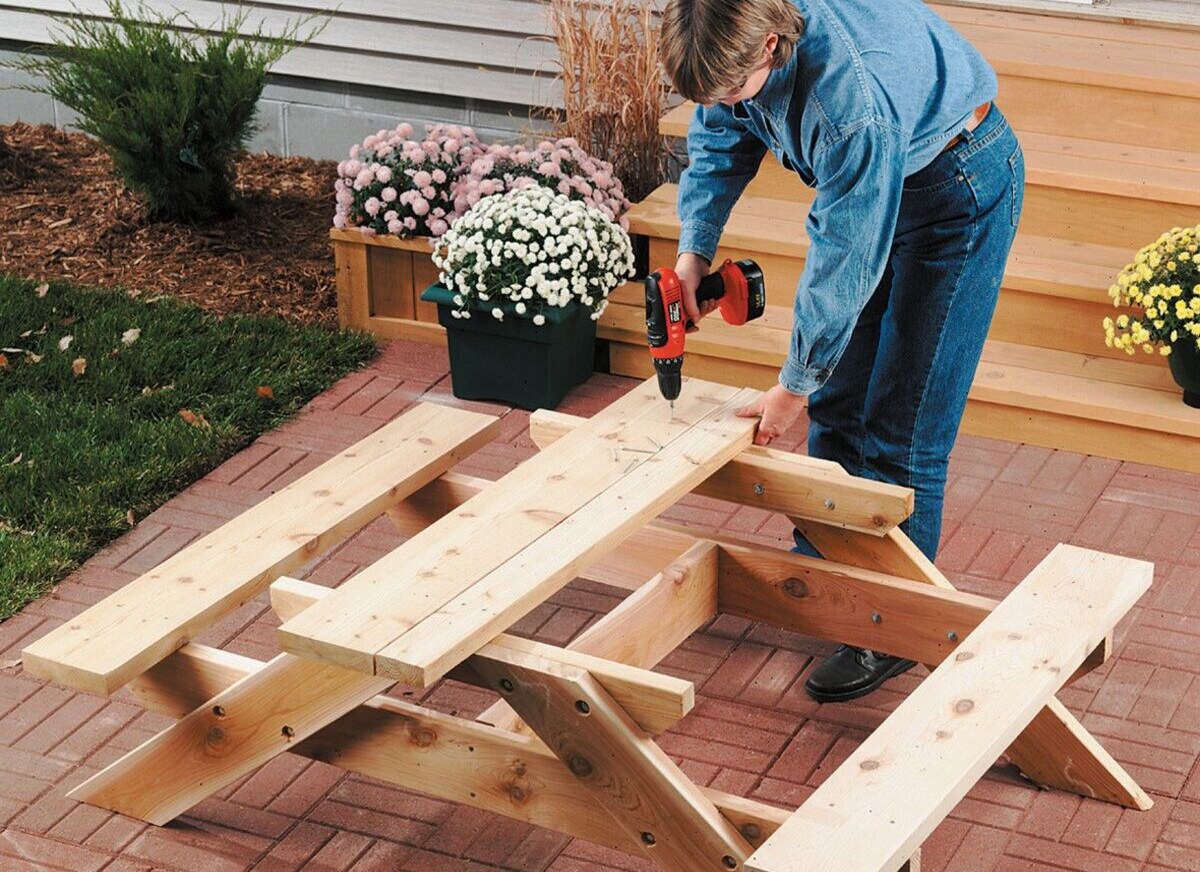
Attaching the Legs to the Tabletop
As you near the culmination of your wooden picnic table construction, it’s time to unite the tabletop and base by attaching the legs. This pivotal step brings together the individual components, transforming them into a cohesive and functional outdoor dining fixture.
Begin by positioning the tabletop upside down on a flat, stable surface. Place the assembled legs at each corner of the tabletop, ensuring they are aligned precisely and flush with the edges. Use clamps to secure the legs in position, preventing any movement during the attachment process.
With the legs securely clamped to the tabletop, it’s time to affix them using screws and wood glue. Pre-drill pilot holes through the legs and into the underside of the tabletop to prevent the wood from splitting when the screws are driven in. Apply wood glue to the areas where the legs and tabletop meet, enhancing the bond between the components for added strength and stability.
Once the pilot holes are drilled and the glue is applied, use a drill to fasten the legs to the tabletop with screws, ensuring a secure and durable connection. It’s essential to drive the screws evenly and avoid over-tightening, as this could compromise the integrity of the wood or cause the tabletop to warp.
As you work through the attachment process, periodically check the alignment and stability of the legs to guarantee that they are securely and evenly attached to the tabletop. This attention to detail ensures that the picnic table will sit level and stable, ready to accommodate outdoor gatherings and dining experiences.
After the legs are successfully attached, remove the clamps and carefully flip the picnic table over to its upright position. Inspect the table to ensure that the legs are firmly and uniformly attached, providing a solid foundation for years of outdoor enjoyment.
With the legs securely affixed to the tabletop, you’ve reached a significant milestone in completing your wooden picnic table. The next phase involves sanding the table’s surfaces and applying a protective finish, bringing out the natural beauty of the wood while safeguarding it from the elements.
As you transition to the final stages of construction, the vision of a stunning and inviting picnic table is within reach, ready to enhance your outdoor entertaining space and create lasting memories with family and friends.
Sanding and Finishing
As you approach the final phase of constructing your wooden picnic table, it’s time to focus on sanding the surfaces and applying a protective finish. This critical step not only enhances the table’s visual appeal but also safeguards the wood from outdoor elements, ensuring its longevity and durability.
Begin by thoroughly sanding the tabletop, seats, legs, and frame to achieve a smooth and splinter-free surface. Start with medium-grit sandpaper to remove any rough spots, imperfections, and mill marks from the wood. Once the surfaces are uniformly smooth, progress to fine-grit sandpaper to achieve a polished and refined finish.
When sanding, pay special attention to the edges and corners, ensuring that they are rounded and smooth to prevent snagging or splintering. Additionally, sand any visible screw heads or fasteners to ensure that the entire table surface is uniform and inviting.
After sanding, thoroughly remove any dust and debris from the table’s surfaces using a clean, dry cloth or a tack cloth designed for this purpose. This preparatory step is essential to ensure that the wood is clean and ready to receive the protective finish.
With the surfaces meticulously sanded and cleaned, it’s time to apply a protective finish to shield the wood from moisture, UV rays, and other outdoor hazards. Choose a high-quality outdoor wood stain or paint designed to withstand the elements and enhance the natural beauty of the wood.
Before applying the finish, carefully read and follow the manufacturer’s instructions, ensuring proper ventilation and application techniques. Use a paintbrush or paint sprayer to apply the finish evenly, working with the wood grain to achieve a professional and uniform appearance.
Once the initial coat is applied, allow the finish to dry according to the manufacturer’s recommendations. Depending on the product, multiple coats may be necessary to achieve the desired level of protection and visual appeal. Between coats, lightly sand the surfaces to promote adhesion and a smooth finish.
After the final coat has dried, consider applying a weather-resistant sealer or varnish to further fortify the wood and prolong the life of the finish. This additional layer of protection will help maintain the table’s appearance and integrity, ensuring that it remains a beautiful and functional centerpiece in your outdoor space for years to come.
With the sanding and finishing process complete, step back and admire the transformation of the raw lumber into a stunning wooden picnic table. The time and effort invested in this final phase will yield a durable, visually appealing, and weather-resistant table, ready to enhance your outdoor entertaining experiences and create cherished memories with loved ones.
Read more: How To Build Wooden Ladder
Conclusion
Congratulations on successfully completing the construction of your very own wooden picnic table! This rewarding DIY project has not only equipped you with valuable woodworking skills but has also provided a charming and functional addition to your outdoor entertaining space. As you reflect on the journey from raw lumber to a beautifully crafted picnic table, take pride in the craftsmanship and dedication that have gone into this project.
Your newly constructed picnic table is more than just a piece of outdoor furniture; it’s a centerpiece for gathering, dining, and creating lasting memories with family and friends. Its sturdy construction and timeless appeal make it a versatile and indispensable asset to your outdoor oasis.
As you envision the countless gatherings, meals, and conversations that will take place around this table, remember the care and attention to detail invested in its construction. The precision of the cuts, the strength of the joints, and the smoothness of the finish all contribute to a picnic table that is as durable as it is inviting.
Embrace the opportunity to personalize your picnic table further by adding decorative touches, such as colorful seat cushions, a festive tablecloth, or potted plants to complement its natural beauty. Your picnic table can serve as a canvas for creativity, reflecting your unique style and enhancing the ambiance of your outdoor space.
As you enjoy the fruits of your labor, consider the potential for future woodworking projects and the skills you’ve honed throughout this endeavor. Whether it’s crafting additional outdoor furniture, building a deck, or tackling indoor woodworking projects, your newfound expertise opens the door to a world of creative possibilities.
Above all, savor the moments spent around your handcrafted picnic table, where laughter, delicious meals, and cherished connections will flourish. Your wooden picnic table stands as a testament to your craftsmanship and a symbol of the joy and togetherness it will inspire for years to come.
So, as you bask in the satisfaction of completing this project, take a moment to appreciate the beauty and functionality of your new picnic table. Whether it’s a leisurely breakfast in the morning sun or a festive outdoor gathering, your wooden picnic table is poised to become a beloved and enduring centerpiece in your outdoor sanctuary.
Now, go ahead and invite your loved ones to gather around this handcrafted masterpiece, and let the delightful outdoor experiences begin!
Frequently Asked Questions about How To Build A Wooden Picnic Table
Was this page helpful?
At Storables.com, we guarantee accurate and reliable information. Our content, validated by Expert Board Contributors, is crafted following stringent Editorial Policies. We're committed to providing you with well-researched, expert-backed insights for all your informational needs.


0 thoughts on “How To Build A Wooden Picnic Table”