Articles
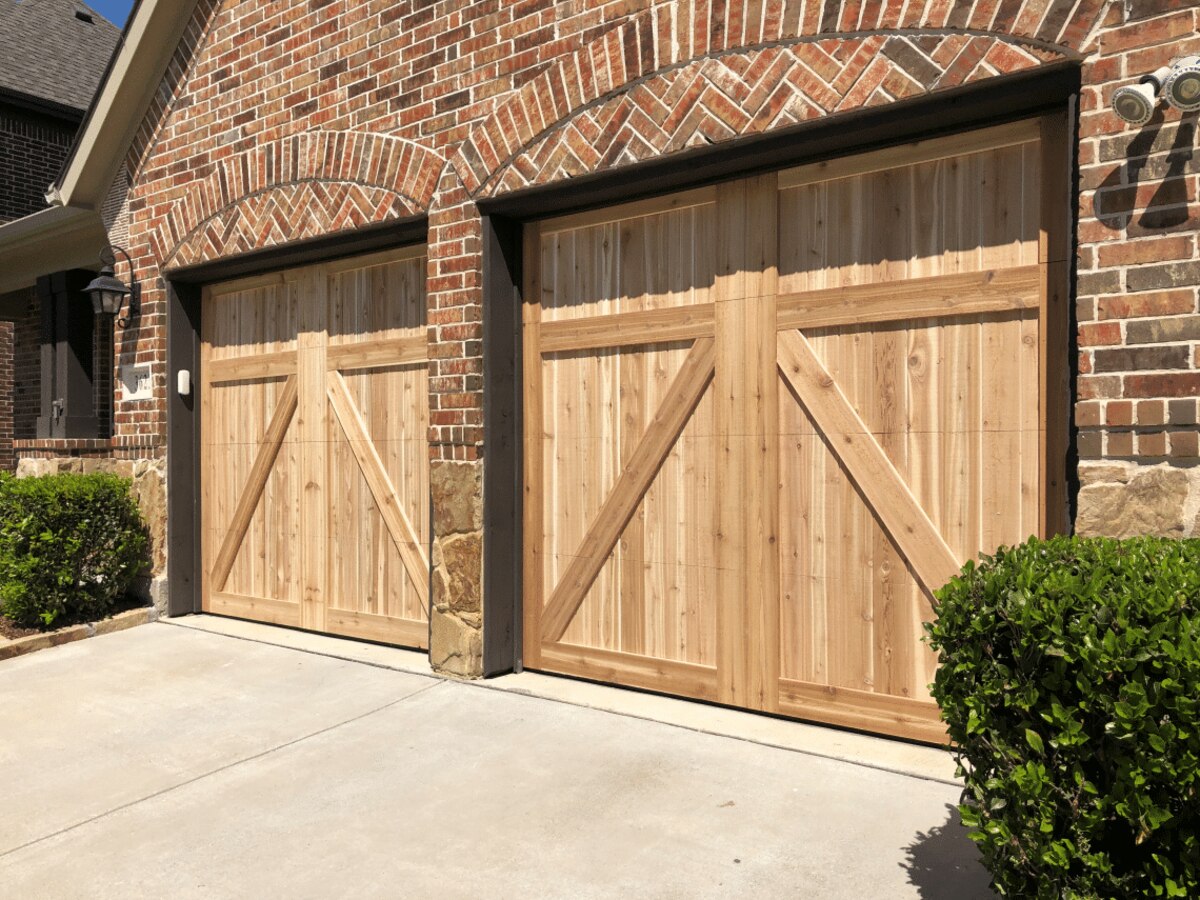
How To Build A Wooden Garage Door
Modified: October 28, 2024
Learn the process of building a durable wooden garage door with this informative articles. Get expert tips and step-by-step instructions to complete your project.
(Many of the links in this article redirect to a specific reviewed product. Your purchase of these products through affiliate links helps to generate commission for Storables.com, at no extra cost. Learn more)
Introduction
Welcome to the world of woodworking, where craftsmanship meets functionality. If you’re considering building a wooden garage door, you’ve come to the right place. A wooden garage door not only adds charm and character to your property, but it also provides durability and security.
Building a wooden garage door may sound like a daunting task, but with the right guidance and tools, anyone can accomplish it. In this article, we will walk you through the process step by step, ensuring that you have all the necessary information to create a beautiful and functional wooden garage door.
Before you embark on this woodworking project, it’s important to note that building a wooden garage door requires some basic carpentry skills and access to the appropriate tools.
Throughout this article, we will highlight the key aspects of building a wooden garage door, from selecting the right wood to applying a finish. We will also provide tips on maintenance to ensure your garage door stands the test of time.
So, grab your tape measure, put on your safety goggles, and let’s dive into the world of woodworking as we explore how to build a wooden garage door.
Key Takeaways:
- Choosing the right wood, taking accurate measurements, and designing the garage door are crucial steps in creating a beautiful and functional wooden garage door that complements your home’s architectural style.
- Applying a quality finish and following regular maintenance tips will ensure the longevity and aesthetic appeal of your wooden garage door, providing both functionality and visual charm for years to come.
Read more: How Much Does A Wooden Garage Door Cost
Selecting the Right Wood for Your Garage Door
When it comes to building a wooden garage door, choosing the right type of wood is crucial. Not only does the wood determine the overall appearance of the door, but it also affects its strength, durability, and resistance to weather elements.
Here are a few popular wood options to consider:
- Cedar: Cedar is a popular choice for wooden garage doors due to its natural beauty and exceptional durability. It has natural oils that act as a preservative, making it resistant to rot, insects, and decay.
- Mahogany: Mahogany is a highly sought-after hardwood known for its rich, reddish-brown color and natural resistance to rot and insects. It provides a timeless and elegant look to your garage door.
- Pine: Pine is a more affordable option that offers a classic and rustic appeal. While it may not be as naturally resistant to rot and insects as other hardwoods, it can still be a viable choice with proper treatment and maintenance.
- Oak: Oak is a durable and strong hardwood that brings a sense of sophistication to your garage door. It is known for its resistance to rot and its ability to withstand the elements.
When selecting wood for your garage door, consider factors like your climate, desired aesthetics, and budget. It’s important to choose a wood species that is suitable for your local weather conditions to prevent warping or deterioration over time.
Additionally, pay attention to the grain and quality of the wood. Look for straight grain patterns and minimal knots, as these can affect the strength and overall appearance of the door.
Once you have chosen the right wood for your garage door, it’s time to move on to the next crucial step: taking accurate measurements.
Taking Accurate Measurements
Before you can start building your wooden garage door, it’s essential to take precise measurements to ensure a proper fit. Taking accurate measurements will help you determine the dimensions of the door panels and the necessary hardware.
Here are the steps to follow when measuring for your garage door:
- Measure the width: Start by measuring the width of the garage door opening from one side to the other. Be sure to measure in multiple places to account for any variations in the opening’s width.
- Measure the height: Next, measure the height of the garage door opening from the top to the floor. Again, measure in multiple locations to account for any irregularities in the height.
- Consider the space: Take note of any restrictions or protrusions within the garage that may affect the door’s operation, such as light fixtures or ceiling obstructions.
Once you have accurate measurements, you can determine the dimensions for your garage door panels. It’s important to add an allowance for any necessary hardware, such as hinges and tracks, to ensure a proper fit.
Remember, precision is key when it comes to measurements. Even the slightest miscalculation can lead to a door that doesn’t fit well or operates smoothly. Take your time during this step to ensure accuracy.
Once you have the measurements, you can move on to the next phase: designing the garage door.
Designing the Garage Door
The design of your wooden garage door will not only impact its aesthetic appeal but also its functionality and overall fit with the architectural style of your home. This is your chance to get creative and make a statement.
Here are some points to consider when designing your garage door:
- Style: Decide on the style of your garage door, whether it’s traditional, modern, or something unique to your personal taste. Consider the architectural style of your home and choose a design that complements it.
- Panel Configuration: Determine how many panels you want your garage door to have and their layout. This can range from single-panel doors to multiple-panel designs. Each panel can be customized with various patterns and details.
- Windows: Decide if you want to incorporate windows into your garage door design. Windows can enhance natural light inside the garage while adding visual appeal. Choose from different shapes, sizes, and arrangements.
- Decorative Hardware: Consider adding decorative hardware elements such as handles, hinges, and studs to enhance the overall look of your garage door.
- Finishing Details: Determine the finishing details, including the type of paint or stain you’ll use, and whether you want a natural wood look or a customized color scheme.
Take into account the size and proportion of your garage door, ensuring that the design elements are appropriately scaled to create a visually pleasing result.
It can be helpful to sketch your design ideas on paper or use specialized software to visualize the final look. This will give you a better sense of how the different design elements work together.
Once you have a clear design in mind, you can move on to the next step: cutting and preparing the wooden panels for your garage door.
Cutting and Preparing the Wooden Panels
With the design finalized, it’s time to bring your wooden garage door to life by cutting and preparing the wooden panels. This step requires careful attention to detail and precision to ensure that the panels fit together seamlessly.
Here’s a guide on how to cut and prepare the wooden panels:
- Gather the materials: Before you start cutting, make sure you have all the necessary materials, including the chosen wood, a table saw or circular saw, a miter saw or coping saw for angled cuts, and a tape measure.
- Measure and mark the panels: Measure and mark the dimensions of each panel based on your earlier measurements. Double-check the measurements to ensure accuracy.
- Cut the panels: Using a table saw or circular saw, carefully cut along the marked lines to create the individual panels. Take your time to ensure clean and precise cuts.
- Create any necessary angled cuts: If your design includes angled cuts, use a miter saw or coping saw to make these cuts. Pay attention to the correct angle measurements and cut slowly and steadily.
- Smooth the edges: After cutting the panels, use sandpaper or a router to smooth out any rough edges or imperfections.
Remember to wear appropriate safety gear such as safety goggles and gloves throughout the cutting and preparation process to protect yourself from any potential accidents.
Once you have prepared the wooden panels, it’s time to join them together to form the complete garage door. This step will require attention to detail and precision to ensure a strong and durable final product.
Read more: How To Build Wooden Ladder
Joining the Panels Together
Now that you have prepared the individual wooden panels for your garage door, it’s time to join them together to create a cohesive and sturdy structure. Properly joining the panels is crucial to ensure the longevity and functionality of your wooden garage door.
Here’s a step-by-step guide on how to join the panels together:
- Assemble the panels: Lay the wooden panels on a flat surface and align them according to your design and measurements. Use clamps or temporary screws to hold them in place temporarily.
- Mark the joining locations: Mark the locations where the panels will be joined. It’s important to ensure that the joints are evenly spaced and aligned.
- Create the joinery: Depending on the design and your skill level, you can choose from various joinery techniques such as tongue and groove, dowels, mortise and tenon, or biscuits. Each technique has its advantages, so choose the one that best suits your preferences and skills.
- Apply the adhesive: Apply wood adhesive to the joining surfaces of the panels, following the manufacturer’s instructions. Make sure to spread the adhesive evenly to ensure a strong bond.
- Join the panels: Carefully align the marked joining locations and press the panels together, ensuring a tight fit. Use clamps or braces to hold the panels in place while the adhesive dries.
Once the adhesive has fully dried, remove any excess glue and sand the joined areas for a smooth finish. Take your time during this process to ensure that the joints are secure and the panels are evenly aligned.
By properly joining the wooden panels, you will create a sturdy and visually appealing garage door. The next step is to reinforce the door and install the necessary hardware for smooth operation.
When building a wooden garage door, make sure to use high-quality, weather-resistant wood to ensure durability and longevity. Additionally, consider adding a protective sealant or paint to further protect the wood from the elements.
Adding Reinforcements and Installing Hardware
Building a strong and functional wooden garage door involves more than just joining the panels together. To ensure durability and smooth operation, it’s important to add reinforcements and install the necessary hardware.
Here are the steps to add reinforcements and install hardware on your wooden garage door:
- Adding horizontal and vertical reinforcement: To strengthen the structure of the door, install horizontal and vertical reinforcement members on the backside of the panels. These can be made from metal or wood and should be securely fastened.
- Installing hinges: Measure and mark the locations for the hinges on the garage door frame and the panels. Pre-drill the holes, and using screws or bolts, attach the hinges to both the frame and the panels. Ensure that the hinges are properly aligned and allow for smooth movement.
- Installing rollers or tracks: If your design includes a roller or track system, carefully install them according to the manufacturer’s instructions. Ensure that the rollers or tracks are securely attached and aligned to allow smooth movement.
- Adding handles and locks: Install handles and locks as per your design and functional requirements. Make sure they are securely fastened and provide ease of access and security.
- Attaching weatherstripping: To provide insulation and protection against the elements, attach weatherstripping along the edges of the garage door panels. This will help prevent drafts and minimize energy loss.
As you install the hardware, pay attention to proper alignment, positioning, and secure fastening. The hardware should not only function smoothly but also contribute to the overall aesthetic appeal of the wooden garage door.
Once you have reinforced the door and installed the necessary hardware, the next step is to apply a finish to protect the wood and enhance its appearance.
Applying a Finish to the Garage Door
Applying a finish to your wooden garage door serves both functional and aesthetic purposes. The right finish not only protects the wood from elements such as moisture, UV rays, and insects but also enhances its appearance, bringing out the natural beauty of the grain.
Here are the steps to follow when applying a finish to your wooden garage door:
- Prepare the surface: Before applying any finish, ensure that the wood surface is clean and smooth. Remove any dust, dirt, or debris using a brush or vacuum cleaner. If needed, sand the surface to create a smooth and even base.
- Choose the finish: There are several options for finishes, including paints, stains, and varnishes. Consider the look you want to achieve and the level of protection required for your garage door. Consult with a professional or refer to the manufacturer’s recommendations for the best finish option.
- Apply the finish: Follow the manufacturer’s instructions for applying the chosen finish. Use a brush, roller, or sprayer to evenly coat the wooden panels. Apply multiple thin layers rather than one thick coat for better absorption and an even finish. Ensure proper ventilation during the application process.
- Allow for drying and curing time: Allow the finish to dry and cure according to the manufacturer’s instructions. This typically takes a few hours to several days, depending on the type of finish. Avoid touching or moving the garage door until the finish is completely dry.
- Inspect and touch up: After the finish has dried, inspect the garage door for any imperfections or uneven areas. If necessary, lightly sand and apply additional coats or touch-ups to achieve the desired finish.
By applying a quality finish, you not only protect your wooden garage door from environmental damage but also enhance its durability and beauty. The next step is to install the garage door in its designated opening.
Installing the Garage Door
Now that you have built and finished your wooden garage door, it’s time to install it in its designated opening. Proper installation ensures that the door operates smoothly, fits securely, and provides maximum functionality.
Here’s a step-by-step guide to installing your wooden garage door:
- Prepare the opening: Clear the area and ensure that the garage door opening is clean and free of any obstructions. Check for levelness and make any necessary adjustments to ensure a proper fit.
- Attach the mounting brackets: Install the mounting brackets to the top corners of the garage door opening. Ensure that they are securely fastened and properly aligned.
- Lift the garage door: With the help of a friend or a garage door opener, lift the garage door and place it into the opening. Make sure the bottom of the door is aligned with the opening and rests securely on the floor.
- Secure the garage door: Once the door is in place, attach the hinges to the mounting brackets. Secure them with screws or bolts, ensuring that they are properly aligned and allow for smooth movement.
- Install the rollers or tracks: If your garage door design includes a roller or track system, carefully install them according to the manufacturer’s instructions. Ensure that the rollers or tracks are securely attached and allow for effortless operation.
- Add the springs and balance the door: If your garage door is equipped with springs, carefully install them and adjust their tension to ensure proper balance and smooth functioning of the door.
- Test the door: Once the installation is complete, test the garage door by opening and closing it multiple times. Make sure it moves smoothly and without any obstructions or excessive noise.
If you encounter any issues during the installation process, it is recommended to consult a professional for assistance to ensure the safety and proper functioning of your garage door.
With the garage door successfully installed, all that’s left is to take care of it and perform regular maintenance to keep it in optimal condition.
Read more: How Build A Wooden Tool Chest
Maintenance Tips for Wooden Garage Doors
Regular maintenance is essential for keeping your wooden garage door in top condition and extending its lifespan. Proper care will not only enhance the door’s longevity but also preserve its aesthetic appeal. Here are some maintenance tips to follow:
- Clean the door regularly: Regularly clean your wooden garage door using a mild soap or detergent and water. Use a soft brush or sponge to gently scrub away any dirt, grime, or debris. Rinse thoroughly and allow the door to dry completely.
- Inspect for damage: Conduct regular inspections to identify any signs of damage such as cracks, peeling paint, or warped panels. Promptly address any issues to prevent further deterioration.
- Seal or paint the door: Apply a protective sealant or paint to your wooden garage door to shield it from moisture, UV rays, and other environmental factors. Follow the manufacturer’s instructions for the appropriate application of the sealant or paint.
- Repair or replace damaged parts: If you notice any damaged or broken components such as hinges, springs, or tracks, repair or replace them promptly. Faulty hardware can affect the door’s functionality and compromise its security.
- Weatherstripping maintenance: Regularly inspect and replace worn or damaged weatherstripping to ensure proper insulation and protection against drafts and moisture. This will help maintain energy efficiency and prevent water damage.
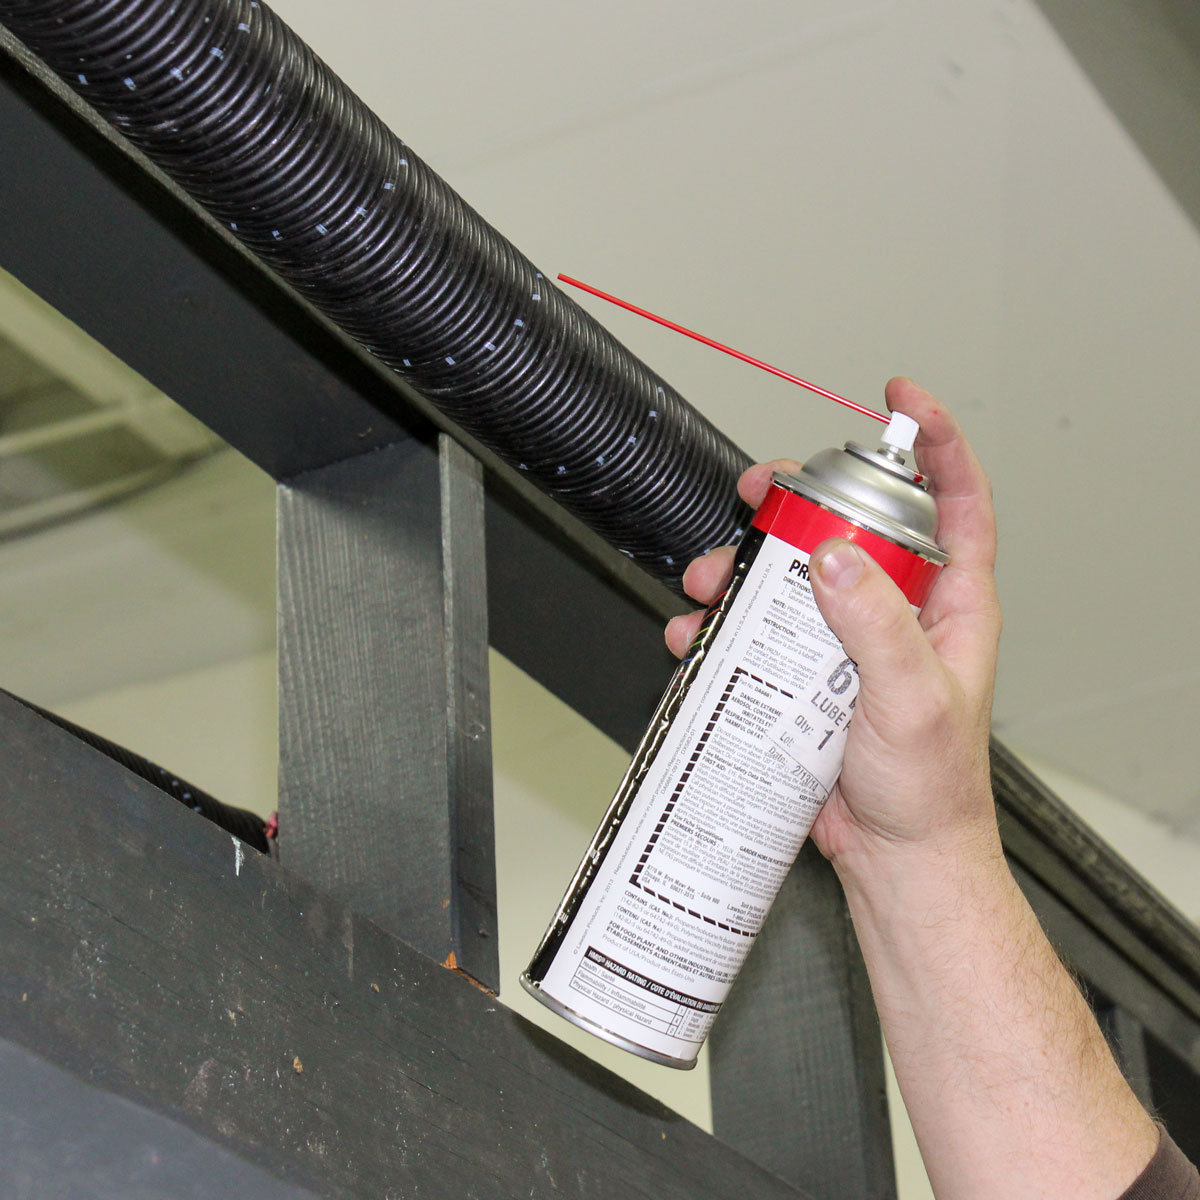
- Keep the door lubricated: Lubricate all moving parts of the garage door, including hinges, rollers, and tracks. Use a silicone-based lubricant to ensure smooth operation and minimize friction.
- Protect the door from moisture: Prevent water damage to your wooden garage door by ensuring that gutters and downspouts are clear, directing water away from the door. Avoid placing sprinklers or plants near the door to minimize exposure to moisture.
- Avoid abrasive cleaners: When cleaning your garage door, avoid using abrasive cleaners, harsh chemicals, or power washers, as they can damage the wood finish. Stick to gentle cleaning solutions and non-abrasive tools.
- Apply touch-ups when needed: Over time, the paint or finish on your wooden garage door may chip or fade. Perform touch-ups regularly to maintain its appearance and protect the wood from the elements.
By following these maintenance tips, you can ensure that your wooden garage door remains in excellent condition and continues to provide both functionality and visual appeal for years to come.
Now that you have learned how to maintain your wooden garage door, you’re ready to enjoy its beauty and functionality for many years to come.
Conclusion
Building and maintaining a wooden garage door is a rewarding endeavor that allows you to showcase your craftsmanship while enhancing the aesthetic appeal of your home. By following the step-by-step process outlined in this article, you can create a beautiful, functional, and durable wooden garage door.
Start with selecting the right wood for your garage door, considering factors such as durability, resistance to weather elements, and your desired aesthetics. Take accurate measurements to ensure a perfect fit, and design the door to complement the architectural style of your home.
Properly cut and prepare the wooden panels, and carefully join them together using the appropriate joinery techniques. Reinforce the door and install the necessary hardware, including hinges, rollers, and handles, to ensure smooth operation and security.
Applying a finish to your wooden garage door not only protects it from moisture and UV rays but also enhances its natural beauty. Regular maintenance, such as cleaning, inspecting, and repairing any damage, will keep your wooden garage door in pristine condition for years to come.
Remember, building and maintaining a wooden garage door requires skill, patience, and attention to detail. If you are unsure or need assistance, it’s always best to consult with a professional carpenter or garage door specialist.
Now, armed with the knowledge and guidance provided in this article, you’re ready to embark on your woodworking journey and create a stunning wooden garage door that will become the envy of the neighborhood.
So, grab your tools, unleash your creativity, and enjoy the satisfaction of seeing your wooden garage door come to life!
Now that you've mastered building your own wooden garage door, why not delve deeper into crafting with wood? Our detailed guide on creating woodworking plans is perfect for those ready to sketch out their next big project. From selecting materials to detailing each cut, this article ensures you're well-prepared to bring any wooden creation to life. Don't miss out on these invaluable insights that can transform your approach to woodworking!
Frequently Asked Questions about How To Build A Wooden Garage Door
Was this page helpful?
At Storables.com, we guarantee accurate and reliable information. Our content, validated by Expert Board Contributors, is crafted following stringent Editorial Policies. We're committed to providing you with well-researched, expert-backed insights for all your informational needs.


0 thoughts on “How To Build A Wooden Garage Door”