Home>Home Maintenance>How To Build A Ventilation System For A Grow Room
Home Maintenance
How To Build A Ventilation System For A Grow Room
Modified: October 20, 2024
Learn how to build a ventilation system for your grow room with our comprehensive guide. Ensure proper airflow and maintain ideal conditions for your home-maintenance project.
(Many of the links in this article redirect to a specific reviewed product. Your purchase of these products through affiliate links helps to generate commission for Storables.com, at no extra cost. Learn more)
Introduction
When it comes to growing plants indoors, proper ventilation is essential to ensure their health and productivity. Whether you have a small grow room or a larger operation, a well-designed ventilation system is crucial for maintaining optimal humidity, temperature, and air quality. With the right ventilation system, you can remove stale air, introduce fresh air, control temperature and humidity levels, and prevent the buildup of harmful gases.
In this article, we will guide you through the process of building an effective ventilation system for your grow room. We will discuss the steps involved in assessing the requirements of your grow room, choosing the right ventilation equipment, calculating the ventilation needs, installing the necessary components, and maintaining the system for long-term performance.
Before we dive into the details, it’s important to note that building a ventilation system requires some basic knowledge of electrical systems and construction. If you are not confident in your abilities, it is advisable to seek professional assistance to ensure a safe and efficient installation.
Now, let’s get started on creating an optimal environment for your plants with a well-designed ventilation system!
Key Takeaways:
- Proper ventilation is crucial for indoor plant growth. Assess your plant’s needs, choose the right ventilation system, and maintain it for healthy and robust plant growth.
- Maintain humidity and temperature levels, clean filters, and monitor fan speed for long-term ventilation system performance. Create a well-ventilated environment for thriving plants.
Read more: How To Build A Curved Range Hood
Step 1: Assessing the Requirements of the Grow Room
The first step in building a ventilation system for your grow room is to assess the specific requirements of your plants and the space in which they will be grown. Consider the following factors:
- Plant Type: Different plants have different ventilation needs. Some plants might require higher humidity levels, while others may thrive in drier conditions. Research the specific requirements of the plants you are growing to determine the necessary ventilation parameters.
- Growth Stage: Plants have distinct requirements during different growth stages. For instance, seedlings and young plants may need lower air circulation and humidity levels compared to mature flowering plants. Consider the growth stage of your plants to determine the ventilation needs.
- Grow Room Size: The size of your grow room will determine the amount of ventilation equipment you will need. Larger rooms will require more powerful fans and larger ductwork to ensure adequate air circulation. Measure the dimensions of your grow room to calculate the volume of air that needs to be exchanged.
- Environmental Conditions: Consider the ambient temperature and humidity of the room where your grow room is located. This will impact the ventilation requirements, as you may need to adjust the temperature and humidity levels inside the grow room to create an optimal environment for your plants.
- Odor Control: Some plants emit strong odors, especially during the flowering stage. If odor control is a concern, you may need to incorporate additional ventilation equipment, such as carbon filters or ozone generators, to remove and neutralize odors from the air.
By taking these factors into consideration, you can determine the specific ventilation requirements for your grow room. This information will guide you in making informed decisions when selecting the appropriate ventilation equipment and designing the system that best suits your needs.
Now that you have assessed the requirements of your grow room, we can proceed to the next step: choosing the right ventilation system.
Step 2: Choosing the Right Ventilation System
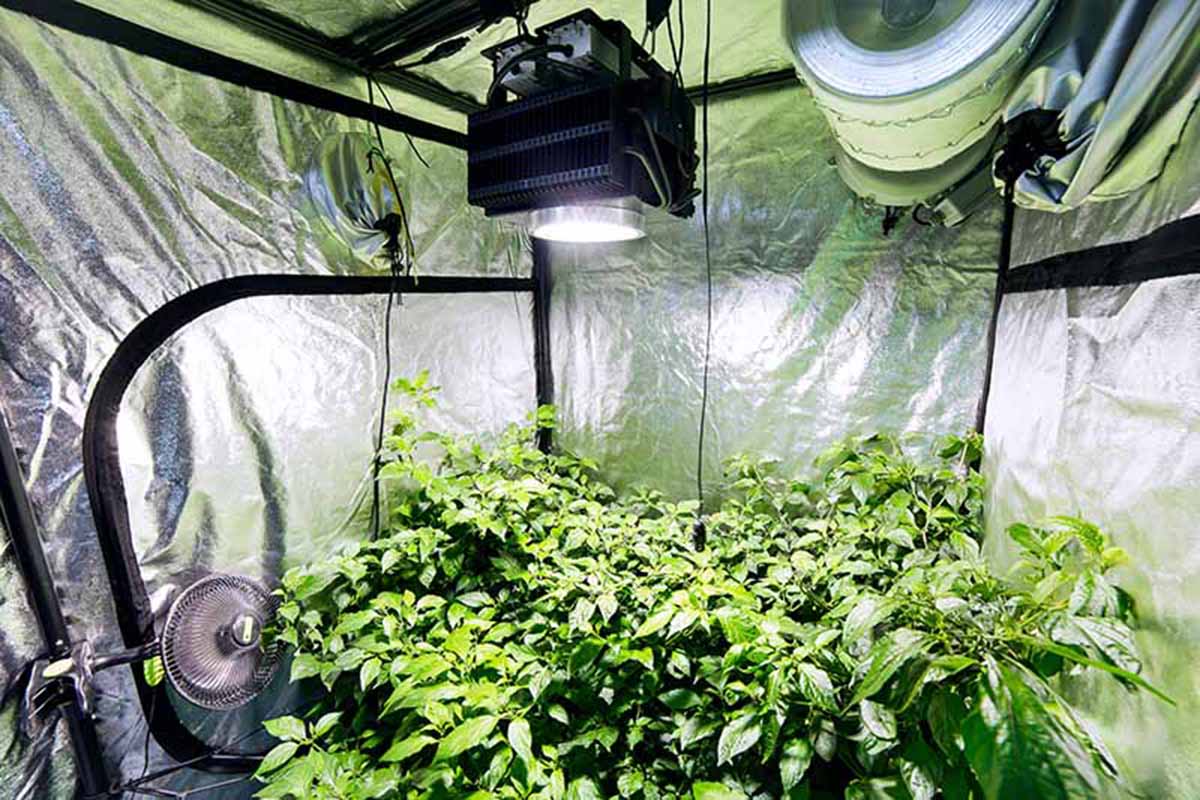
Choosing the right ventilation system is crucial for maintaining the optimal environment in your grow room. There are a few key components to consider when selecting the appropriate equipment:
- Exhaust Fan: The exhaust fan is the heart of your ventilation system. It is responsible for removing stale air, excess heat, and humidity from the grow room. Consider the size of your grow room and the amount of air exchange required to choose an exhaust fan with sufficient airflow capacity.
- Air Intake: An air intake is necessary to bring fresh air into the grow room. This can be achieved through a passive intake system using vents or by incorporating an intake fan. The intake should be positioned strategically to ensure adequate airflow for proper plant growth.
- Ductwork: Ductwork connects the exhaust and intake components, allowing air to flow in and out of the grow room. It is important to choose the right size and material for your ductwork to minimize resistance and maximize airflow. Insulated ducting can also help maintain the desired temperature in the grow room.
- Fan Speed Controller: A fan speed controller allows you to adjust the speed of the exhaust and intake fans, enabling precise control over air circulation and ventilation. This is especially important during different growth stages when plants may require varying air movement and airflow.
- Optional Accessories: Depending on your specific requirements, you may consider additional accessories such as carbon filters, ozone generators, or humidifiers. These can help control odors, improve air quality, and maintain optimal humidity levels in the grow room.
Take into account the specific needs of your plants and the size of your grow room when choosing the ventilation system. It is also important to select equipment from reputable brands that offer reliable performance and energy efficiency.
Once you have chosen the right ventilation system components, it’s time to move on to the next step: calculating the ventilation requirements for your grow room.
Step 3: Calculating the Ventilation Requirements
Calculating the ventilation requirements for your grow room is essential to ensure that you have adequate airflow and air exchange to maintain a healthy environment for your plants. Here are the key factors to consider when determining the ventilation needs:
- Air Exchange Rate: The air exchange rate refers to the number of times the entire volume of air in the grow room is exchanged per hour. A general guideline is to aim for at least 4-6 air exchanges per hour for optimal plant growth. Calculate the volume of the grow room by multiplying its length, width, and height. Then, multiply this volume by the desired air exchange rate to determine the airflow capacity required for the exhaust fan.
- Temperature Control: Consider the desired temperature range for your plants and the ambient temperature of the room where the grow room is located. Determine the temperature difference between the ambient room and the desired temperature inside the grow room. This temperature difference will help you select an exhaust fan that can effectively remove the excess heat and maintain the desired temperature.
- Humidity Control: Humidity levels are crucial for plant growth, and proper ventilation helps regulate moisture levels. Determine the desired humidity range for your plants and consider the ambient humidity in the room. If you need to decrease humidity levels, choose an exhaust fan that can remove moisture effectively. If you need to increase humidity, you may need to incorporate a humidifier or adjust the intake airflow.
- Odor Control: If odor control is a concern, consider the strength of the odor emitted by your plants and the size of the grow room. To effectively mitigate odors, you may need to incorporate a carbon filter into your ventilation system or invest in an ozone generator.
Take the time to calculate and understand the specific ventilation requirements of your grow room. This will ensure that you choose the right exhaust fan, determine the necessary airflow capacity, and maintain optimal temperature, humidity, and air quality for healthy plant growth.
With your ventilation requirements calculated, we can now move on to the next step: installing the ductwork and air intake.
Step 4: Installing Ductwork and Air Intake
The installation of ductwork and air intake is a critical step in building an effective ventilation system for your grow room. Follow these guidelines to ensure proper installation:
- Ductwork Installation: Begin by determining the optimal placement of the exhaust fan. This is typically positioned high in the grow room to effectively remove warm air and humidity. Install the exhaust fan using the manufacturer’s instructions, ensuring a secure and airtight connection. Next, connect ducting to the exhaust fan and extend it to the outside of the building or to a suitable ventilation point.
- Air Intake Installation: Determine the best location for the air intake based on your grow room setup. It is advisable to position the air intake on the opposite side of the grow room from the exhaust fan. This allows for proper air circulation and prevents the recirculation of stale air. Install the intake vent or intake fan, ensuring that it is securely mounted and positioned for optimal airflow. If using passive intake, ensure that there are sufficient vents to allow fresh air to enter the grow room.
- Ductwork Layout: Plan the layout of the ductwork to minimize bends and obstructions. Smooth, straight ducting allows for better airflow and reduces resistance. Use appropriate fittings, elbows, and couplers to connect the sections of ducting. Insulated ducting can be used to minimize heat transfer and maintain the desired temperature inside the grow room.
- Airtight Sealing: Properly seal all connections and joints in the ductwork to prevent air leaks. Use aluminum foil tape or ducting clamps to secure the connections and ensure a tight seal. Air leaks can compromise the efficiency of the ventilation system and lead to improper airflow.
- Intake and Exhaust Balance: It is essential to maintain a proper balance between the intake and exhaust airflow. This will prevent negative pressure inside the grow room and ensure efficient circulation. Adjust the fan speed and/or the size of the intake opening to achieve the desired balance.
Proper installation of ductwork and air intake is crucial for the overall performance of your ventilation system. Take your time to ensure a well-planned and professionally executed installation to guarantee optimal airflow and maintain a healthy environment for your plants.
With the ductwork and air intake in place, it’s time to move on to the next step: setting up the exhaust fans and air circulation.
Make sure to calculate the proper size of your ventilation system based on the size of your grow room. A good rule of thumb is to have the system exchange the air in the room at least once every 5 minutes.
Read more: How To Build A Room Divider
Step 5: Setting up Exhaust Fans and Air Circulation
Setting up the exhaust fans and establishing proper air circulation is crucial to ensure efficient ventilation in your grow room. Follow these steps to get the best results:
- Positioning the Exhaust Fans: Determine the optimal placement of the exhaust fans based on the size and layout of your grow room. Generally, it is recommended to position the fans high in the room to effectively remove hot air and humidity. Mount the fans securely using the manufacturer’s instructions, ensuring they are positioned to provide maximum airflow throughout the space.
- Air Circulation: In addition to the exhaust fans, it is important to promote adequate air circulation within the grow room. This can be achieved by strategically placing oscillating fans or circulation fans to ensure airflow reaches all corners of the room. Air circulation helps prevent stagnant air pockets, promotes even distribution of temperature and humidity, and strengthens plant stems, preventing them from becoming weak and susceptible to pests and diseases.
- Fan Speed Control: Utilize the fan speed controller to adjust the speed of the exhaust fans and circulation fans. This allows you to fine-tune the air movement and airflow based on the specific requirements of your plants and the stage of growth. Experiment with different fan speeds to find the optimal setting that maintains the desired temperature, humidity, and air quality for your plants.
- Timer Controls: Consider using timer controls to automate the operation of the exhaust fans and circulation fans. This ensures consistent air movement and ventilation, even when you’re not physically present. Timers can be set to simulate natural day and night cycles, controlling the intensity of air circulation based on the growth stage of your plants.
- Monitor and Adjust: Regularly monitor the temperature, humidity, and overall air quality in your grow room. Make necessary adjustments to the fan speeds or positioning to maintain optimal conditions. Keep an eye out for any signs of poor air circulation, such as wilting plants or condensation on the walls, and address these issues promptly.
By setting up the exhaust fans and establishing proper air circulation, you can ensure that your plants receive adequate fresh air, temperature regulation, and removal of excess heat and humidity. This leads to healthier, more productive, and robust growth.
With the exhaust fans and air circulation in place, let’s move on to the next step: controlling humidity and temperature in your grow room.
Step 6: Controlling Humidity and Temperature
Controlled humidity and temperature are crucial factors in maintaining a healthy and thriving grow room environment. Here are some steps you can take to effectively manage humidity and temperature levels:
- Monitor Humidity: Use a hygrometer to regularly monitor the humidity levels in your grow room. Different plant species have specific humidity requirements, so it’s important to ensure that the levels remain within the desired range. If humidity levels are too high, consider using a dehumidifier or increasing ventilation to remove excess moisture. Conversely, if humidity levels are too low, a humidifier or misting system can be employed to add moisture to the air.
- Control Temperature: Maintaining the appropriate temperature range is crucial for optimal plant growth. Use a thermometer to monitor the temperature inside the grow room consistently. If the temperature is too high, adjust the fan speed or increase ventilation to remove excess heat. Additionally, you can use a cooling system, such as an air conditioner or evaporative cooler, to lower the temperature. Conversely, if the temperature is too low, consider using a heater or adjusting the fan speed to circulate warm air more effectively.
- Use Reflective Surfaces: Enhance temperature control by using reflective materials or surfaces to distribute light evenly and reduce heat build-up. Reflective surfaces help maximize the efficiency of your grow lights, ensuring more even light distribution and minimizing hotspots.
- Insulate the Grow Room: Proper insulation can help maintain stable temperature and humidity levels. Ensure that walls, floors, and ceilings are insulated to minimize heat or moisture exchange with the surrounding environment. This helps to create a more controlled and stable climate inside the grow room.
- Implement Light Timers: Control the duration and intensity of light exposure using timers. Timers allow you to simulate natural light cycles, regulating temperature fluctuations and preventing overheating caused by prolonged exposure to grow lights.
By effectively managing humidity and temperature, you create an optimal environment for your plants, promoting healthy growth and minimizing the risk of pest infestations and diseases.
With humidity and temperature under control, let’s move on to the final step: maintaining the ventilation system for long-term performance.
Step 7: Maintaining the Ventilation System
Maintaining your ventilation system is essential to ensure its long-term performance and the continued health of your plants. Regular maintenance and upkeep will help prevent issues and prolong the lifespan of your equipment. Here are some important maintenance tasks to consider:
- Clean the Filters: If you are using filters in your ventilation system, such as carbon filters for odor control, make sure to clean or replace them as needed. Dirty filters can restrict airflow and reduce the effectiveness of your system. Regularly inspect and clean the filters to ensure optimal performance.
- Check and Clean Ductwork: Periodically inspect the ductwork for any obstructions, such as debris or dust buildup. Use a vacuum or a brush to clean the ducts and remove any blockages that may restrict airflow. This will help maintain proper air circulation and prevent contamination of the grow room environment.
- Inspect and Lubricate Fans: Regularly check the exhaust fans and circulation fans for any signs of wear or damage. Lubricate the fan bearings as recommended by the manufacturer to ensure smooth operation. Cleaning the fan blades will also help improve airflow and prevent the buildup of dust and debris.
- Monitor Fan Speed: Keep an eye on the fan speed and verify that it is operating at the desired settings. Adjust the fan speed as needed to maintain the appropriate airflow and ventilation requirements for your plants.
- Inspect Electrical Connections: Inspect the electrical connections of your ventilation system periodically to ensure they are secure and free from damage. Loose or damaged connections can lead to inefficiency or even pose a safety hazard. If you notice any issues, contact a qualified electrician for repairs.
- Regularly Monitor Environmental Conditions: Continuously monitor the temperature, humidity, and overall air quality inside your grow room. Keep an eye out for any fluctuations or abnormal readings, as they may indicate a problem with the ventilation system. Address these issues promptly to prevent further complications.
By regularly maintaining your ventilation system, you can ensure its optimal performance and extend its lifespan. This will help create a stable and healthy growing environment for your plants and maximize their productivity.
With the ventilation system properly maintained, you have now completed all the necessary steps to build an effective ventilation system for your grow room. Congratulations! Your plants will thrive in the well-ventilated environment you have created.
Remember to consult the manufacturer’s instructions and guidelines for specific maintenance recommendations for your equipment.
Should you encounter any difficulties or require professional assistance, do not hesitate to seek the help of experienced technicians or electricians who specialize in indoor gardening setups.
Happy growing!
Conclusion
Building a ventilation system for your grow room is a crucial step in creating an optimal environment for your plants. By following the steps outlined in this guide, you can ensure proper airflow, temperature, and humidity control, promoting healthy and robust plant growth.
Assessing the specific requirements of your grow room, choosing the right ventilation system, and calculating the necessary airflow are the initial steps in the process. Installing ductwork and air intake components correctly, setting up exhaust fans, and establishing proper air circulation are pivotal for efficient ventilation.
Controlling humidity and temperature levels ensures that your plants thrive in an environment that suits their needs. Regular maintenance of your ventilation system, including cleaning filters, inspecting and cleaning ductwork, and monitoring fan speed, will guarantee long-term performance.
Remember to monitor the environmental conditions in your grow room regularly and make adjustments as needed. Implementing timers, using reflective surfaces, and insulating the room will contribute to a more controlled and stable climate.
With a well-designed and maintained ventilation system, you can create the ideal growing environment that maximizes plant health, productivity, and ultimately, your gardening success.
Now that you have the knowledge and tools to build an effective ventilation system, it’s time to put them into action. As you embark on your indoor gardening journey, continue to research and stay updated on the latest advancements and techniques in ventilation to further enhance your grow room setup.
Happy growing and may your plants flourish in their well-ventilated sanctuary!
Frequently Asked Questions about How To Build A Ventilation System For A Grow Room
Was this page helpful?
At Storables.com, we guarantee accurate and reliable information. Our content, validated by Expert Board Contributors, is crafted following stringent Editorial Policies. We're committed to providing you with well-researched, expert-backed insights for all your informational needs.


0 thoughts on “How To Build A Ventilation System For A Grow Room”