Home>Home Maintenance>How To Clear A Clogged Dryer Vent
Home Maintenance
How To Clear A Clogged Dryer Vent
Modified: October 23, 2024
Learn how to clear a clogged dryer vent with our expert home maintenance tips. Prevent fire hazards and ensure efficient drying.
(Many of the links in this article redirect to a specific reviewed product. Your purchase of these products through affiliate links helps to generate commission for Storables.com, at no extra cost. Learn more)
Introduction
Welcome to our comprehensive guide on how to clear a clogged dryer vent. When it comes to home maintenance, keeping your dryer vent clean is essential for the efficient operation of your dryer and ensuring the safety of your home. Over time, lint and debris can accumulate in the vent, causing airflow restrictions and potential fire hazards. In this article, we will provide you with step-by-step instructions on how to clear a clogged dryer vent, as well as highlight the signs of a clogged vent and the importance of regular maintenance.
As homeowners, we rely on our dryers to quickly and efficiently dry our clothes. However, many of us overlook the importance of proper maintenance to keep our dryers running smoothly. A clogged dryer vent can lead to a variety of issues, including longer drying times, decreased efficiency, increased energy consumption, and even the risk of a dryer fire.
By following the steps outlined in this guide, you can easily clear your clogged dryer vent and ensure that your appliance is working at its best. From disconnecting the dryer and removing the vent cover to cleaning the exterior vent and clearing the lint trap and vent pipe, we will guide you through each stage of the process.
Before we dive into the details, it’s important to keep safety in mind. Make sure to unplug your dryer before beginning any maintenance. Additionally, if you’re uncomfortable performing any of the steps yourself, it’s always best to contact a professional to ensure the job is done correctly and safely.
Now, let’s get started on clearing that clogged dryer vent and improving the performance and safety of your appliance!
Key Takeaways:
- Regularly clearing your clogged dryer vent improves efficiency, extends your dryer’s lifespan, and reduces the risk of fire hazards. Keep your home safe and your clothes dry with simple maintenance.
- By following our step-by-step guide, you can confidently clear your clogged dryer vent and enjoy efficient drying while minimizing the risk of fire hazards. Prioritize safety and regular maintenance for peace of mind.
Read more: How To Clean Clogged Dryer Vent
Signs of a Clogged Dryer Vent
It’s important to be aware of the signs that indicate a clogged dryer vent. Recognizing these signs can help you address the issue promptly before it leads to more serious problems. Here are some common indicators that your dryer vent may be clogged:
- Longer Drying Times: If you notice that it takes longer than usual for your clothes to dry, it could be a sign of a clogged vent. When the vent is restricted, the airflow is limited, and moisture is not efficiently removed from the dryer, resulting in longer drying cycles.
- Hot Dryer or Laundry Room: A clogged vent can cause the temperature inside the dryer and the laundry room to rise. If you notice that your dryer or the area surrounding it feels unusually hot during operation, it may indicate a clogged vent. Excessive heat can also put a strain on the dryer’s components and potentially lead to mechanical issues.
- Burning Odor: A musty or burning smell coming from your dryer or laundry room can be a sign of a clogged vent. When lint accumulates in the vent, it can become overheated and emit a distinct odor. This smell should not be ignored, as it could be a potential fire hazard.
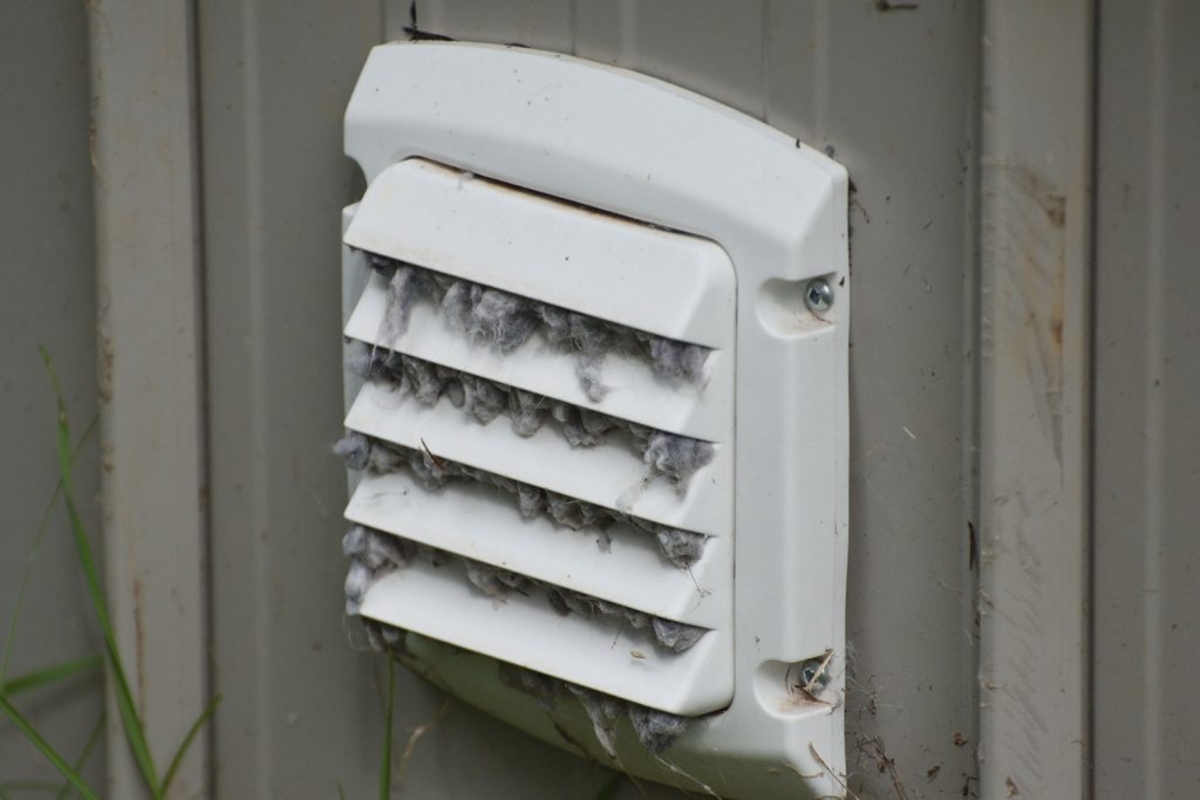
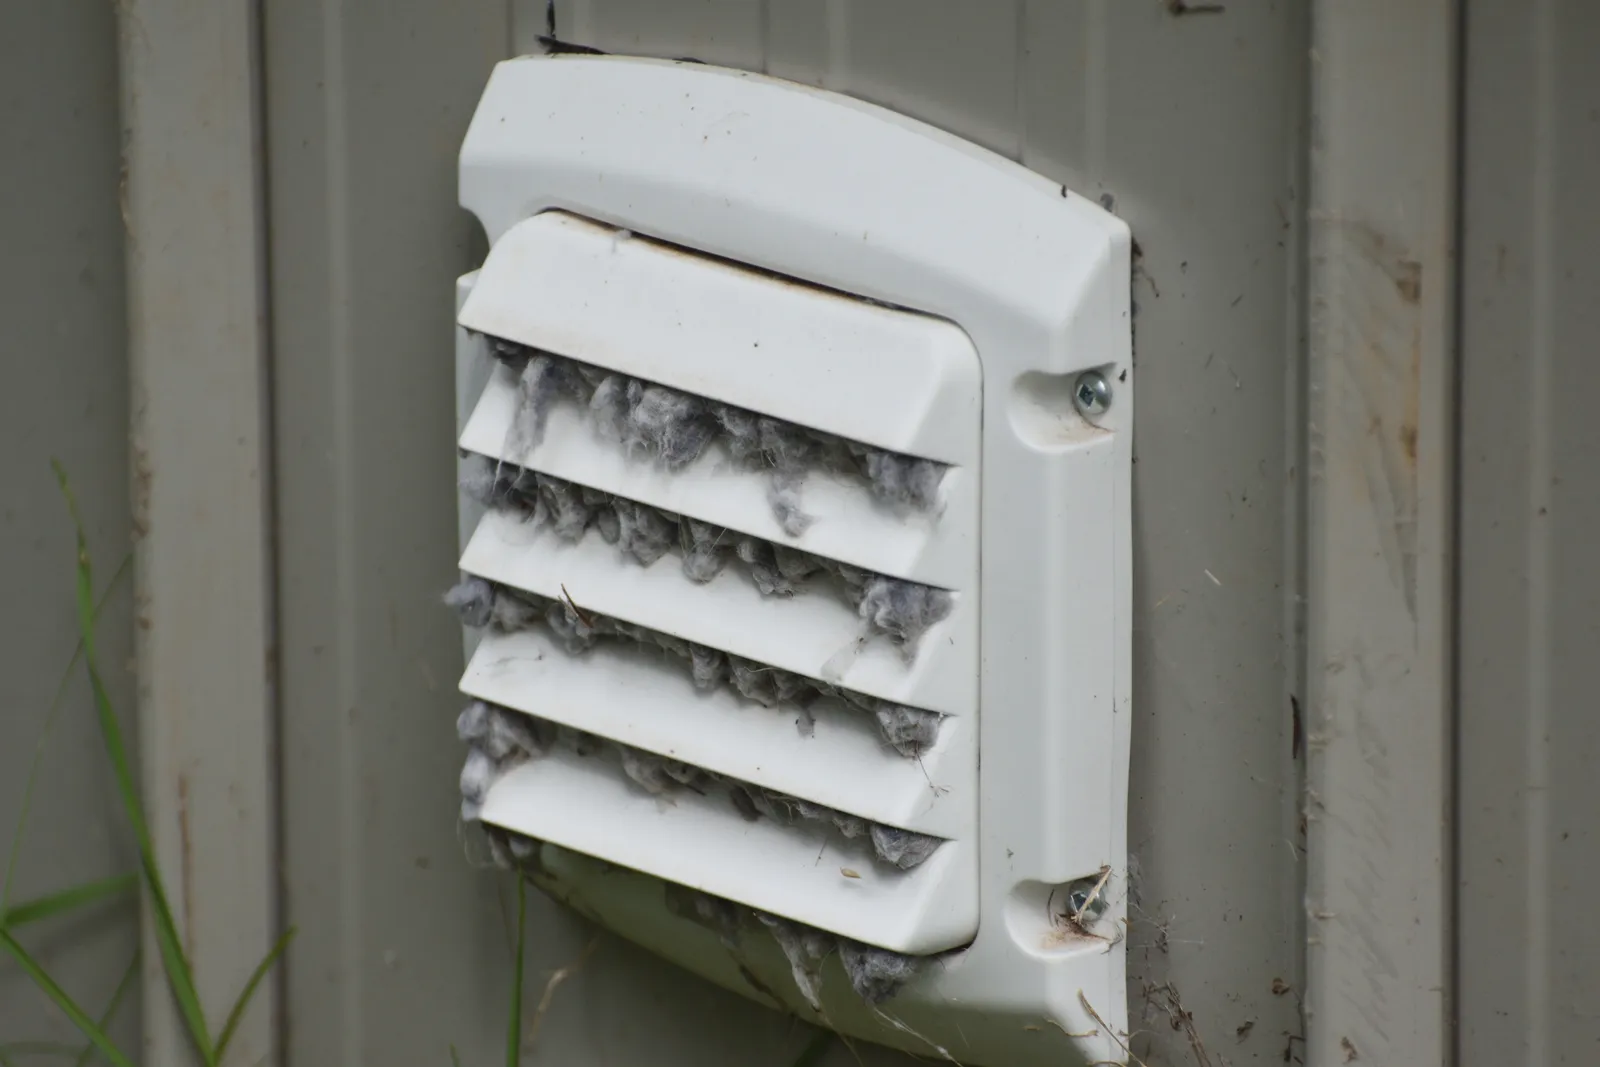
- Lint Buildup Outside the Vent: Take a look outside your home where the dryer vent exits. If you notice a visible buildup of lint or debris around the vent opening, it’s a clear sign that your vent needs attention. This accumulation obstructs airflow and should be addressed promptly.
- Inefficiency: A clogged dryer vent can significantly reduce the efficiency of your dryer. You may find that your laundry is not fully dry, even after running through multiple cycles. This inefficiency can lead to increased energy consumption and higher utility bills.
If you notice any of these signs, it’s crucial to take action and clear your clogged dryer vent. Not only will it prevent further issues with your dryer, but it will also ensure the safety of your home and reduce the risk of a dryer fire. Now that we’ve identified the signs, let’s move on to understanding the importance of clearing a clogged dryer vent.
Importance of Clearing a Clogged Dryer Vent
Clearing a clogged dryer vent is not just about improving the efficiency of your dryer; it is also vital for the safety of your home and family. Here are some reasons why clearing a clogged dryer vent should be a top priority:
- Fire Prevention: One of the most critical reasons to clear a clogged dryer vent is to reduce the risk of a house fire. When lint and debris accumulate in the vent, they can become highly flammable. As the dryer heats up, this accumulation can ignite, resulting in a dangerous fire. Regular maintenance and clearing of the vent can significantly minimize this risk.
- Improved Energy Efficiency: A clogged dryer vent restricts the airflow, causing your dryer to work harder and longer to dry your clothes. This increased workload results in higher energy consumption and increased utility bills. By clearing the vent, you can restore proper airflow, allowing your dryer to function efficiently and reducing energy waste.
- Extend the Lifespan of Your Dryer: When your dryer has to work harder due to a clogged vent, it puts undue stress on the appliance’s components. This extra strain can lead to mechanical issues and potentially shorten the lifespan of your dryer. Regular maintenance, including clearing the vent, can help prolong the life of your dryer, saving you money on costly repairs or replacements.
- Prevent Mold and Mildew: A clogged dryer vent creates a damp environment that is conducive to the growth of mold and mildew. This moisture buildup can not only lead to unpleasant odors but also pose a threat to your health. By keeping your dryer vent clear, you can prevent the formation of mold and mildew and maintain a clean and safe laundry area.
- Reduce Carbon Monoxide Risk: If your dryer is not properly vented, it can cause a buildup of harmful gases, such as carbon monoxide, inside your home. This poses a severe health risk to you and your family. Regularly clearing the vent ensures that these gases are correctly expelled, reducing the risk of carbon monoxide poisoning.
Now that you understand the importance of clearing a clogged dryer vent, it’s time to gather the necessary tools and supplies and start the maintenance process. Make sure to follow the step-by-step instructions carefully to ensure a thorough cleaning and optimum performance of your dryer. Let’s move on to the next section and learn about the tools and supplies you’ll need for the job.
Tools and Supplies Needed
Before you begin clearing a clogged dryer vent, it’s important to gather the necessary tools and supplies. Having the right equipment will ensure a smooth and successful maintenance process. Here’s a list of the items you’ll need:
- Screwdriver: A flat-head or Phillips screwdriver will be needed to disconnect and remove the dryer vent cover.
- Vent Cleaning Brush: A vent cleaning brush with long bristles is essential for removing lint and debris from the vent pipe. Make sure to choose a brush that is specifically designed for dryer vents to ensure effective cleaning.
- Vacuum Cleaner with Hose Attachment: A vacuum cleaner with a long hose attachment will help you remove loose debris and lint from the vent pipe. Opt for a vacuum with strong suction to ensure a thorough cleaning.
- Gloves: Wearing gloves is recommended to protect your hands from sharp edges or potential contaminants while working on the dryer vent.
- Dryer Vent Cleaning Kit (Optional): If you prefer a more comprehensive solution, you can consider purchasing a dryer vent cleaning kit. These kits usually include a brush, extension rods, and possibly a vacuum attachment, providing you with all the necessary tools in one package.
- Rags or Towels: Having some rags or towels on hand will come in handy for wiping down surfaces and cleaning up any mess that may occur during the process.
Ensure that you have all these tools and supplies ready before you begin clearing your clogged dryer vent. Having them readily available will save you time and make the maintenance process more efficient.
Once you have everything you need, it’s time to move on to the next step: disconnecting the dryer. In the following sections, we will guide you through each step of the process to ensure a thorough cleaning of your dryer vent. Let’s get started!
Step 1: Disconnecting the Dryer
Before you can begin clearing a clogged dryer vent, you need to safely disconnect the dryer from the power source. Follow these steps to disconnect your dryer:
- Ensure safety first: Before working on your dryer, ensure that it is turned off and unplugged from the electrical outlet. This will prevent any accidental start-ups or electrical hazards.
- Move the dryer away from the wall: Gently pull the dryer away from the wall to create enough space to access the vent on the back of the unit. Be cautious not to damage or kink the dryer vent hose.
- Unplug the vent hose: The dryer vent hose is typically connected to the back of the dryer using a clamp. Loosen the clamp using a screwdriver and slide it away from the dryer. Carefully detach the vent hose from the dryer by pulling it off.
- Set the dryer aside: Once the vent hose is detached, you can set the dryer aside, ensuring it is in a safe and stable position. You may want to place a towel or protective mat beneath the dryer to prevent scratching the floor.
It’s important to proceed with caution to avoid causing any damage to your dryer or injuring yourself. If you’re unsure about disconnecting the dryer, it’s recommended to seek professional assistance.
With the dryer disconnected and safely moved aside, you can now move on to the next step: removing the dryer vent cover. This will allow you to access the vent and proceed with clearing the clog. We will cover this step in the next section.
Read more: How To Tell If The Dryer Vent Is Clogged
Step 2: Removing the Dryer Vent Cover
Now that the dryer is safely disconnected, it’s time to remove the vent cover to gain access to the clogged dryer vent. Follow these steps to remove the dryer vent cover:
- Locate the vent cover: The vent cover is usually located on the exterior wall of your home where the dryer vent exits. It’s typically a rectangular or circular metal or plastic panel.
- Inspect the vent cover: Before removing the vent cover, take a moment to inspect it for any visible damage or excessive buildup of debris. If you notice any issues, such as rust or significant blockage, it may be necessary to replace the vent cover.
- Remove the screws or fasteners: Most vent covers are secured to the wall with screws or fasteners. Use a screwdriver or the appropriate tool to remove these screws or fasteners. Carefully place them in a safe location to avoid misplacing them.
- Take off the vent cover: Once the screws or fasteners are removed, gently pull the vent cover away from the wall. Be cautious, as there may be lint or debris behind the cover. Set the vent cover aside for now.
- Inspect the vent opening: With the vent cover removed, take a moment to inspect the vent opening for any visible debris or blockages. If there is a significant buildup, it may be necessary to clean the exterior vent before proceeding further.
Removing the dryer vent cover allows you to access the clogged vent and ensures better airflow during the cleaning process. It’s important to handle the vent cover and screws or fasteners with care to avoid any damage.
With the vent cover removed, you’re now ready to move on to the next step: cleaning the exterior vent. This step is crucial for removing any debris or blockages from the vent opening. We will cover this step in the next section.
Regularly clean the lint trap and vent to prevent clogs. Use a vent cleaning brush to remove built-up lint and debris from the vent hose. Check the outside vent for obstructions.
Step 3: Cleaning the Exterior Vent
Now that you have removed the dryer vent cover, it’s time to clean the exterior vent to remove any debris or blockages. This step is essential for ensuring proper airflow and preventing future clogs. Follow these steps to clean the exterior vent:
- Inspect the vent opening: Take a close look at the vent opening to assess the level of debris or blockage. Use a flashlight if necessary to get a better view. Remove any visible obstructions, such as leaves, lint, or twigs, using your hands or a small brush.
- Use a vent cleaning brush: Take your vent cleaning brush and insert it into the vent opening. Push the brush into the vent as far as it can go, then, using a gentle twisting motion, move the brush back and forth to dislodge any trapped lint or debris. Continue this motion several times to ensure a thorough cleaning.
- Remove loosened debris: As you use the brush, you may notice lint or other debris being dislodged from the vent opening. Use a vacuum cleaner with a hose attachment to remove this loosened debris. Insert the hose attachment into the vent opening and carefully vacuum up any accumulated lint.
- Repeat if necessary: Depending on the level of buildup, you may need to repeat the previous steps multiple times to ensure a clean and clear exterior vent. Continue brushing, twisting, and vacuuming until no more debris is coming out of the vent.
- Inspect the vent cover: Before reattaching the vent cover, take a moment to inspect it for any debris or blockages. Clean the vent cover using a damp cloth or brush to remove any remaining lint or dirt.
Clearing the exterior vent is an essential step in the process of cleaning a clogged dryer vent. It helps to ensure proper airflow and prevent future blockages. By removing the debris and cleaning the vent opening, you are taking important measures to maintain the efficiency and safety of your dryer.
With the exterior vent now clean, it’s time to move on to the next step: clearing the lint trap. This step focuses on removing lint and debris from the dryer itself. We will cover it in the next section.
Step 4: Clearing the Lint Trap
After cleaning the exterior vent, it’s crucial to turn your attention to the lint trap inside the dryer. The lint trap collects lint and debris from your clothing during the drying process. A clogged or dirty lint trap can hinder airflow and reduce the efficiency of your dryer. Follow these steps to clear the lint trap:
- Locate the lint trap: The lint trap is typically located inside the dryer, near or behind the dryer door. It is a rectangular filter that you can easily remove for cleaning.
- Remove the lint trap: Gently pull out the lint trap from its designated slot. Depending on your dryer model, you may need to undo a latch or release a mechanism to remove it.
- Inspect the lint trap: Take a moment to inspect the lint trap for any visible lint buildup or obstructions. Use your fingers or a small brush to remove any lint that is clumped together or adhered to the screen.
- Clean the lint trap with water (optional): If you notice a significant buildup of detergent residue or fabric softener on the lint trap, you can clean it with warm water. Fill a sink or basin with warm water and a mild detergent. Submerge the lint trap in the soapy water and gently scrub it with a soft brush to remove any residue. Rinse the lint trap thoroughly and allow it to dry completely before reinserting it into the dryer.
- Dispose of the lint: Once the lint trap is clean and dry, dispose of the collected lint in a trash bin. Be sure to empty it completely to ensure optimal performance of the lint trap.
Clearing the lint trap is a simple yet crucial step in maintaining the efficiency of your dryer. Regularly cleaning the lint trap prevents lint buildup and improves the drying process. By removing lint from the trap, you are preventing it from circulating through the vent and potentially causing clogs.
With the lint trap cleared, it’s time to move on to the next step: cleaning the dryer vent pipe. This step focuses on removing lint and debris from the vent pipe itself. We will cover it in the next section.
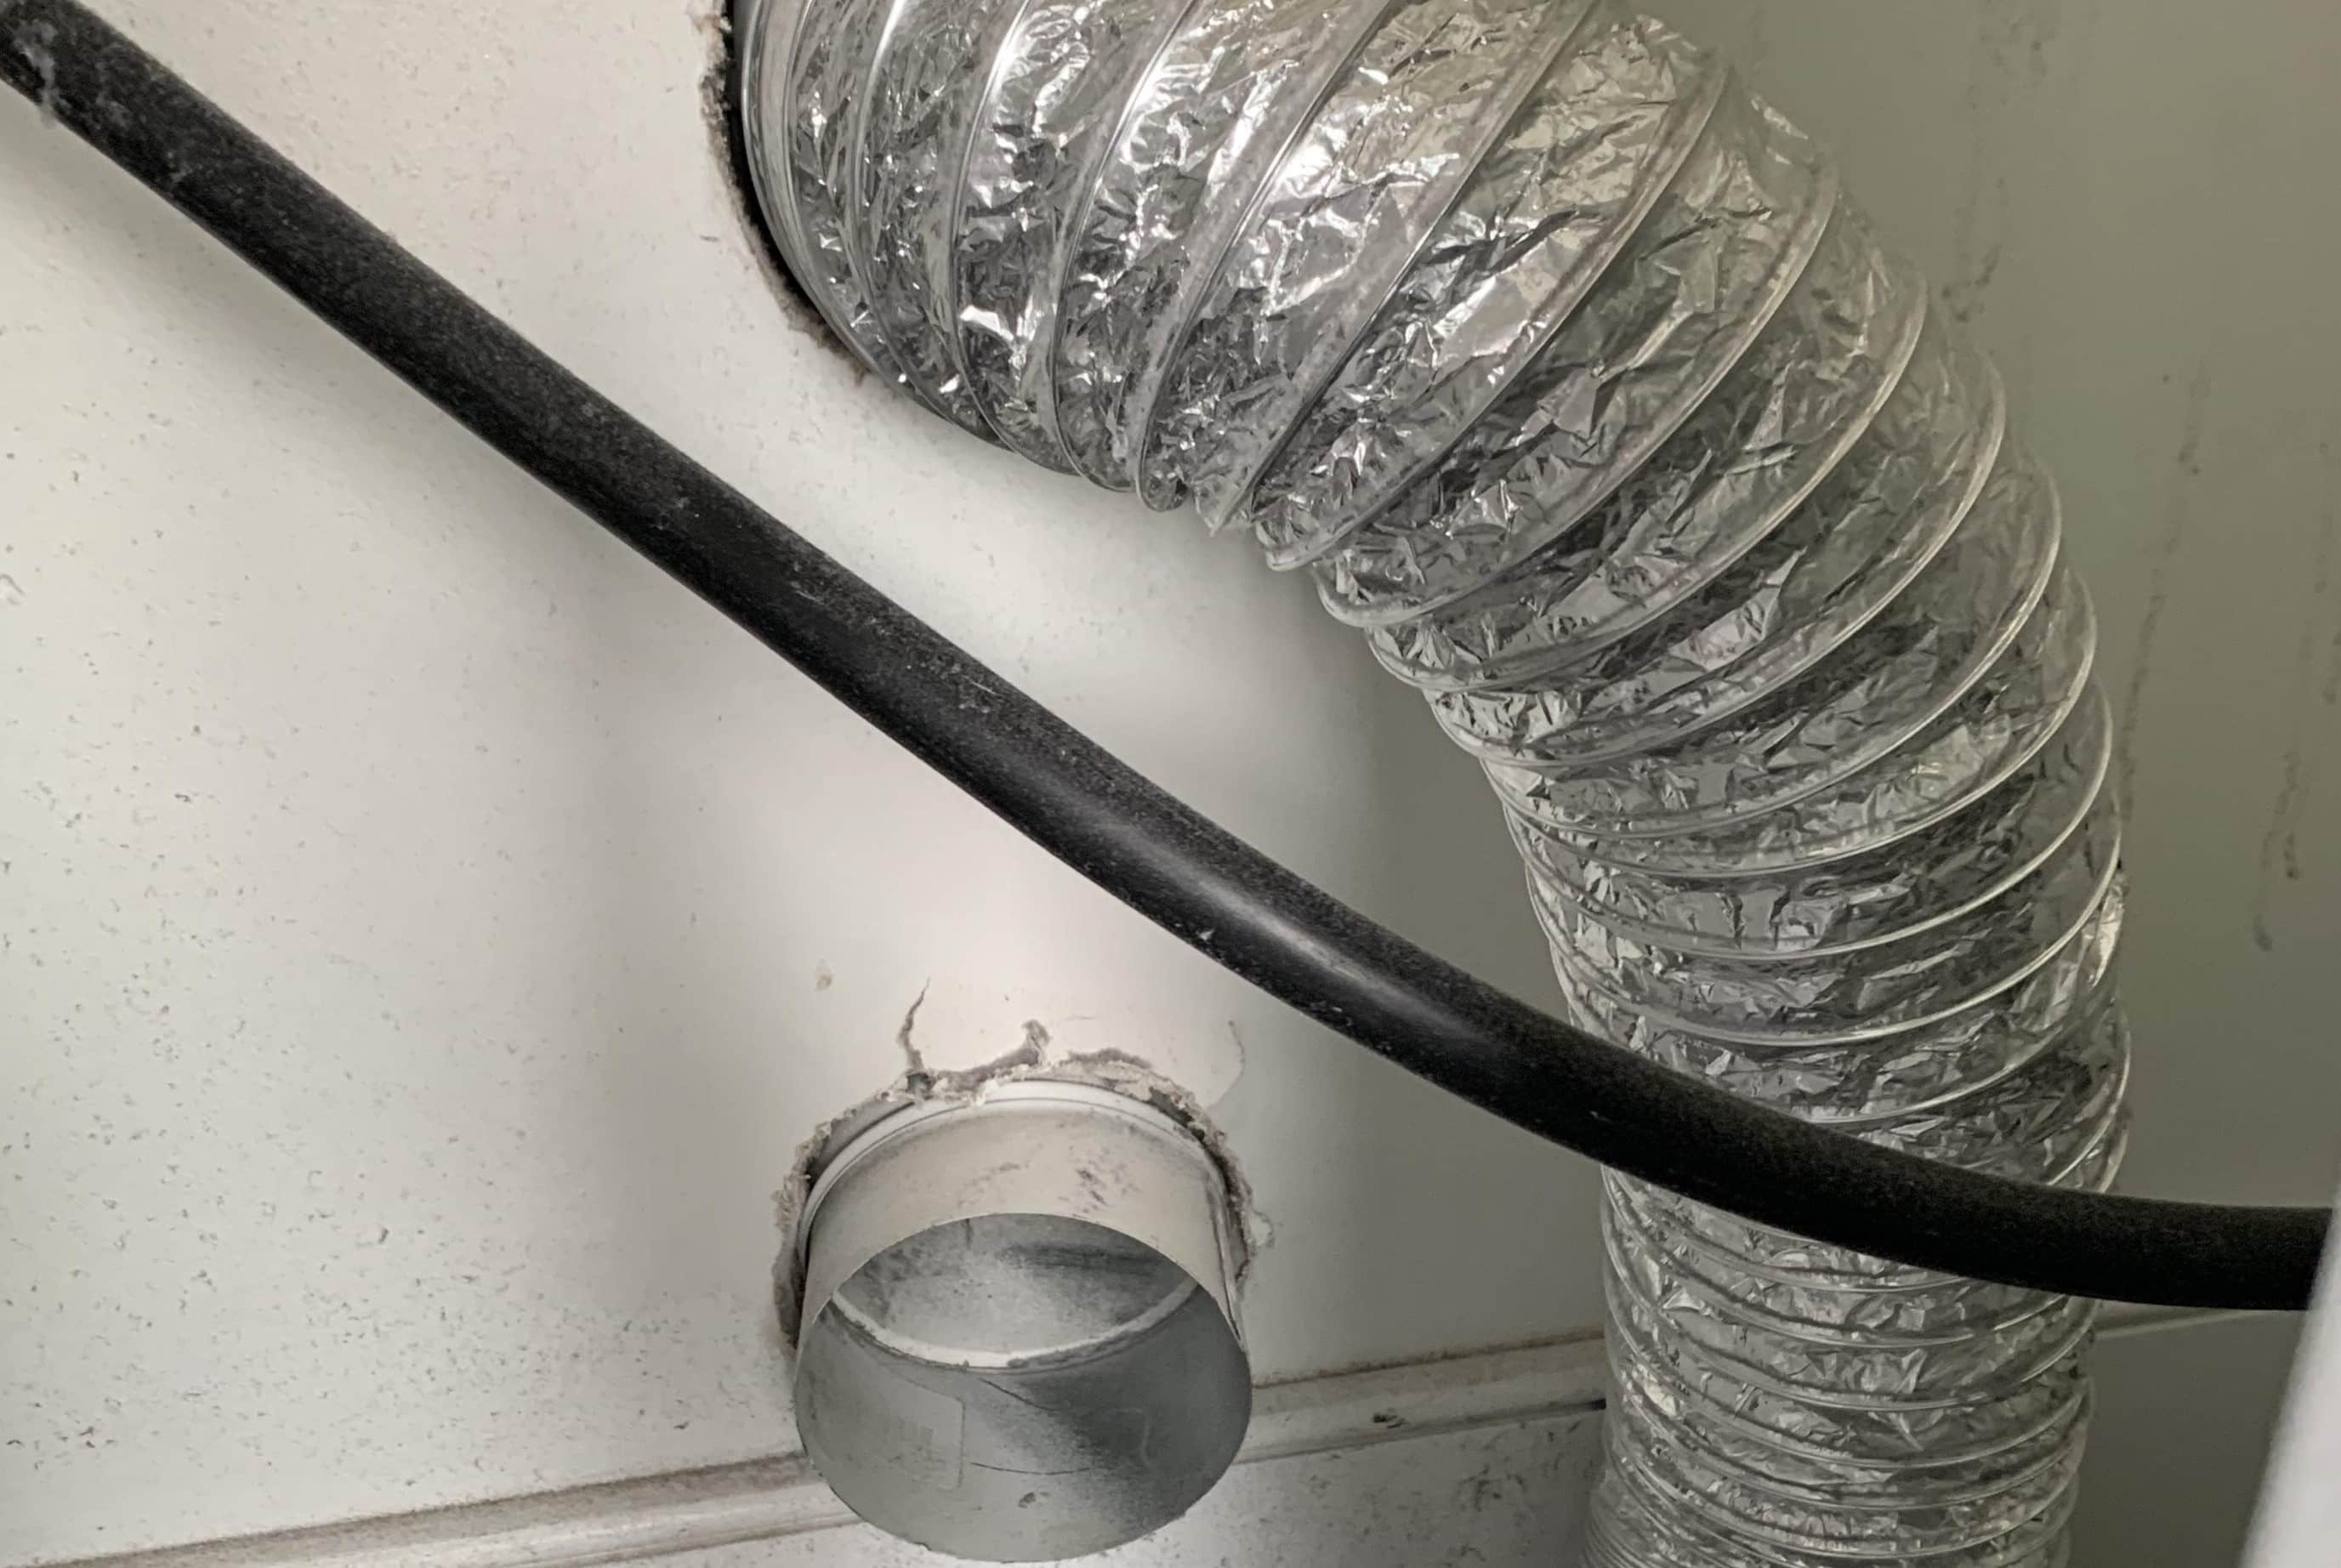
Step 5: Cleaning the Dryer Vent Pipe
Now that you’ve cleared the lint trap, it’s time to focus on cleaning the dryer vent pipe itself. This step is essential for removing any accumulated lint and debris that may be causing a clog. Follow these steps to clean the dryer vent pipe:
- Attach the vent cleaning brush to an extension rod: If your vent cleaning brush comes with an extension rod, attach it to the brush to create a longer reach. This will allow you to effectively clean the entire length of the vent pipe.
- Insert the brush into the vent pipe: Carefully insert the brush into the vent pipe from both ends. Use a twisting motion as you push the brush through the pipe to dislodge any lint or debris that may be blocking the airflow.
- Clean the vent pipe thoroughly: Continue pushing and twisting the brush through the vent pipe, ensuring that you cover the entire length. Move the brush back and forth several times to loosen any stubborn lint or debris.
- Remove loosened debris: As you clean the vent pipe with the brush, you may notice loose lint or debris being dislodged. Use a vacuum cleaner with a hose attachment to suction away this debris. Repeat the process until no more debris is being removed.
- Reattach the vent pipe: Once the vent pipe is cleaned and free of debris, reattach it securely to the back of the dryer. Make sure it is properly aligned and use a screwdriver to tighten any clamps or fasteners.
Cleaning the dryer vent pipe is a crucial step in the process of clearing a clogged dryer vent. By removing lint and debris from the vent pipe, you ensure proper airflow and reduce the risk of clogs, inefficiency, and potential fire hazards.
With the vent pipe cleaned and reattached, you’re now ready to move on to the final step: reassembling and testing the dryer. We will cover this step in the next section, so let’s keep the momentum going!
Read more: How To Clear Clogged Gutters
Step 6: Reassembling and Testing the Dryer
After completing the cleaning process, it’s time to reassemble the dryer and ensure it’s functioning properly. Follow these steps to reassemble and test your dryer:
- Reposition the dryer: Carefully move the dryer back into its original position, ensuring that it is level and stable. If necessary, use a level to adjust the feet of the dryer.
- Reconnect the vent hose: Take the vent hose that you disconnected in the first step and reattach it to the back of the dryer. Use a screwdriver to tighten the clamp securely, ensuring a tight seal.
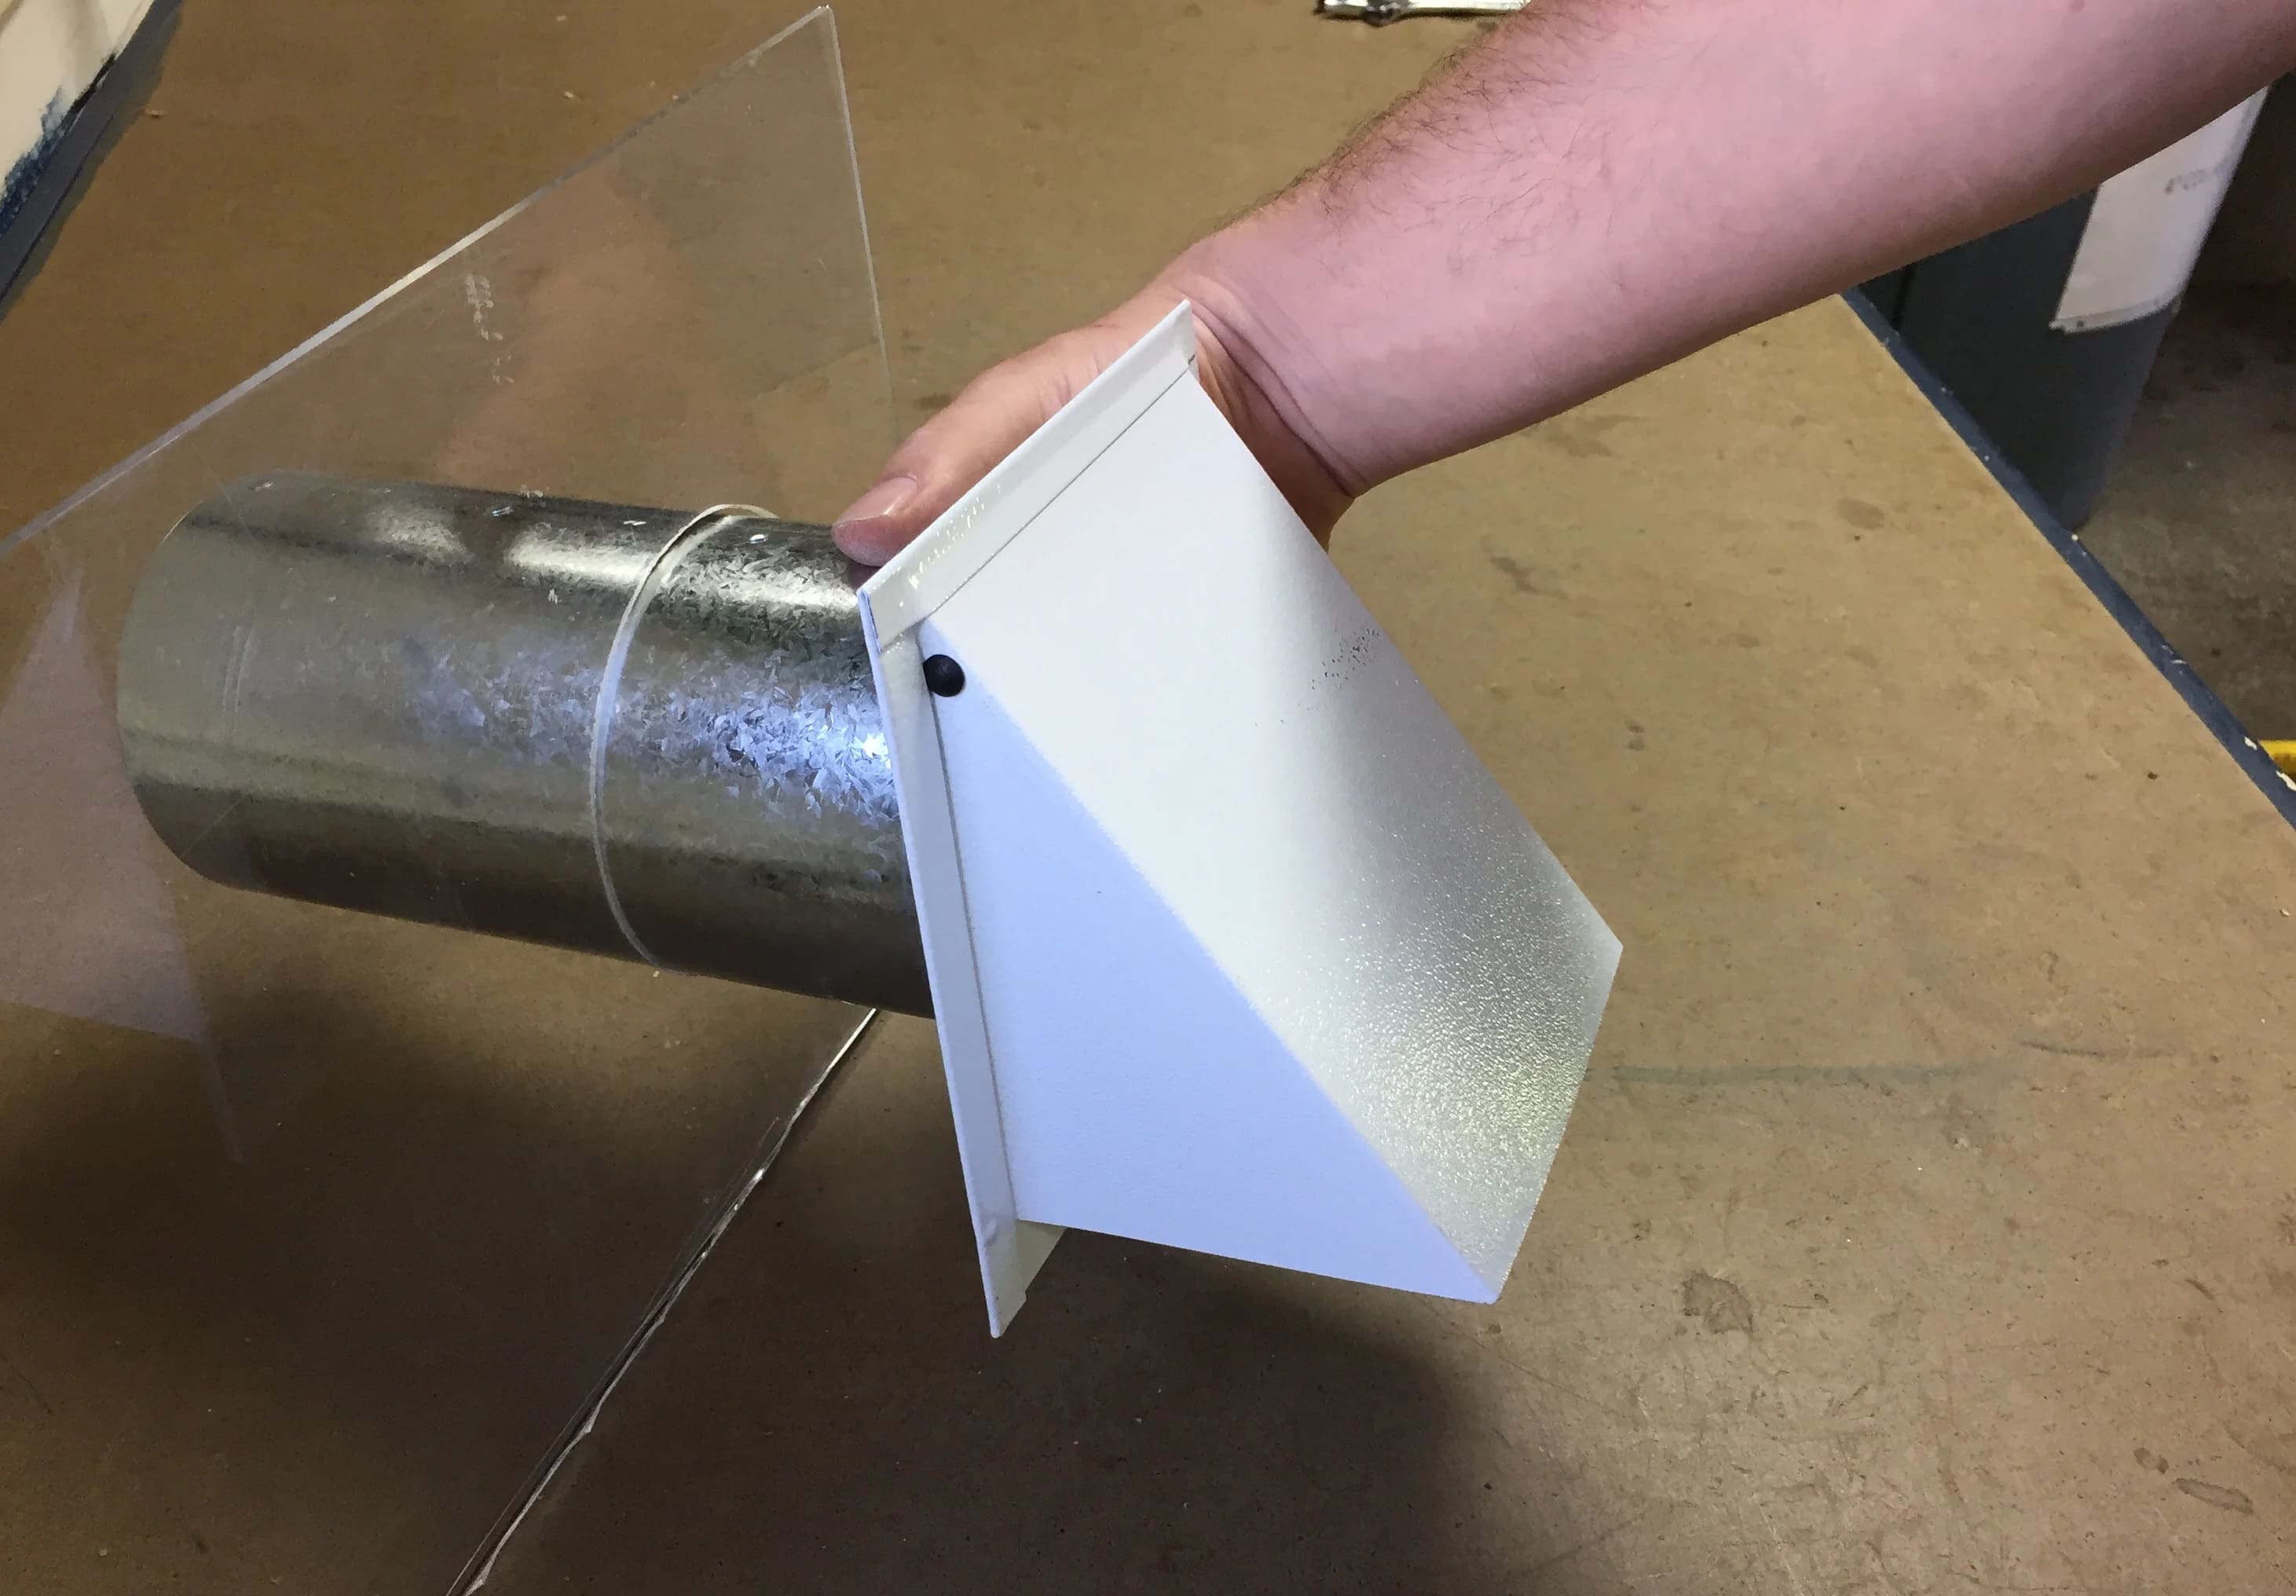
- Reattach the dryer vent cover: Position the dryer vent cover back onto the exterior wall where the vent exits. Align the screw holes or fasteners and use a screwdriver to securely reattach the vent cover.
- Plug in the dryer: Once everything is reassembled, plug the dryer back into the electrical outlet. Double-check that the power cord is properly connected and that there are no loose or exposed wires.
- Run a test cycle: Turn on the dryer and run a test cycle to ensure everything is working as it should. Pay attention to the airflow and dryer performance. If you notice any issues, such as poor drying or unusual noises, consult a professional for further inspection.
- Monitor future performance: Going forward, be vigilant about keeping your dryer vent clean. Regularly check the lint trap and the exterior vent for any signs of accumulation. Consider performing this maintenance task at least once a year or more frequently if you notice any recurring issues.
Reassembling and testing the dryer is an essential final step in the process of clearing a clogged dryer vent. It ensures that everything is functioning correctly and allows you to identify and address any potential issues before they escalate.
Congratulations! You have successfully cleared your clogged dryer vent and restored optimal performance to your dryer. By following these steps and maintaining regular dryer vent maintenance, you can prolong the lifespan of your dryer, reduce energy consumption, and ensure the safety of your home.
Remember, a clean and well-maintained dryer vent is a small investment of time and effort that can yield significant benefits in the long run. Keep up with regular maintenance to enjoy efficient drying and peace of mind.
If you have any further questions or encounter any challenges along the way, don’t hesitate to seek professional assistance.
Happy drying!
Conclusion
Cleaning a clogged dryer vent is a vital task that should not be overlooked by homeowners. By clearing the vent of lint and debris, you can improve the efficiency of your dryer, extend its lifespan, and reduce the risk of fire hazards. Regular maintenance of your dryer vent is essential for the safety of your home and the well-being of your family.
In this comprehensive guide, we have provided step-by-step instructions on how to clear a clogged dryer vent. We discussed the signs of a clogged vent and the importance of regular maintenance. We also outlined the tools and supplies needed for the job and detailed each step of the cleaning process.
From disconnecting the dryer and removing the vent cover to cleaning the exterior vent, clearing the lint trap, and cleaning the vent pipe, we covered each stage of the process. With these instructions, you can confidently tackle the task of clearing your clogged dryer vent.
Remember to prioritize safety throughout the process. Always ensure that your dryer is unplugged before starting any maintenance, and if you are uncomfortable performing any steps, seek professional assistance.
By following these steps and maintaining regular maintenance, you can enjoy a dryer that operates efficiently, dries your clothes effectively, and minimizes the risk of fire hazards. Clearing a clogged dryer vent is a small investment of time and effort that can yield significant benefits in the long run.
We hope that this guide has provided you with the knowledge and confidence to clear your clogged dryer vent effectively. Keep up with regular maintenance, and your dryer will continue to serve you well for years to come.
Stay diligent, stay safe, and enjoy the benefits of a clean and efficiently operating dryer!
Frequently Asked Questions about How To Clear A Clogged Dryer Vent
Was this page helpful?
At Storables.com, we guarantee accurate and reliable information. Our content, validated by Expert Board Contributors, is crafted following stringent Editorial Policies. We're committed to providing you with well-researched, expert-backed insights for all your informational needs.