Articles
How To Vent A Dryer
Modified: October 20, 2024
Learn how to properly vent a dryer with our informative articles. Ensure your dryer is working efficiently by following these expert tips and guidelines.
(Many of the links in this article redirect to a specific reviewed product. Your purchase of these products through affiliate links helps to generate commission for Storables.com, at no extra cost. Learn more)
Introduction
Dryers are essential appliances in most households, providing convenience and efficiency when it comes to drying clothes. However, many people overlook the importance of proper dryer ventilation. A dryer vent is a critical component that helps expel moisture and lint from the dryer to the outside of the house.
Improper dryer ventilation can lead to a variety of issues, including reduced drying efficiency, increased energy consumption, and even fire hazards. When a dryer is not vented correctly, moisture and lint can build up, causing mold growth, musty odors, and potential damage to the dryer itself.
This article will guide you through the process of correctly venting your dryer to ensure optimal performance and safety. We will cover the various types of dryer ventilation systems, the tools and materials needed, and the step-by-step process of venting a dryer.
By following these guidelines, you can ensure that your dryer operates efficiently, extends its lifespan, and reduces the risk of fire hazards. So, let’s dive into the world of dryer venting and learn how to properly vent your dryer.
Key Takeaways:
- Proper dryer ventilation is crucial for efficient drying, energy savings, fire safety, and improved indoor air quality. Follow the step-by-step guide to ensure optimal performance and reduce potential hazards.
- Choosing the right venting location, gathering necessary tools, and proper installation are key to a well-vented dryer. Regular maintenance ensures efficient airflow and reduces fire risks.
Read more: How To Replace Dryer Vent
Why is Proper Dryer Ventilation Important?
Proper dryer ventilation is crucial for several reasons. Let’s explore why it is essential to ensure that your dryer is correctly vented:
1. Efficient Drying: A properly vented dryer allows hot air, moisture, and lint to escape efficiently. When the ventilation system is clogged or restricted, the dryer’s performance is compromised, resulting in longer drying times. This can be frustrating and time-consuming, especially when you have a pile of laundry to tackle.
2. Energy Savings: When a dryer is working harder to dry your clothes due to poor ventilation, it consumes more energy. By ensuring proper dryer ventilation, you can save on energy costs and reduce your carbon footprint.
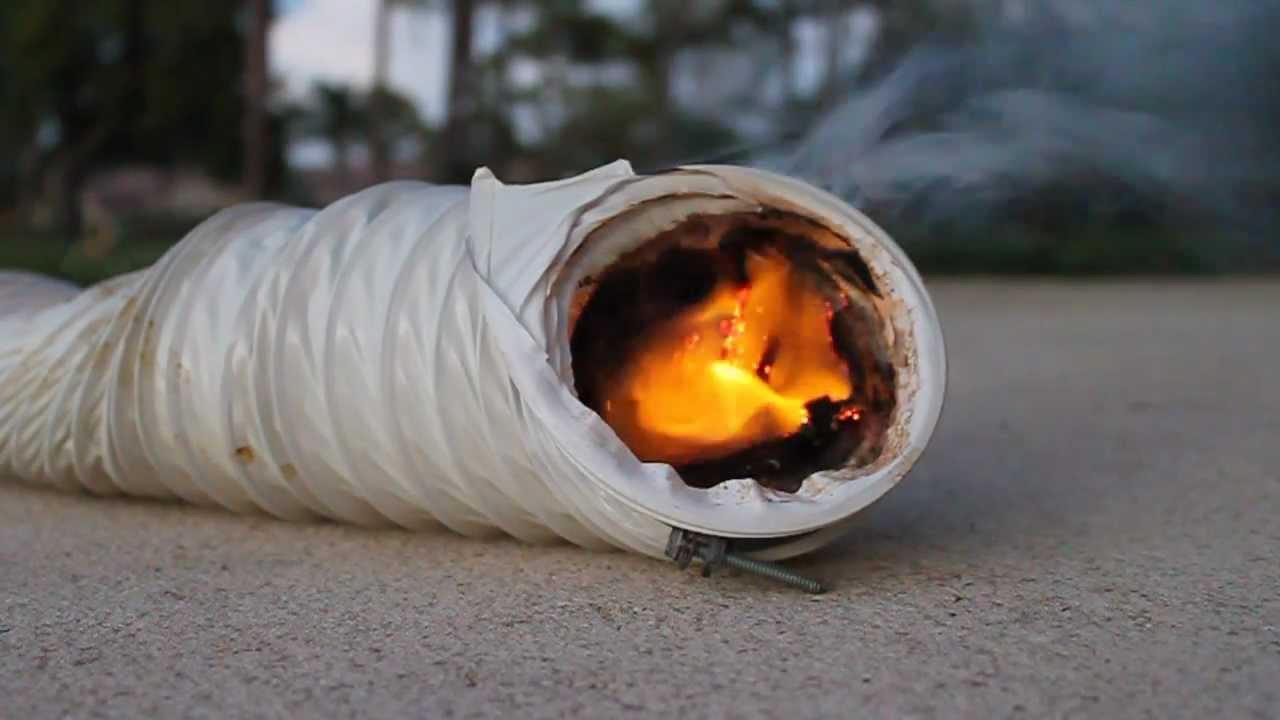
3. Fire Safety: Lint is highly flammable, and when it accumulates in the dryer vent, it becomes a potential fire hazard. According to the U.S. Fire Administration, an estimated 2,900 residential fires originate from clothes dryers each year, leading to injuries, property damage, and even fatalities. Proper dryer ventilation helps minimize the risk of lint buildup and reduces the chances of a devastating dryer fire.
4. Preventing Mold and Mildew: Moisture that is not properly vented out of the dryer can lead to the growth of mold and mildew. Mold infestations not only cause unpleasant odors but can also be harmful to your health, particularly for those with allergies or respiratory issues.
5. Extending the Dryer’s Lifespan: Inadequate ventilation can cause the dryer’s internal components to overheat, leading to premature wear and tear. By allowing proper airflow, you can prevent the accumulation of heat that can damage the dryer and its internal mechanisms.
6. Improved Indoor Air Quality: When a dryer is not properly vented, the damp, moisture-laden air it emits can contribute to poor indoor air quality. This can trigger respiratory issues, allergies, and other health problems. By ensuring proper dryer ventilation, you can maintain a healthier living environment for you and your family.
Overall, proper dryer ventilation enhances the efficiency of your dryer, reduces energy consumption, minimizes fire hazards, prevents mold growth, prolongs the lifespan of your dryer, and improves indoor air quality. It is a small but crucial step in maintaining a safe and healthy home environment.
Types of Dryer Ventilation Systems
There are several types of dryer ventilation systems available, each with its own advantages and considerations. Let’s explore the most common types:
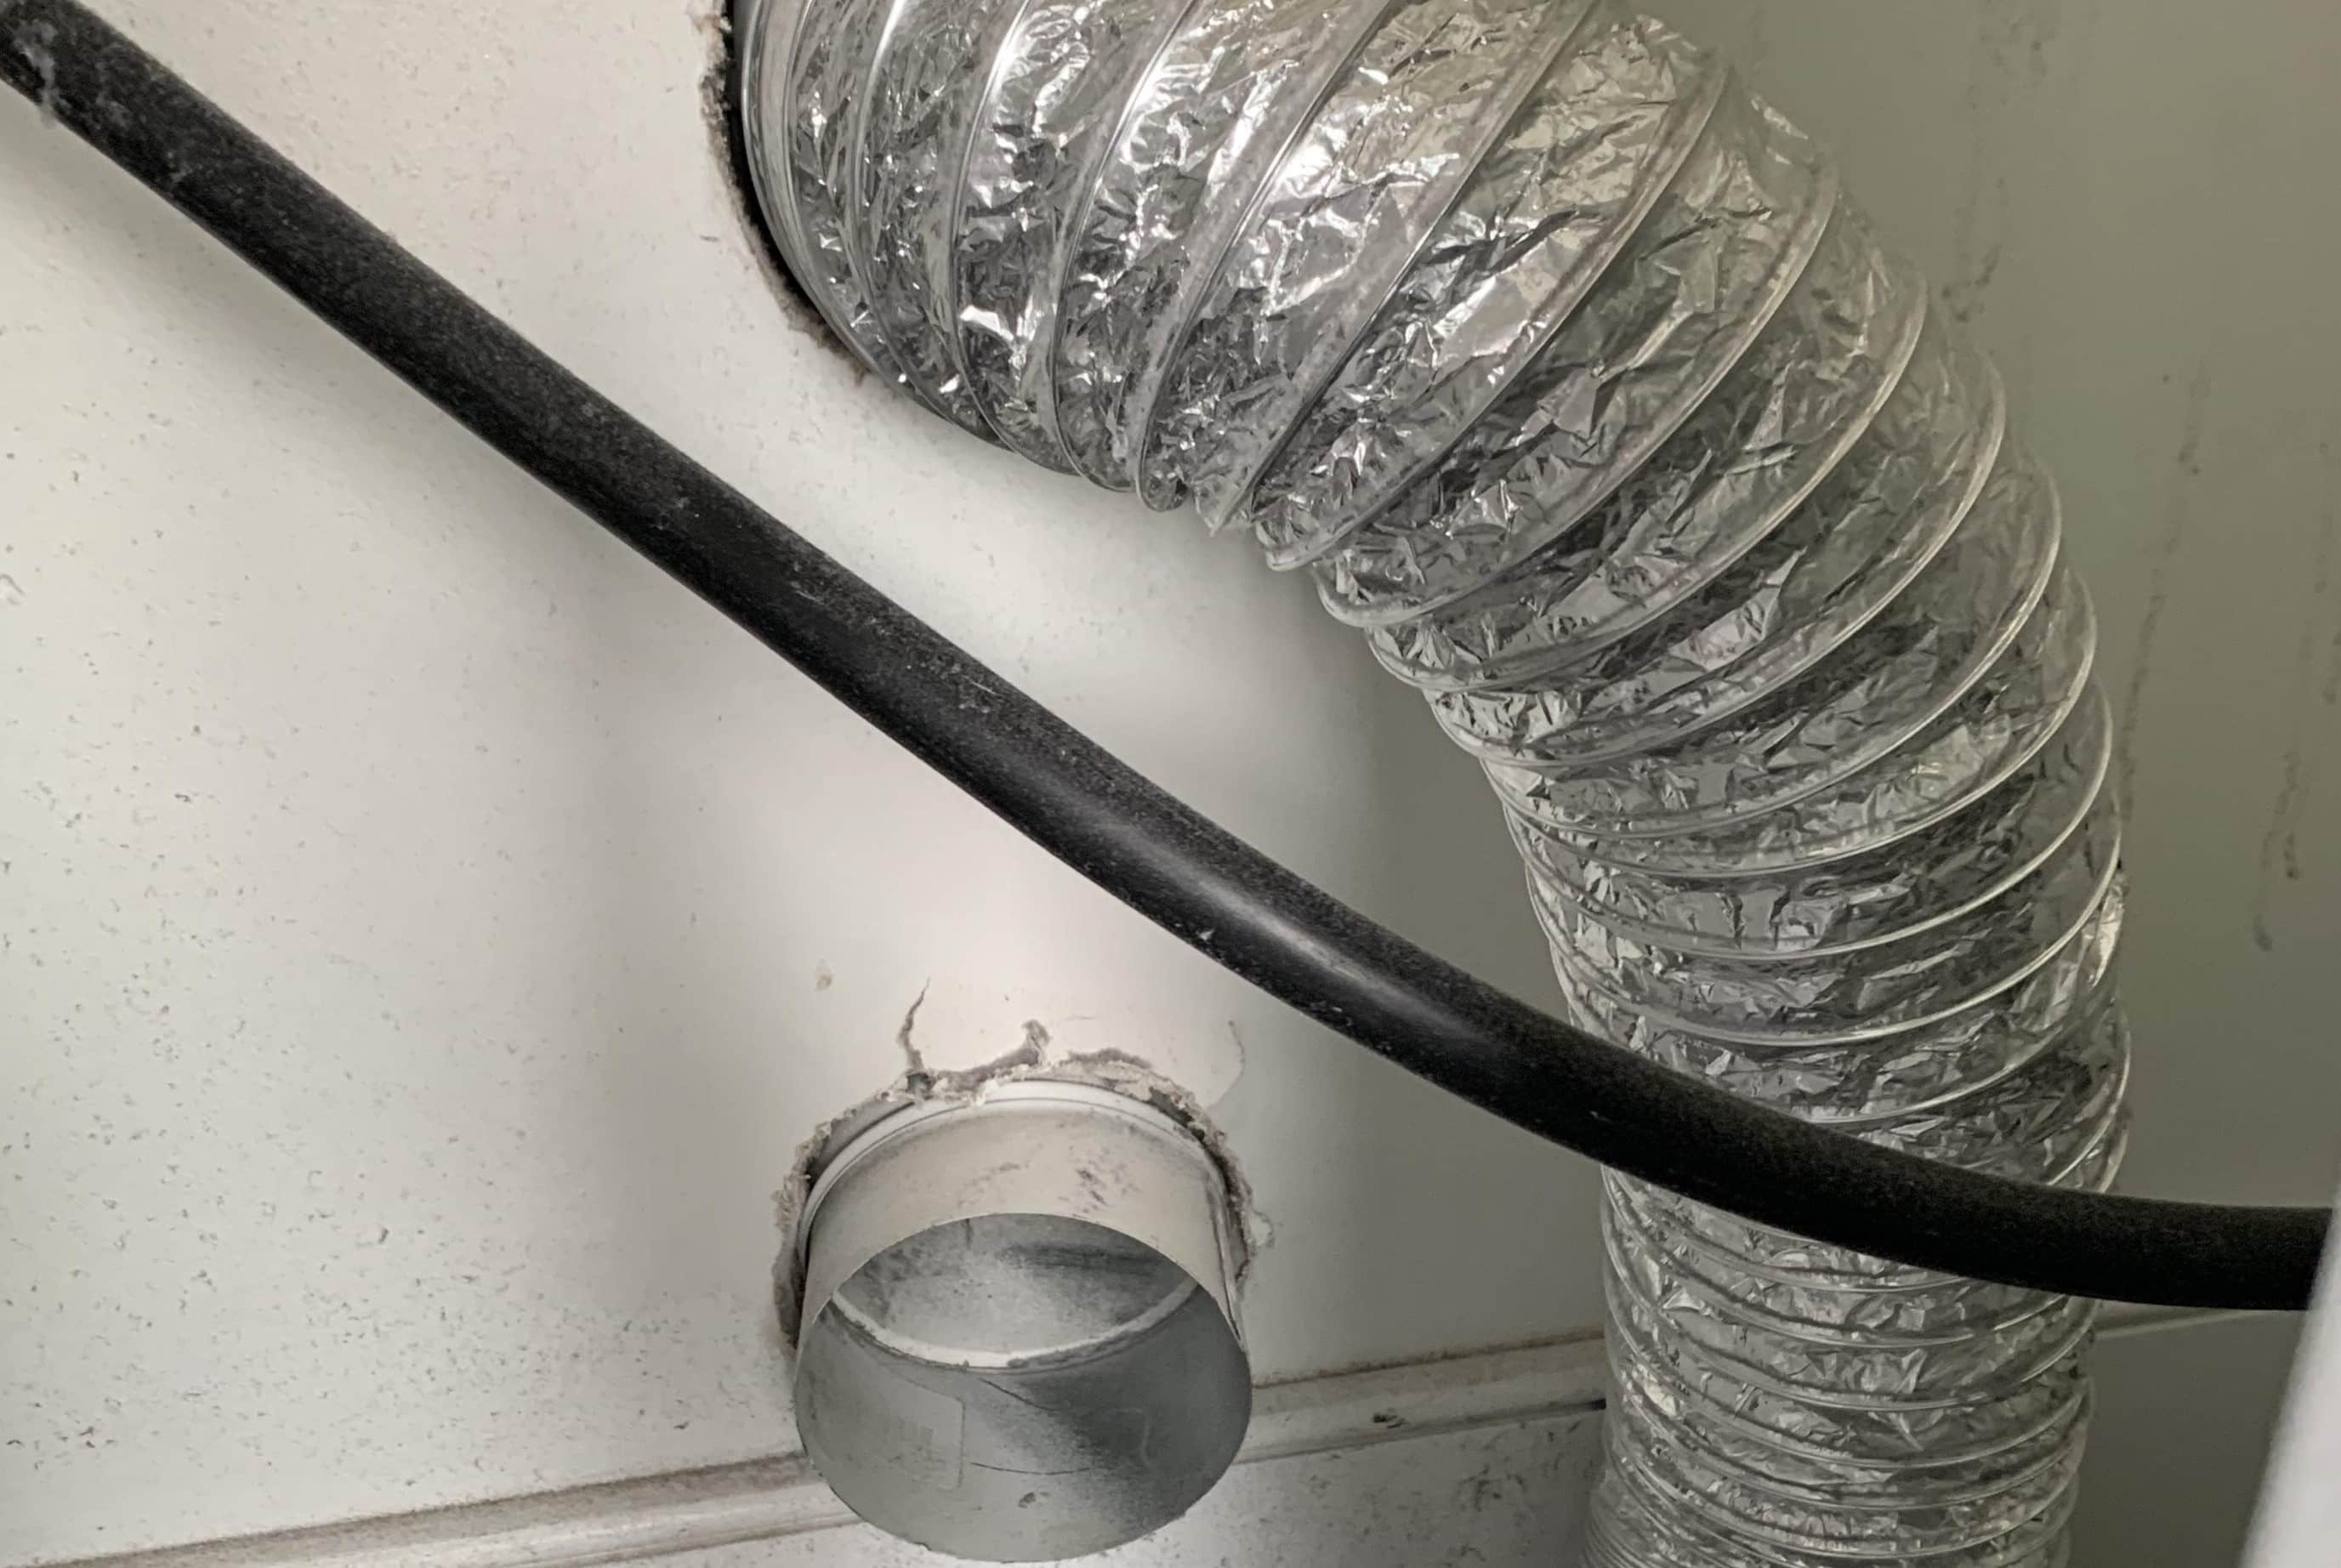
- Vent through the Wall: This is one of the most common and straightforward methods of dryer venting. A hole is cut through an exterior wall, and a vent hood is installed on the outside. The vent pipe is then connected to the back of the dryer, allowing hot air and moisture to exit through the wall. This type of system is relatively easy to install and is suitable for ground-level and first-floor laundry rooms.
- Vent through the Roof: In some cases, venting through the roof may be necessary due to the configuration of the house or the location of the laundry room. This type of ventilation system involves cutting a hole in the roof and installing a vent cap or roof vent. The vent pipe is run through the attic and connected to the dryer. Venting through the roof requires additional precautions to ensure proper sealing and waterproofing.
- Downward Venting: Downward venting is an alternative option when venting through a wall or roof is not feasible. This method involves routing the vent pipe from the dryer downward through the floor and out of the crawl space or basement. Downward venting requires careful planning to ensure the pipe is properly supported, sloped to prevent condensation buildup, and adequately sealed at the exit point.
- Periscope Venting: Periscope venting is used when space is limited behind the dryer. It involves using a periscope vent pipe, which is a rigid or flexible pipe that can be adjusted and extended to position the vent behind the dryer in a tight space. This type of ventilation is ideal for apartments, closets, or laundry areas with limited room.
- Indoor Venting Kits: Indoor venting kits are an option for situations where venting to the outside is not possible or allowed. These kits use a filtration system to capture lint and moisture from the dryer exhaust, allowing the air to be recirculated back into the room. While indoor venting kits may seem convenient, it is important to note that they are not as efficient as outdoor venting and can contribute to increased humidity levels and decreased indoor air quality.
When choosing a dryer ventilation system, consider factors such as the layout of your home, local building codes, the distance between the dryer and the exterior wall or roof, and the space available for installation. Consulting a professional if you’re unsure which type of ventilation system is best for your specific circumstances is always a good idea.
Now that we’ve explored the different types of dryer venting systems available, let’s move on to the tools and materials you’ll need to successfully complete the installation process.
Tools and Materials Needed
Before you begin venting your dryer, it’s important to gather all the necessary tools and materials to ensure a smooth and successful installation. Here’s a list of items you’ll need:
Tools:
- Screwdriver or drill
- Hole saw or jigsaw
- Tape measure
- Utility knife
- Adjustable wrench
- Tin snips
- Duct tape
- Straight edge
- Pencil
Materials:
- Dryer vent hood
- Dryer vent pipe (rigid or flexible)
- Vent clamps
- Duct connectors
- Wall or roof cap
- Screws
- Aluminum foil tape or duct sealant
- Roof flashing (if applicable)
When selecting the dryer vent hood, choose one that is suitable for your chosen venting method (wall or roof). Opt for a hood with a built-in damper to prevent backdrafts and critters from entering the ductwork.
As for the vent pipe, you can choose between rigid or flexible options, depending on your specific needs and space limitations. Rigid pipes provide better airflow and are less likely to trap lint, while flexible pipes are more versatile and easier to install in tight spaces. Ensure the pipe matches the diameter of the dryer vent outlet and the vent hood for secure connections.
When it comes to sealing the connections and joints, choose aluminum foil tape or a duct sealant to ensure an airtight seal that prevents leaks and reduces the risk of lint buildup.
Remember to check your local building codes to ensure compliance and any additional materials or requirements specific to your area.
With the necessary tools and materials in hand, you’re now ready to move on to the next steps of the dryer venting process: determining the best location for venting and measuring and cutting the vent hole.
Step 1: Determine the Best Location for Venting
Before you start the installation process, it’s crucial to determine the most suitable location for venting your dryer. Here are some factors to consider:
1. Proximity to the Dryer: The ideal location for the vent should be as close to the dryer as possible. This minimizes the length of the vent pipe, allowing for more efficient airflow and reducing the risk of lint buildup. However, ensure that the location does not interfere with the dryer’s operation or impede access to the back of the machine.
2. Exterior Accessibility: Choose a location that provides easy access to the exterior of your house. This will make it more convenient to install the vent hood and perform regular maintenance, such as cleaning out lint and inspecting for any obstructions or damage.
3. Obstructions: Ensure there are no obstructions such as windows, doors, or other vents in the chosen location. This will allow for a direct and unobstructed path for the vented air and reduce the likelihood of backdrafts or restricted airflow.
4. Exterior Aesthetics: Consider the visual impact of the vent hood on the exterior of your house. Choose a location that is aesthetically pleasing and blends well with the overall appearance of your home.
5. Building Codes and Regulations: Check your local building codes and regulations to ensure compliance with any specific requirements regarding the placement and installation of dryer vents. Some areas may have restrictions on where vents can be installed, particularly in multi-unit buildings or historical homes.
After considering these factors, you can determine the best location for venting your dryer. Common locations include an exterior wall, the roof, or downward venting into a crawl space or basement. Each location has its own set of considerations and may require different venting methods.
Once you have determined the best location for the vent, it’s time to move on to the next step: gathering the necessary tools and materials for the installation process.
Read more: How To Reroute A Dryer Vent
Step 2: Gather the Necessary Tools and Materials
Before you begin the dryer vent installation, it’s important to gather all the necessary tools and materials. Here’s a checklist of what you’ll need:
Tools:
- Screwdriver or drill
- Hole saw or jigsaw
- Tape measure
- Utility knife
- Adjustable wrench
- Tin snips
- Duct tape
- Straight edge
- Pencil
Materials:
- Dryer vent hood
- Dryer vent pipe (rigid or flexible)
- Vent clamps
- Duct connectors
- Wall or roof cap
- Screws
- Aluminum foil tape or duct sealant
- Roof flashing (if applicable)
Having the right tools and materials will make the installation process more efficient and ensure a secure and proper venting system for your dryer.
Your screwdriver or drill will be needed to remove any existing fasteners or screws and to secure the vent hood and other components. The hole saw or jigsaw will be used to create the opening for the vent in either the wall or roof, depending on your chosen venting method.
The tape measure, straight edge, and pencil are necessary for accurately measuring and marking the location of the vent hole. These tools will help ensure that the hole is in the correct position and the right size for the vent pipe and hood.
An adjustable wrench will come in handy for tightening and securing the various connectors and clamps throughout the installation process. Tin snips, a utility knife, and duct tape will be needed for cutting and sealing the vent pipe as necessary.
When selecting the materials, choose a vent hood that is appropriate for your chosen venting method (wall or roof). The vent pipe can be either rigid or flexible, depending on your specific needs and space limitations. Ensure that the diameter of the pipe matches the outlet of the dryer and the vent hood for a secure and proper connection.
Other materials such as vent clamps, duct connectors, screws, aluminum foil tape, and duct sealant will be required to secure and seal the various components of the venting system. If you are venting through the roof, you may also need roof flashing to ensure a watertight seal.
By gathering all the necessary tools and materials upfront, you will save time and frustration during the installation process. With everything prepared, you’re ready to move on to the next step: measuring and cutting the vent hole.
Make sure the dryer vent is properly installed and free of any obstructions to ensure efficient airflow and reduce the risk of fire. Regularly clean the vent to prevent lint buildup.
Step 3: Measure and Cut the Vent Hole
Once you have determined the best location for venting and gathered all the necessary tools and materials, it’s time to measure and cut the vent hole. Follow these steps to ensure accurate measurements and a proper fit:
- Locate the Dryer Vent Outlet: Start by locating the dryer vent outlet on the back of the dryer. This is where the vent pipe will connect.
- Measure the Diameter: Measure the diameter of the dryer vent outlet using a tape measure. It is essential to use the correct size when selecting the vent pipe and attachments.
- Determine the Vent Hole Location: Based on the chosen venting method (wall, roof, or downward venting), determine the appropriate location for the vent hole. Use a straight edge and pencil to mark the center of the hole.
- Create the Vent Hole: Use a hole saw or jigsaw to cut out the vent hole following the marked location. Be sure to wear protective eyewear and follow the manufacturer’s instructions for the tool you are using. Take your time and make precise cuts to ensure a clean and accurate opening.
- Check the Fit: After cutting the vent hole, check the fit by placing the vent hood or connector in the hole. Ensure that it fits securely and is aligned correctly before proceeding.
Remember to consider any additional clearance requirements specified by the dryer manufacturer or local building codes when determining the location and size of the vent hole. It’s important to provide enough space for proper airflow and to avoid any interference with other structures or appliances.
Once the vent hole is cut and the fit is confirmed, you can proceed to the next step: installing the vent hood or connector.
Note: If you are not comfortable or experienced with cutting holes or using power tools, it may be best to consult a professional for assistance.
Step 4: Install the Vent Hood
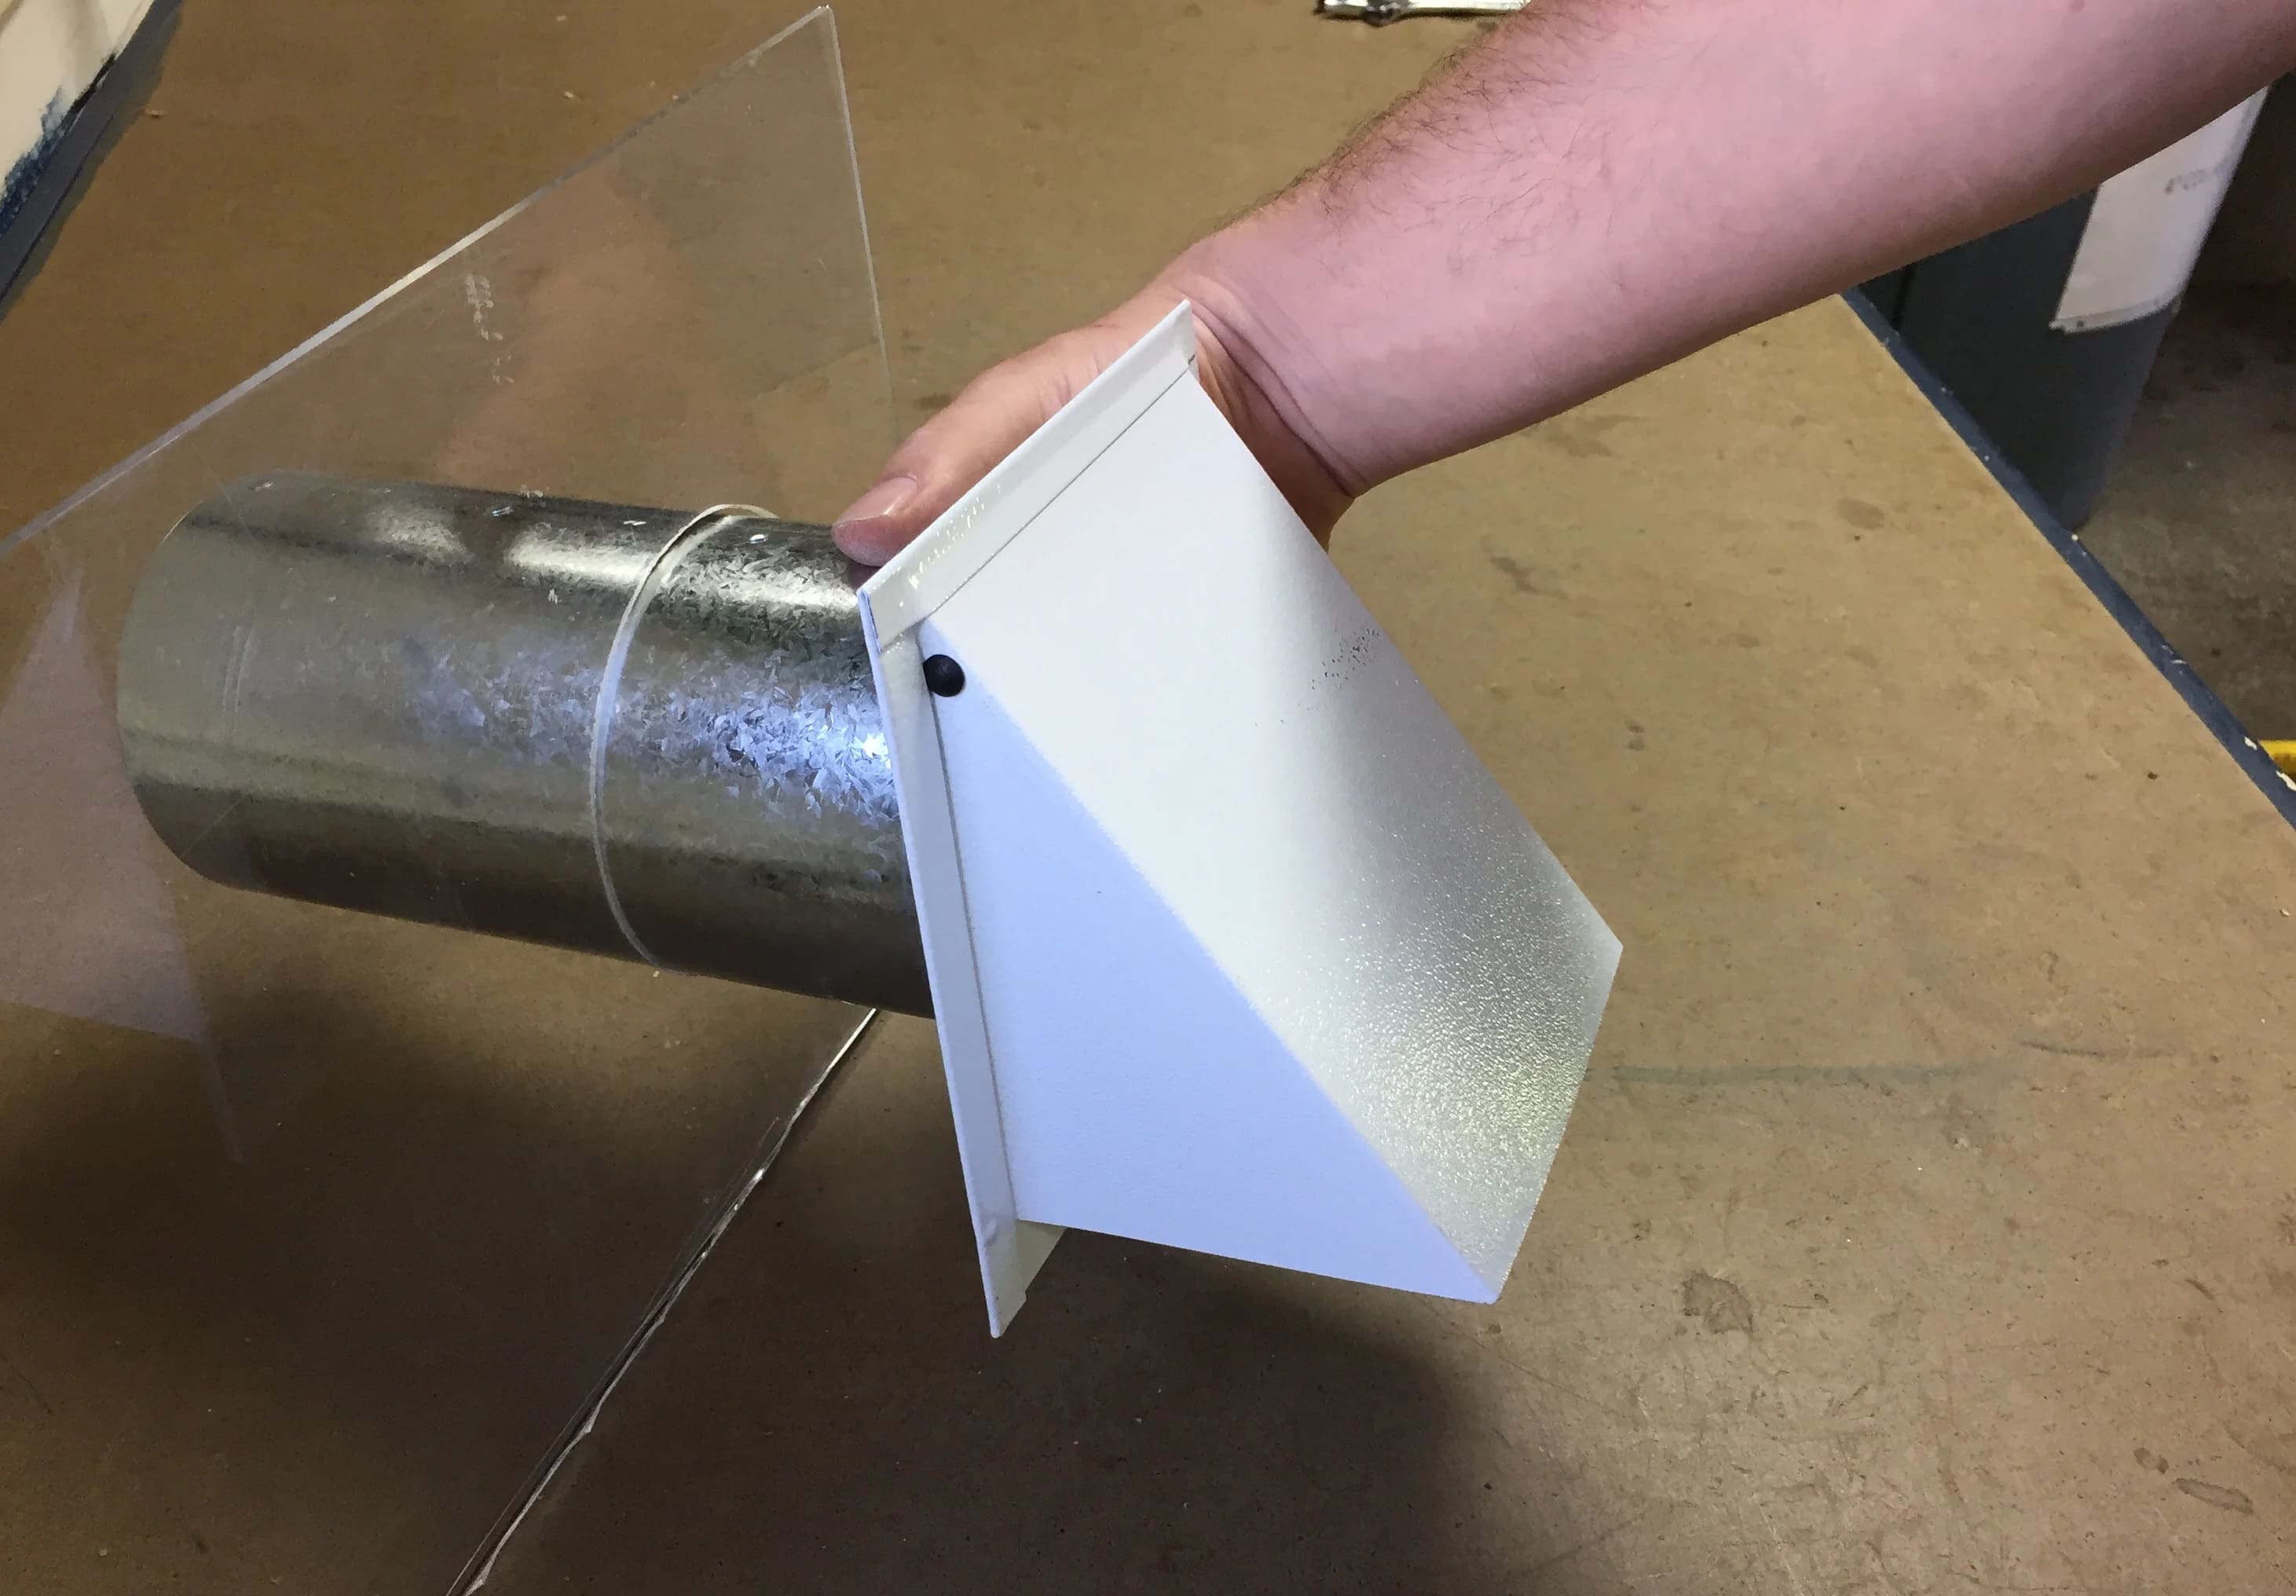
Now that you have measured and cut the vent hole, it’s time to install the vent hood. The vent hood serves as the exterior opening for the dryer vent, allowing hot air and moisture to escape while preventing critters and debris from entering the ductwork. Follow these steps for proper installation:
- Position the Vent Hood: Place the vent hood over the vent hole on the exterior of your home. Ensure that it is positioned correctly and aligned with the hole.
- Secure the Vent Hood: Depending on the type of vent hood you have, use screws or other fasteners to secure it in place. Refer to the manufacturer’s instructions for specific guidelines.
- Tighten the Connection: Check the tightness of the connection between the vent hood and the exterior wall. Use an adjustable wrench or a screwdriver to ensure the hood is securely fastened.
- Verify Proper Alignment: Confirm that the vent hood is facing the correct direction. It should be angled downward to prevent water or debris from entering the vent pipe.
- Inspect for Adequate Clearance: Ensure that there is enough space around the vent hood for proper airflow and to prevent any obstructions. Trim any excess siding or other materials if necessary.
- Check for a Secure Fit: Give the vent hood a gentle tug to ensure it is firmly attached to the exterior wall. It should not wobble or move easily.
Proper installation of the vent hood is crucial to ensure efficient and safe venting of your dryer. It is important to use the appropriate screws or fasteners based on the exterior surface of your home, such as wood, vinyl siding, or stucco. If needed, consult with a professional or refer to the manufacturer’s instructions for guidance specific to your vent hood model.
With the vent hood securely installed, you can now move on to connecting the vent pipe and completing the dryer vent installation.
Step 5: Connect the Vent Pipe
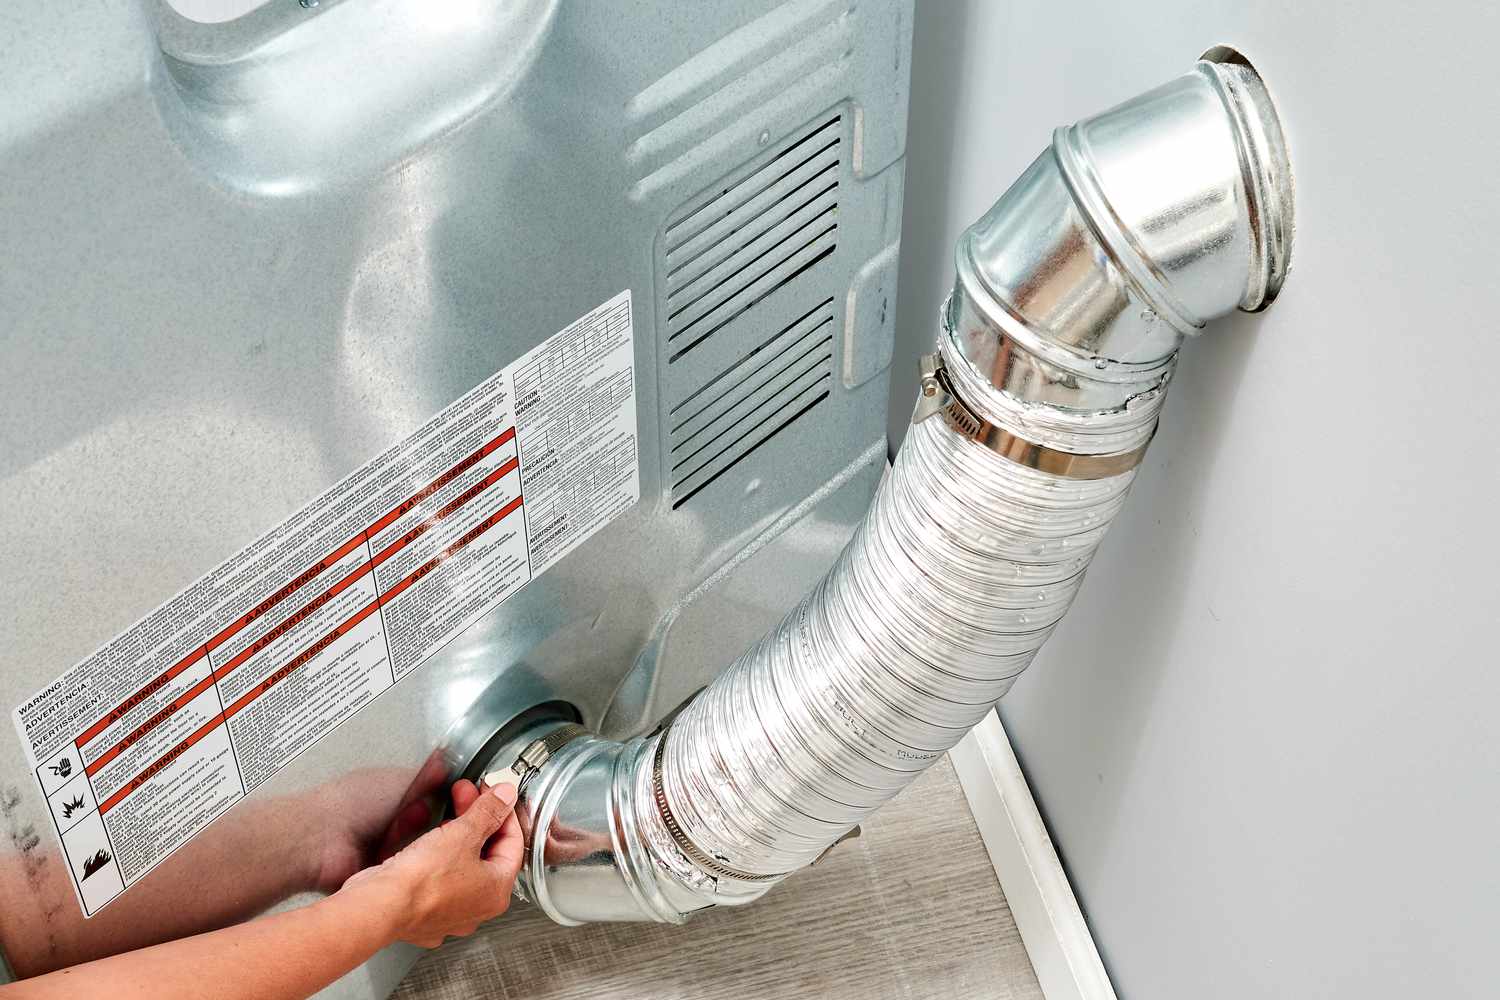
Now that the vent hood is securely installed, it’s time to connect the vent pipe from the dryer to the vent hood. This step ensures that hot air, moisture, and lint can flow efficiently from the dryer to the exterior of your home. Follow these steps to properly connect the vent pipe:
- Choose the Vent Pipe: Select either a rigid or flexible vent pipe based on your specific needs and space limitations. Ensure that the diameter of the vent pipe matches the outlet of the dryer and the vent hood for a secure connection.
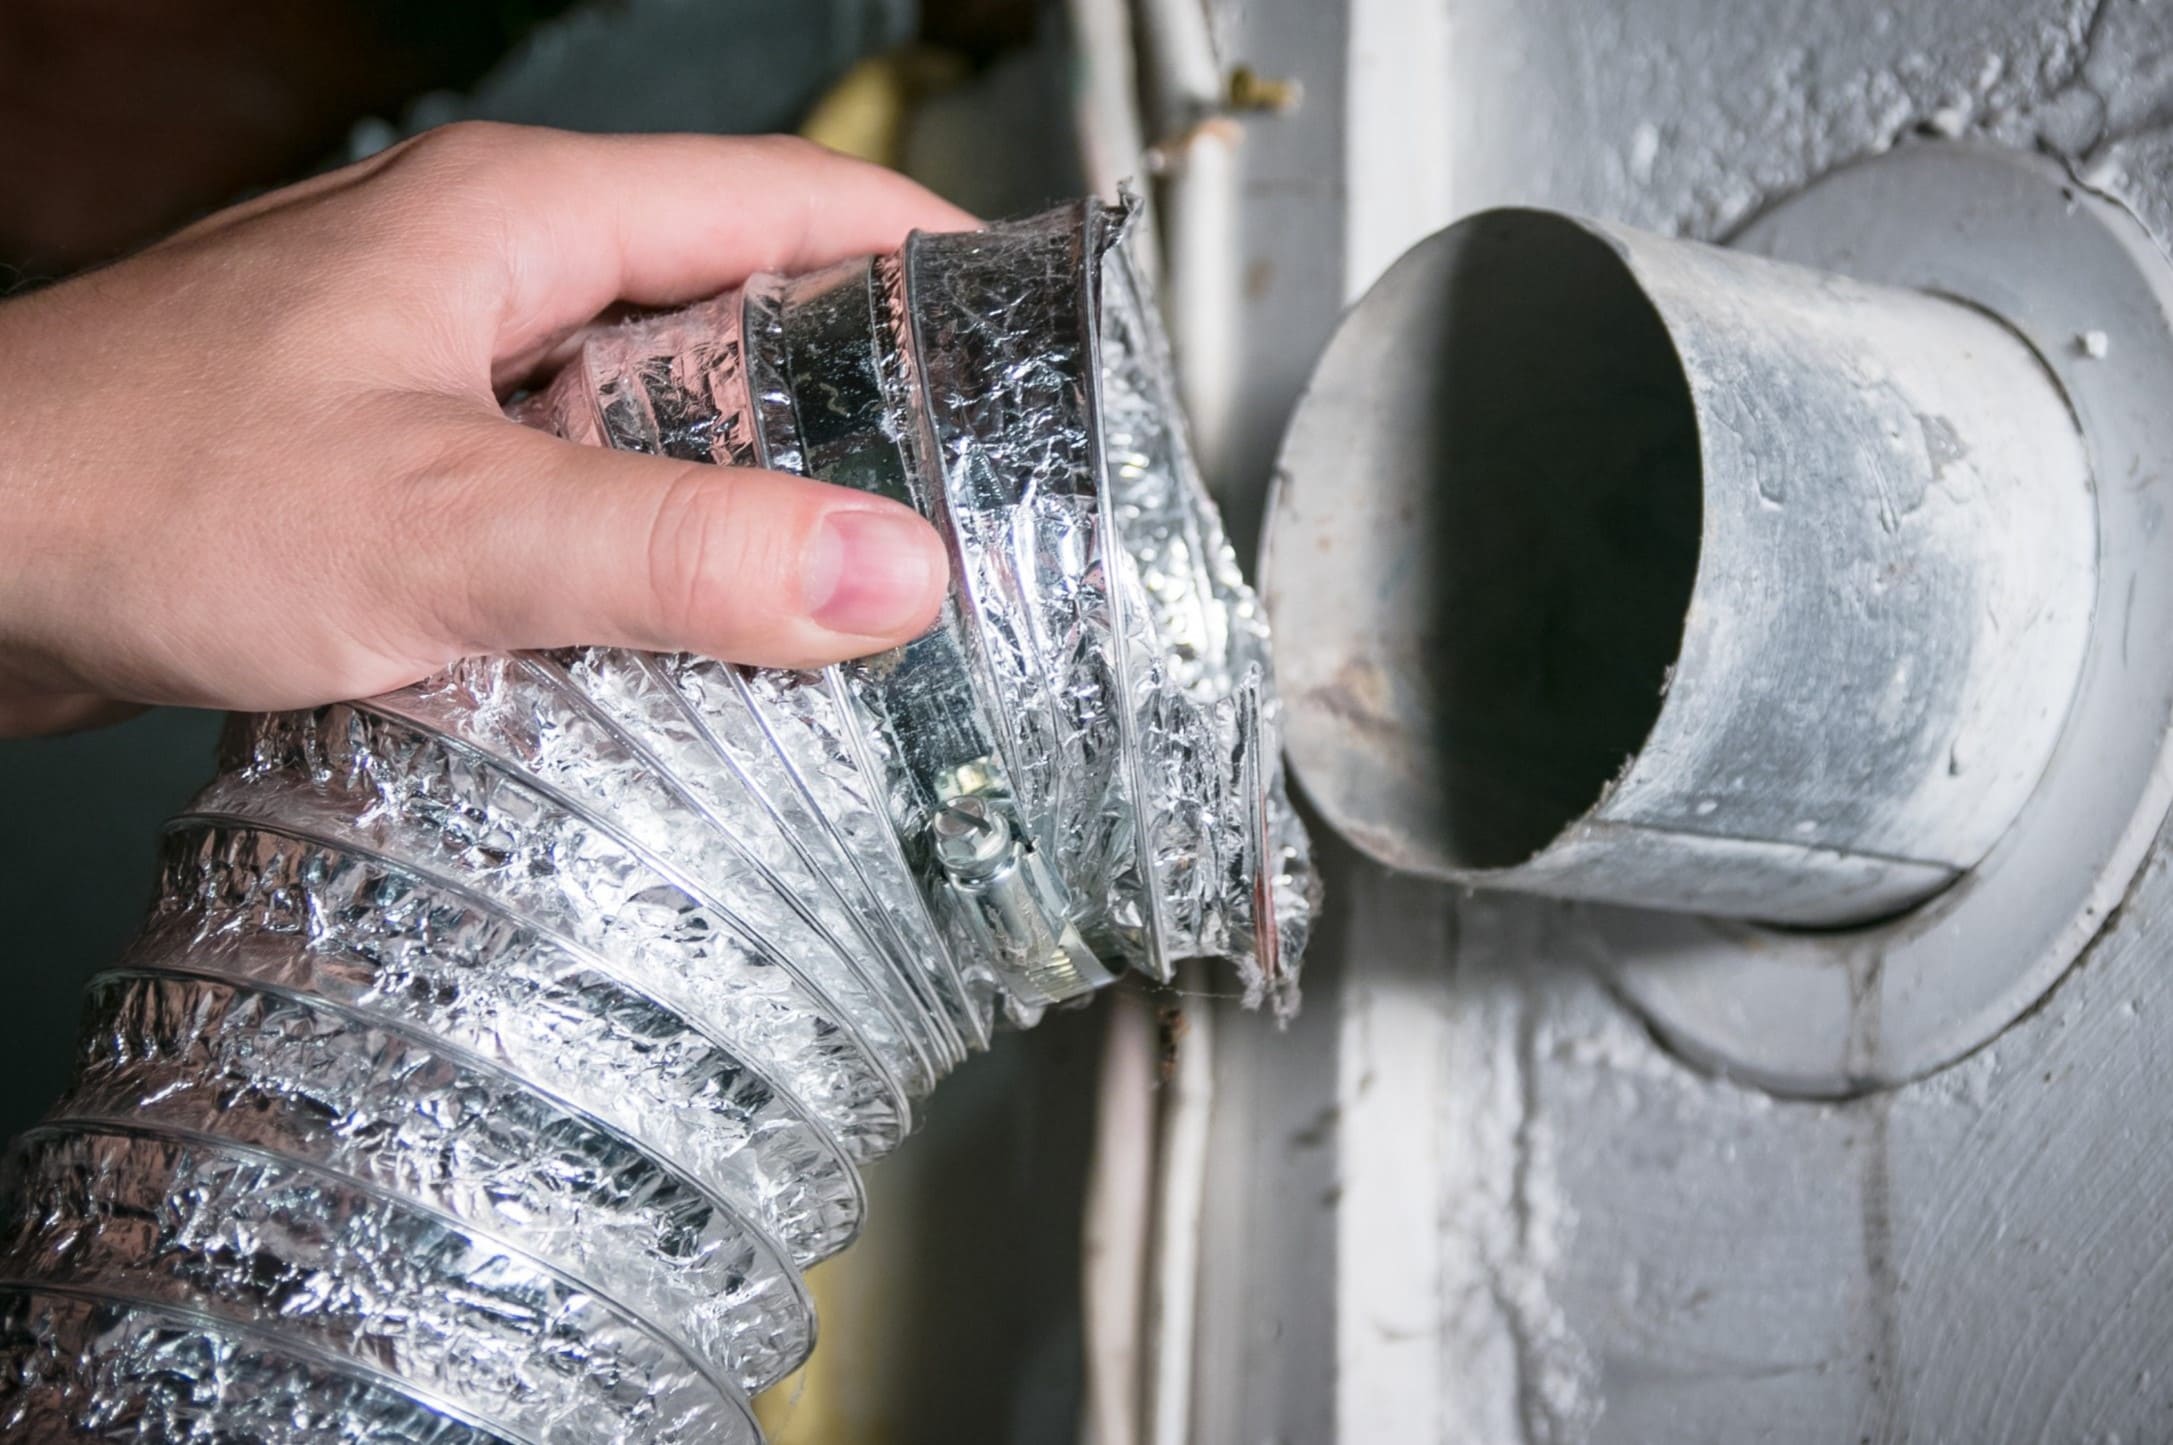
- Connect the Vent Pipe to the Dryer Outlet: Attach one end of the vent pipe to the dryer’s vent outlet. Depending on the type of dryer, you may need a connector or clamp to secure the pipe in place. Tighten the connection using an adjustable wrench or screwdriver.
- Route the Vent Pipe: Carefully route the vent pipe from the dryer to the vent hood. Ensure that the path is free from any obstructions or sharp turns that could restrict airflow. If necessary, use duct connectors to join multiple sections of vent pipe together.
- Secure the Vent Pipe: Use vent clamps or other suitable fasteners to secure the vent pipe in place. It is important to keep the pipe taut and properly aligned throughout its length to prevent sagging or kinks that may impede airflow.
- Seal the Connections: Ensure that all connections between sections of vent pipe are tightly sealed. Use aluminum foil tape or duct sealant to create an airtight seal. This prevents air leaks and reduces the risk of lint buildup or potential fire hazards.
- Confirm Proper Alignment: Check that the vent pipe is aligned with the vent hood and the dryer outlet without any sharp bends or kinks. This allows for optimal airflow and ensures efficient venting.
When connecting the vent pipe, it’s important to prioritize safety and efficiency. Avoid using screws or other fasteners that may protrude into the pipe, as they can trap lint and hinder airflow. Ensure that the connections between the vent pipe, dryer outlet, and vent hood are secure and well-sealed to prevent any leaks.
Once the vent pipe is properly connected, you can move on to the next step: securing the vent pipe and sealing any leaks to ensure a fully functional and efficient dryer ventilation system.
Read more: How To Connect A Dryer Vent
Step 6: Secure the Vent Pipe and Seal Any Leaks
Now that the vent pipe is connected from the dryer to the vent hood, it’s important to secure it in place and seal any potential leaks. This step ensures that the vent pipe remains stable and airtight, allowing for efficient airflow and reducing the risk of lint buildup. Follow these steps to properly secure the vent pipe and seal any leaks:
- Support the Vent Pipe: Use strapping or other suitable support methods to secure the vent pipe along its length. This prevents sagging or drooping, which can disrupt proper airflow. Ensure that the pipe is adequately supported every 4-5 feet.
- Check for Proper Alignment: Verify that the vent pipe is aligned with the vent hood and the dryer outlet without any sharp bends or kinks. Proper alignment allows for optimal airflow and efficient venting.
- Inspect for Any Leaks: Thoroughly examine the connections and joints of the vent pipe. Look for any gaps or openings where air can escape. Common areas prone to leaks include the connection points, duct connectors, and any sections of the pipe that were joined together.
- Seal the Leaks: Use aluminum foil tape or duct sealant to seal any leaks or gaps in the vent pipe and its connections. Apply the tape or sealant generously, ensuring that all areas are properly covered. This creates an airtight seal, preventing air leaks and reducing the risk of lint buildup.
- Test for Proper Seal: After sealing the leaks, run the dryer and carefully check for any air leaks along the vent pipe. Place your hand near the connections and joints, feeling for any airflow. If you detect any leaks, reseal the area until a proper seal is achieved.
- Secure the Vent Pipe at the Vent Hood: Use vent clamps or other suitable fasteners to secure the vent pipe to the vent hood. Ensure that the connection is tight and secure, preventing any movement or separation.
Securing the vent pipe and sealing any leaks are crucial to ensure the efficient and safe operation of your dryer. Proper support prevents sagging or misalignment, while sealing the leaks minimizes the risk of lint accumulation inside the vent pipe and reduces the likelihood of air leaks and potential fire hazards.
With the vent pipe secured and any leaks sealed, you can proceed to the final step: testing the dryer ventilation system to ensure it is functioning properly.
Step 7: Test the Ventilation System
Once you have securely connected and sealed the vent pipe, it’s important to test the dryer ventilation system to ensure it is functioning properly. Testing the system allows you to confirm efficient airflow, identify any potential issues, and make necessary adjustments. Follow these steps to test the ventilation system:
- Power on the Dryer: Start by powering on the dryer and selecting a drying cycle. Allow the dryer to run for a few minutes to generate hot air.
- Check for Proper Airflow: Go outside and stand near the vent hood. Feel for warm air coming out of the vent. Proper airflow indicates that the ventilation system is working effectively.
- Inspect the Vent Hood: While the dryer is running, visually inspect the vent hood to ensure that it is opening and closing properly. The flaps should open when the dryer is running and close when it is not, preventing backdrafts and critters from entering the ductwork.
- Listen for Strange Noises: Pay attention to any unusual sounds, such as rattling or vibrating, that may indicate loose connections or obstructions within the vent pipe. If you notice any abnormal noises, turn off the dryer and inspect the system for possible issues.
- Clean and Maintain Regularly: It’s important to establish a regular cleaning and maintenance schedule for your dryer ventilation system. Clean out the lint trap after every use and periodically check and clean the vent pipe and vent hood to prevent lint buildup. This ensures continued efficiency and reduces the risk of fire hazards.
Testing the ventilation system allows you to verify that the hot air, moisture, and lint are properly vented outside, minimizing the risk of fire, improving energy efficiency, and ensuring the longevity of your dryer. If you notice any issues during the testing process, such as low airflow or unusual noises, it’s important to address them promptly. This may involve checking and cleaning the vent pipe, tightening connections, or seeking professional assistance if necessary.
By regularly testing and maintaining your dryer ventilation system, you can ensure its optimal performance and the safety of your home and family.
Congratulations! You have successfully completed the process of venting your dryer. You can now enjoy efficient drying, reduced energy consumption, improved indoor air quality, and peace of mind knowing that your dryer is properly ventilated.
Remember to consult the manufacturer’s instructions and local building codes throughout the installation process to ensure compliance and safety. If you are unsure or uncomfortable with any steps, it’s always best to seek professional assistance.
Enjoy the benefits of a well-vented dryer and the peace of mind that comes with proper ventilation!
Conclusion
Venting your dryer properly is an essential step in ensuring its performance, safety, and longevity. By following the steps outlined in this guide, you have learned how to vent a dryer correctly and optimize its efficiency. Proper dryer ventilation allows for efficient drying, energy savings, and improved indoor air quality while reducing the risk of fire hazards, mold growth, and potential damage to your dryer.
Throughout this guide, we explored various aspects of dryer venting, including the importance of proper ventilation, different types of ventilation systems, the tools and materials required for installation, and the step-by-step process to follow.
Remember, when venting your dryer:
- Choose the best location for venting, considering proximity, accessibility, and aesthetics.
- Gather all the necessary tools and materials before starting the installation process.
- Measure and cut the vent hole accurately to provide a proper opening for the vent pipe.
- Install the vent hood securely to create a proper exterior opening.
- Connect the vent pipe from the dryer to the vent hood, considering the type of pipe and properly sealing the connections.
- Secure the vent pipe along its length and seal any potential leaks to ensure efficient airflow.
- Test the ventilation system to ensure proper airflow and make necessary adjustments.
Regular maintenance, such as cleaning the lint trap and periodically checking and cleaning the vent pipe and vent hood, is essential to keep your dryer ventilation system functioning optimally.
By following these guidelines, you can enjoy the benefits of a properly vented dryer, including shorter drying times, energy savings, improved indoor air quality, and reduced fire risks.
Remember, if you are unsure or uncomfortable with any steps, it’s always best to seek professional assistance. Your safety and the proper functioning of your dryer ventilation system are of utmost importance.
Congratulations on successfully venting your dryer! Enjoy the efficiency and peace of mind that comes with a properly ventilated dryer.
Frequently Asked Questions about How To Vent A Dryer
Was this page helpful?
At Storables.com, we guarantee accurate and reliable information. Our content, validated by Expert Board Contributors, is crafted following stringent Editorial Policies. We're committed to providing you with well-researched, expert-backed insights for all your informational needs.


0 thoughts on “How To Vent A Dryer”